
 Web Front-end
JS Tutorial
How to build reliable cloud applications with React and Microsoft Azure
Web Front-end
JS Tutorial
How to build reliable cloud applications with React and Microsoft Azure
How to build reliable cloud applications with React and Microsoft Azure


How to build reliable cloud applications using React and Microsoft Azure
With the development of cloud computing, more and more applications are beginning to migrate to the cloud. In this process, it is very important to choose a reliable and efficient development framework. React, as a popular front-end framework, has features such as efficient component development and virtual DOM updates, while Microsoft Azure is a flexible cloud service platform that provides powerful computing, storage, and deployment capabilities. This article will introduce how to build reliable cloud applications using React and Microsoft Azure, and provide some specific code examples.
1. Create a React application
First, we need to create a basic React application. You can use the create-react-app tool to quickly initialize a React project. Execute the following command in the command line:
npx create-react-app my-app
cd my-app
npm start
This will create a React application named my-app locally and start the development server. Next, we can write the React component in the src/App.js file.
2. Connect to Azure service
In order to connect to Azure service, we need to use the JS SDK provided by Azure. First, we need to install the necessary dependent libraries in the terminal:
npm i @azure/identity @azure/storage-blob
Then, import the required modules in the src/App.js file:
import { DefaultAzureCredential } from "@azure/identity";
import { BlobServiceClient } from "@azure/storage-blob";Next, we can use the following The code creates a BlobServiceClient instance:
// 获取Azure身份凭证
const credential = new DefaultAzureCredential();

// 创建BlobServiceClient实例
const blobServiceClient = new BlobServiceClient(
  "https://youraccount.blob.core.windows.net/",
  credential
);
In this way, we successfully connected to the Azure Blob storage service.
3. Upload files to Azure Blob Storage
Next, we can use the following code to upload the file to Azure Blob Storage:
// 上传文件
async function uploadFile(file) {
  // 获取Blob容器
  const containerClient = blobServiceClient.getContainerClient("containerName");

  // 生成Blob名称
  const blobName = `${Date.now()}-${file.name}`;

  // 获取Blob客户端
  const blobClient = containerClient.getBlobClient(blobName);

  // 上传文件
  await blobClient.blockBlobClient.uploadData(file);
}In this way, we successfully upload the file Uploaded to Azure Blob Storage.
4. Download files from Azure Blob Storage
Next, we can use the following code to download files from Azure Blob Storage:
// 下载文件
async function downloadFile(blobName) {
  // 获取Blob容器
  const containerClient = blobServiceClient.getContainerClient("containerName");

  // 获取Blob客户端
  const blobClient = containerClient.getBlobClient(blobName);

  // 下载文件
  const response = await blobClient.download();
  const buffer = await response.blobBody;

  // 创建下载链接
  const downloadUrl = URL.createObjectURL(buffer);

  // 打开下载链接
  window.open(downloadUrl);
}In this way, we successfully download files from Azure Download files from blob storage.
5. Deploy to Azure static website
Finally, we can use the static website service provided by Azure to deploy the React application to the cloud. First, execute the following command in the terminal to install the necessary dependent libraries:
npm i -g azure-storage-cli
Then, create a file named ".env" in the project root directory and add the following content:
AZURE_STORAGE_ACCOUNT=youraccount
AZURE_STORAGE_KEY=yourkey
Next, execute the following command in the terminal to deploy the React application:
az storage cors add --methods OPTIONS GET HEAD POST PUT --origins "*" --allowed-headers "*" --exposed-headers "*" --max-age 200 --services b
az storage blob service-properties update --account-name youraccount --static-website --404-document index.html --index-document index.html
az storage blob service-properties update --account-name youraccount --static-website --default-index-document-path index.html
az storage blob upload-batch --destination "web" --source build
In this way, we have successfully deployed the React application to the Azure static website.
Conclusion
This article introduces how to use React and Microsoft Azure to build reliable cloud applications. By connecting to Azure services we can easily upload and download files. By deploying to Azure Static Website, we can quickly deploy React applications to the cloud. I hope this article was helpful and welcome any questions and suggestions.
The above is the detailed content of How to build reliable cloud applications with React and Microsoft Azure. For more information, please follow other related articles on the PHP Chinese website!

Hot AI Tools

Undresser.AI Undress
AI-powered app for creating realistic nude photos

AI Clothes Remover
Online AI tool for removing clothes from photos.

Undress AI Tool
Undress images for free

Clothoff.io
AI clothes remover

Video Face Swap
Swap faces in any video effortlessly with our completely free AI face swap tool!

Hot Article
Hot Tools

Notepad++7.3.1
Easy-to-use and free code editor

SublimeText3 Chinese version
Chinese version, very easy to use

Zend Studio 13.0.1
Powerful PHP integrated development environment

Dreamweaver CS6
Visual web development tools

SublimeText3 Mac version
God-level code editing software (SublimeText3)
Hot Topics
 1664
1664
 14
1422
52
1316
25
1267
29
1239
24
14
1422
52
1316
25
1267
29
1239
24

 Error code 801c03ed: How to fix it on Windows 11
Oct 04, 2023 pm 06:05 PM
Error code 801c03ed: How to fix it on Windows 11
Oct 04, 2023 pm 06:05 PM
Error 801c03ed is usually accompanied by the following message: Administrator policy does not allow this user to join the device. This error message will prevent you from installing Windows and joining a network, thereby preventing you from using your computer, so it is important to resolve this issue as soon as possible. What is error code 801c03ed? This is a Windows installation error that occurs due to the following reason: Azure setup does not allow new users to join. Device objects are not enabled on Azure. Hardware hash failure in Azure panel. How to fix error code 03c11ed on Windows 801? 1. Check Intune settings Log in to Azure portal. Navigate to Devices and select Device Settings. Change "Users can
 React Router User Guide: How to implement front-end routing control
Sep 29, 2023 pm 05:45 PM
React Router User Guide: How to implement front-end routing control
Sep 29, 2023 pm 05:45 PM
ReactRouter User Guide: How to Implement Front-End Routing Control With the popularity of single-page applications, front-end routing has become an important part that cannot be ignored. As the most popular routing library in the React ecosystem, ReactRouter provides rich functions and easy-to-use APIs, making the implementation of front-end routing very simple and flexible. This article will introduce how to use ReactRouter and provide some specific code examples. To install ReactRouter first, we need
 PHP, Vue and React: How to choose the most suitable front-end framework?
Mar 15, 2024 pm 05:48 PM
PHP, Vue and React: How to choose the most suitable front-end framework?
Mar 15, 2024 pm 05:48 PM
PHP, Vue and React: How to choose the most suitable front-end framework? With the continuous development of Internet technology, front-end frameworks play a vital role in Web development. PHP, Vue and React are three representative front-end frameworks, each with its own unique characteristics and advantages. When choosing which front-end framework to use, developers need to make an informed decision based on project needs, team skills, and personal preferences. This article will compare the characteristics and uses of the three front-end frameworks PHP, Vue and React.
 Integration of Java framework and front-end React framework
Jun 01, 2024 pm 03:16 PM
Integration of Java framework and front-end React framework
Jun 01, 2024 pm 03:16 PM
Integration of Java framework and React framework: Steps: Set up the back-end Java framework. Create project structure. Configure build tools. Create React applications. Write REST API endpoints. Configure the communication mechanism. Practical case (SpringBoot+React): Java code: Define RESTfulAPI controller. React code: Get and display the data returned by the API.
 Using Azure Semantic Search and OpenAI to build a cognitive search system
Oct 12, 2023 am 10:18 AM
Using Azure Semantic Search and OpenAI to build a cognitive search system
Oct 12, 2023 am 10:18 AM
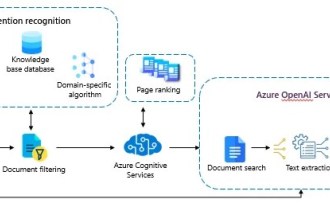
Designed to simplify document search, a combination of services and platforms are key to unparalleled performance. In this article, we'll explore a holistic approach that combines the power of Azure Cognitive Services with the capabilities of OpenAI. By delving into intent recognition, document filtering, domain-specific algorithms, and text summarization, you'll learn to create a system that not only understands user intent but also processes and presents information efficiently.
 Microsoft Azure OpenAI service now supports GPT-4 Turbo with Vision
Dec 18, 2023 am 08:18 AM
Microsoft Azure OpenAI service now supports GPT-4 Turbo with Vision
Dec 18, 2023 am 08:18 AM
According to news from this site on December 17, the Azure OpenAI service provides REST API access to OpenAI’s powerful language models, which include GPT-4, GPT-3.5-Turbo and embedded model series. Microsoft announced further enhancements to the Azure OpenAI service and provided customers with a public preview version of the latest GPT-4 Turbo with Vision. This advanced multi-modal AI model inherits all the powerful features of GPT-4 Turbo and also adds image processing and analysis. ability. This opens up the opportunity to leverage GPT-4 for more tasks, such as improving accessibility, interpreting and analyzing data visualizations, and
 Vue.js vs. React: Project-Specific Considerations
Apr 09, 2025 am 12:01 AM
Vue.js vs. React: Project-Specific Considerations
Apr 09, 2025 am 12:01 AM
Vue.js is suitable for small and medium-sized projects and fast iterations, while React is suitable for large and complex applications. 1) Vue.js is easy to use and is suitable for situations where the team is insufficient or the project scale is small. 2) React has a richer ecosystem and is suitable for projects with high performance and complex functional needs.
 React's Role in HTML: Enhancing User Experience
Apr 09, 2025 am 12:11 AM
React's Role in HTML: Enhancing User Experience
Apr 09, 2025 am 12:11 AM
React combines JSX and HTML to improve user experience. 1) JSX embeds HTML to make development more intuitive. 2) The virtual DOM mechanism optimizes performance and reduces DOM operations. 3) Component-based management UI to improve maintainability. 4) State management and event processing enhance interactivity.
