

Revisiting Squire: an efficient HTML5 rich text editor

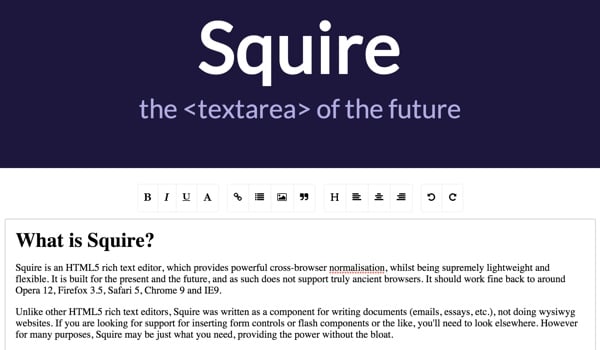
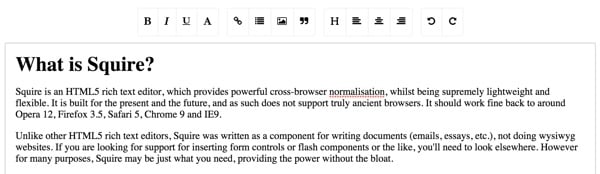
What is Squire?
Squire is an extremely lightweight HTML5 rich text editor, best suited for rich input forms and simple document creation for your applications. It provides cross-browser support but deliberately avoids the complexity of supporting older browsers. It works best on Opera 10, Firefox 3.5, Safari 4, Chrome 9 and IE8.
Squire is not suitable for creating and editing WYSIWYG website pages. However, for many rich text input and web applications, Squire may be just what you need. It provides power without bloat. It is also licensed from MIT for flexible reuse.
In this tutorial, I'll show you how to download Squire and use it to build a sample input form. If you want to see Squire in action, visit the demo.
Where did the squire come from?
The FastMail team built Squire to simplify their webmail editor requirements. FastMail is an excellent cloud-based email alternative to Gmail — I'm a daily FastMail user. Since it's based in Australia and operates under different laws than the United States, FastMail users have slightly improved privacy protections. You can read more about it here: FastMail says it's not subject to NSA surveillance.
As the FastMail team writes in their blog, they have used CKeditor before:
While not a bad choice, like most other editors it is designed for creating websites rather than writing emails. So by default, simply inserting an image brings up a dialog box with three tabs and more options than you might imagine... It also comes with its own UI toolkit and framework that we have to It took a lot of customization to fit the rest of the new UI we were building; it was a pain to maintain.
Since we care about speed and performance, we also care about code size. The version of CKEditor we used for the previous (classic) UI only included the plugins we needed and was a 159 KB download (gzipped; 441 KB uncompressed). This is code only, styles and images are not included.
They decided to build Squire from scratch. With a compressed and gzipped JavaScript size of just 11.5 KB (34.7 KB uncompressed) and no dependencies, Squire is extremely lightweight.
The results are impressive. The combined code weight required to load the entire compose screen, base libraries, mail and contact model code, and all UI code to render the entire screen is now just 149.4 KB (459.7 KB uncompressed), which is smaller than CKEditor alone.
Squire has no dependencies. There are no XHR wrappers, widget libraries or lightbox overlays. The toolbar has no user interface, which eliminates the bloat that comes with loading two UI toolkits. This is just a simple <textarea> component that can be manipulated via JavaScript.
How Squire works
Squire uses the selection and range APIs to manipulate the DOM. This eliminates common cross-browser incompatibilities. Again from the FastMail Blog:
Making a rich text editor is notoriously difficult because different browsers are extremely inconsistent in this regard. These APIs were all introduced by Microsoft during the heyday of IE and then copied by other vendors in various incompatible ways... Most rich text editors execute the command and then try to clean up the mess the browser created. With Squire, we neatly bypass this problem.
The general idea of Squire is to allow the browser to do as much as possible (not a lot unfortunately), but control anything that deviates from what is required, or where there are significant cross-browser differences.
Install SquireSecond, copy the contents of the
build/directory into your application. p>Third, edit the
<style>block indocument.htmlto add the default style you want the editor to use (or link to an external style sheet).Use Squire
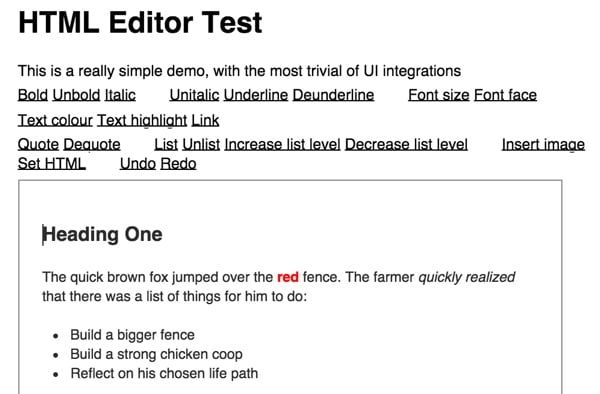
Let’s take a look at the demo application that comes with Squire. When using Squire, you can use
<iframe src="path/to/document.html">instead of the<textarea>element.In demo:
<iframe src="build/document.html" onload="top.editor=this.contentWindow.editor" width="500" height="500"></iframe>Copy after login
Document.htmlis a blank canvas with default styles that loads Squire:<!DOCTYPE html> <html lang="en"> <head> <meta charset="UTF-8"> <meta http-equiv="X-UA-Compatible" content="IE=edge,chrome=1"> <title></title> <style type="text/css"> ... a { text-decoration: underline; } h1 { font-size: 138.5%; } ... blockquote { border-left: 2px solid blue; margin: 0; padding: 0 10px; } </style> </head> <body> <script type="text/javascript" src="squire.js"></script> </body> </html>Copy after loginWhen using Squire, you can attach an event listener to the iframe's load event. When this event fires, you can get a reference to the editor object via iframe.contentWindow.editor. For example, a demo iframe includes:
onload="top.editor=this.contentWindow.editor"该演示有两种类型的链接,用于在 Squire 中操作内容。可以对任何选定文本进行操作的简单命令如下所示:
<span id="bold">Bold</span>需要额外用户输入的复杂命令如下所示;他们添加了提示符 c:
<span id="setFontSize" class="prompt">字体大小</span>演示应用程序如下所示:
演示页面顶部的 JavaScript 侦听对这些 span 命令的任何点击。如果提示类存在,它会从用户收集更多信息:
<script type="text/javascript" charset="utf-8">
var editor;
document.addEventListener( 'click', function ( e ) {
  var id = e.target.id,
      value;
  if ( id && editor && editor[ id ] ) {
    if ( e.target.className === 'prompt' ) {
      value = prompt( 'Value:' );
    }
    editor[ id ]( value );
  }
}, false );
</script>
Copy after login然后,它使用命令和任何用户提供的值调用 Squire 编辑器。然后,Squire 将命令应用于当前选定的文本:
编辑器[ id ]( value );您可以了解有关 Squire 的更多信息,并在自述文件中查看其完整的 API 文档。
扩展演示
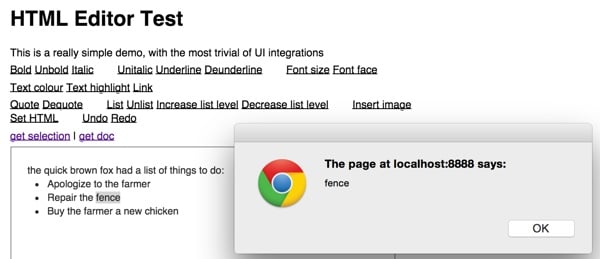
作为示例,让我们添加两个读取 Squire 编辑器状态的命令。我们将在演示命令标题的底部添加两个链接:
  <p>
  <a href="#" onclick="alert(editor['getSelectedText']());">get selection</a> |
  <a href="#" onclick="alert(editor['getDocument']());">get doc</a>
  </p>
</header>
Copy after login当您选择某些文本并单击它时,所选内容将在警报中弹出,如下所示。
让我们来看看更美观的演示及其工具栏:
此页面的头块集成了 Bootstrap 的样式表和名为
Squire-UI的样式表。它还为此Squire-UI提供 JavaScript。<!DOCTYPE html> <html lang="en"> <head> <meta http-equiv="X-UA-Compatible" content="IE=edge,chrome=1"> <meta charset="UTF-8"> <title>Squire</title> <!--[if IE 8]> <script type="text/javascript" src="build/ie8.js"></script> <![endif]--> <link href='//fonts.googleapis.com/css?family=Lato' rel='stylesheet' type='text/css'> <link href="build/Squire-UI.css" rel="stylesheet" type="text/css" /> <link href="build/bootstrap/bootstrap.min.css" rel="stylesheet" type="text/css" /> <script src="build/jQuery/jQuery.js" type="text/javascript"></script> <script src="build/squire-raw.js" type="text/javascript"></script> <script src="build/Squire-UI.js" type="text/javascript"></script> It also offers static html for a textarea in the body <div class="container"> <div class="row"> <div class="col-centered"> <textarea id="foo"></textarea> </div> </div>Copy after login但在加载时,其 JQuery
$(document).ready函数将静态#foo文本区域替换为其SquireUI。<script> $(document).ready(function () { UI = new SquireUI({replace: 'textarea#foo', height: 300}); }); </script>Copy after login工具栏配置是通过相当复杂的 JQuery、AJAX、HTML5 和 CSS 配置来实现的。它正在加载此 HTML 页面以显示大部分工具栏:http://neilj.github.io/Squire/build/Squire-UI.html。
$(div).load(options.buildPath + 'Squire-UI.html', function() {
      this.linkDrop = new Drop({
        target: $('#makeLink').first()[0],
        content: $('#drop-link').html(),
        position: 'bottom center',
        openOn: 'click'
      });
Copy after login以下是 Squire-UI.html 源代码的子集,以便您可以查看正在加载的内容:
<div class="menu" contenteditable="false">
    <div class="group">
        <div data-action="bold"  class="item"><i class="fa fa-bold"></i></div>
        <div data-action="italic"  class="item"><i  class="fa fa-italic"></i></div>
        <div data-action="underline"  class="item"><i class="fa fa-underline"></i></div>
        <div id="selectFont" data-action="selectFont"  class="item">
            <i class="fa fa-font"></i>
        </div>
    </div>
    <div class="group">
        <div id="makeLink" data-action="makeLink" class="item"><i class="fa fa-link"></i></div>
        <div data-action="makeOrderedList"  class="item"><i class="fa fa-list"></i></div>
        <div id="insertImage" data-action="insertImage"  class="item">
            <i class="fa fa-picture-o"></i>
        </div>
        <div data-action="increaseQuoteLevel"  class="item"><i class="fa fa-quote-right"></i></div>
    </div>
...
Copy after login如果他们在分发代码中提供简化的 Bootstrap 工具栏作为附加组件,那就太好了,但您当然可以从他们在上面自己的演示中所做的事情中学习。
我希望您发现 Squire 对您自己的应用程序很有用。请随时在下面发表更正、问题或评论。您还可以通过 Twitter @reifman 联系我或直接向我发送电子邮件。
相关链接
- Squire:FastMail 的富文本编辑器
- Squire演示页面
- Github 上的 Squire 代码库
The above is the detailed content of Revisiting Squire: an efficient HTML5 rich text editor. For more information, please follow other related articles on the PHP Chinese website!

Hot AI Tools

Undresser.AI Undress
AI-powered app for creating realistic nude photos

AI Clothes Remover
Online AI tool for removing clothes from photos.

Undress AI Tool
Undress images for free

Clothoff.io
AI clothes remover

Video Face Swap
Swap faces in any video effortlessly with our completely free AI face swap tool!

Hot Article
Hot Tools

Notepad++7.3.1
Easy-to-use and free code editor

SublimeText3 Chinese version
Chinese version, very easy to use

Zend Studio 13.0.1
Powerful PHP integrated development environment

Dreamweaver CS6
Visual web development tools

SublimeText3 Mac version
God-level code editing software (SublimeText3)
Hot Topics


 How To Begin A WordPress Blog: A Step-By-Step Guide For Beginners
Apr 17, 2025 am 08:25 AM
How To Begin A WordPress Blog: A Step-By-Step Guide For Beginners
Apr 17, 2025 am 08:25 AM
Blogs are the ideal platform for people to express their opinions, opinions and opinions online. Many newbies are eager to build their own website but are hesitant to worry about technical barriers or cost issues. However, as the platform continues to evolve to meet the capabilities and needs of beginners, it is now starting to become easier than ever. This article will guide you step by step how to build a WordPress blog, from theme selection to using plugins to improve security and performance, helping you create your own website easily. Choose a blog topic and direction Before purchasing a domain name or registering a host, it is best to identify the topics you plan to cover. Personal websites can revolve around travel, cooking, product reviews, music or any hobby that sparks your interests. Focusing on areas you are truly interested in can encourage continuous writing
 How to adjust the wordpress article list
Apr 20, 2025 am 10:48 AM
How to adjust the wordpress article list
Apr 20, 2025 am 10:48 AM
There are four ways to adjust the WordPress article list: use theme options, use plugins (such as Post Types Order, WP Post List, Boxy Stuff), use code (add settings in the functions.php file), or modify the WordPress database directly.
 How to display child categories on archive page of parent categories
Apr 19, 2025 pm 11:54 PM
How to display child categories on archive page of parent categories
Apr 19, 2025 pm 11:54 PM
Do you want to know how to display child categories on the parent category archive page? When you customize a classification archive page, you may need to do this to make it more useful to your visitors. In this article, we will show you how to easily display child categories on the parent category archive page. Why do subcategories appear on parent category archive page? By displaying all child categories on the parent category archive page, you can make them less generic and more useful to visitors. For example, if you run a WordPress blog about books and have a taxonomy called "Theme", you can add sub-taxonomy such as "novel", "non-fiction" so that your readers can
 How to get logged in user information in WordPress for personalized results
Apr 19, 2025 pm 11:57 PM
How to get logged in user information in WordPress for personalized results
Apr 19, 2025 pm 11:57 PM
Recently, we showed you how to create a personalized experience for users by allowing users to save their favorite posts in a personalized library. You can take personalized results to another level by using their names in some places (i.e., welcome screens). Fortunately, WordPress makes it very easy to get information about logged in users. In this article, we will show you how to retrieve information related to the currently logged in user. We will use the get_currentuserinfo(); function. This can be used anywhere in the theme (header, footer, sidebar, page template, etc.). In order for it to work, the user must be logged in. So we need to use
 Is WordPress easy for beginners?
Apr 03, 2025 am 12:02 AM
Is WordPress easy for beginners?
Apr 03, 2025 am 12:02 AM
WordPress is easy for beginners to get started. 1. After logging into the background, the user interface is intuitive and the simple dashboard provides all the necessary function links. 2. Basic operations include creating and editing content. The WYSIWYG editor simplifies content creation. 3. Beginners can expand website functions through plug-ins and themes, and the learning curve exists but can be mastered through practice.
 How to sort posts by post expiration date in WordPress
Apr 19, 2025 pm 11:48 PM
How to sort posts by post expiration date in WordPress
Apr 19, 2025 pm 11:48 PM
In the past, we have shared how to use the PostExpirator plugin to expire posts in WordPress. Well, when creating the activity list website, we found this plugin to be very useful. We can easily delete expired activity lists. Secondly, thanks to this plugin, it is also very easy to sort posts by post expiration date. In this article, we will show you how to sort posts by post expiration date in WordPress. Updated code to reflect changes in the plugin to change the custom field name. Thanks Tajim for letting us know in the comments. In our specific project, we use events as custom post types. Now
 How to display query count and page loading time in WordPress
Apr 19, 2025 pm 11:51 PM
How to display query count and page loading time in WordPress
Apr 19, 2025 pm 11:51 PM
One of our users asked other websites how to display the number of queries and page loading time in the footer. You often see this in the footer of your website, and it may display something like: "64 queries in 1.248 seconds". In this article, we will show you how to display the number of queries and page loading time in WordPress. Just paste the following code anywhere you like in the theme file (e.g. footer.php). queriesin
 How to Automate WordPress and Social Media with IFTTT (and more)
Apr 18, 2025 am 11:27 AM
How to Automate WordPress and Social Media with IFTTT (and more)
Apr 18, 2025 am 11:27 AM
Are you looking for ways to automate your WordPress website and social media accounts? With automation, you will be able to automatically share your WordPress blog posts or updates on Facebook, Twitter, LinkedIn, Instagram and more. In this article, we will show you how to easily automate WordPress and social media using IFTTT, Zapier, and Uncanny Automator. Why Automate WordPress and Social Media? Automate your WordPre
