

Create a WordPress Landing Page: A Step-by-Step Guide

A landing page on your WordPress site is an invaluable tool if you want to sell something or get visitors to sign up. In this article, you will learn how to create a landing page in WordPress for free and encourage people to buy or sign up for your services.
We will create the landing page by customizing a third-party WordPress theme. This is the best way to create a WordPress landing page for free and gives you the most flexibility, but it requires some coding knowledge. If you want to create a landing page that requires no coding, check out some of our other posts.
Landing pages are key pages designed to prompt users to take action. Exactly what this does depends on your business, but it could be one of two things:
- Buy something, maybe something big-ticket, since you'll use the product page to buy smaller products.
- Register for something, which may be a subscription to a service or course, or a mailing list.
You need to drive as much traffic to this page as possible as it will be very important to your website. You can do this through SEO, advertising, or direct marketing (or a combination of both).
But once people get to that landing page, you need to make sure they buy or sign up.
The content of the page will be part of how you do this - not just the content itself, but also how you lay it out. Generally speaking, the more expensive the item, the more text and calls to action you need.
But it’s not just about content. You also want to make sure that when someone lands on the page, the only option available to them is to click the buy button. If there's a navigation menu, certain widgets, or a clickable logo, there's a chance they'll click away to investigate the rest of the site and never return to the landing page.
This is where creating a landing page in your theme comes in. The landing page will have no links outside of the content. There will be no menus, no widgets, no clickable links in the header, footer, or anywhere else. It's usually full width (since you don't need sidebar widgets), and it has a clean layout designed to focus attention on the content.
In this tutorial, I will show you how to create a landing page template for your theme. This includes four things:
- Create page templates for your landing pages
- Create headers for landing pages without links
- Create a footer without links for your landing page
- Create landing pages using templates
So let’s get started. I'm going to create this landing page template for the Twenty Twenty theme, which means creating a child theme so that I don't have to edit a third-party theme.
What do you need
To follow this tutorial you will need:
- Test or Development Installation of WordPress
- Code Editor
- Theme installed
So let’s get started.
Create subtheme
If you are developing your own theme, you can skip this section. However, if you use a third-party theme downloaded from the theme directory or purchased from ThemeForest or other sources, you will need a child theme.
Follow our guidelines to create a child theme and save the new theme in your site's wp-content/themes directory.
Create landing page template file
Now you need to create a page template to serve as your landing page template. You'll need to copy any templates used by pages in your theme and rename the new files. For many themes, this is page.php. For Twenty Twenty, that would be singular.php. You can use the WordPress template hierarchy to determine which template file is being used.
If you use a child theme, you can copy the copy to the child theme. If you are using the main theme, save a copy in the main theme. Note: Do not do this on your live website!
If your theme has a full-width page template, please use it instead of page.php as the page layout is already set up without a sidebar and the sidebar will have been removed.
I have named the file landing-page-template.php. Don't give it a name starting with page. If you subsequently create a page with that name, WordPress will automatically assign the template to that page. It's better to keep it manual so you have more control.
This is the complete contents of my new landing-page-template.php file. If you use a different theme, your theme will look different.
<?php
/**
 * The template for displaying single posts and pages.
 *
 * @link https://developer.wordpress.org/themes/basics/template-hierarchy/
 *
 * @package WordPress
 * @subpackage Twenty_Twenty
 * @since Twenty Twenty 1.0
 */

get_header();
?>

<main id="site-content" role="main">

    <?php

	if ( have_posts() ) {

		while ( have_posts() ) {
			the_post();

			get_template_part( 'template-parts/content', get_post_type() );
		}
	}

	?>

</main><!-- #site-content -->

<?php get_template_part( 'template-parts/footer-menus-widgets' ); ?>

<?php get_footer(); ?>
Now it's time to edit the file. Start with the commented out text at the top. Replace it with the text required by the page template:
<?php
/**
* Template Name: Landing Page
*
*/
The next step is to remove any calls to the sidebar or footer. How you do this depends on your theme and whether you use a full-width template in the first place.
在《二十二十分》中,没有对侧边栏的调用,所以我不需要删除它。如果您的模板中有此行,则需要将其删除:
<?php get_sidebar(); ?>
注意:编辑完此模板文件后,您可能会发现布局在侧边栏应有的位置留下了间隙。编辑模板的 CSS 或更改内容部分中的类以使其全宽。
现在是页脚。您不想完全删除页脚,因为您仍然需要版权页和对 wp_footer 的调用,因此您不必删除 get_footer() 调用,而是将其保留在那里并为您的目标网页创建一个新的页脚文件。
在《二十二十分》中,页脚无法以标准方式工作。我的模板文件中有两个调用:
<?php get_template_part( 'template-parts/footer-menus-widgets' ); ?>

<?php get_footer(); ?>
第一个调用一个包含文件,该文件只包含小部件。第二个调用我需要的页脚,但我们稍后会对其进行编辑。所以我删除这一行:
<?php get_template_part( 'template-parts/footer-menus-widgets' ); ?>
现在保存您的文件。我们很快就会回来讨论这个问题。
为您的目标网页创建标头
现在是时候为您的目标网页创建一个没有导航、小部件或链接的标题了。
复制主题的 header.php 文件(在主主题或子主题中)并将其命名为 header-landing.php。
删除徽标或网站标题中的链接
在头文件中查找站点名称或徽标。我的由一个函数组成:
twentytwenty_site_logo();
我不会尝试编辑该函数,而是将其替换为对徽标的调用:
<img src="<?php echo get_stylesheet_directory_uri(); ?>/images/xxx.jpg” >
将上面代码中的xxx.jpg替换为您自己的徽标名称,并确保使用正确的路径。
如果您的网站在标题中使用网站标题而不是徽标图像,请使用以下内容:
<div class="site-title faux-heading">

    <?php bloginfo( 'name' ); ?>

</div>
注意:我上面使用的类是特定于 20 20 的。编辑它们以反映您的主题。
如果您的主题以比二十二十更标准的方式工作,您可能会发现此代码已经存在。您所要做的就是删除其周围的任何 <a> 元素,以便网站标题或徽标仍然存在,但它们不会充当链接。
删除导航菜单
现在是时候删除导航菜单了。在头文件管理器中找到它的代码。在《二十二》中,它位于一个如下所示的元素内:
<div class=“header-navigation-wrapper">

</div><!-- .header-navigation-wrapper —>
如果您正在使用“二十二十”,请删除它以及其中的所有内容。如果没有,您需要找到具有相似名称的 div、aside 或 section。
Twenty Twenty 在这些元素内还有两个用于移动设备的切换导航按钮:
<button class="toggle search-toggle mobile-search-toggle">

</button>
<button class="toggle nav-toggle mobile-nav-toggle">

</button>
删除这些内容,确保不要删除它们之间的网站标题和说明。如果您的主题有类似的内容,请将其删除。
删除任何小部件区域或其他带有链接的代码
《二十二十》也有搜索代码,我也将删除它。您的主题可能在小部件中包含此内容,在这种情况下,请删除头文件中的所有小部件区域。
最后,在《二十二十》中,文件末尾有一个模式菜单,我也想将其删除。同样,您的主题可能没有这个 - 《二十二十》比许多主题更复杂!
我的header-landing.php文件现在看起来简单多了:
<?php
/**
 * Header file for the Twenty Twenty WordPress default theme.
 *
 * @link https://developer.wordpress.org/themes/basics/template-files/#template-partials
 *
 * @package WordPress
 * @subpackage Twenty_Twenty
 * @since Twenty Twenty 1.0
 */

?><!DOCTYPE html>

<html class="no-js" <?php language_attributes(); ?>>

    <head>

        <meta charset="<?php bloginfo( 'charset' ); ?>">
        <meta name="viewport" content="width=device-width, initial-scale=1.0" >

    	<link rel="profile" href="https://gmpg.org/xfn/11">

    	<?php wp_head(); ?>

    </head>

	<body <?php body_class(); ?>>

		<?php
		wp_body_open();
		?>

		<header id="site-header" class="header-footer-group" role="banner">

			<div class="header-inner section-inner">

				<div class="header-titles-wrapper">

					<div class="header-titles">

						<?php
							// Site title or logo.
							bloginfo( 'name' );

							// Site description.
							twentytwenty_site_description();
						?>

					</div><!-- .header-titles -->

				</div><!-- .header-titles-wrapper -->


			</div><!-- .header-inner -->

		</header><!-- #site-header —>
保存文件并返回到您的模板文件。找到调用标题的行:
get_header();
编辑它,以便它调用新的头文件:
get_header( ‘landing’ );
现在保存您的文件。
为着陆页创建页脚
现在是时候为您的目标网页创建页脚了。
复制 footer.php 并将其命名为 footer-landing.php。打开您的新文件。
找到小部件区域的任何代码并将其删除。 《二十二十》在 footer.php 文件中没有小部件区域;它们位于一个包含文件中,我已经删除了对该文件的调用。
您还需要编辑版权页以删除链接。这是《二十二十分》的版权页:
<div class="footer-credits">
<p class="footer-copyright">©
<?php
echo date_i18n(
/* translators: Copyright date format, see https://www.php.net/date */
_x( 'Y', 'copyright date format', 'twentytwenty' )
);
?>
<a href="<?php echo esc_url( home_url( '/' ) ); ?>"><?php bloginfo( 'name' ); ?></a>
</p><!-- .footer-copyright -->
<p class="powered-by-wordpress">
<a href="<?php echo esc_url( __( 'https://wordpress.org/', 'twentytwenty' ) ); ?>">
<?php _e( 'Powered by WordPress', 'twentytwenty' ); ?>
</a>
</p><!-- .powered-by-wordpress -->
</div><!-- .footer-credits -->
删除代码中的所有链接。我的现在是这样的:
<div class="footer-credits">
<p class="footer-copyright">©
<?php
echo date_i18n(
/* translators: Copyright date format, see https://www.php.net/date */
_x( 'Y', 'copyright date format', 'twentytwenty' )
);
?>
<?php bloginfo( 'name' ); ?>
</p><!-- .footer-copyright -->
<p class="powered-by-wordpress">
<?php _e( 'Powered by WordPress', 'twentytwenty' ); ?>
</p><!-- .powered-by-wordpress -->
</div><!-- .footer-credits -->
现在保存页脚文件并返回到您的模板文件。找到对页脚的调用:
<?php get_footer(); ?>
编辑它以调用新的页脚文件:
<?php get_footer( 'landing' ); ?>
我的模板文件现在已被精简,内容如下:
<?php /** * Template Name: Landing Page * */ get_header(); ?><?php get_footer( 'landing' ); ?>
保存您的模板文件,如果您正在使用子主题,请在 WordPress 管理员中激活它。
使用模板创建您的目标网页
为您的目标网页创建一个新的静态页面,并为其指定一个适合您希望其执行的操作的标题。
创建内容,然后在右侧文档窗格的页面属性部分中,选择着陆页 >模板 下拉菜单。
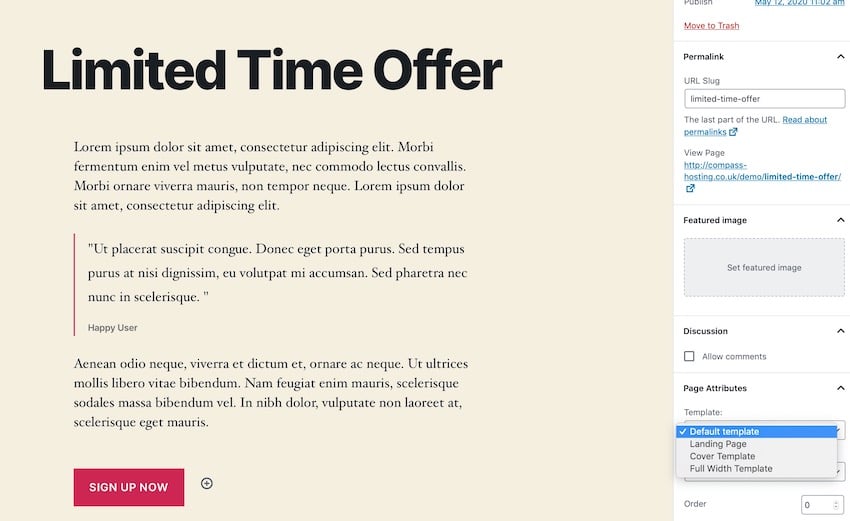
Publish page.
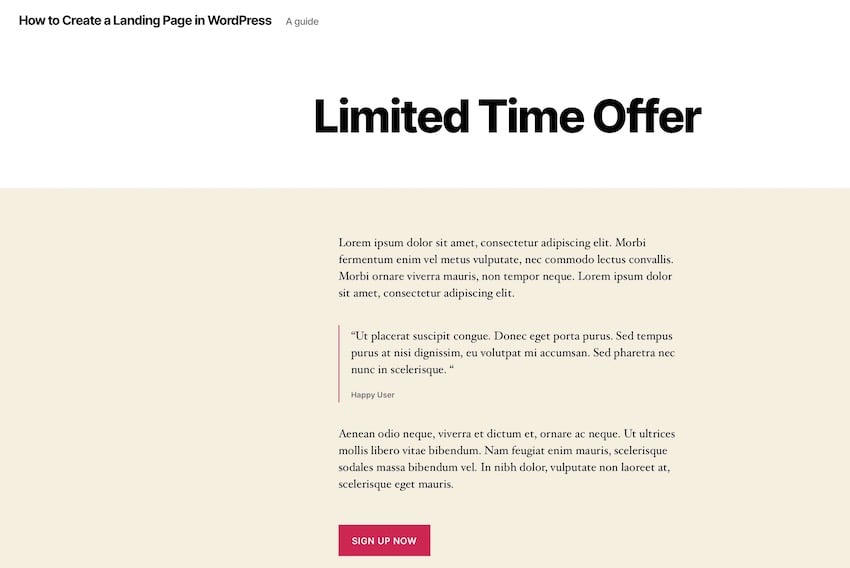
Now when you access it on the front end you will notice that it has no links or navigation and the only thing people can click on the page is your call to action button.

Summary
Landing pages will be more powerful if you ensure that the only action people can take when they get there is to click your "Buy" button. By creating a landing page template in your WordPress theme, you will make your landing page more effective and get more sales or subscriptions.
Follow this guide and you'll have a powerful landing page that fits your theme!
The above is the detailed content of Create a WordPress Landing Page: A Step-by-Step Guide. For more information, please follow other related articles on the PHP Chinese website!

Hot AI Tools

Undresser.AI Undress
AI-powered app for creating realistic nude photos

AI Clothes Remover
Online AI tool for removing clothes from photos.

Undress AI Tool
Undress images for free

Clothoff.io
AI clothes remover

Video Face Swap
Swap faces in any video effortlessly with our completely free AI face swap tool!

Hot Article
Hot Tools

Notepad++7.3.1
Easy-to-use and free code editor

SublimeText3 Chinese version
Chinese version, very easy to use

Zend Studio 13.0.1
Powerful PHP integrated development environment

Dreamweaver CS6
Visual web development tools

SublimeText3 Mac version
God-level code editing software (SublimeText3)
Hot Topics
 1653
1653
 14
1413
52
1304
25
1251
29
1224
24
14
1413
52
1304
25
1251
29
1224
24

 How To Begin A WordPress Blog: A Step-By-Step Guide For Beginners
Apr 17, 2025 am 08:25 AM
How To Begin A WordPress Blog: A Step-By-Step Guide For Beginners
Apr 17, 2025 am 08:25 AM
Blogs are the ideal platform for people to express their opinions, opinions and opinions online. Many newbies are eager to build their own website but are hesitant to worry about technical barriers or cost issues. However, as the platform continues to evolve to meet the capabilities and needs of beginners, it is now starting to become easier than ever. This article will guide you step by step how to build a WordPress blog, from theme selection to using plugins to improve security and performance, helping you create your own website easily. Choose a blog topic and direction Before purchasing a domain name or registering a host, it is best to identify the topics you plan to cover. Personal websites can revolve around travel, cooking, product reviews, music or any hobby that sparks your interests. Focusing on areas you are truly interested in can encourage continuous writing
 How to adjust the wordpress article list
Apr 20, 2025 am 10:48 AM
How to adjust the wordpress article list
Apr 20, 2025 am 10:48 AM
There are four ways to adjust the WordPress article list: use theme options, use plugins (such as Post Types Order, WP Post List, Boxy Stuff), use code (add settings in the functions.php file), or modify the WordPress database directly.
 How to get logged in user information in WordPress for personalized results
Apr 19, 2025 pm 11:57 PM
How to get logged in user information in WordPress for personalized results
Apr 19, 2025 pm 11:57 PM
Recently, we showed you how to create a personalized experience for users by allowing users to save their favorite posts in a personalized library. You can take personalized results to another level by using their names in some places (i.e., welcome screens). Fortunately, WordPress makes it very easy to get information about logged in users. In this article, we will show you how to retrieve information related to the currently logged in user. We will use the get_currentuserinfo(); function. This can be used anywhere in the theme (header, footer, sidebar, page template, etc.). In order for it to work, the user must be logged in. So we need to use
 How to display child categories on archive page of parent categories
Apr 19, 2025 pm 11:54 PM
How to display child categories on archive page of parent categories
Apr 19, 2025 pm 11:54 PM
Do you want to know how to display child categories on the parent category archive page? When you customize a classification archive page, you may need to do this to make it more useful to your visitors. In this article, we will show you how to easily display child categories on the parent category archive page. Why do subcategories appear on parent category archive page? By displaying all child categories on the parent category archive page, you can make them less generic and more useful to visitors. For example, if you run a WordPress blog about books and have a taxonomy called "Theme", you can add sub-taxonomy such as "novel", "non-fiction" so that your readers can
 How to sort posts by post expiration date in WordPress
Apr 19, 2025 pm 11:48 PM
How to sort posts by post expiration date in WordPress
Apr 19, 2025 pm 11:48 PM
In the past, we have shared how to use the PostExpirator plugin to expire posts in WordPress. Well, when creating the activity list website, we found this plugin to be very useful. We can easily delete expired activity lists. Secondly, thanks to this plugin, it is also very easy to sort posts by post expiration date. In this article, we will show you how to sort posts by post expiration date in WordPress. Updated code to reflect changes in the plugin to change the custom field name. Thanks Tajim for letting us know in the comments. In our specific project, we use events as custom post types. Now
 Is WordPress easy for beginners?
Apr 03, 2025 am 12:02 AM
Is WordPress easy for beginners?
Apr 03, 2025 am 12:02 AM
WordPress is easy for beginners to get started. 1. After logging into the background, the user interface is intuitive and the simple dashboard provides all the necessary function links. 2. Basic operations include creating and editing content. The WYSIWYG editor simplifies content creation. 3. Beginners can expand website functions through plug-ins and themes, and the learning curve exists but can be mastered through practice.
 How to Automate WordPress and Social Media with IFTTT (and more)
Apr 18, 2025 am 11:27 AM
How to Automate WordPress and Social Media with IFTTT (and more)
Apr 18, 2025 am 11:27 AM
Are you looking for ways to automate your WordPress website and social media accounts? With automation, you will be able to automatically share your WordPress blog posts or updates on Facebook, Twitter, LinkedIn, Instagram and more. In this article, we will show you how to easily automate WordPress and social media using IFTTT, Zapier, and Uncanny Automator. Why Automate WordPress and Social Media? Automate your WordPre
 How to display query count and page loading time in WordPress
Apr 19, 2025 pm 11:51 PM
How to display query count and page loading time in WordPress
Apr 19, 2025 pm 11:51 PM
One of our users asked other websites how to display the number of queries and page loading time in the footer. You often see this in the footer of your website, and it may display something like: "64 queries in 1.248 seconds". In this article, we will show you how to display the number of queries and page loading time in WordPress. Just paste the following code anywhere you like in the theme file (e.g. footer.php). queriesin
