

How to add Google Analytics 4 in WordPress

Need to update to Google Analytics 4, but not sure how? Having a hard time setting up Google Analytics 4 that you need now? In this article, I'll show you how.

Google Analytics 4 is replacing its predecessor, Universal Analytics, which will stop collecting data in July 2023 (July 2024 for Google Analytics 360 customers). For non-360 customers, switching to GA4 is mandatory, so it's important to start now.
don’t worry! This practical guide will give you step-by-step instructions on how to easily install and activate GA4 on your WordPress website. Let's get started updating your old Google Analytics.
Install and activate the Google Analytics for WordPress plugin
The first step in setting up Google Analytics 4 on your website is to install a WordPress plugin that adds the Google Analytics tracking code to your website.
To do this, navigate to the Plugins section in your WordPress dashboard, click Add New, and search for Google Analytics .
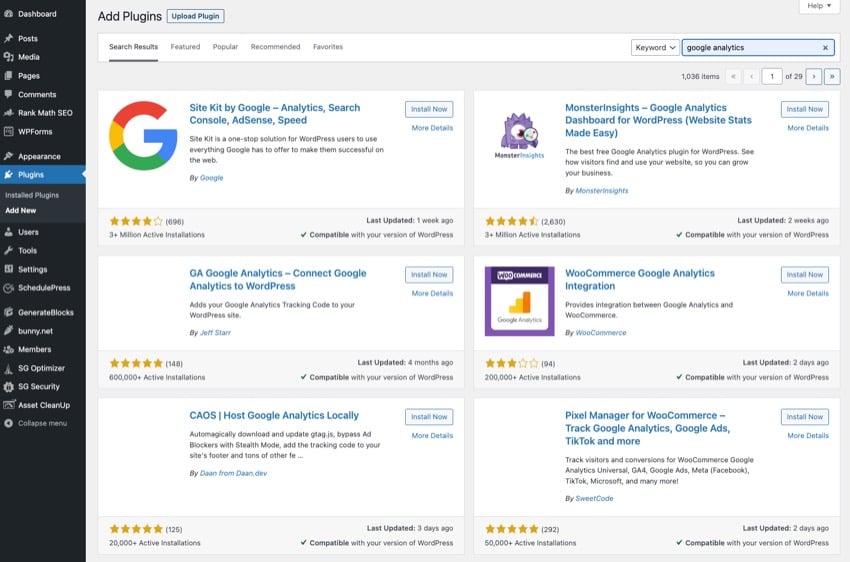
From the search results, find GA Google Analytics or MonsterInsights, which are widely recommended plugins due to their seamless integration with Google Analytics 4 Famous for WordPress integration.
Select Install now, then click to activate.
You have now successfully installed and activated the Google Analytics plugin and are ready to set it up.
Create a Google Analytics 4 Property
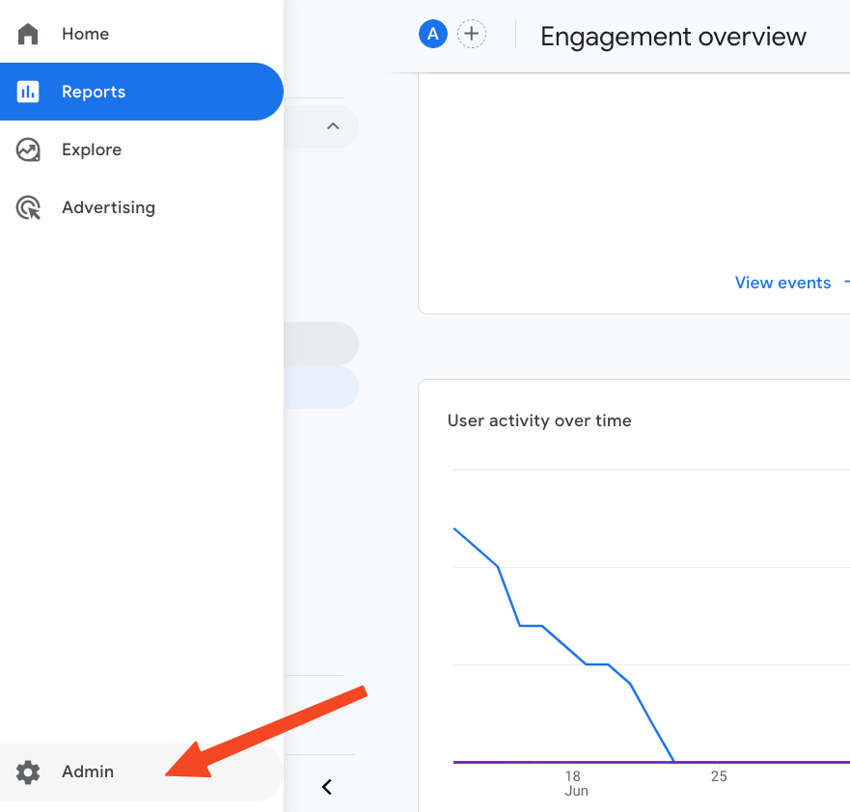
When transitioning from Universal Analytics to GA, you must create a new Google Analytics 4 property for your WordPress site. Here are step-by-step instructions.
Visit the Google Analytics website and click Manage in the lower left corner of your account.
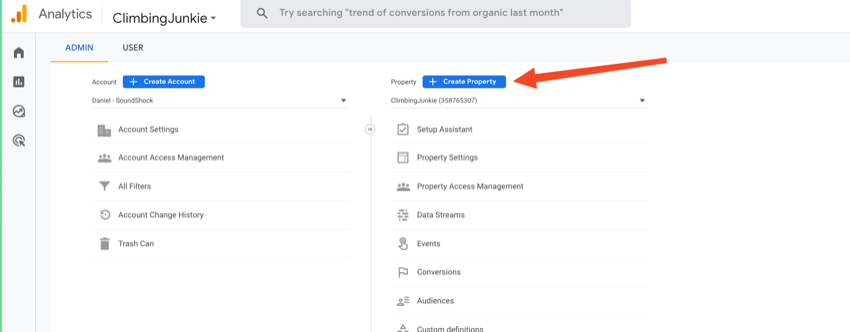
Select your account in the Account column of the Admin console. Then go to the Properties column and click Create Property.
Name your new property after your WordPress site, then fill out the Business Details and Business Goals pages.
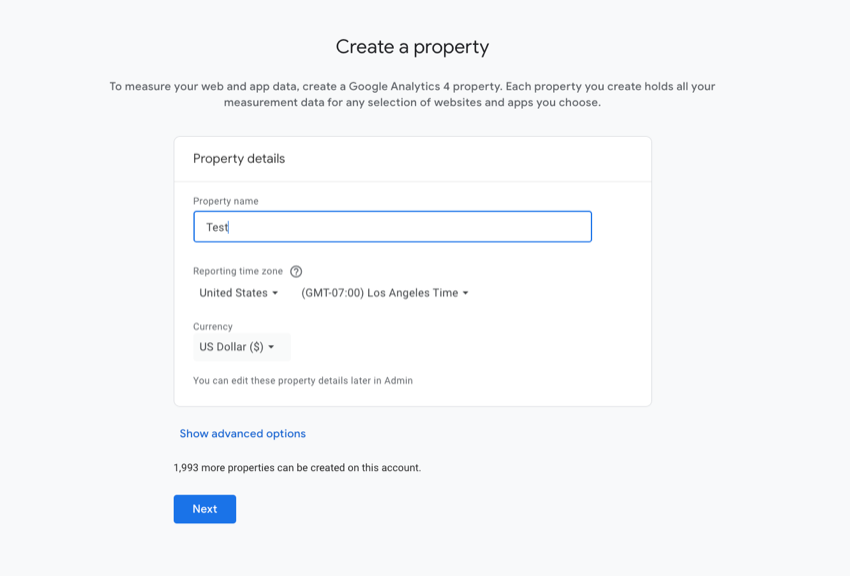
On the final settings screen, click Web as your platform. Enter the details of your WordPress site, including the URL under Website URL and the site name.
Click Create and, if necessary, accept the terms of the service agreement.
Your Google Analytics 4 property is now set up and ready to collect data.
Get Google Analytics 4 Measurement ID
Now that you have set up your Google Analytics property, you must obtain your measurement ID.
Click the Manage button in the lower left corner of the Google Analytics screen.
Under the Properties column, select Data Flow.
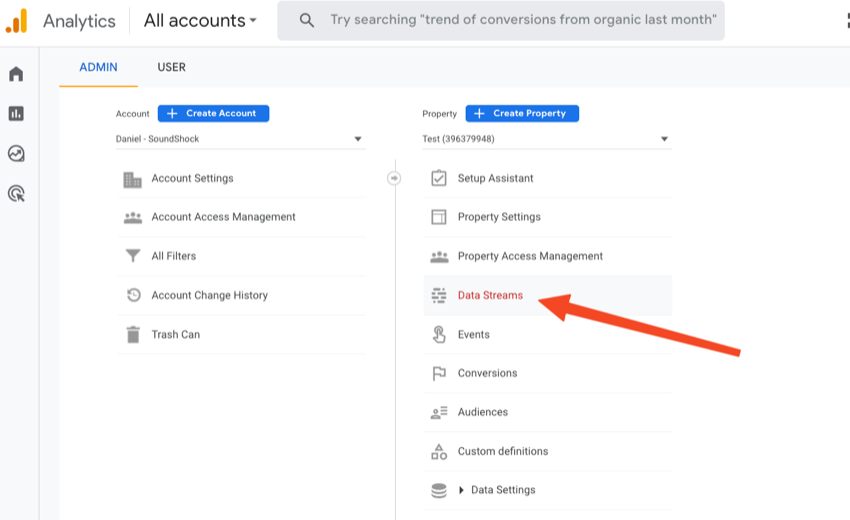
Select the Web option and select the properties you just set. A panel will appear with all the information about the stream, including the measurement ID.
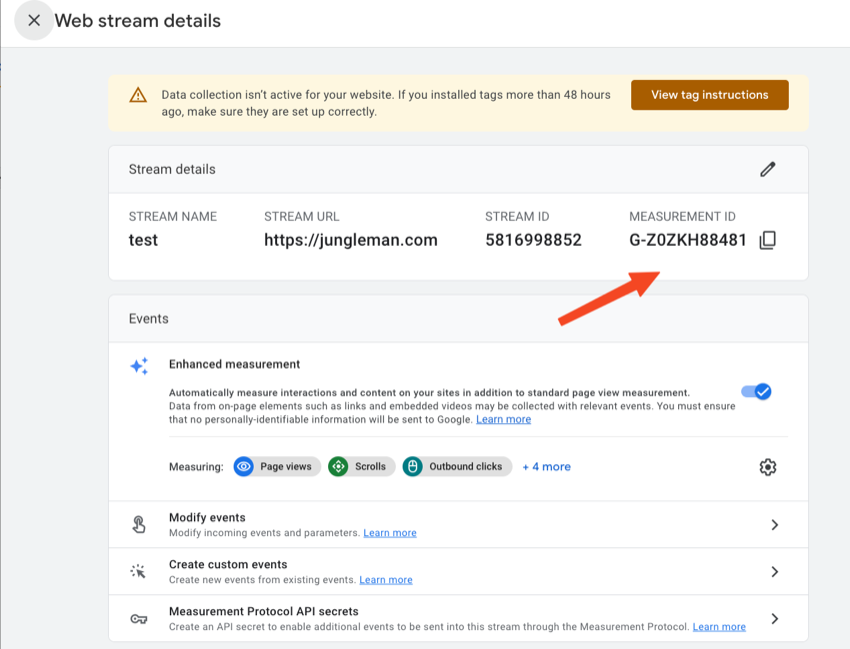
Copy the measurement ID as needed to configure the Google Analytics WordPress plugin.
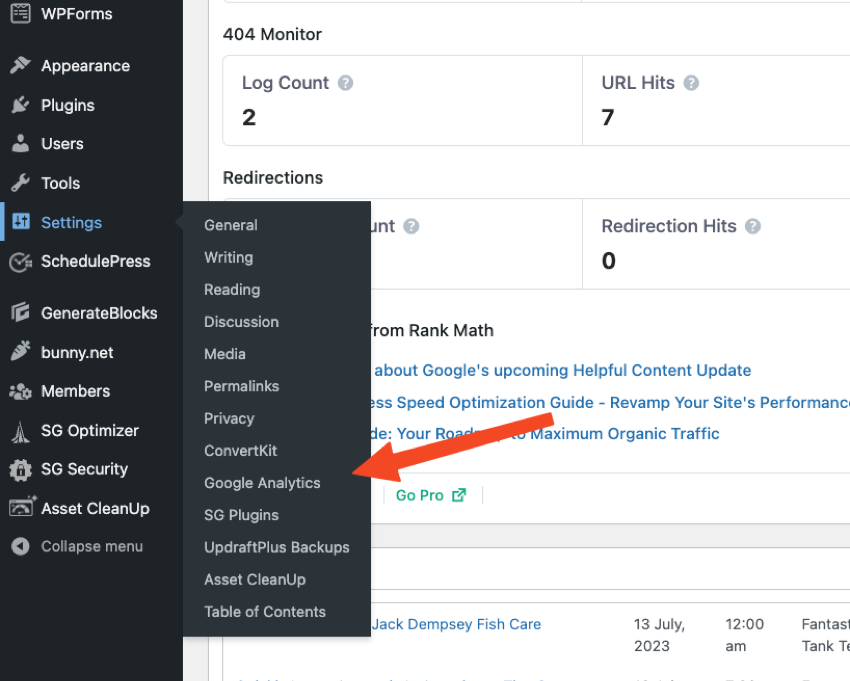
Configure Google Analytics for WordPress plugin
To configure the Google Analytics for WordPress plugin, follow these steps:
Go to the Settings menu in your WordPress dashboard and click Google Analytics.
Enter your GA4 Measurement ID in the GA Tracking ID section.
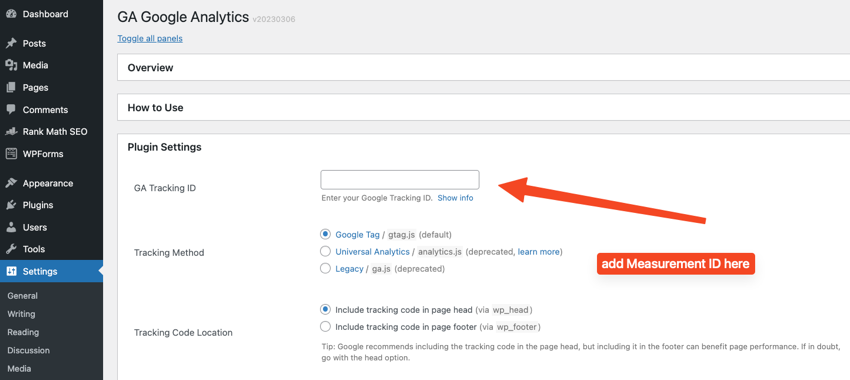
Next, select a tracking method Google Tag in the section below.
Finally, click the Disable tracking for admin-level users section so that Google Analytics will not track your admin activity.
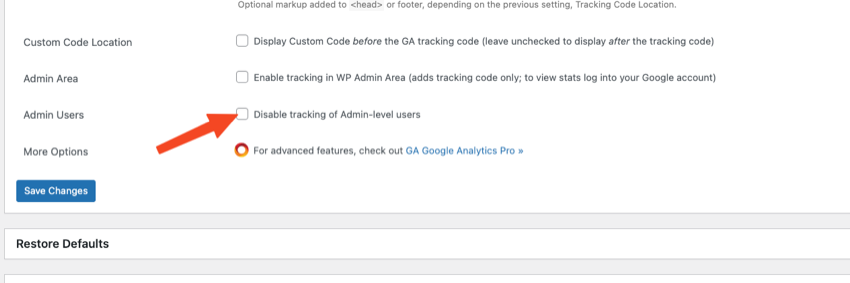
Save changes and exit setup.
Now it’s time to verify that Google Analytics 4 is running on your WordPress site.
Verify Google Analytics 4 Tracking on WordPress
To ensure that Google Analytics 4 (GA4) is set up and tracked correctly on your WordPress site, you can verify this in a few ways:
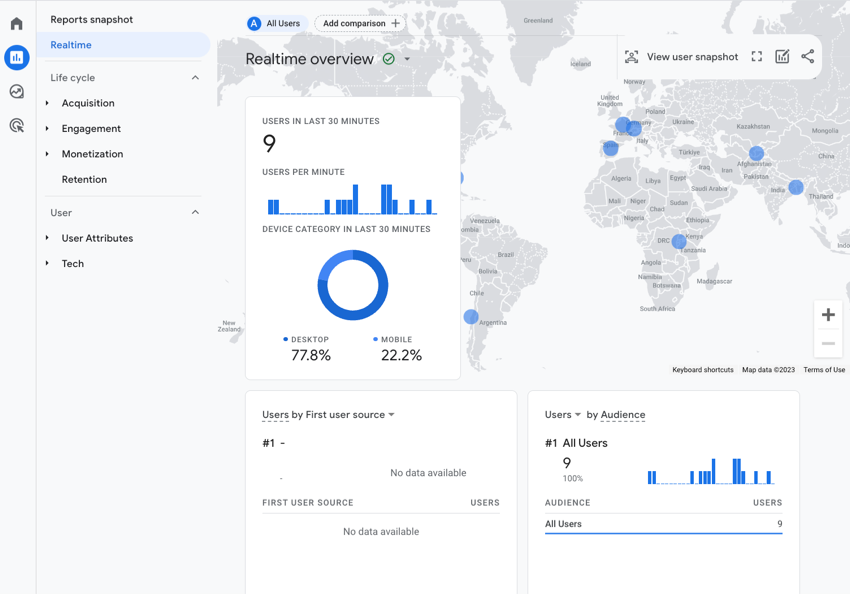
Verify installation using real-time reporting
Open your website in a new browser tab.
Go back to your Google Analytics account and navigate to Real-Time Reports.
Find the Overview report and check if your site appears in the Current Active Users section. If you see active users on your site, it means GA4 is tracking your site.
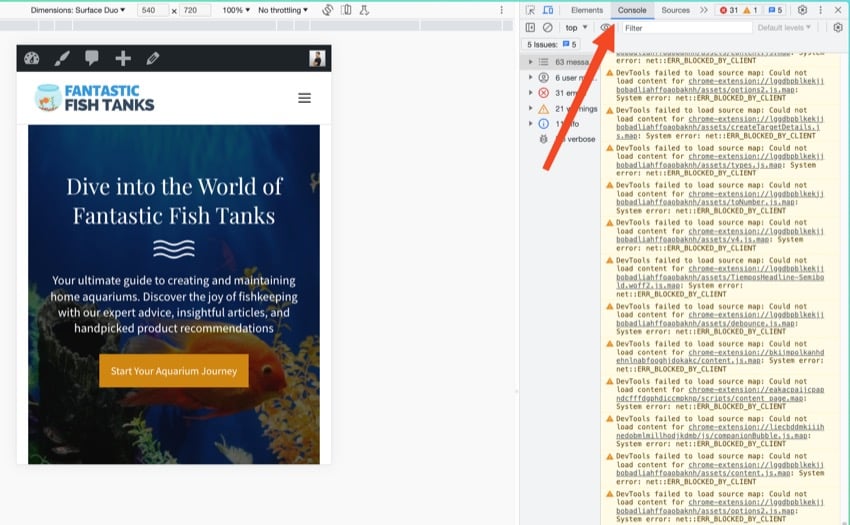
Using the DebugView function
Open your website in a new browser tab.
Add the following to the end of the website URL, ?debug_mode=true.

Next, open your browser's developer console by right-clicking and selecting Inspect or by pressing F12.
Look for the Google Analytics DebugView panel in the console and check for any error messages or warnings related to GA4. If there are no errors or warnings, GA4 is functioning properly.
Download High Quality WordPress Plugin
Looking to take your WordPress website to the next level? WordPress plugins are an invaluable tool for all WordPress website owners. They provide your website with important features you need to run a successful website, which a new WordPress website does not have.
Check out the resources below for tons of great plugins you can download for your WordPress site today!
Unleash the power of Google Analytics 4 for your WordPress website
Adding Google Analytics 4 to your WordPress website is a simple process that can provide valuable insights into your website performance. By following the steps outlined in this guide and using the available plugins, you can easily configure GA4 tracking and take advantage of its powerful features.
With GA4, you'll have access to rich customer data and enhanced marketing capabilities to optimize your ads and improve your overall online presence. So don’t miss this opportunity to realize the full potential of your WordPress website with Google Analytics 4!
If you need more high-quality plugins and themes for your WordPress site, use Envato Elements. You can access thousands of WordPress resources for a low monthly fee.
The above is the detailed content of How to add Google Analytics 4 in WordPress. For more information, please follow other related articles on the PHP Chinese website!

Hot AI Tools

Undresser.AI Undress
AI-powered app for creating realistic nude photos

AI Clothes Remover
Online AI tool for removing clothes from photos.

Undress AI Tool
Undress images for free

Clothoff.io
AI clothes remover

Video Face Swap
Swap faces in any video effortlessly with our completely free AI face swap tool!

Hot Article
Hot Tools

Notepad++7.3.1
Easy-to-use and free code editor

SublimeText3 Chinese version
Chinese version, very easy to use

Zend Studio 13.0.1
Powerful PHP integrated development environment

Dreamweaver CS6
Visual web development tools

SublimeText3 Mac version
God-level code editing software (SublimeText3)
Hot Topics
 1662
1662
 14
1419
52
1312
25
1262
29
1235
24
14
1419
52
1312
25
1262
29
1235
24

 How To Begin A WordPress Blog: A Step-By-Step Guide For Beginners
Apr 17, 2025 am 08:25 AM
How To Begin A WordPress Blog: A Step-By-Step Guide For Beginners
Apr 17, 2025 am 08:25 AM
Blogs are the ideal platform for people to express their opinions, opinions and opinions online. Many newbies are eager to build their own website but are hesitant to worry about technical barriers or cost issues. However, as the platform continues to evolve to meet the capabilities and needs of beginners, it is now starting to become easier than ever. This article will guide you step by step how to build a WordPress blog, from theme selection to using plugins to improve security and performance, helping you create your own website easily. Choose a blog topic and direction Before purchasing a domain name or registering a host, it is best to identify the topics you plan to cover. Personal websites can revolve around travel, cooking, product reviews, music or any hobby that sparks your interests. Focusing on areas you are truly interested in can encourage continuous writing
 How to adjust the wordpress article list
Apr 20, 2025 am 10:48 AM
How to adjust the wordpress article list
Apr 20, 2025 am 10:48 AM
There are four ways to adjust the WordPress article list: use theme options, use plugins (such as Post Types Order, WP Post List, Boxy Stuff), use code (add settings in the functions.php file), or modify the WordPress database directly.
 How to get logged in user information in WordPress for personalized results
Apr 19, 2025 pm 11:57 PM
How to get logged in user information in WordPress for personalized results
Apr 19, 2025 pm 11:57 PM
Recently, we showed you how to create a personalized experience for users by allowing users to save their favorite posts in a personalized library. You can take personalized results to another level by using their names in some places (i.e., welcome screens). Fortunately, WordPress makes it very easy to get information about logged in users. In this article, we will show you how to retrieve information related to the currently logged in user. We will use the get_currentuserinfo(); function. This can be used anywhere in the theme (header, footer, sidebar, page template, etc.). In order for it to work, the user must be logged in. So we need to use
 How to display child categories on archive page of parent categories
Apr 19, 2025 pm 11:54 PM
How to display child categories on archive page of parent categories
Apr 19, 2025 pm 11:54 PM
Do you want to know how to display child categories on the parent category archive page? When you customize a classification archive page, you may need to do this to make it more useful to your visitors. In this article, we will show you how to easily display child categories on the parent category archive page. Why do subcategories appear on parent category archive page? By displaying all child categories on the parent category archive page, you can make them less generic and more useful to visitors. For example, if you run a WordPress blog about books and have a taxonomy called "Theme", you can add sub-taxonomy such as "novel", "non-fiction" so that your readers can
 How to sort posts by post expiration date in WordPress
Apr 19, 2025 pm 11:48 PM
How to sort posts by post expiration date in WordPress
Apr 19, 2025 pm 11:48 PM
In the past, we have shared how to use the PostExpirator plugin to expire posts in WordPress. Well, when creating the activity list website, we found this plugin to be very useful. We can easily delete expired activity lists. Secondly, thanks to this plugin, it is also very easy to sort posts by post expiration date. In this article, we will show you how to sort posts by post expiration date in WordPress. Updated code to reflect changes in the plugin to change the custom field name. Thanks Tajim for letting us know in the comments. In our specific project, we use events as custom post types. Now
 How to Automate WordPress and Social Media with IFTTT (and more)
Apr 18, 2025 am 11:27 AM
How to Automate WordPress and Social Media with IFTTT (and more)
Apr 18, 2025 am 11:27 AM
Are you looking for ways to automate your WordPress website and social media accounts? With automation, you will be able to automatically share your WordPress blog posts or updates on Facebook, Twitter, LinkedIn, Instagram and more. In this article, we will show you how to easily automate WordPress and social media using IFTTT, Zapier, and Uncanny Automator. Why Automate WordPress and Social Media? Automate your WordPre
 How to display query count and page loading time in WordPress
Apr 19, 2025 pm 11:51 PM
How to display query count and page loading time in WordPress
Apr 19, 2025 pm 11:51 PM
One of our users asked other websites how to display the number of queries and page loading time in the footer. You often see this in the footer of your website, and it may display something like: "64 queries in 1.248 seconds". In this article, we will show you how to display the number of queries and page loading time in WordPress. Just paste the following code anywhere you like in the theme file (e.g. footer.php). queriesin
 How to build a website for wordpress host
Apr 20, 2025 am 11:12 AM
How to build a website for wordpress host
Apr 20, 2025 am 11:12 AM
To build a website using WordPress hosting, you need to: select a reliable hosting provider. Buy a domain name. Set up a WordPress hosting account. Select a topic. Add pages and articles. Install the plug-in. Customize your website. Publish your website.
