

Extending the default WordPress RSS Feed

Sometimes you may need to enhance your online presence and reach a wider audience by submitting content outside of your website. For example, you might want to make your posts available on the most popular social network aggregators, or make them available on mobile devices, or publish your audio/video podcasts on digital stores.
In most cases, it is necessary to customize the RSS feed to make it suitable for publication by adding custom metadata.
In this tutorial, we'll see how to achieve this on two major platforms: Flipboard and the iTunes Store, but the code can be easily customized for other platforms and web services.
Introduction
Flipboard is a social network aggregation app for Android and iOS devices that regularly fetches content from your website and presents it in magazine format so that mobile users can access it via an app installed on their smartphone or tablet Read your news. The iTunes Store is an online digital media store where you can publish audio or video podcasts.
Subscriptions to both services are free but require approval, especially since Flipboard only seems to accept sites with a large readership.
They both allow you to publish content via a blog RSS feed, but this must comply with their specifications. Fortunately, WordPress allows developers to modify the default RSS feed structure.
<h2> Step 1Default WordPress RSS Feed Structure
By default, WordPress comes with various feeds. In this tutorial, we will use http://example.com/?feed=rss2 or http://example.com/feed/ if the following conditions are met The RSS 2.0 feed you use permalinks. This feed is a simple XML document with the following structure:
<?xml version="1.0" encoding="UTF-8"?>
<rss version="2.0"
  <!-- these are the namespaces -->
  xmlns:content="http://purl.org/rss/1.0/modules/content/"
  xmlns:wfw="http://wellformedweb.org/CommentAPI/"
  xmlns:dc="http://purl.org/dc/elements/1.1/"
  xmlns:atom="http://www.w3.org/2005/Atom"
  xmlns:sy="http://purl.org/rss/1.0/modules/syndication/"
  xmlns:slash="http://purl.org/rss/1.0/modules/slash/"
>

	<channel>
		<!-- this is the head -->
		<title>Your Blog Title</title>
		<atom:link href="http://your-site-url.com/feed" rel="self" type="application/rss+xml" />
		<link>http://your-site-url.com</link>
		<description>your Blog Description</description>
		<lastBuildDate>Thu, 27 Sep 2012 18:30:06 +0000</lastBuildDate>
		<language>en-US</language>
		<sy:updatePeriod>hourly</sy:updatePeriod>
		<sy:updateFrequency>1</sy:updateFrequency>
		<generator>http://wordpress.org/?v=3.4.2</generator>

		<!-- this is the first post -->
		<item>
			<title>Post 1 Title</title>
			<link>http://your-site-url.com/post-1-slug</link>
			<comments>http://your-site-url.com/post-1-slug#comments</comments>
			<pubDate>Tue, 15 May 2012 13:47:12 +0000</pubDate>
			<dc:creator>John Doe</dc:creator>
			<category><![CDATA[Category 1]]></category>
			<guid isPermaLink="false">http://your-site-url.com/?p=1</guid>
			<description><![CDATA[Aliquam rutrum placerat aliquet. Maecenas congue felis erat]]></description>
			<content:encoded><![CDATA[<p>Aliquam rutrum placerat aliquet. Maecenas congue felis erat.</p>]]></content:encoded>
			<wfw:commentRss>http://your-site-url.com/post-1-slug/feed</wfw:commentRss>
			<slash:comments>0</slash:comments>
		</item>

		<!-- this is the second post -->
		<item>
			<title>Post 2 Title</title>
			<link>http://your-site-url.com/post-2-slug</link>
			<comments>http://your-site-url.com/post-2-slug#comments</comments>
			<pubDate>Tue, 15 May 2012 13:37:56 +0000</pubDate>
			<dc:creator>John Doe</dc:creator>
			<category><![CDATA[Category 1]]></category>
			<category><![CDATA[Category 2]]></category>
			<guid isPermaLink="false">http://your-site-url.com/?p=2</guid>
			<description><![CDATA[Aliquam rutrum placerat aliquet.]]></description>
			<content:encoded><![CDATA[<p>Aliquam rutrum placerat aliquet</p>]]></content:encoded>
			<wfw:commentRss>http://your-site-url.com/post-2-slug/feed</wfw:commentRss>
			<slash:comments>0</slash:comments>
		</item>
	</channel>

</rss>
As you can see, each <item> element represents a Post and contains multiple child elements, each of which is related to that Post "component". There are:
-
<title>is the post title -
<link>is the post fixed link -
<pubDate>is the release date in RFC822 format -
<dc:creator>is the name of the post author -
<dc:category>is a subset of elements, one per post category
-
<description>is an excerpt of the post without HTML tags -
<content:encoded>is the entire post content with HTML tags
<h2> Step 2Customize Flipboard’s RSS feed
Content may be enhanced based on Flipboard technical requirements.
<blockquote>Add the ability to specify citations, slideshows, and other design elements by providing additional semantics in article markup
These additional semantics are:
- Title and Subtitle
- Quote
- Image, Video and Audio Resources
- Slideshow
- Geographic Information
We can implement these semantics in RSS Feed through plug-ins. As mentioned before, WordPress provides specific Hooks that allow you to modify the default RSS feed structure:
-
rss2_ns- Allows adding new namespaces within the root XML element; -
rss2_head- Allows adding tags in the feed header; -
the_content_feed- Allows modification of the content of each post shown in the feed; -
rss2_item- allows adding new child elements to each<item>(Post) element;
Create a new file called flipboard-feed.php, open your favorite text editor and paste this plugin header:
<?php
/*
 * Plugin Name:   Flipboard RSS Feed
 * Plugin URI:    http://www.studio404.it
 * Description:   A plugin to customize the default RSS Feed according to Flipboard technical specifications.
 * Version:       1.0
 * Author:        Claudio Simeone
 * Author URI:    http://www.studio404.it
 */
?>
Copy the file in the /wp-content/plugins/ directory and activate it from the Plugins management page.
Title and Subtitle
If you want to add a title and subtitle before the post content, you must add the following:
<hgroup>
	<h1>Title of the Post</h1>
	<h2>This is the Post subtitle</h2>
</hgroup>
You can also add it to the post content manually in a text editor, but this is not the best solution because these tags will also be displayed on your website (unless you don't hide hgroup element via CSS styling). So, to achieve this automatically and only in RSS feeds , it is better to use customization of post title with <h1> elements and <h2> subtitle Field.
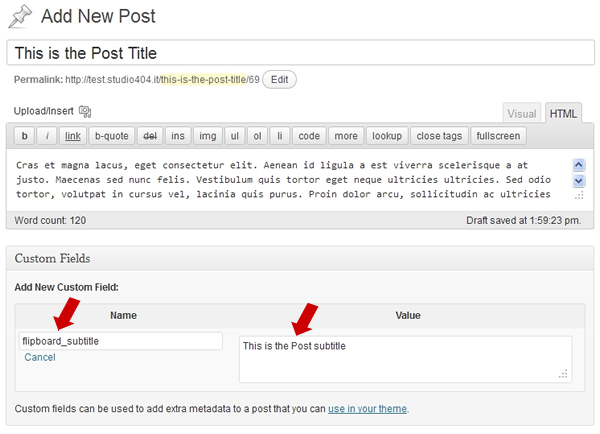
In the edit post page, add the flipboard_subtitle custom field.
Add these lines to our Flipboard RSS Feed plugin:
add_filter( 'the_content_feed', 'flipboard_title_and_subtitle' );

function flipboard_title_and_subtitle( $content ) {
	global $post;
	$post_subtitle = get_post_meta( $post->ID, 'flipboard_subtitle', TRUE );
	// add hgroup only if the Custom Field is set
	if ( $post_subtitle ) {
		$hgroup = '<hgroup><h1>' . $post->post_title . '</h1>';
		$hgroup .= '<h2>' . $post_subtitle . '</h2></hgroup>';
		return $hgroup . $content;
	} else {
		return $content;
	}
}
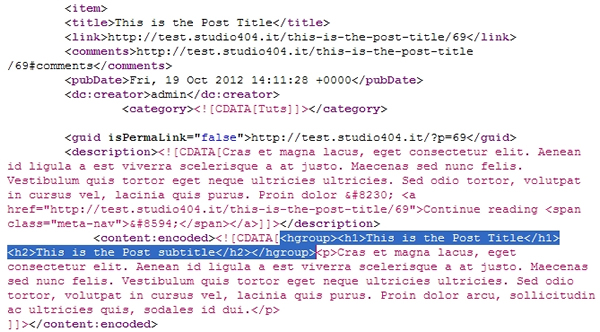
Now, if you publish a post and refresh the RSS feed page source, you will see the hgroup tag before the post content.
引用
对于拉引号,您可以在帖子内容中使用 <blockquote> 标记来指出文本的某些部分。我们可以利用该插件将 <blockquote> 替换为 <aside> 标签。

将这些行添加到我们的 Flipboard RSS Feed 插件中:
add_filter( 'the_content_feed', 'flipboard_pull_quotes' );

function flipboard_pull_quotes( $content ) {
	// replace blockquote tag with aside
	return str_replace( 'blockquote>', 'aside>', $content );
}
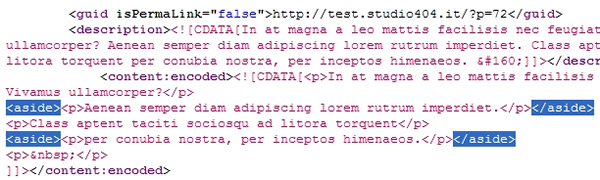
重新加载您的 RSS Feed 页面源代码,您将看到新的 <aside> 标记。
图片
对于所有这些元素,我们将遵循 Flipboard 建议的另一种方法:我们将向 <item> 元素添加新的媒体 RSS 元素子集,而不是将语义直接放入帖子内容中。< /p>
Media RSS 是一种 RSS 扩展,可增强 RSS 源中多媒体文件的发布。由于其特殊元素,图像、视频和音频文件及其元数据可以包含到 RSS 源中。
在我们的例子中,我们将使用其中主要的一个:<media:content>。
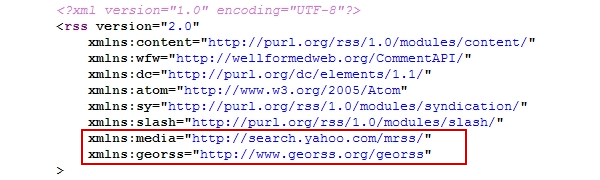
此外,我们还需要GeoRSS扩展来支持地理信息,因此我们必须向RSS Feed添加正确的命名空间才能使其有效。
将这些行添加到我们的 Flipboard RSS Feed 插件中:
add_filter( 'rss2_ns', 'flipboard_namespace' );

function flipboard_namespace() {
	echo 'xmlns:media="http://search.yahoo.com/mrss/"
	xmlns:georss="http://www.georss.org/georss"';
}
结果将是:
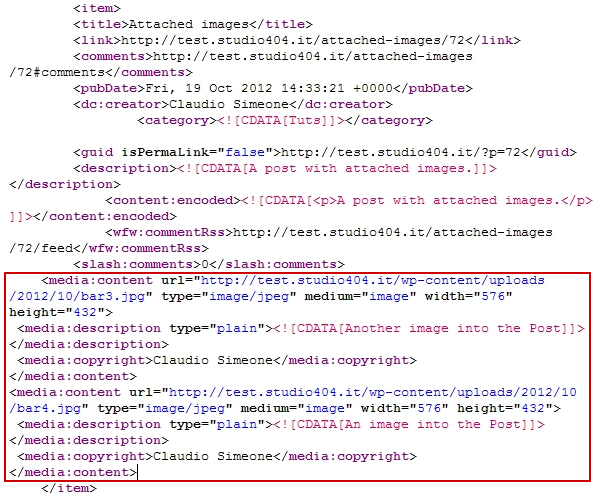
现在我们想要将帖子中附加的所有图像添加到 RSS 提要中。我们必须做这样的事情:
<item>
	<!-- Full item markup omitted for brevity -->
	<media:content type="image/jpeg" media="image" width="900" height="600" url="http://media.example.com/kitten-landscape.jpg">
		<media:description type="plain">An adorable kitten</media:description>
		<media:copyright>Carl Carlson</media:copyright>
	</media:content>
</item>
<media:content> 元素支持两个子元素: <media:description> 是用于图像的标题,在 WordPress 中是图像的标题,而 <media: copyright> 包含图像作者的版权信息或来源。
现在,我们将在 WordPress Feed 中实现这一点。撰写帖子并附加一些图像(请注意,图像的最小尺寸必须至少为 400 像素):
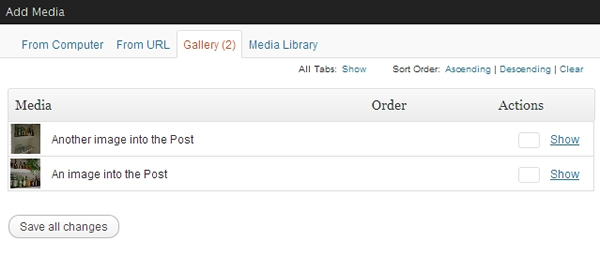
发布帖子,然后将这些行添加到我们的 Flipboard RSS Feed 插件中:
add_filter( 'rss2_item', 'flipboard_attached_images' );

function flipboard_attached_images() {
	global $post;
	$attachments = get_posts( array(
		'post_type' => 'attachment',
		'post_mime_type' => 'image',
		'posts_per_page' => -1,
		'post_parent' => $post->ID,
		'exclude' => get_post_thumbnail_id()
	) );
	if ( $attachments ) {
		foreach ( $attachments as $att ) {
			$img_attr = wp_get_attachment_image_src( $att->ID, 'full' );
			?>
			<media:content url="<?php echo $img_attr[0]; ?>" type="<?php echo $att->post_mime_type; ?>" medium="image" width="<?php echo $img_attr[1]; ?>" height="<?php echo $img_attr[2]; ?>">
				<media:description type="plain"><![CDATA[<?php echo $att->post_title; ?>]]></media:description>
				<media:copyright><?php echo get_the_author(); ?></media:copyright>
			</media:content>
			<?php
		}
	}
}
重新加载您的 RSS Feed 页面源代码,您将看到每个附加图像的 <media:content> 元素。
关于 <media:group> 元素的简要说明:它可用于提供同一图像的替代裁剪和尺寸,例如纵向/横向版本。
视频
对于视频文件 Flipboard 建议使用以下代码:
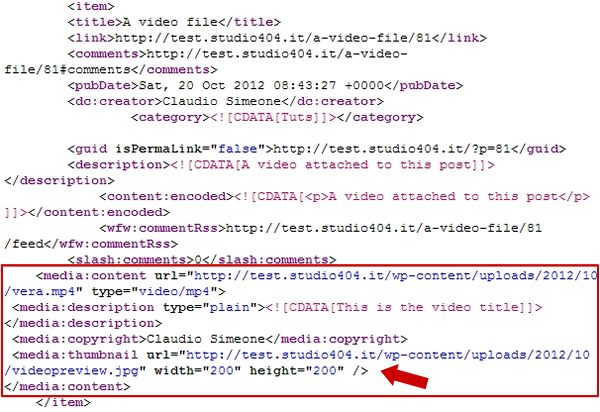
<media:content url="http://www.example.com/lisa-saxophone.mp4" type="video/mp4">
	<media:description type="plain">Lisa plays the saxophone</media:description>
	<media:thumbnail url="http://www.example.com/lisa-saxophone.jpg" width="200" height="200" />
	<media:copyright>Carl Carlson</media:copyright>
</media:content>
这里我们有一个新的子元素:<media:thumbnail>:它只是指定视频的预览图像。这可能有点棘手,因为我们需要一种方法来在附加视频与其预览图像之间创建直接连接,并告诉 WordPress 这两个文件已连接。我们可以这样进行:
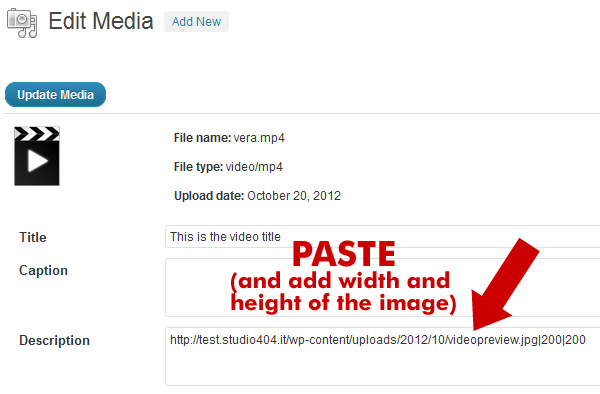
- 添加新帖子并附加一个或多个视频/音频

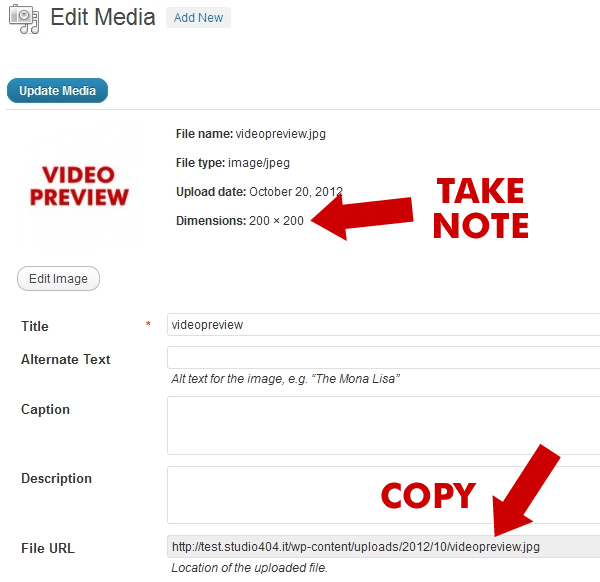
- 在媒体库页面中,上传预览图像,记下图像尺寸并复制图像文件网址
- 在媒体库中找到视频,对其进行编辑并将图像 URL 粘贴到说明字段中,还添加宽度和图像的高度,每个由管道字符“
|”分隔。为了设置正确的图像尺寸,这是必要的。
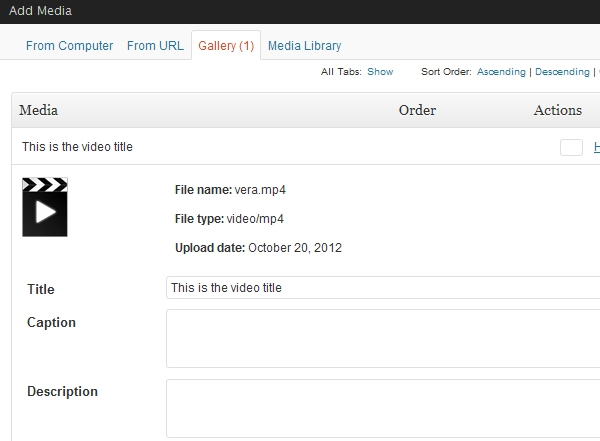
现在是时候将视频放入我们的 RSS 源中了。将这些行添加到我们的 Flipboard RSS Feed 插件中:
add_filter( 'rss2_item', 'flipboard_attached_videos' );

function flipboard_attached_videos() {
	global $post;
	$attachments = get_posts( array(
		'post_type' => 'attachment',
		'post_mime_type' => 'video',
		'posts_per_page' => -1,
		'post_parent' => $post->ID,
		'exclude' => get_post_thumbnail_id()
	) );
	if ( $attachments ) {
		foreach ( $attachments as $att ) {
			$video_url = wp_get_attachment_url( $att->ID );
			$parts = explode( '|', $att->post_content );
			?>
			<media:content url="<?php echo $video_url; ?>" type="<?php echo $att->post_mime_type; ?>">
				<media:description type="plain"><![CDATA[<?php echo $att->post_title; ?>]]></media:description>
				<media:copyright><?php echo get_the_author(); ?></media:copyright>
				<media:thumbnail url="<?php echo $parts[0]; ?>" width="<?php echo $parts[1]; ?>" height="<?php echo $parts[2]; ?>" />
			</media:content>
			<?php
		}
	}
}
这是最终结果:
音频
音频文件的 Fliboard 代码是:
<media:content url="http://www.example.com/bartman.mp3" fileSize="1000" type="audio/mpeg" >
	<media:description type="plain">Lisa plays the saxophone</media:description>
	<media:thumbnail url="http://www.example.com/lisa-saxophone.jpg" width="200" height="200" />
	<media:copyright>Carl Carlson</media:copyright>
</media:content>
如您所见,它与视频基本相同:因此要将图像预览附加到音频文件,我们可以使用与视频相同的方法。
因此,在我们的插件中添加这些行:
add_filter( 'rss2_item', 'flipboard_attached_audio' );

function flipboard_attached_audio() {
	global $post;
	$attachments = get_posts( array(
		'post_type' => 'attachment',
		'post_mime_type' => 'audio',
		'posts_per_page' => -1,
		'post_parent' => $post->ID,
		'exclude' => get_post_thumbnail_id()
	) );
	if ( $attachments ) {
		foreach ( $attachments as $att ) {
			$audio_url = wp_get_attachment_url( $att->ID );
			$parts = explode( '|', $att->post_content );
			$headers = get_headers( $audio_url, 1 );
			$filesize = $headers['Content-Length'];
			?>
			<media:content url="<?php echo $audio_url; ?>" fileSize="<?php echo $filesize; ?>" type="<?php echo $att->post_mime_type; ?>">
				<media:description type="plain"><![CDATA[<?php echo $att->post_title; ?>]]></media:description>
				<media:copyright><?php echo get_the_author(); ?></media:copyright>
				<media:thumbnail url="<?php echo $parts[0]; ?>" width="<?php echo $parts[1]; ?>" height="<?php echo $parts[2]; ?>" />
			</media:content>
			<?php
		}
	}
}
幻灯片
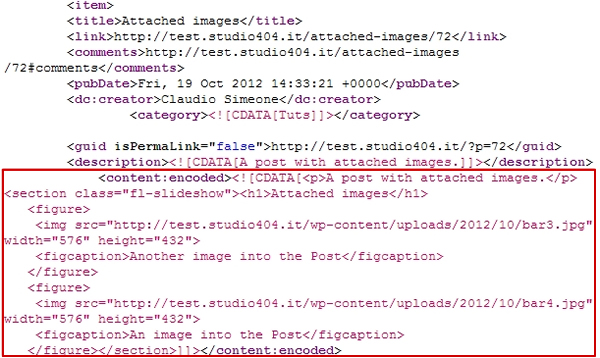
要以幻灯片格式添加附加到帖子的所有图像,我们必须将一部分 HTML 代码添加到 RSS Feed 帖子内容中:
<section class="fl-slideshow">
	<h1>My favorite animals</h1>
	<figure>
		<img src="puppy.jpg" width="1200" height="900">
		<figcaption>Puppies are cute</figcaption>
	</figure>
	<figure>
		<img src="kitten.jpg" width="900" height="1200">
		<figcaption>Kittens are too</figcaption>
	</figure>
	<figure>
		<img src="lamb.jpg" width="900" height="900">
		<figcaption>And baby sheep grow into ewe</figcaption>
	</figure>
</section>
在我们的插件中添加这些行:
add_filter( 'the_content_feed', 'flipboard_slideshow' );

function flipboard_slideshow( $content ) {
	global $post;
	$attachments = get_posts( array(
		'post_type' => 'attachment',
		'post_mime_type' => 'image',
		'posts_per_page' => -1,
		'post_parent' => $post->ID,
		'exclude'     => get_post_thumbnail_id()
	) );
	if ( $attachments ) {
		$slide = '<section class="fl-slideshow"><h1>' . $post->post_title . '</h1>';
		foreach ( $attachments as $att ) {
			$img_attr = wp_get_attachment_image_src( $att->ID, 'full' );
			$slide .= '<figure>
				<img src="' . $img_attr[0] . '" width="' . $img_attr[1] . '" height="' . $img_attr[2] . '">
				<figcaption>' . $att->post_title . '</figcaption>
			</figure>';
		}
		$slide .= '</section>';
		return $content . $slide;
	} else {
		return $content;
	}
}
这就是结果:
地理信息
要显示地理信息,我们可以使用自定义字段,就像我们对 hgroup 副标题所做的那样。
因此,在“编辑帖子”页面中,添加 flipboard_geo 自定义字段,并按如下格式设置值:45.256 -71.92(GeoRSS 文档中提供了受支持标签的完整列表)。< /p>
将这些行添加到我们的 Flipboard RSS Feed 插件中:
add_filter( 'the_content_feed', 'flipboard_geo' );

function flipboard_geo( $content ) {
	global $post;
	$flipboard_geo = get_post_meta( $post->ID, 'flipboard_geo', TRUE );
	if ( $flipboard_geo ) {
		$geo = '<georss:poin>' . $flipboard_geo . '</georss:point>';
		return $content . $geo;
	} else {
		return $content;
	}
}
将您的 Feed 提交到 Flipboard
一旦 RSS Feed 准备就绪,您就可以请求 Flipboard 将其包含在其新闻来源中:您必须通过电子邮件联系 Flipboard 工作人员,包括您的 RSS Feed URL、Twitter、Facebook 和网站详细信息。工作人员将审核所有信息,并会在 5 个工作日内通知您。
<h2> 第 3 步为 iTunes 上的播客自定义 RSS Feed
要在 Apple iTunes 上发布我们的音频或视频播客,我们需要通过新插件根据 iTunes 技术规范格式化 RSS Feed:
创建一个名为 itunes-feed.php 的新文件,打开您最喜欢的文本编辑器并粘贴以下内容:
<?php
/*
 * Plugin Name:   iTunes RSS Feed
 * Plugin URI:    http://www.studio404.it
 * Description:   A plugin to customize the default RSS Feed according to iTunes technical specifications.
 * Version:       1.0
 * Author:        Claudio Simeone
 * Author URI:    http://www.studio404.it
 */
?>
复制 /wp-content/plugins/ 目录中的文件并在插件管理页面中激活它。
iTunes 命名空间
要添加 iTunes 命名空间并支持 iTunes 特定元标记,我们可以使用 rss2_ns 过滤器:
add_filter( 'rss2_ns', 'itunes_namespace' );

// Add namespace
function itunes_namespace() {
	echo 'xmlns:itunes="http://www.itunes.com/dtds/podcast-1.0.dtd"';
}
iTunes 头部标签
下一步是添加各种信息,以帮助 iTunes 更好地对商店中的提要进行分类,并显示有关您的播客频道的详细信息。
我们可以通过 rss2_head 过滤器添加所有这些信息:
add_filter( 'rss2_head', 'itunes_head' );

function itunes_head() {
	?>
	<itunes:subtitle>A show about everything</itunes:subtitle>
	<itunes:author>John Doe</itunes:author>
	<itunes:summary>All About Everything is a show about everything...</itunes:summary>
	<itunes:owner>
		<itunes:name>John Doe</itunes:name>
		<itunes:email>john.doe@example.com</itunes:email>
	</itunes:owner>
	<itunes:image href="https://www.php.cn/link/4c9c3070235a7af934be4e46215c0cbc" />
	<itunes:category text="Technology">
		<itunes:category text="Gadgets"/>
	</itunes:category>
	<?php
}
为了本教程的简洁,该示例是静态的。您可以在插件源代码中手动修改所有信息。如果您希望使其动态化,您可以创建一个选项页来处理所有这些信息(另请参阅:Ozh 的使用 register_setting() 处理 WordPress 2.8 中的插件选项)。
iTunes 帖子标签
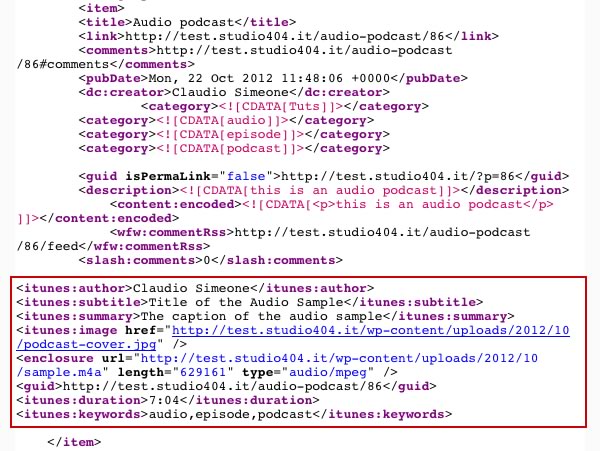
对于每篇帖子,iTunes 都会要求添加一些额外的标签:
<itunes:author>John Doe</itunes:author>
<itunes:subtitle>A short primer on table spices</itunes:subtitle>
<itunes:summary>This week we talk about salt and pepper shakers...</itunes:summary>
<itunes:image href="http://example.com/podcasts/everything/AllAboutEverything/Episode1.jpg" />
<enclosure url="http://example.com/podcasts/everything/AllAboutEverythingEpisode3.m4a" length="8727310" type="audio/x-m4a" />
<guid>http://example.com/podcasts/archive/aae20050615.m4a</guid>
<itunes:duration>7:04</itunes:duration>
<itunes:keywords>salt, pepper, shaker, exciting</itunes:keywords>
我们可以像这样处理其中一些信息:
- 作者:我们将使用帖子作者
- 副标题:我们将使用帖子的附件标题
- 摘要:我们将使用附件标题
- 持续时间:我们将使用附件说明
- 关键字:我们将使用帖子标签
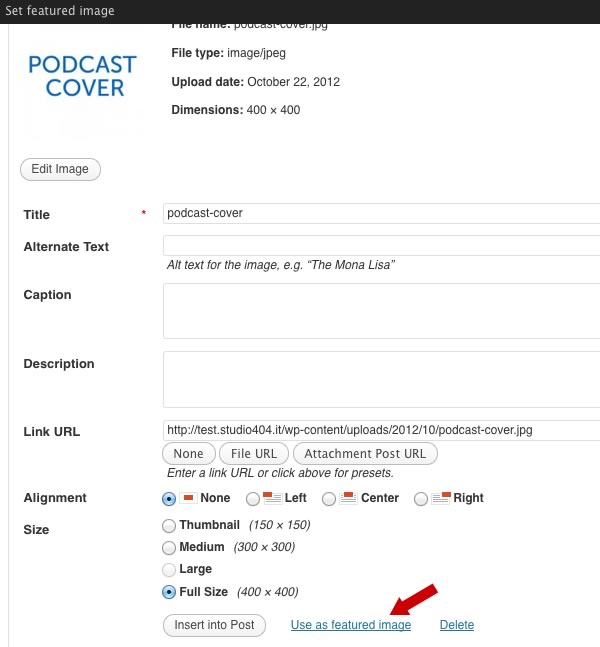
写一篇新文章,添加标题、一些内容和一些标签。然后,将音频文件附加到帖子中。
文件上传后,添加其他信息:标题、说明文字,并使用说明字段指定持续时间。
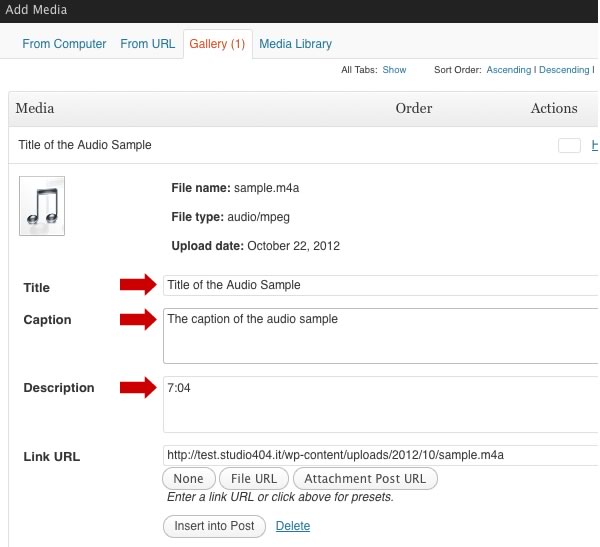
将精选图片添加到帖子中,最后发布。
现在,在我们的 itunes-feed.php 插件中添加以下行:
// add support for Post Thumbnails we will use for podcast covers
add_theme_support( 'post-thumbnails' );

// iTunes prefers square .jpg images that are at least 400 x 400 pixels
add_image_size( 'itunes-cover', 400, 400, true );

function itunes_attached_audio() {
	global $post;
	$attachments = get_posts( array(
		'post_type' => 'attachment',
		'post_mime_type' => 'audio', // if you use videos, change here
		'posts_per_page' => -1,
		'post_parent' => $post->ID,
		'exclude' => get_post_thumbnail_id()
	) );

	// use the post tags for itunes:keywords
	$itunes_keywords_arr = get_the_tags();
	if ( $itunes_keywords_arr ) {
		foreach( $itunes_keywords_arr as $tag ) {
			$itunes_keywords .= $tag->name . ',';
		}
		$itunes_keywords = substr_replace( trim( $itunes_keywords ), '', -1 );
	}

	// use the post thumb for itunes:image
	$post_thumbnail_id = get_post_thumbnail_id( $post->ID );
	$itunes_image_arr = wp_get_attachment_image_src( $post_thumbnail_id, 'itunes-cover' );

	if ( $attachments ) {
		foreach ( $attachments as $att ) {
			$audio_url = wp_get_attachment_url( $att->ID );
			$parts = explode( '|', $att->post_content );
			$headers = get_headers( $audio_url, 1 );
			$filesize = $headers['Content-Length'];
			?>
			<itunes:author><?php echo get_the_author(); ?></itunes:author>
			<itunes:subtitle><?php echo $att->post_title; ?></itunes:subtitle>
			<itunes:summary><?php echo $att->post_excerpt; ?></itunes:summary>
			<itunes:image href="<?php echo $itunes_image_arr[0]; ?>" />
			<enclosure url="<?php echo $audio_url; ?>" length="<?php echo $filesize; ?>" type="<?php echo $att->post_mime_type; ?>" />
			<guid><?php the_permalink(); ?></guid>
			<itunes:duration><?php echo $att->post_content; ?></itunes:duration>
			<itunes:keywords><?php echo $itunes_keywords; ?></itunes:keywords>
			<?php
		}
	}
}
最后,发布帖子并重新加载 RSS Feed 页面源。
结论
虽然本教程仅涵盖两个主要平台,但借助 WordPress Hooks,可以自定义默认的 RSS Feed 并使其适用于其他外部 Web 应用程序。对于每篇帖子,您可以使用新的 RSS 扩展附加附加信息,也可以通过提供附加 HTML 代码来增强帖子内容,以满足您要用于发布内容的所有平台的要求。
参考文献
- Apple iTunes 示例 Feed
- GeoRSS-简单文档
- 通过 RSS Feed 在 Flipboard 上发布内容
-
WordPress 挂钩和过滤器
- WordPress 插件 API
- 关于在帖子和自定义帖子类型管理屏幕中添加自定义列中的 WordPress 挂钩
- WordPress 操作和过滤器初学者指南
The above is the detailed content of Extending the default WordPress RSS Feed. For more information, please follow other related articles on the PHP Chinese website!

Hot AI Tools

Undresser.AI Undress
AI-powered app for creating realistic nude photos

AI Clothes Remover
Online AI tool for removing clothes from photos.

Undress AI Tool
Undress images for free

Clothoff.io
AI clothes remover

Video Face Swap
Swap faces in any video effortlessly with our completely free AI face swap tool!

Hot Article
Hot Tools

Notepad++7.3.1
Easy-to-use and free code editor

SublimeText3 Chinese version
Chinese version, very easy to use

Zend Studio 13.0.1
Powerful PHP integrated development environment

Dreamweaver CS6
Visual web development tools

SublimeText3 Mac version
God-level code editing software (SublimeText3)
Hot Topics


 Alipay PHP SDK transfer error: How to solve the problem of 'Cannot declare class SignData'?
Apr 01, 2025 am 07:21 AM
Alipay PHP SDK transfer error: How to solve the problem of 'Cannot declare class SignData'?
Apr 01, 2025 am 07:21 AM
Alipay PHP...
 Explain JSON Web Tokens (JWT) and their use case in PHP APIs.
Apr 05, 2025 am 12:04 AM
Explain JSON Web Tokens (JWT) and their use case in PHP APIs.
Apr 05, 2025 am 12:04 AM
JWT is an open standard based on JSON, used to securely transmit information between parties, mainly for identity authentication and information exchange. 1. JWT consists of three parts: Header, Payload and Signature. 2. The working principle of JWT includes three steps: generating JWT, verifying JWT and parsing Payload. 3. When using JWT for authentication in PHP, JWT can be generated and verified, and user role and permission information can be included in advanced usage. 4. Common errors include signature verification failure, token expiration, and payload oversized. Debugging skills include using debugging tools and logging. 5. Performance optimization and best practices include using appropriate signature algorithms, setting validity periods reasonably,
 How does session hijacking work and how can you mitigate it in PHP?
Apr 06, 2025 am 12:02 AM
How does session hijacking work and how can you mitigate it in PHP?
Apr 06, 2025 am 12:02 AM
Session hijacking can be achieved through the following steps: 1. Obtain the session ID, 2. Use the session ID, 3. Keep the session active. The methods to prevent session hijacking in PHP include: 1. Use the session_regenerate_id() function to regenerate the session ID, 2. Store session data through the database, 3. Ensure that all session data is transmitted through HTTPS.
 Describe the SOLID principles and how they apply to PHP development.
Apr 03, 2025 am 12:04 AM
Describe the SOLID principles and how they apply to PHP development.
Apr 03, 2025 am 12:04 AM
The application of SOLID principle in PHP development includes: 1. Single responsibility principle (SRP): Each class is responsible for only one function. 2. Open and close principle (OCP): Changes are achieved through extension rather than modification. 3. Lisch's Substitution Principle (LSP): Subclasses can replace base classes without affecting program accuracy. 4. Interface isolation principle (ISP): Use fine-grained interfaces to avoid dependencies and unused methods. 5. Dependency inversion principle (DIP): High and low-level modules rely on abstraction and are implemented through dependency injection.
 How to debug CLI mode in PHPStorm?
Apr 01, 2025 pm 02:57 PM
How to debug CLI mode in PHPStorm?
Apr 01, 2025 pm 02:57 PM
How to debug CLI mode in PHPStorm? When developing with PHPStorm, sometimes we need to debug PHP in command line interface (CLI) mode...
 Framework Security Features: Protecting against vulnerabilities.
Mar 28, 2025 pm 05:11 PM
Framework Security Features: Protecting against vulnerabilities.
Mar 28, 2025 pm 05:11 PM
Article discusses essential security features in frameworks to protect against vulnerabilities, including input validation, authentication, and regular updates.
 How to automatically set permissions of unixsocket after system restart?
Mar 31, 2025 pm 11:54 PM
How to automatically set permissions of unixsocket after system restart?
Mar 31, 2025 pm 11:54 PM
How to automatically set the permissions of unixsocket after the system restarts. Every time the system restarts, we need to execute the following command to modify the permissions of unixsocket: sudo...
 What are Enumerations (Enums) in PHP 8.1?
Apr 03, 2025 am 12:05 AM
What are Enumerations (Enums) in PHP 8.1?
Apr 03, 2025 am 12:05 AM
The enumeration function in PHP8.1 enhances the clarity and type safety of the code by defining named constants. 1) Enumerations can be integers, strings or objects, improving code readability and type safety. 2) Enumeration is based on class and supports object-oriented features such as traversal and reflection. 3) Enumeration can be used for comparison and assignment to ensure type safety. 4) Enumeration supports adding methods to implement complex logic. 5) Strict type checking and error handling can avoid common errors. 6) Enumeration reduces magic value and improves maintainability, but pay attention to performance optimization.
