

Angular Serving: A Comprehensive Guide for Beginners

Hello! I hope you have read our tutorial on Angular Components and Routing. In this article, we will continue discussing another interesting concept in Angular: services.
If Angular components are the presentation layer of our application, then what will be responsible for actually getting the real data and executing the business logic? This is where Angular services come in. The role of Angular services is to obtain, organize and ultimately share data, models and business logic across components.Before we dive into the technical details of Angular services, let’s first understand its functionality. This will help you understand which part of the code needs to be placed inside the component and which part needs to be placed inside the Angular service.
Here are some important facts about the service:
Services are defined using the
@Injectable decorator. This tells Angular that the service can be injected into components or other services. We'll discuss injecting services in detail later.
Service is a singleton class. Only a single instance of a specific service will run in your Angular application.
What is a service?
A service in Angular is an object that is instantiated only once during the life cycle of the application. The data received and maintained by the service can be used throughout the application. This means that components can get data from the service at any time.
Dependency injection is used to introduce services inside the component.
Let us try to understand how to create a service and use it in an Angular component. You can find the complete source code for the project in our GitHub repository.Once you have the source code, navigate to the project directory and install the required dependencies using
npm install. After installing the dependencies, start the application by typing:
ng serve
https://localhost:4200/.
src
--app
----components
------employee.component.css
------employee.component.html
------employee.component.ts
----services
------employee.service.spec.ts
------employee.service.ts
------employeeDetails.service.ts
--app.routing.module.ts
--app.component.css
--app.component.html
--app.component.spec.ts
--app.component.ts
--app.module.ts
--assets
--index.html
--tsconfig.json
1.Building the skeleton of the service
There are two ways to create services in Angular:
- Manually create folders and files within the project.
- Use the
- ng g service
<path/service_name> command to automatically create a service. When using this method, you will automatically get the.service.ts and .service.spec.ts files in the selected directory.
ng g service components/employee
2. Create service
Now that the.service.ts file has been created in your project structure, it's time to populate the contents of the service. To do this, you must decide what the service needs to do. Remember that you can have multiple services, each performing a specific business operation. In our case we will use employee.service.ts to return a static list of roles to any component that uses it.
Enter the following code inemployee.service.ts.
import { Injectable } from '@angular/core';

@Injectable({
  providedIn: 'root',
})

export class EmployeeService {
  role = [
    {'id':'1', 'type':'admin'},
    {'id':'2', 'type':'engineer'},
    {'id':'3', 'type':'sales'},
    {'id':'4', 'type':'human_resources'}
  ]
    getRole(){
    return this.role;
  }
}
- We import
- Injectable
from the@angular/corelibrary. This is crucial because our service will be consumed or injected into the component.@InjectableInstructions allow us to identify services.Next, we apply the - @Injectable
decorator. TheprovidedInproperty of@Injectablespecifies where the injector is available. Most of the time,rootis specified as its value. This means services can be injected at the application level. Other options areany,platform,null, orType<any>.We create a class component named - EmployeeService
. This class has a methodgetRole, which returns a static array of objects.
3.Create component
As mentioned earlier, services in Angular are used to hold the business logic of the application. In order to display data to the viewer, we need a presentation layer. This is where traditional class-based Angular components come in, which are created using the decorator@Component.
employee.component.ts and add the following code to it:
import { Component, OnInit } from '@angular/core';
import { EmployeeService } from '../services/employee.service';

@Component({
  selector: 'employee',
  templateUrl: './employee.component.html'
})

export class EmployeeComponent implements OnInit {

    role: any;

    constructor(private employeeService: EmployeeService) {
	}

    ngOnInit(): void {
        this.role = this.employeeService.getRole()
    }

}
- 导入
@Component装饰器并调用它。我们指定'employee'作为选择器,并提供一个指向描述组件视图的 HTML 的模板 URL。 - 声明组件类并指定它实现
OnInit。因此,我们可以定义一个ngOnInit事件处理程序,该处理程序将在创建组件时调用。 - 为了使用我们的服务,必须在构造函数内声明它。在我们的例子中,您将在构造函数中看到
private employeeService: EmployeeService。通过此步骤,我们将使该服务可以跨组件访问。 - 由于我们的目标是在创建员工组件时加载角色,因此我们在
ngOnInit中获取数据。
这可以变得更简单吗?由于该服务是一个单例类,因此可以在多个组件之间重用,而不会造成任何性能损失。
4.创建视图
现在我们的组件中有数据了,让我们构建一个简单的 employee.component.html 文件来迭代角色并显示它们。下面,我们使用 *ngFor 来迭代角色,并仅向用户显示类型。
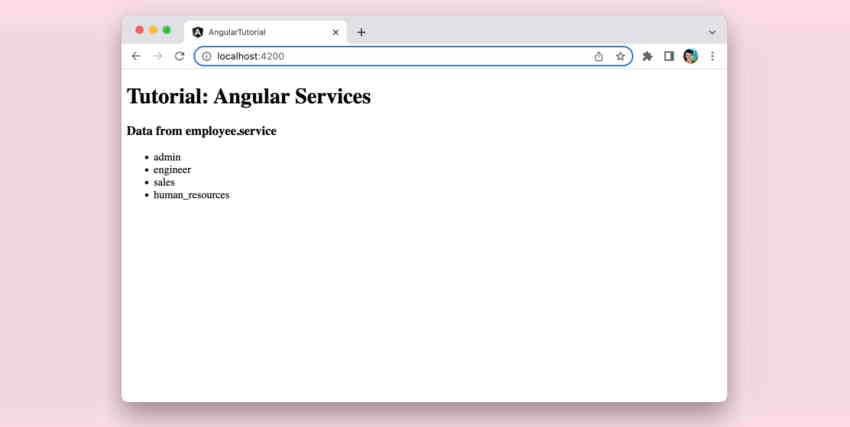
<h3>Data from employee.service</h3>
<ul>
    <li *ngFor = "let role of roles">{{role.type}}</li>
</ul>
5.运行项目
在项目启动并运行之前我们只剩下一步了。我们需要确保 employee.component.ts 文件包含在 @NgModule 指令内的声明列表中。
如下所示,EmployeeComponent 已添加到 app.module.ts 文件中。
//app.module.ts
import { NgModule } from '@angular/core';
import { BrowserModule } from '@angular/platform-browser';

import { AppRoutingModule } from './app-routing.module';
import { AppComponent } from './app.component';
import { EmployeeComponent } from './components/employee.component';

@NgModule({
  declarations: [
    AppComponent,
    EmployeeComponent
  ],
  imports: [
    BrowserModule,
    AppRoutingModule
  ],
  providers: [],
  bootstrap: [AppComponent]
})
export class AppModule { }
有趣的是,我们尚未将该服务添加到我们的提供商列表中,但我们能够成功使用该服务。为什么?因为我们已经指定在应用程序的根级别提供服务(即使用 providedIn: 'root' 参数)。但是,请继续阅读以了解有关我们确实需要在 @NgModule 的 providers 数组中提及服务的场景的更多信息。
此外,我们还需要将 employee 元素添加到 app.component.html 文件中。
<h1>
  Tutorial: Angular Services
</h1>
<employee></employee>

<router-outlet></router-outlet>
如果我们到目前为止运行我们的应用程序,它将如下所示:
6.从服务动态获取数据
现在,我们将获取特定于 employee.component.ts 的数据。
让我们创建一个新服务来从 API 获取数据。
import { Injectable } from '@angular/core';
import { HttpClient } from '@angular/common/http';
@Injectable()
export class EmployeDetailsService {
    fetchEmployeeDetailsURL = 'https://reqres.in/api/users?page=2'
    constructor(private http: HttpClient) { }
    fetchEmployeeDetails = () => {
        return this.http.get(this.fetchEmployeeDetailsURL);
    }
}
现在,让我们逐行理解我们的代码。
- 由于我们要通过 AJAX 调用获取数据,因此导入
HttpClient非常重要。如果您是HttpClient的新手,您可以在本系列的另一篇文章中了解更多信息。 - 在我们的
EmployeeDetailsService中,我们没有指定provideIn参数。这意味着我们需要执行额外的步骤来让整个应用程序了解我们的可注入服务。您将在下一步中了解这一点。 -
HttpClient本身就是一个可注入服务。在构造函数中声明它,以便将其注入到组件中。在fetchEmployeeDetails方法中,我们将使用HttpClient.get方法从 URL 获取数据。
7. 在 app.module 中注册服务
与我们的第一个服务不同,我们在 app.module.ts 中注册 EmployeeDetailsService 至关重要,因为我们尚未在根级别声明可注入。这是更新后的 app.module.ts 文件:
import { NgModule } from '@angular/core';
import { BrowserModule } from '@angular/platform-browser';
import { HttpClientModule } from '@angular/common/http';
import { AppRoutingModule } from './app-routing.module';
import { AppComponent } from './app.component';
import { EmployeeComponent } from './components/employee.component';
import { EmployeDetailsService } from './services/employeeDetails.service';

@NgModule({
  declarations: [
    AppComponent,
    EmployeeComponent
  ],
  imports: [
    BrowserModule,
    AppRoutingModule,
    HttpClientModule
  ],
  providers: [
    EmployeDetailsService],
  bootstrap: [AppComponent]
})
export class AppModule { }
如果您密切关注,您可能会注意到两个重要的变化:
- 在我们的
app.module.ts文件中,我们需要将EmployeDetailsService包含在Providers列表中。 - 我们需要从
@angular/common/http导入HttpClientModule。HttpClientModule必须包含在我们的imports列表中。
就是这样 - 我们现在准备在组件中使用 EmployeeDetailsService 。
8.获取动态数据
为了适应新服务,我们将对组件进行一些更改。
添加一个按钮来加载数据
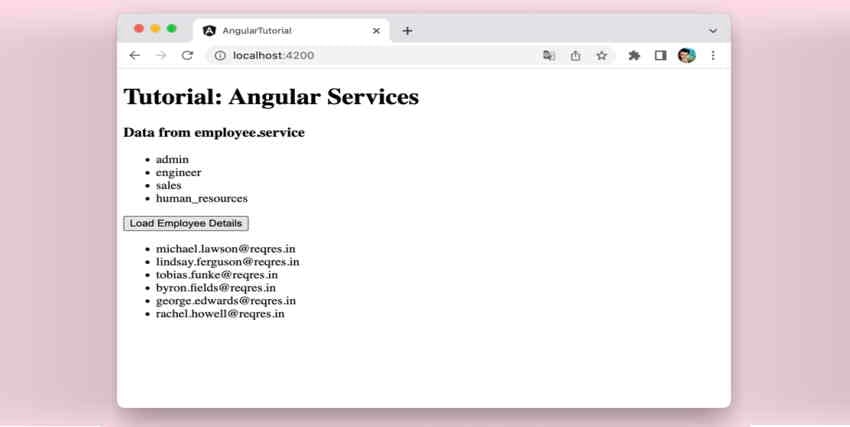
首先,我们将在视图中添加一个按钮。当我们单击此按钮时,将通过 AJAX 调用加载数据。这是更新后的employee.component.html文件:
<h3>Data from employee.service</h3>
<ul>
<li *ngFor = "let role of roles">{{role.type}}</li>
</ul>
- {{employee.email}}
订阅Getter函数
接下来订阅EmployeDetailsService中的getter函数。为此,我们将 EmployeDetailsService 添加到 employee.component.ts 中的构造函数中:
import { Component, OnInit } from '@angular/core';
import { EmployeeService } from '../services/employee.service';
import { EmployeDetailsService } from '../services/employeeDetails.service';

@Component({
  selector: 'employee',
  templateUrl: './employee.component.html'
})

export class EmployeeComponent implements OnInit {

    roles: any;
    employeeDetails: any;
    constructor(private employeeService: EmployeeService,
        private employeeDetailsService: EmployeDetailsService) {
	}
    ngOnInit(): void {
        this.roles = this.employeeService.getRole()
    }

    loadEmployeeDetails = () => {
        this.employeeDetailsService.fetchEmployeeDetails()
                                    .subscribe((response:any)=>{
                                        this.employeeDetails = response.data;
                                    })
    }

}
完成此更改后,单击 LoadEmployeeDetails 按钮,我们将看到以下视图。
结论
给你!我们已经逐步构建了一个可以处理静态和动态数据的 Angular 服务。现在,您应该能够构建自己的 Angular 服务并使用它们通过 AJAX 调用获取数据。您甚至可以以更可重用的方式实现业务逻辑。
The above is the detailed content of Angular Serving: A Comprehensive Guide for Beginners. For more information, please follow other related articles on the PHP Chinese website!

Hot AI Tools

Undresser.AI Undress
AI-powered app for creating realistic nude photos

AI Clothes Remover
Online AI tool for removing clothes from photos.

Undress AI Tool
Undress images for free

Clothoff.io
AI clothes remover

Video Face Swap
Swap faces in any video effortlessly with our completely free AI face swap tool!

Hot Article
Hot Tools

Notepad++7.3.1
Easy-to-use and free code editor

SublimeText3 Chinese version
Chinese version, very easy to use

Zend Studio 13.0.1
Powerful PHP integrated development environment

Dreamweaver CS6
Visual web development tools

SublimeText3 Mac version
God-level code editing software (SublimeText3)
Hot Topics
 1653
1653
 14
1413
52
1305
25
1251
29
1224
24
14
1413
52
1305
25
1251
29
1224
24

 How To Begin A WordPress Blog: A Step-By-Step Guide For Beginners
Apr 17, 2025 am 08:25 AM
How To Begin A WordPress Blog: A Step-By-Step Guide For Beginners
Apr 17, 2025 am 08:25 AM
Blogs are the ideal platform for people to express their opinions, opinions and opinions online. Many newbies are eager to build their own website but are hesitant to worry about technical barriers or cost issues. However, as the platform continues to evolve to meet the capabilities and needs of beginners, it is now starting to become easier than ever. This article will guide you step by step how to build a WordPress blog, from theme selection to using plugins to improve security and performance, helping you create your own website easily. Choose a blog topic and direction Before purchasing a domain name or registering a host, it is best to identify the topics you plan to cover. Personal websites can revolve around travel, cooking, product reviews, music or any hobby that sparks your interests. Focusing on areas you are truly interested in can encourage continuous writing
 How to adjust the wordpress article list
Apr 20, 2025 am 10:48 AM
How to adjust the wordpress article list
Apr 20, 2025 am 10:48 AM
There are four ways to adjust the WordPress article list: use theme options, use plugins (such as Post Types Order, WP Post List, Boxy Stuff), use code (add settings in the functions.php file), or modify the WordPress database directly.
 How to get logged in user information in WordPress for personalized results
Apr 19, 2025 pm 11:57 PM
How to get logged in user information in WordPress for personalized results
Apr 19, 2025 pm 11:57 PM
Recently, we showed you how to create a personalized experience for users by allowing users to save their favorite posts in a personalized library. You can take personalized results to another level by using their names in some places (i.e., welcome screens). Fortunately, WordPress makes it very easy to get information about logged in users. In this article, we will show you how to retrieve information related to the currently logged in user. We will use the get_currentuserinfo(); function. This can be used anywhere in the theme (header, footer, sidebar, page template, etc.). In order for it to work, the user must be logged in. So we need to use
 How to display child categories on archive page of parent categories
Apr 19, 2025 pm 11:54 PM
How to display child categories on archive page of parent categories
Apr 19, 2025 pm 11:54 PM
Do you want to know how to display child categories on the parent category archive page? When you customize a classification archive page, you may need to do this to make it more useful to your visitors. In this article, we will show you how to easily display child categories on the parent category archive page. Why do subcategories appear on parent category archive page? By displaying all child categories on the parent category archive page, you can make them less generic and more useful to visitors. For example, if you run a WordPress blog about books and have a taxonomy called "Theme", you can add sub-taxonomy such as "novel", "non-fiction" so that your readers can
 How to sort posts by post expiration date in WordPress
Apr 19, 2025 pm 11:48 PM
How to sort posts by post expiration date in WordPress
Apr 19, 2025 pm 11:48 PM
In the past, we have shared how to use the PostExpirator plugin to expire posts in WordPress. Well, when creating the activity list website, we found this plugin to be very useful. We can easily delete expired activity lists. Secondly, thanks to this plugin, it is also very easy to sort posts by post expiration date. In this article, we will show you how to sort posts by post expiration date in WordPress. Updated code to reflect changes in the plugin to change the custom field name. Thanks Tajim for letting us know in the comments. In our specific project, we use events as custom post types. Now
 Is WordPress easy for beginners?
Apr 03, 2025 am 12:02 AM
Is WordPress easy for beginners?
Apr 03, 2025 am 12:02 AM
WordPress is easy for beginners to get started. 1. After logging into the background, the user interface is intuitive and the simple dashboard provides all the necessary function links. 2. Basic operations include creating and editing content. The WYSIWYG editor simplifies content creation. 3. Beginners can expand website functions through plug-ins and themes, and the learning curve exists but can be mastered through practice.
 How to Automate WordPress and Social Media with IFTTT (and more)
Apr 18, 2025 am 11:27 AM
How to Automate WordPress and Social Media with IFTTT (and more)
Apr 18, 2025 am 11:27 AM
Are you looking for ways to automate your WordPress website and social media accounts? With automation, you will be able to automatically share your WordPress blog posts or updates on Facebook, Twitter, LinkedIn, Instagram and more. In this article, we will show you how to easily automate WordPress and social media using IFTTT, Zapier, and Uncanny Automator. Why Automate WordPress and Social Media? Automate your WordPre
 How to display query count and page loading time in WordPress
Apr 19, 2025 pm 11:51 PM
How to display query count and page loading time in WordPress
Apr 19, 2025 pm 11:51 PM
One of our users asked other websites how to display the number of queries and page loading time in the footer. You often see this in the footer of your website, and it may display something like: "64 queries in 1.248 seconds". In this article, we will show you how to display the number of queries and page loading time in WordPress. Just paste the following code anywhere you like in the theme file (e.g. footer.php). queriesin
