

Explore the MEAN Stack: Introduction

Building web applications involves having to use different technologies and tools to handle database operations, server-side operations, and client-side operations Process and display data from the server. before starting A new project, all tools and project structure must be set up, this is Time-consuming tasks. Using a framework or stack to perform this task can speed things up Develop and ease the work of developers.
What is average
"MEAN is a full-stack JavaScript platform for modern web applications."
This is how the authors of the MEAN stack define it on their website. It's clear that MEAN is aimed at JavaScript developers of all kinds (server-side and client-side), and it's a stack platform means it is made up of multiple components.
The components are:
- MongoDB
- express delivery
- AngularJS
- NodeJS
As you can see, MEAN brings together four of the most used and appreciated JavaScript development technology lays the foundation for easy development Build complex web applications.
Install
MEAN stack can be installed in two ways:
- Use mean.io website
- Use various Yeoman generators.
Install MEAN using its site
This method is very simple. All you need to do is visit
mean.io website and you can download the framework
zip file, click the big green button.
Another option available here is to clone the Git repository. Just open one Terminal and issue the following command:
git clone https://github.com/linnovate/mean.git
Use Yeoman to install MEAN
There are several Yeoman generators, written by different people Developer. Installing MEAN using the generator is done in two steps, first Install generator:
npm install -g generator-meanstack
Then use yo to create the application:
yo meanstack
The above example assumes that the meanstack generator is installed, and that Yeoman is also installed. For a list of MEAN generators, check this
Link and filter by "Average". for
For information about installing Yeoman, check out the Yeoman website.
Addy Osmani wrote a very interesting blog post About the MEAN stack and Yeoman generators. I highly recommend you read that article to learn how to install a stack using a generator.
For the purposes of this article, I will be using the Git clone method.
After installation
After installation, just put cd into the folder where the MEAN stack is installed
and issue the grunt command (you should have grunt-cli installed). this
The command will start a server listening on port 3000, so access
http://localhost:3000 The following content will be displayed in the browser:
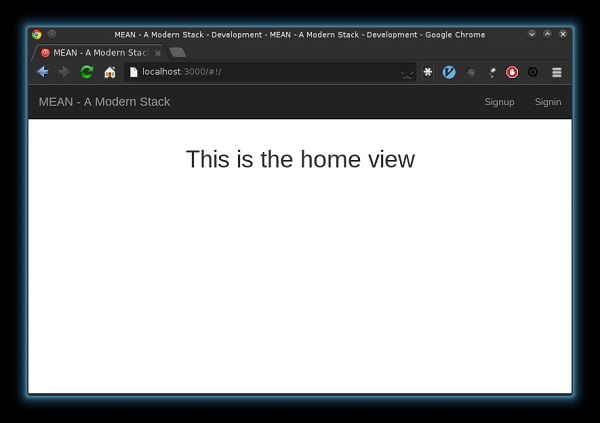
What do we get after installation
MEAN stack is actually a fully functional blogging engine application. it has Authenticate using various methods: Facebook, GitHub, Twitter or Google and Also via simple email and password.
I bet by now you're dying to see some code... so let's take a look. mean The stack folder structure should look like this:
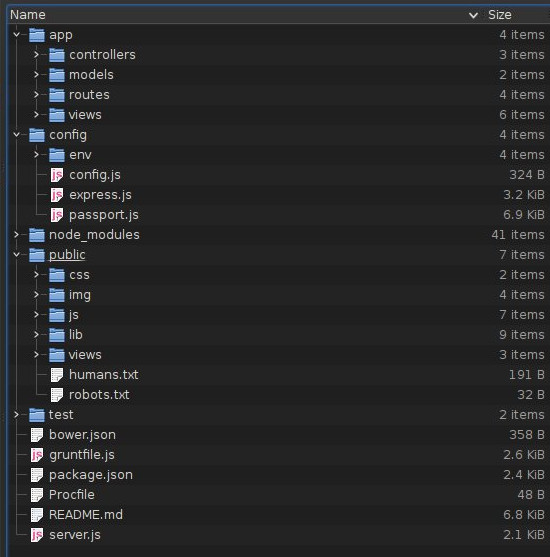
Server part
The server is divided into two folders and one file:
-
appfolder - contains the controllers, models, and views that make upappapplication -
configFolder - Contains files that control various parts of the application Be well behaved -
server.js- is the entry point of the application
Let’s take a look one by one:
server.js File
This is the file that starts the entire application. If you don't want to use
grunt You can use node server,js to start the server.
server.js File responsible:
- Loading configuration. files used to configure the application itself, Authentication and database connections are loaded.
- Bootstrap model. This is done by iterating over the model folders Load all files within this folder (or its subdirectories).
- GUIDE PASSPORT
- Initialize the express application
- Configure the express application
- Configure quick application route
- Start listening on the configured port.
config Folder
This folder contains application configuration files. inside you can find a
env Folder containing configurations for development, production and testing
The mode in which the application is run.
Additionally, there are files containing the configuration of the application itself, Express section and passport configuration for login.
app Folder
In the app folder, the entire server-side code is stored. this folder
Subfolders containing the controllers, models, and views that make up MVC
Folders for server applications and provided routes.
By default, there are controller and index files for articles, users root path. Additionally, models and routes for articles and users were created Article, user, and root paths are created during installation.
For views created by default, the following structure will be created:
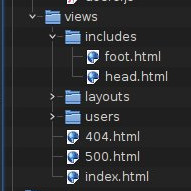
includes folder contains the footer and header portion of the page
is inserted into all pages belonging to the application. layout Folder
Contains basic HTML for page layout. This layout extends from the views folder to the index.html file.
users folder contains markup code for login, registration and login
Verifying.
In the root directory of the views folder, next to the index.html file, there is the file
Contains flags for 404 and 500 errors.
Client part
The client part code is located in the public folder. This folder contains a
css Subfolder for application styles and img folder containing images
used in the application.
Special attention should be paid to the js folder, where
Contains Angular code, initialization code, etc. for the client application
directive and filter code (currently an empty file) and controller and
Serves the article and title sections of the application. views
The folder contains tags for article creation, editing, display, and
Check.
Finally, the lib folder contains the Angular library code.
Application Test
Thetest folder contains files for testing the application. There are
is the file that uses Mocha to test the server part and is used for testing
Using the client side of Karma.
Tools provided
When using the MEAN stack, you as a developer also have access to npm, bower, and grunt, among which Should be installed,
It is worth mentioning that JSHint has been provided, and all JavaScript code has been provided Hair loss. Additionally, using Grunt, you can monitor your project for modifications and Automatically rebuild.
in conclusion
This article is intended as a follow-up to the second tutorial, in which the complete Applications will be built on top of the MEAN stack, showing you how MEAN can Configure and adjust for use in other types of applications.
Stay tuned the second part!
The above is the detailed content of Explore the MEAN Stack: Introduction. For more information, please follow other related articles on the PHP Chinese website!

Hot AI Tools

Undresser.AI Undress
AI-powered app for creating realistic nude photos

AI Clothes Remover
Online AI tool for removing clothes from photos.

Undress AI Tool
Undress images for free

Clothoff.io
AI clothes remover

Video Face Swap
Swap faces in any video effortlessly with our completely free AI face swap tool!

Hot Article
Hot Tools

Notepad++7.3.1
Easy-to-use and free code editor

SublimeText3 Chinese version
Chinese version, very easy to use

Zend Studio 13.0.1
Powerful PHP integrated development environment

Dreamweaver CS6
Visual web development tools

SublimeText3 Mac version
God-level code editing software (SublimeText3)
Hot Topics


 How To Begin A WordPress Blog: A Step-By-Step Guide For Beginners
Apr 17, 2025 am 08:25 AM
How To Begin A WordPress Blog: A Step-By-Step Guide For Beginners
Apr 17, 2025 am 08:25 AM
Blogs are the ideal platform for people to express their opinions, opinions and opinions online. Many newbies are eager to build their own website but are hesitant to worry about technical barriers or cost issues. However, as the platform continues to evolve to meet the capabilities and needs of beginners, it is now starting to become easier than ever. This article will guide you step by step how to build a WordPress blog, from theme selection to using plugins to improve security and performance, helping you create your own website easily. Choose a blog topic and direction Before purchasing a domain name or registering a host, it is best to identify the topics you plan to cover. Personal websites can revolve around travel, cooking, product reviews, music or any hobby that sparks your interests. Focusing on areas you are truly interested in can encourage continuous writing
 How to adjust the wordpress article list
Apr 20, 2025 am 10:48 AM
How to adjust the wordpress article list
Apr 20, 2025 am 10:48 AM
There are four ways to adjust the WordPress article list: use theme options, use plugins (such as Post Types Order, WP Post List, Boxy Stuff), use code (add settings in the functions.php file), or modify the WordPress database directly.
 How to display child categories on archive page of parent categories
Apr 19, 2025 pm 11:54 PM
How to display child categories on archive page of parent categories
Apr 19, 2025 pm 11:54 PM
Do you want to know how to display child categories on the parent category archive page? When you customize a classification archive page, you may need to do this to make it more useful to your visitors. In this article, we will show you how to easily display child categories on the parent category archive page. Why do subcategories appear on parent category archive page? By displaying all child categories on the parent category archive page, you can make them less generic and more useful to visitors. For example, if you run a WordPress blog about books and have a taxonomy called "Theme", you can add sub-taxonomy such as "novel", "non-fiction" so that your readers can
 How to get logged in user information in WordPress for personalized results
Apr 19, 2025 pm 11:57 PM
How to get logged in user information in WordPress for personalized results
Apr 19, 2025 pm 11:57 PM
Recently, we showed you how to create a personalized experience for users by allowing users to save their favorite posts in a personalized library. You can take personalized results to another level by using their names in some places (i.e., welcome screens). Fortunately, WordPress makes it very easy to get information about logged in users. In this article, we will show you how to retrieve information related to the currently logged in user. We will use the get_currentuserinfo(); function. This can be used anywhere in the theme (header, footer, sidebar, page template, etc.). In order for it to work, the user must be logged in. So we need to use
 Is WordPress easy for beginners?
Apr 03, 2025 am 12:02 AM
Is WordPress easy for beginners?
Apr 03, 2025 am 12:02 AM
WordPress is easy for beginners to get started. 1. After logging into the background, the user interface is intuitive and the simple dashboard provides all the necessary function links. 2. Basic operations include creating and editing content. The WYSIWYG editor simplifies content creation. 3. Beginners can expand website functions through plug-ins and themes, and the learning curve exists but can be mastered through practice.
 How to sort posts by post expiration date in WordPress
Apr 19, 2025 pm 11:48 PM
How to sort posts by post expiration date in WordPress
Apr 19, 2025 pm 11:48 PM
In the past, we have shared how to use the PostExpirator plugin to expire posts in WordPress. Well, when creating the activity list website, we found this plugin to be very useful. We can easily delete expired activity lists. Secondly, thanks to this plugin, it is also very easy to sort posts by post expiration date. In this article, we will show you how to sort posts by post expiration date in WordPress. Updated code to reflect changes in the plugin to change the custom field name. Thanks Tajim for letting us know in the comments. In our specific project, we use events as custom post types. Now
 How to display query count and page loading time in WordPress
Apr 19, 2025 pm 11:51 PM
How to display query count and page loading time in WordPress
Apr 19, 2025 pm 11:51 PM
One of our users asked other websites how to display the number of queries and page loading time in the footer. You often see this in the footer of your website, and it may display something like: "64 queries in 1.248 seconds". In this article, we will show you how to display the number of queries and page loading time in WordPress. Just paste the following code anywhere you like in the theme file (e.g. footer.php). queriesin
 How to Automate WordPress and Social Media with IFTTT (and more)
Apr 18, 2025 am 11:27 AM
How to Automate WordPress and Social Media with IFTTT (and more)
Apr 18, 2025 am 11:27 AM
Are you looking for ways to automate your WordPress website and social media accounts? With automation, you will be able to automatically share your WordPress blog posts or updates on Facebook, Twitter, LinkedIn, Instagram and more. In this article, we will show you how to easily automate WordPress and social media using IFTTT, Zapier, and Uncanny Automator. Why Automate WordPress and Social Media? Automate your WordPre
