

WP_Query parameters: author, search, password and permissions

So far in this series, you have learned about parameter selection that you can use with the WP_Query class to select posts by post type, category, tags, metadata, date, status, etc. More.
In this final tutorial on WP_Query parameters, I will cover some less commonly used parameters that can provide more flexibility in your queries.
The parameters we introduce here are used for:
- author
- search
- password
- Permissions
- caching
- Return fields
Before we begin, let’s quickly review how to write parameters using WP_Query.
Review how parameters in WP_Query work
When you write a WP_Query in a theme or plugin, you need to include four main elements:
- Query parameters, use the parameters that will be introduced in this tutorial
- The query itself
- cycle
- End: close if and while tags and reset publishing data
In practice, this will look something like the following:
<?php

$args = array(
    // Arguments for your query.
);

// Custom query.
$query = new WP_Query( $args );

// Check that we have query results.
if ( $query->have_posts() ) {

    // Start looping over the query results.
    while ( $query->have_posts() ) {

        $query->the_post();

        // Contents of the queried post results go here.

    }

}

// Restore original post data.
wp_reset_postdata();

?>
These parameters tell WordPress what data to get from the database, which I will cover here. So what we're focusing on here is the first part of the code:
$args = array(
    // Arguments for your query.
);
As you can see, the parameters are contained in an array. As you follow this tutorial, you'll learn how to code them.
Write your parameters
The parameters in the array have a specific encoding method, as follows:
$args = array(
    'parameter1' => 'value',
    'parameter2' => 'value',
    'parameter3' => 'value'
);
You must enclose parameters and their values in single quotes, use => between them, and separate them with commas. If you make this mistake, WordPress may not add all parameters to the query, otherwise you may see a white screen.
Author parameters
There are four parameters that can be used to query by author:
-
author(int): Use author ID -
author_name(String): Use "user_nicename" (not a name) -
author__in(array): Use author ID -
author__not_in(array)
The first one author allows you to query for posts by one or more authors by providing the author ID:
$args = array(
    'author' => '2'
);
The above code queries all posts of the author with ID 2.
You can also use a string to query posts by multiple authors:
$args = array(
    'author' => '1, 2'
);
If you want to query by name, you can use author_name Parameters:
$args = array(
    'author_name' => 'rachelmccollin'
);
This parameter takes the value of the user_nicename field in the database as its parameter, which is displayed as the nickname in the user management screen:
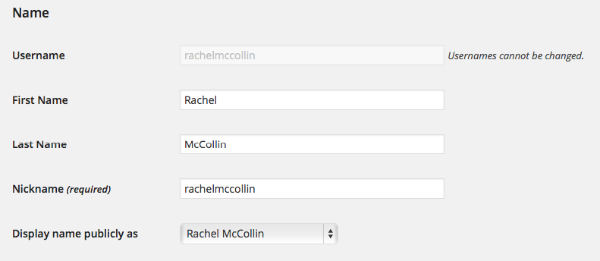
Note that since users can edit this, it is safer to use the author parameter if you think your users might change it.
You can also query a series of author’s posts:
$args = array(
    'author__in' => array(
        '1',
        '2'
    )
);
The above will query the posts of two authors: the authors with IDs 1 and 2, and the results given are the same as mine in the author parameter.
Finally, you can exclude posts from one or more authors using the author__not_in parameter. The following parameters query all posts except author 1:
$args = array(
    'author__not_in' => array( '1' )
);
Or you can exclude multiple authors:
$args = array(
    'author__not_in' => array(
        '1',
        '2'
    )
);
Alternatively, you can use the author parameter and use a minus sign in front of the author ID to exclude authors:
$args = array(
    'author' => '-2'
);
Search parameters
There is only one search parameter, which is s. Use this to query for posts that match your search terms. For example, to query for posts containing the keyword "my favorite food" you would use:
$args = array(
    's' => 'my favorite food'
);
For example, you might find this useful for searching for related posts with similar keywords.
Password parameters
You can use two password parameters to query for posts with or without password protection:
-
has_password(bool) -
post_password(String)
The first parameter has_password allows you to query for posts with or without password protection. Therefore, to query password-protected posts:
$args = array(
    'has_password' => true
);
For posts without password:
$args = array(
    'has_password' => false
);
You can also query by the password itself, using post_password Parameters:
$args = array(
    'post_password' => 'mypassword'
);
Permission parameters
Permission has only one parameter, perm, which is used to query the posts that the current user has permission to read. It takes a 'readable' value and is intended to be used in conjunction with other parameters.
因此,要查询受密码保护的帖子并仅在用户具有适当权限时才显示它们,您可以使用以下命令:
$args = array(
    'has_password' => true,
    'perm' => 'readable'
);
或者,如果当前用户有权查看草稿帖子,则可以使用以下命令:
$args = array(
    'post_status' => 'draft',
    'perm' => 'readable'
);
缓存参数
共有三个缓存参数,它们会阻止查询检索到的数据添加到缓存中:
-
cache_results(boolean):帖子信息缓存 -
update_post_meta_cache(boolean):发布元信息缓存 -
update_post_term_cache(boolean):帖子术语信息缓存
这三个选项的默认值都是 true:如果您希望将数据添加到缓存中,则不需要使用它们。
因此,要显示 product 帖子类型的所有帖子,但不将帖子信息添加到缓存中,您可以使用以下命令:
$args = array(
    'post_type' => 'product',
    'cache_results' => false
);
通常您不应该使用这些参数,因为将发布数据添加到缓存是一个很好的做法。但是,您有时可能希望检索帖子,以便只使用一些帖子数据,在这种情况下,您不需要缓存中的其余帖子数据。例如,当您只想输出带有链接的帖子标题列表时,在这种情况下,您不需要将帖子术语数据或元数据添加到缓存中:
$args = array(
    'post_type' => 'product',
    'update_post_meta_cache' => false,
    'update_post_term_cache' => false
);
返回字段参数
您可以使用 fields 参数来指定从查询中返回哪些字段。这可以节省从数据库中的字段返回的数据,而在循环中输出数据时不需要这些数据。
默认情况下是返回所有字段,但是您有两个选项可以使用 fields 参数来限制这一点。首先,'ids' 参数:
$args = array(
    'fields' => 'ids'
);
这只会返回帖子 ID 数组,不会返回其他字段。如果您想在循环中输出任何内容(例如帖子标题),则必须使用 get_the_title ($post->ID); 等函数来输出标题,这将处理事情的方式很冗长。
您可以使用的另一个参数获取帖子 ID 与子帖子 ID 的关联数组:
$args = array(
    'fields' => 'id=>parent'
);
您可以使用它根据您的其他参数及其子参数查询帖子。
摘要
WP_Query 系列的这一部分介绍了 WP_Query 类的最终参数集。您可以使用它们按作者、密码保护状态或密码本身和搜索词查询帖子,并设置是否将查询结果添加到缓存以及查询返回哪些字段。
在本系列的下一部分中,您将看到一些在主题或插件中使用 WP_Query 的有效示例。
The above is the detailed content of WP_Query parameters: author, search, password and permissions. For more information, please follow other related articles on the PHP Chinese website!

Hot AI Tools

Undresser.AI Undress
AI-powered app for creating realistic nude photos

AI Clothes Remover
Online AI tool for removing clothes from photos.

Undress AI Tool
Undress images for free

Clothoff.io
AI clothes remover

Video Face Swap
Swap faces in any video effortlessly with our completely free AI face swap tool!

Hot Article
Hot Tools

Notepad++7.3.1
Easy-to-use and free code editor

SublimeText3 Chinese version
Chinese version, very easy to use

Zend Studio 13.0.1
Powerful PHP integrated development environment

Dreamweaver CS6
Visual web development tools

SublimeText3 Mac version
God-level code editing software (SublimeText3)
Hot Topics


 How to solve the problem that Windows 11 prompts you to enter the administrator username and password to continue?
Apr 11, 2024 am 09:10 AM
How to solve the problem that Windows 11 prompts you to enter the administrator username and password to continue?
Apr 11, 2024 am 09:10 AM
When using Win11 system, sometimes you will encounter a prompt that requires you to enter the administrator username and password. This article will discuss how to deal with this situation. Method 1: 1. Click [Windows Logo], then press [Shift+Restart] to enter safe mode; or enter safe mode this way: click the Start menu and select Settings. Select "Update and Security"; select "Restart Now" in "Recovery"; after restarting and entering the options, select - Troubleshoot - Advanced Options - Startup Settings -&mdash
 Enable root permissions with one click (quickly obtain root permissions)
Jun 02, 2024 pm 05:32 PM
Enable root permissions with one click (quickly obtain root permissions)
Jun 02, 2024 pm 05:32 PM
It allows users to perform more in-depth operations and customization of the system. Root permission is an administrator permission in the Android system. Obtaining root privileges usually requires a series of tedious steps, which may not be very friendly to ordinary users, however. By enabling root permissions with one click, this article will introduce a simple and effective method to help users easily obtain system permissions. Understand the importance and risks of root permissions and have greater freedom. Root permissions allow users to fully control the mobile phone system. Strengthen security controls, customize themes, and users can delete pre-installed applications. For example, accidentally deleting system files causing system crashes, excessive use of root privileges, and inadvertent installation of malware are also risky, however. Before using root privileges
 How to set router WiFi password using mobile phone (using mobile phone as tool)
Apr 24, 2024 pm 06:04 PM
How to set router WiFi password using mobile phone (using mobile phone as tool)
Apr 24, 2024 pm 06:04 PM
Wireless networks have become an indispensable part of people's lives in today's digital world. Protecting the security of personal wireless networks is particularly important, however. Setting a strong password is key to ensuring that your WiFi network cannot be hacked by others. To ensure your network security, this article will introduce in detail how to use your mobile phone to change the router WiFi password. 1. Open the router management page - Open the router management page in the mobile browser and enter the router's default IP address. 2. Enter the administrator username and password - To gain access, enter the correct administrator username and password in the login page. 3. Navigate to the wireless settings page - find and click to enter the wireless settings page, in the router management page. 4. Find the current Wi
 Incorrect password, beware BitLocker warning
Mar 26, 2024 am 09:41 AM
Incorrect password, beware BitLocker warning
Mar 26, 2024 am 09:41 AM
This article will explore how to solve the problem of wrong password, especially the need to be careful when dealing with BitLocker warnings. This warning is triggered when an incorrect password is entered multiple times in BitLocker to unlock the drive. Usually, this warning occurs because the system has a policy that limits incorrect login attempts (usually three login attempts are allowed). In this case, the user will receive an appropriate warning message. The complete warning message is as follows: The password entered is incorrect. Please note that continuously entering incorrect passwords will cause the account to be locked. This is to protect the security of your data. If you need to unlock your account, you will need to use a BitLocker recovery key. The password is incorrect, beware the BitLocker warning you receive when you log in to your computer
 Tutorial on changing wifi password on mobile phone (simple operation)
Apr 26, 2024 pm 06:25 PM
Tutorial on changing wifi password on mobile phone (simple operation)
Apr 26, 2024 pm 06:25 PM
Wireless networks have become an indispensable part of our lives with the rapid development of the Internet. In order to protect personal information and network security, it is very important to change your wifi password regularly, however. To help you better protect your home network security, this article will introduce you to a detailed tutorial on how to use your mobile phone to change your WiFi password. 1. Understand the importance of WiFi passwords. WiFi passwords are the first line of defense to protect personal information and network security. In the Internet age, understanding its importance can better understand why passwords need to be changed regularly. 2. Confirm that the phone is connected to wifi. First, make sure that the phone is connected to the wifi network whose password you want to change before changing the wifi password. 3. Open the phone’s settings menu and enter the phone’s settings menu.
 WPS table cannot find the data you are searching for, please check the search option location
Mar 19, 2024 pm 10:13 PM
WPS table cannot find the data you are searching for, please check the search option location
Mar 19, 2024 pm 10:13 PM
In the era dominated by intelligence, office software has also become popular, and Wps forms are adopted by the majority of office workers due to their flexibility. At work, we are required not only to learn simple form making and text entry, but also to master more operational skills in order to complete the tasks in actual work. Reports with data and using forms are more convenient, clear and accurate. The lesson we bring to you today is: The WPS table cannot find the data you are searching for. Why please check the search option location? 1. First select the Excel table and double-click to open it. Then in this interface, select all cells. 2. Then in this interface, click the "Edit" option in "File" in the top toolbar. 3. Secondly, in this interface, click "
 What should I do if my Win10 password does not meet the password policy requirements? What to do if my computer password does not meet the policy requirements?
Jun 25, 2024 pm 04:59 PM
What should I do if my Win10 password does not meet the password policy requirements? What to do if my computer password does not meet the policy requirements?
Jun 25, 2024 pm 04:59 PM
In the Windows 10 system, the password policy is a set of security rules to ensure that the passwords set by users meet certain strength and complexity requirements. If the system prompts that your password does not meet the password policy requirements, it usually means that your password does not meet the requirements set by Microsoft. standards for complexity, length, or character types, so how can this be avoided? Users can directly find the password policy under the local computer policy to perform operations. Let’s take a look below. Solutions that do not comply with password policy specifications: Change the password length: According to the password policy requirements, we can try to increase the length of the password, such as changing the original 6-digit password to 8-digit or longer. Add special characters: Password policies often require special characters such as @, #, $, etc. I
 How to set a password for excel
Mar 21, 2024 am 09:00 AM
How to set a password for excel
Mar 21, 2024 am 09:00 AM
A few days ago, my cousin came to me to complain that he had worked hard to create a lot of data using Excel, but it was later modified by his colleagues. He didn't know the situation at the time. After sending it to his boss, he was scolded. This is really frustrating. Some people just don’t like you and want to deliberately punish you. After you leave school and enter society, you will find that more and more people are stabbing you in the back. In addition to a few words of comfort to my cousin, I also gave my cousin an advice. If you are afraid of encountering such a thing again in the future, then set a password for the excel form so that no one can open it except you. Netizens, if you are afraid that your Excel spreadsheet will be secretly modified by others, you should also set a password. How to set password for excel password form? Come with me to find out! 1.
