

Building with Ionic Components: A Beginner's Guide

<button ion-button>Navigate to Info</button>
Slideshow component
<p>The slideshow component is usually used as an introduction to the application. Here are pictures of its common usage: <p>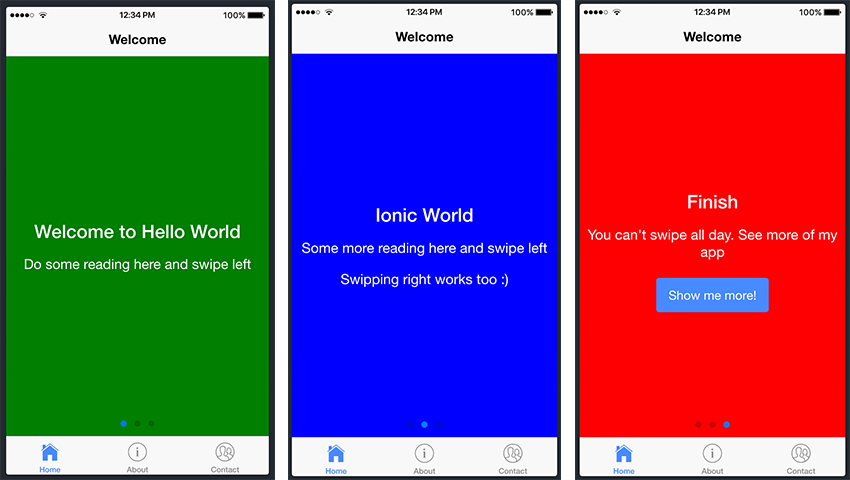
List component<p>
<p> Lists are one of the components you'll use frequently in Ionic applications. See the screenshot example below. <p>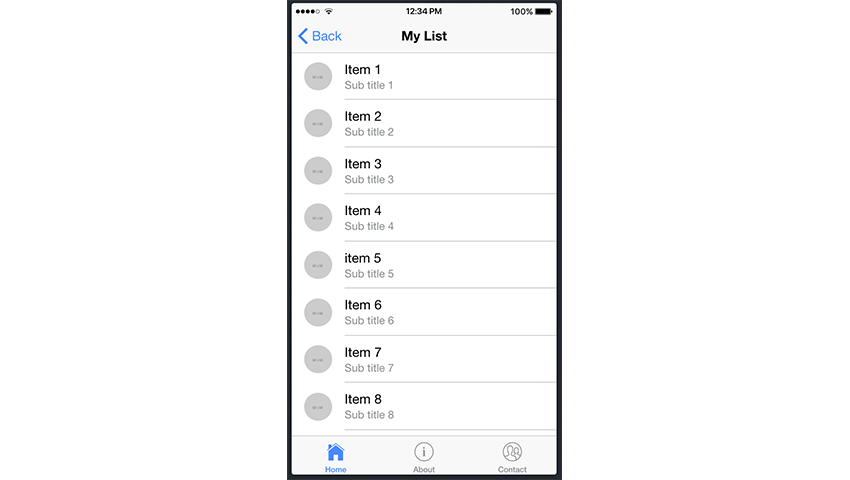 <h2>Add components to your project<p>
<p> Now that we've gathered some information about Ionic components, let's try to put some of these "building blocks" together. Let's go ahead and add some components to our Ionic project.
<p>We will use the project we created in the previous tutorial, and since Homepage is the entry point to our app, we will add slides to Homepage. html file to add our slideshow. To do this, we will navigate to the home.html file in src/pages/home and make the following changes to the file:
<h2>Add components to your project<p>
<p> Now that we've gathered some information about Ionic components, let's try to put some of these "building blocks" together. Let's go ahead and add some components to our Ionic project.
<p>We will use the project we created in the previous tutorial, and since Homepage is the entry point to our app, we will add slides to Homepage. html file to add our slideshow. To do this, we will navigate to the home.html file in src/pages/home and make the following changes to the file:
<ion-header>
  <ion-navbar>
    <ion-title>Welcome</ion-title>
  </ion-navbar>
</ion-header>

<ion-content>
  <!-- Start Ionic Slides Component -->
  <ion-slides pager>

    <ion-slide style="background-color: green">
      <h2 id="Welcome-to-Hello-World">Welcome to Hello World</h2>
      <p>Do some reading here and swipe left</p>
    </ion-slide>

    <ion-slide style="background-color: blue">
      <h2 id="Ionic-World">Ionic World</h2>
      <p>Some more reading here and swipe left</p>
      <p>Swiping right works too :)</p>
    </ion-slide>

    <ion-slide style="background-color: red">
      <h2 id="Finish">Finish</h2>
      <p>You can't swipe all day. See more of my app</p>
      <button ion-button (click)="navigateToMyList()">Show me more!</button>
    </ion-slide>

  </ion-slides>
  <!-- End Ionic Slides Component -->
</ion-content>
<ion-slide>content here...</ion-slide>. You can generate as many slides as you like, but for the purposes of this example, we only created three.
<p>We will use another Ionic component: the list component. To do this, we go ahead and generate a new page titled My List. You should remember how to generate a new page from the previous tutorial using the following command: ionic generate page my-list.
<p>After adding the newly created page to the application, let's continue navigating to my-list.html and edit the file as follows:
<ion-header>

  <ion-navbar>
    <ion-title>My List</ion-title>
  </ion-navbar>

</ion-header>

<ion-content>
    <!-- Start Ionic List Component -->
    <ion-list>
      <ion-item>1</ion-item>
      <ion-item>2</ion-item>
      <ion-item>3</ion-item>
    </ion-list>
    <!-- End Ionic List Component -->
</ion-content>
<ion-header>

  <ion-navbar>
    <ion-title>My List</ion-title>
  </ion-navbar>

</ion-header>

<ion-content>
    <!-- Start Ionic List Component -->
    <ion-list>
      <ion-item>1</ion-item>
      <ion-item>2</ion-item>
      <ion-item>3</ion-item>
      <ion-item>4</ion-item>
      <ion-item>5</ion-item>
      <ion-item>6</ion-item>
      <ion-item>7</ion-item>
      <ion-item>8</ion-item>
      <ion-item>9</ion-item>
      <ion-item>10</ion-item>
      <ion-item>11</ion-item>
      <ion-item>12</ion-item>
      <ion-item>13</ion-item>
      <ion-item>14</ion-item>
      <ion-item>15</ion-item>
      <ion-item>16</ion-item>
      <ion-item>17</ion-item>
      <ion-item>18</ion-item>
      <ion-item>19</ion-item>
      <ion-item>20</ion-item>
    </ion-list>
    <!-- End Ionic List Component -->
</ion-content>
<ion-item>...content...</ion-item> for each one. Fortunately, there is a better way, and even as a beginner, you should try to follow the same approach when dealing with large amounts of data and information.
<p>The official Ionic documentation shows how to populate a list with items using different methods:
<ion-header>

  <ion-navbar>
    <ion-title>My List</ion-title>
  </ion-navbar>

</ion-header>

<ion-content>
    <!-- Start Ionic List Component -->
    <ion-list>
        <button ion-item *ngFor="let item of items" (click)="itemSelected(item)">
        {{ item }}
        </button>
    </ion-list>
    <!-- End Ionic List Component -->
</ion-content>
*ngFor. We won’t go into more depth about what this directive means and what it does, but in a nutshell, it iterates over a collection of data, allowing us to build data presentation lists and tables in our app. items is a variable containing our data, and item is populated with each item in the list. If you want to know more about this directive, check out the official Angular documentation.
<p>With this knowledge, we can use the *ngFor directive to improve our project. Edit the my-list.html file to reflect the following:
<ion-header>

  <ion-navbar>
    <ion-title>My List</ion-title>
  </ion-navbar>

</ion-header>

<ion-content>
    <!-- Start Ionic List Component -->
    <ion-list>
      <ion-item *ngFor="let item of items">
        <ion-avatar item-start>
          <img  src="/static/imghw/default1.png"  data-src="{{item.image}}"  class="lazy" alt="Building with Ionic Components: A Beginner's Guide" >
        </ion-avatar>
        <h2 id="item-title">{{item.title}}</h2>
        <p>{{item.subTitle}}</p>
      </ion-item>
    </ion-list>
    <!-- End Ionic List Component -->
</ion-content>
<ion-list> 包含一系列 <ion-avatar> 组件。 item-start 属性意味着头像将与右侧对齐。每个列表项还包含一个标题标签 (<h2>) 和一个段落标签 (<p>)。
<p>因此,基本上,您还可以在列表组件内添加其他组件。看看 Ionic 文档中的卡片列表示例中如何实现此目的的另一个很好的示例。同样,在该示例中实现 *ngFor 将会带来好处。
<p>现在,回到我们的代码,items 中的 item 包含 title、subTitle 和 >图像。让我们继续在 my-list.ts 文件中进行以下更改:
export class MyListPage {
  items: any;

  constructor(public navCtrl: NavController, public navParams: NavParams) {
    this.items = [
      {
        title: 'Item 1',
        subTitle: 'Sub title 1',
        image: 'https://placehold.it/50'
      },
      {
        title: 'Item 2',
        subTitle: 'Sub title 2',
        image: 'http://placehold.it/50'
      },
      {
        title: 'Item 3',
        subTitle: 'Sub title 3',
        image: 'http://placehold.it/50'
      },
      {
        title: 'Item 4',
        subTitle: 'Sub title 4',
        image: 'http://placehold.it/50'
      },
      {
        title: 'item 5',
        subTitle: 'Sub title 5',
        image: 'http://placehold.it/50'
      },
      title: 'item 6',
        subTitle: 'Sub title 6',
        image: 'http://placehold.it/50'
      },
      title: 'item 7',
        subTitle: 'Sub title 7',
        image: 'http://placehold.it/50'
      },
      title: 'item 8',
        subTitle: 'Sub title 8',
        image: 'http://placehold.it/50'
      },
      title: 'item 9',
        subTitle: 'Sub title 9',
        image: 'http://placehold.it/50'
      },
      title: 'item 10',
        subTitle: 'Sub title 10',
        image: 'http://placehold.it/50'
      }]
    }
结论
<p> <p>虽然我们没有涵盖所有 Ionic 组件,但相同的原则也适用于其他组件。我想鼓励您尝试并测试其余组件并开始熟悉它们的使用。正如我在开头提到的,这些组件将成为您将构建的每个 Ionic 应用程序的构建块! <p> <p>同时,请查看我们关于 Ionic 应用程序开发的其他一些帖子。 <p>The above is the detailed content of Building with Ionic Components: A Beginner's Guide. For more information, please follow other related articles on the PHP Chinese website!

Hot AI Tools

Undresser.AI Undress
AI-powered app for creating realistic nude photos

AI Clothes Remover
Online AI tool for removing clothes from photos.

Undress AI Tool
Undress images for free

Clothoff.io
AI clothes remover

Video Face Swap
Swap faces in any video effortlessly with our completely free AI face swap tool!

Hot Article
Hot Tools

Notepad++7.3.1
Easy-to-use and free code editor

SublimeText3 Chinese version
Chinese version, very easy to use

Zend Studio 13.0.1
Powerful PHP integrated development environment

Dreamweaver CS6
Visual web development tools

SublimeText3 Mac version
God-level code editing software (SublimeText3)
Hot Topics
 1664
1664
 14
1423
52
1318
25
1269
29
1248
24
14
1423
52
1318
25
1269
29
1248
24

 How to adjust the wordpress article list
Apr 20, 2025 am 10:48 AM
How to adjust the wordpress article list
Apr 20, 2025 am 10:48 AM
There are four ways to adjust the WordPress article list: use theme options, use plugins (such as Post Types Order, WP Post List, Boxy Stuff), use code (add settings in the functions.php file), or modify the WordPress database directly.
 How to get logged in user information in WordPress for personalized results
Apr 19, 2025 pm 11:57 PM
How to get logged in user information in WordPress for personalized results
Apr 19, 2025 pm 11:57 PM
Recently, we showed you how to create a personalized experience for users by allowing users to save their favorite posts in a personalized library. You can take personalized results to another level by using their names in some places (i.e., welcome screens). Fortunately, WordPress makes it very easy to get information about logged in users. In this article, we will show you how to retrieve information related to the currently logged in user. We will use the get_currentuserinfo(); function. This can be used anywhere in the theme (header, footer, sidebar, page template, etc.). In order for it to work, the user must be logged in. So we need to use
 How To Begin A WordPress Blog: A Step-By-Step Guide For Beginners
Apr 17, 2025 am 08:25 AM
How To Begin A WordPress Blog: A Step-By-Step Guide For Beginners
Apr 17, 2025 am 08:25 AM
Blogs are the ideal platform for people to express their opinions, opinions and opinions online. Many newbies are eager to build their own website but are hesitant to worry about technical barriers or cost issues. However, as the platform continues to evolve to meet the capabilities and needs of beginners, it is now starting to become easier than ever. This article will guide you step by step how to build a WordPress blog, from theme selection to using plugins to improve security and performance, helping you create your own website easily. Choose a blog topic and direction Before purchasing a domain name or registering a host, it is best to identify the topics you plan to cover. Personal websites can revolve around travel, cooking, product reviews, music or any hobby that sparks your interests. Focusing on areas you are truly interested in can encourage continuous writing
 How to display child categories on archive page of parent categories
Apr 19, 2025 pm 11:54 PM
How to display child categories on archive page of parent categories
Apr 19, 2025 pm 11:54 PM
Do you want to know how to display child categories on the parent category archive page? When you customize a classification archive page, you may need to do this to make it more useful to your visitors. In this article, we will show you how to easily display child categories on the parent category archive page. Why do subcategories appear on parent category archive page? By displaying all child categories on the parent category archive page, you can make them less generic and more useful to visitors. For example, if you run a WordPress blog about books and have a taxonomy called "Theme", you can add sub-taxonomy such as "novel", "non-fiction" so that your readers can
 How to sort posts by post expiration date in WordPress
Apr 19, 2025 pm 11:48 PM
How to sort posts by post expiration date in WordPress
Apr 19, 2025 pm 11:48 PM
In the past, we have shared how to use the PostExpirator plugin to expire posts in WordPress. Well, when creating the activity list website, we found this plugin to be very useful. We can easily delete expired activity lists. Secondly, thanks to this plugin, it is also very easy to sort posts by post expiration date. In this article, we will show you how to sort posts by post expiration date in WordPress. Updated code to reflect changes in the plugin to change the custom field name. Thanks Tajim for letting us know in the comments. In our specific project, we use events as custom post types. Now
 How to build a website for wordpress host
Apr 20, 2025 am 11:12 AM
How to build a website for wordpress host
Apr 20, 2025 am 11:12 AM
To build a website using WordPress hosting, you need to: select a reliable hosting provider. Buy a domain name. Set up a WordPress hosting account. Select a topic. Add pages and articles. Install the plug-in. Customize your website. Publish your website.
 How to Automate WordPress and Social Media with IFTTT (and more)
Apr 18, 2025 am 11:27 AM
How to Automate WordPress and Social Media with IFTTT (and more)
Apr 18, 2025 am 11:27 AM
Are you looking for ways to automate your WordPress website and social media accounts? With automation, you will be able to automatically share your WordPress blog posts or updates on Facebook, Twitter, LinkedIn, Instagram and more. In this article, we will show you how to easily automate WordPress and social media using IFTTT, Zapier, and Uncanny Automator. Why Automate WordPress and Social Media? Automate your WordPre
 How to display query count and page loading time in WordPress
Apr 19, 2025 pm 11:51 PM
How to display query count and page loading time in WordPress
Apr 19, 2025 pm 11:51 PM
One of our users asked other websites how to display the number of queries and page loading time in the footer. You often see this in the footer of your website, and it may display something like: "64 queries in 1.248 seconds". In this article, we will show you how to display the number of queries and page loading time in WordPress. Just paste the following code anywhere you like in the theme file (e.g. footer.php). queriesin
