

Learn about Headless WordPress and its benefits

Headless CMS is gaining traction as developers seek web development solutions that offer more freedom and interoperability. But what exactly is a headless CMS?
To help understand exactly what a headless CMS is, I’m going to quickly break everything down into simplified terms.
If you look at a normal WordPress setup, you’ll see that it consists of two components:
- Admin or Dashboard: Here you can create content, add pages, upload media and manage the site.
- Front End: This is the part that visitors see when they visit your website. The browser assembles the front-end using PHP, JavaScript, images, data, and other resources from WordPress.
As you can see, these two components are coupled together to form a software stack, which can sometimes cause problems. The process of assembling pages takes time. The larger the website, the more time it takes for the browser to render it.
With a headless CMS, the two components are decoupled from each other - the frontend can be anything, while the backend acts as a standalone service accessible through an API or SDK.
Headless WordPress websites use WordPress to manage content but allow developers to use their preferred front-end stack to display content to website visitors.
There are many Headless CMS solutions on the market - Contentful, Netlify, ButterCMS and many more. Let’s take a look at one that is specifically tailored for building WordPress websites.
Headless WordPress Example
Strattic is a hosting platform that allows you to create fast, optimized, and secure WordPress websites using serverless architecture. It was acquired by Elementor in mid-2022.
Before we start testing the CMS, it’s important to understand the typical headless WordPress workflow. Using the headless version of WordPress requires three components:
-
Included WordPress environment: Typical WordPress where you log into the admin dashboard and manage your website.
-
Static preview environment: Can be used as a website preview version of the temporary website. Here you can push updates to your website and test whether they are working properly.
-
Static live environment: The live site itself. Once you've made your changes and confirmed they're valid, you'll push the changes to the live website.
For example, when you create a page, Strattic's servers merge all resources (images, data, etc.) into HTML files, store them on their servers, and deliver them via a CDN. This way, when your users visit your site, they will get a pre-generated HTML version of your site from the CDN.
We will cover the benefits of this setup later in this article.
Back in Strattic, once you have created your site in Strattic, your site details section will contain three different sections - WordPress connection information, preview site connection information, and live site connection information.
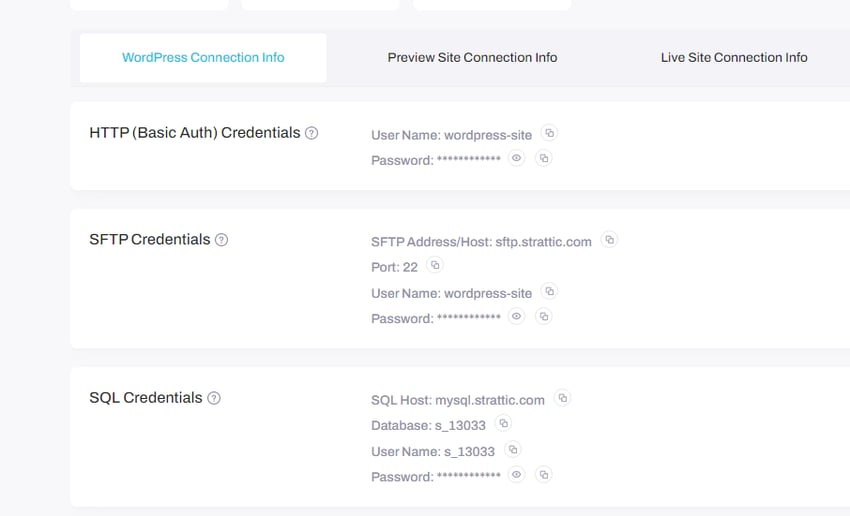
Here we get the WordPress site connection information. This is the WordPress setup on the actual Strattic server. You should know that your live site will remain active while you are working there (in your normal environment in the dashboard).
Next, you will get the URL of the preview website.
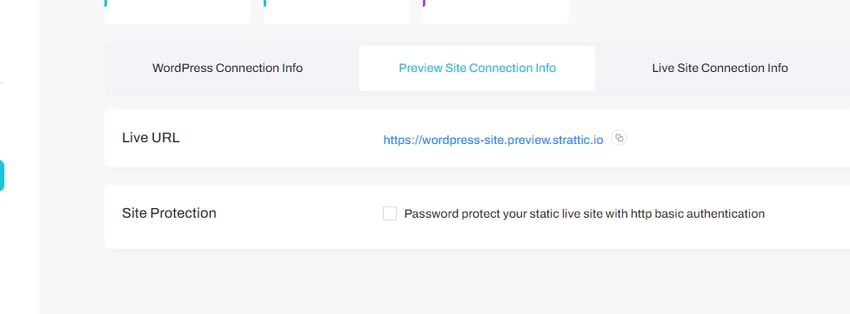
When you make changes to your site in a normal environment, Strattic will push the changes to the preview site. So the preview is no longer WordPress, but just the output in the preview state.
You can use Preview as a staging site to check all the changes you make to WordPress and make sure everything is running as expected before pushing it to the final component (i.e. the live site).
This is the version of the website that users will see and interact with. By default, Strattic assigns you a temporary stratic.io domain, but you can connect a custom domain if you have one.
Editing your website in WordPress
You can install WordPress in a Strattic environment by clicking the Edit in WordPress button on the sidebar of your homepage.
This will launch WordPress and redirect you to the typical WordPress setup workflow.
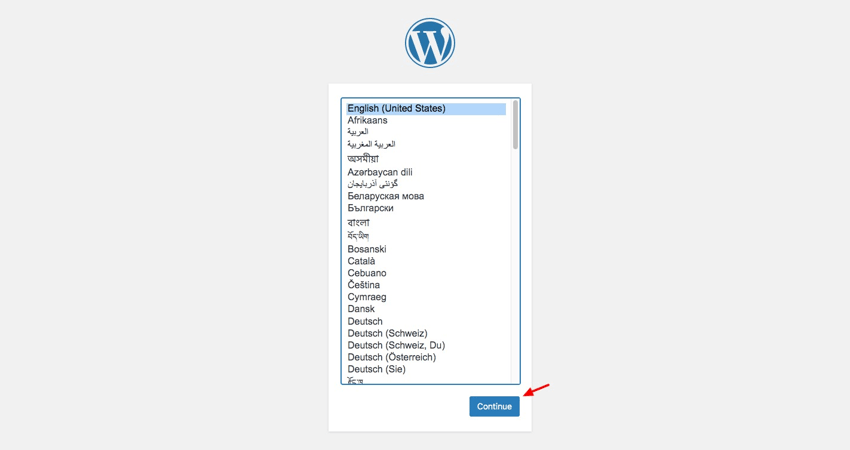
Complete these steps and provide the required information at each step. You will then be asked to log in to the admin dashboard. There you can create posts and pages, install plugins and themes, and manage your website just like in a normal WordPress setup.
Benefits of using Headless WordPress
Traditional WordPress is favored by non-technical users as it does not require any coding knowledge. But for experienced developers who want more freedom and a better development experience, WordPress may not cut it.
If you are one of these developers, you may want to consider decoupling WordPress from the front-end. Let’s review some of its key benefits.
Support more tools, frameworks and libraries
With stock WordPress, you have to stick with the technologies built into the stack. This architecture prevents you from integrating tools and libraries with which you may be more experienced.
In contrast, headless WordPress is technology agnostic, so it can integrate with a wider range of libraries and tools. You can build a website using your favorite JavaScript front-end framework and tool stack, and even integrate it into your existing workflow without sacrificing what you've already built.
Faster speed and performance
WordPress is built around PHP. Because each page is generated from data saved in a database, they load slower than static websites created using HTML files. The website becomes even slower when plugins are included.
As you know, headless WordPress works by pre-generating HTML and caching it in CDN servers around the world. This setup greatly improves the delivery speed of your website. Additionally, you can integrate your backend with a Next.js or Gatsby frontend to enjoy performance benefits such as server-side rendering and out-of-the-box SEO options.
Better Security
Vanilla WordPress is a huge playground for hackers. In fact, a hacker only needs access to your site's /wp-login.php file to conduct a brute force attack or overload your site with a DDoS attack.
On the other hand, sites with headless architecture are less susceptible to this type of attack. WordPress is no longer used to output data, so the same vulnerabilities that plagued WordPress cannot apply.
Additionally, headless WordPress’s API-first settings allow you to add network security services and tools to defend against any other form of attack.
in conclusion
With a headless approach, you get huge performance gains as well as architectural freedom. On the other hand, if you are a novice developer or a non-technical person, you have to deal with complexity that may be difficult to handle.
Headless WordPress will never replace traditional WordPress. This is more of an option for enterprises with the necessary development teams who want to adapt their platforms or services to serve new use cases.
If you have the ability, go headless. Before you commit, make sure you're doing it for the right reasons. You won't regret it.
The above is the detailed content of Learn about Headless WordPress and its benefits. For more information, please follow other related articles on the PHP Chinese website!

Hot AI Tools

Undresser.AI Undress
AI-powered app for creating realistic nude photos

AI Clothes Remover
Online AI tool for removing clothes from photos.

Undress AI Tool
Undress images for free

Clothoff.io
AI clothes remover

Video Face Swap
Swap faces in any video effortlessly with our completely free AI face swap tool!

Hot Article
Hot Tools

Notepad++7.3.1
Easy-to-use and free code editor

SublimeText3 Chinese version
Chinese version, very easy to use

Zend Studio 13.0.1
Powerful PHP integrated development environment

Dreamweaver CS6
Visual web development tools

SublimeText3 Mac version
God-level code editing software (SublimeText3)
Hot Topics
 1654
1654
 14
1413
52
1306
25
1252
29
1225
24
14
1413
52
1306
25
1252
29
1225
24

 How To Begin A WordPress Blog: A Step-By-Step Guide For Beginners
Apr 17, 2025 am 08:25 AM
How To Begin A WordPress Blog: A Step-By-Step Guide For Beginners
Apr 17, 2025 am 08:25 AM
Blogs are the ideal platform for people to express their opinions, opinions and opinions online. Many newbies are eager to build their own website but are hesitant to worry about technical barriers or cost issues. However, as the platform continues to evolve to meet the capabilities and needs of beginners, it is now starting to become easier than ever. This article will guide you step by step how to build a WordPress blog, from theme selection to using plugins to improve security and performance, helping you create your own website easily. Choose a blog topic and direction Before purchasing a domain name or registering a host, it is best to identify the topics you plan to cover. Personal websites can revolve around travel, cooking, product reviews, music or any hobby that sparks your interests. Focusing on areas you are truly interested in can encourage continuous writing
 How to adjust the wordpress article list
Apr 20, 2025 am 10:48 AM
How to adjust the wordpress article list
Apr 20, 2025 am 10:48 AM
There are four ways to adjust the WordPress article list: use theme options, use plugins (such as Post Types Order, WP Post List, Boxy Stuff), use code (add settings in the functions.php file), or modify the WordPress database directly.
 How to get logged in user information in WordPress for personalized results
Apr 19, 2025 pm 11:57 PM
How to get logged in user information in WordPress for personalized results
Apr 19, 2025 pm 11:57 PM
Recently, we showed you how to create a personalized experience for users by allowing users to save their favorite posts in a personalized library. You can take personalized results to another level by using their names in some places (i.e., welcome screens). Fortunately, WordPress makes it very easy to get information about logged in users. In this article, we will show you how to retrieve information related to the currently logged in user. We will use the get_currentuserinfo(); function. This can be used anywhere in the theme (header, footer, sidebar, page template, etc.). In order for it to work, the user must be logged in. So we need to use
 How to display child categories on archive page of parent categories
Apr 19, 2025 pm 11:54 PM
How to display child categories on archive page of parent categories
Apr 19, 2025 pm 11:54 PM
Do you want to know how to display child categories on the parent category archive page? When you customize a classification archive page, you may need to do this to make it more useful to your visitors. In this article, we will show you how to easily display child categories on the parent category archive page. Why do subcategories appear on parent category archive page? By displaying all child categories on the parent category archive page, you can make them less generic and more useful to visitors. For example, if you run a WordPress blog about books and have a taxonomy called "Theme", you can add sub-taxonomy such as "novel", "non-fiction" so that your readers can
 How to sort posts by post expiration date in WordPress
Apr 19, 2025 pm 11:48 PM
How to sort posts by post expiration date in WordPress
Apr 19, 2025 pm 11:48 PM
In the past, we have shared how to use the PostExpirator plugin to expire posts in WordPress. Well, when creating the activity list website, we found this plugin to be very useful. We can easily delete expired activity lists. Secondly, thanks to this plugin, it is also very easy to sort posts by post expiration date. In this article, we will show you how to sort posts by post expiration date in WordPress. Updated code to reflect changes in the plugin to change the custom field name. Thanks Tajim for letting us know in the comments. In our specific project, we use events as custom post types. Now
 How to Automate WordPress and Social Media with IFTTT (and more)
Apr 18, 2025 am 11:27 AM
How to Automate WordPress and Social Media with IFTTT (and more)
Apr 18, 2025 am 11:27 AM
Are you looking for ways to automate your WordPress website and social media accounts? With automation, you will be able to automatically share your WordPress blog posts or updates on Facebook, Twitter, LinkedIn, Instagram and more. In this article, we will show you how to easily automate WordPress and social media using IFTTT, Zapier, and Uncanny Automator. Why Automate WordPress and Social Media? Automate your WordPre
 How to display query count and page loading time in WordPress
Apr 19, 2025 pm 11:51 PM
How to display query count and page loading time in WordPress
Apr 19, 2025 pm 11:51 PM
One of our users asked other websites how to display the number of queries and page loading time in the footer. You often see this in the footer of your website, and it may display something like: "64 queries in 1.248 seconds". In this article, we will show you how to display the number of queries and page loading time in WordPress. Just paste the following code anywhere you like in the theme file (e.g. footer.php). queriesin
 How to build a website for wordpress host
Apr 20, 2025 am 11:12 AM
How to build a website for wordpress host
Apr 20, 2025 am 11:12 AM
To build a website using WordPress hosting, you need to: select a reliable hosting provider. Buy a domain name. Set up a WordPress hosting account. Select a topic. Add pages and articles. Install the plug-in. Customize your website. Publish your website.
