

Retargeting WordPress: Transferring Website from Multisite Network

Sometimes a site is already created in a WordPress multisite network but needs to be moved to its own single-site installation. There are several situations in which this may occur, including:
- The site has grown too large to be included in the network.
- This website needs its own IP address.
- The website owner is changing providers or taking over full management of the website itself.
In some cases you may find that you can move a site out of multisite using a plugin or combination of plugins, but if this doesn't work you will need to move the relevant database tables. Moving a site out of a multisite network in this way is a tricky process because it involves isolating the database tables in the multisite database that are relevant to that specific site. But it's not impossible.
What do you need
To follow this tutorial you will need:
- WordPress multisite installation with a subsite that you want to move to its own WordPress installation.
- The second location you want to move your site to.
- For manual moves, you will need an FTP client, a code editor, and access to phpMyAdmin.
Note: You cannot move the primary site out of a multisite network because the network will not workwithout it. If you do need to move your main site's content elsewhere, I recommend creating a copy and then replacing the original site's content with a dummy site. However, you won't be able to move the domain because it's also used by every other site in your network.
Use plugins to migrate sites out of multisite
If your website doesn’t have extensive configuration via plugins, themes, or website settings screens, you can successfully move it using the WordPress Importer plugin. If your website has widgets, you can copy their settings using the Widget Settings Importer/Exporter plugin.
However, if you added a lot of custom configurations using the settings or options screen or the theme customizer, none of these configurations will be copied. In this case, you need to move manually.
For full details on how to use these plugins to move your site, see my previous tutorial on moving a WordPress site using plugins. The process is exactly the same as moving a site from a multisite network to its own WordPress installation.
Manually migrate a site out of multisite
The site you are moving out of Multisite will contain three components that you need to copy from the Multisite network:
- Theme and plugin files - you can copy these files or reinstall them in a new website
- uploads — You can find these in the sites subdirectory at
wp-content/uploads/sites - Database Tables - You don’t need all database tables, just the ones related to this website
Note: If your multisite network was created before WordPress 3.5, you will not have a sites folder. Instead, you will have a blogs.dir folder in wp-content that contains all the uploaded files for the subsite. This will give you a numbered folder for the site you want to migrate, which you can copy . I'll cover this in more detail below.
Do you really need a mobile website?
Before you begin, consider why you want to move your site. Is it just to change to a new domain name? If this is the case, then a free domain mapping plugin will allow you to give each site its own domain, and your visitors will never see the domain of your multisite network.
But if that’s not the only reason, keep reading!
Backup first
Before performing such operations, it is a good idea to back up your multisite installation. Use your favorite backup plugin, or if you prefer to work manually, use a combination of FTP and phpMyAdmin.
You will use this backup to copy relevant files to your new website and also give you peace of mind in case of any issues.
Find your site’s ID in a multisite network
Each site in a multisite network has its own unique numerical ID. This is used to identify folders in the wp-content/uploads/sites directory (or wp-content/blogs.dir if you have an older multisite network, see above ) and identify the site's database tables.
You can find this by going to Network Management > Sites and selecting the Edit option for the site you are using. The URL that WordPress directs you to will provide you with the ID of your website. The URL should be in the format http://mynetwork.com/wp-admin/network/site-info.php?id=XX.
XX is the ID of your site, and will be the name of the folder containing its files, and the prefix of its database table name.
p>
Export the table of the site from the network
Since you are only moving a subsite and not the entire installation, you do not need the contents of the entire database.
In PhpMyAdmin, click the Export tab. Then find the table related to the site you want to export. They will start with wp_XX_, where XX is your site's ID. An example is shown below.
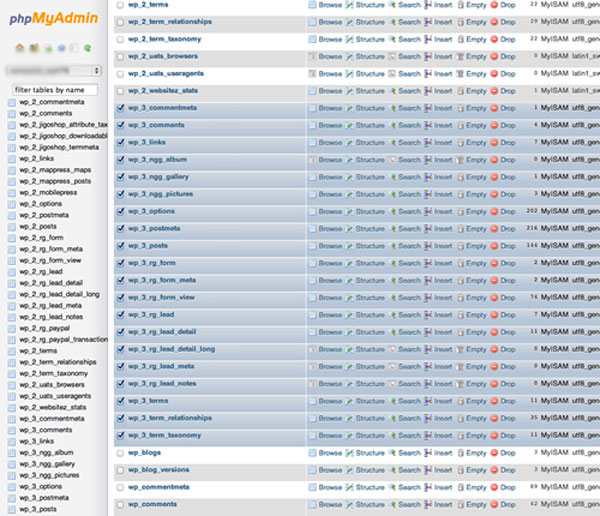
Select all tables related to your subsite and export them.
Note: WordPress Multisite stores all data related to web users in the wp_users and wp_usermeta tables: it does not create separate data for each site. If you have a lot of users on your site that you want to copy from the web, you may also want to export these tables, import them to the new site and edit the users in the admin screen to remove any non-existent users. Related to the new website. However, if your site only has one or two users, it will be easier to recreate the users on the new site. For more information about multisite and database tables, see our tutorial on WordPress databases and multisites.
Edit database table
Copy the sql file that was downloaded to your computer and give it a name (for example, add copy to its name). Open it in the code editor.
Edit link
Change all instances of a site domain in a multi-site network to their new single-site domain. For example, if your site is at http://network.com/mysite, change it to http://mysite.com. If your network uses subdomains, you will need to change all instances of http://mysite.network.com. If you do this, I recommend you also run check subdirectory versions just in case. Save your file.
Note: If your site is mapped to a domain that is not the one you are moving it to, you will also need to replace it with the new domain. Be very careful here and keep backups!
Edit table reference
The database tables in a new single-site installation will not have the site ID prefixed, so you need to delete them. In the sql file, replace all instances of wp_XX_ with wp_, where XX is your site ID. p>
Now save the sql file.
Install WordPress and create the database in the new location
In phpMyAdmin, create a new database in the location of your new site and install WordPress in the normal way.
Upload files to new website
Identify the plugins used by the subsite and install them into your new WordPress site via the Plugins screen or upload them from your backup of the old site.
Do the same with any themes your site uses - copy them from the backup to the wp-content/themes directory of your new standalone WordPress installation, or just reinstall them.
Copy upload content from old website to new website:
- If the network was created after WordPress 3.5, it will contain a
sitesfolder inwp-content/uploads. Find the subfolder that contains your site ID and upload its contents to thewp-content/uploadsfolder in your new site. - If you are on an older network and have a
blogs.dirfolder, that folder will also contain a folder containing your website ID. There will then be a subfolder namedfiles. Copy the contents of thefilesfolder to thewp-content/uploadsfolder in the new website.
Note: You may need to delete any folders WordPress created in the new uploads folder to avoid any conflicts.
After completing all this, activate all themes and plugins.
Import the table into the new database
Now that you have the theme and plugin installed, you need to import the database tables.
Delete existing table
Before uploading the table from the old website, you need to delete the duplicate table that WordPress added to the new website.
In phpMyAdmin, delete the following tables from the database:
wp_commentmetawp_commentswp_linkswp_optionswp_postmetawp_postswp_termswp_term_relationshipswp_term_taxonomy
Screenshot showing my database with only these tables selected:
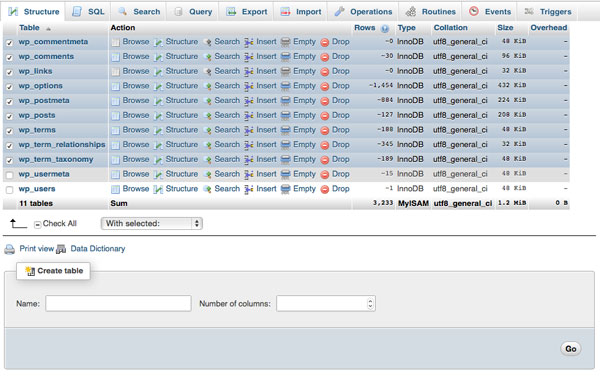
Select them, click the Select: drop-down box, and select Delete. When prompted, click Start.
Note: Do not delete the <em>wp_usermeta</em> or <em>wp_users</em> table , unless you also choose to copy these tables from the network (see above).
Upload database table
Next upload your edited database:
- Click to import the tag.
- Click the Select File button.
- Select the sql file you have edited, and then click Select or Confirm.
- Click the Start button.
- After some time (depending on the size of the database), you will see a message telling you that the upload completed successfully.
Final Steps
Clear your browser's cache. This avoids any issues you might encounter if your browser has cached content from an older website.
Now log in as the WordPress administrator of the remote site. If you move the users table, your login details will be the same as on the old site, but if you didn't, these details will be what you specified when you installed WordPress in the new location.
Visit the Permalinks screen and reopen the beautiful permalinks.
Check that all your links are working properly and widgets and plugins are functioning as they should. If not, you can fall back on the process and use backups where needed, or just set up plugins and widgets in your new site.
Removing a site from a multisite network
Once you are completely satisfied that everything is working properly, remove the site from the multisite installation. I recommend leaving it on for a week or so in case you notice anything that hasn't been moved. In the meantime, you can use a plugin or configure the old site's domain in CPanel to map to the new site.
Yo! It's a long and slightly complicated process, but you're done.
Summary
Moving a site from WordPress Multisite to its own installation is not something that can be done quickly or thoroughly, but it is possible and I have done it a few times. If you follow the steps above and make sure you have a backup in case anything goes wrong, you should find that it goes smoothly for you.
The above is the detailed content of Retargeting WordPress: Transferring Website from Multisite Network. For more information, please follow other related articles on the PHP Chinese website!

Hot AI Tools

Undresser.AI Undress
AI-powered app for creating realistic nude photos

AI Clothes Remover
Online AI tool for removing clothes from photos.

Undress AI Tool
Undress images for free

Clothoff.io
AI clothes remover

Video Face Swap
Swap faces in any video effortlessly with our completely free AI face swap tool!

Hot Article
Hot Tools

Notepad++7.3.1
Easy-to-use and free code editor

SublimeText3 Chinese version
Chinese version, very easy to use

Zend Studio 13.0.1
Powerful PHP integrated development environment

Dreamweaver CS6
Visual web development tools

SublimeText3 Mac version
God-level code editing software (SublimeText3)
Hot Topics


 How To Begin A WordPress Blog: A Step-By-Step Guide For Beginners
Apr 17, 2025 am 08:25 AM
How To Begin A WordPress Blog: A Step-By-Step Guide For Beginners
Apr 17, 2025 am 08:25 AM
Blogs are the ideal platform for people to express their opinions, opinions and opinions online. Many newbies are eager to build their own website but are hesitant to worry about technical barriers or cost issues. However, as the platform continues to evolve to meet the capabilities and needs of beginners, it is now starting to become easier than ever. This article will guide you step by step how to build a WordPress blog, from theme selection to using plugins to improve security and performance, helping you create your own website easily. Choose a blog topic and direction Before purchasing a domain name or registering a host, it is best to identify the topics you plan to cover. Personal websites can revolve around travel, cooking, product reviews, music or any hobby that sparks your interests. Focusing on areas you are truly interested in can encourage continuous writing
 How to adjust the wordpress article list
Apr 20, 2025 am 10:48 AM
How to adjust the wordpress article list
Apr 20, 2025 am 10:48 AM
There are four ways to adjust the WordPress article list: use theme options, use plugins (such as Post Types Order, WP Post List, Boxy Stuff), use code (add settings in the functions.php file), or modify the WordPress database directly.
 How to display child categories on archive page of parent categories
Apr 19, 2025 pm 11:54 PM
How to display child categories on archive page of parent categories
Apr 19, 2025 pm 11:54 PM
Do you want to know how to display child categories on the parent category archive page? When you customize a classification archive page, you may need to do this to make it more useful to your visitors. In this article, we will show you how to easily display child categories on the parent category archive page. Why do subcategories appear on parent category archive page? By displaying all child categories on the parent category archive page, you can make them less generic and more useful to visitors. For example, if you run a WordPress blog about books and have a taxonomy called "Theme", you can add sub-taxonomy such as "novel", "non-fiction" so that your readers can
 How to get logged in user information in WordPress for personalized results
Apr 19, 2025 pm 11:57 PM
How to get logged in user information in WordPress for personalized results
Apr 19, 2025 pm 11:57 PM
Recently, we showed you how to create a personalized experience for users by allowing users to save their favorite posts in a personalized library. You can take personalized results to another level by using their names in some places (i.e., welcome screens). Fortunately, WordPress makes it very easy to get information about logged in users. In this article, we will show you how to retrieve information related to the currently logged in user. We will use the get_currentuserinfo(); function. This can be used anywhere in the theme (header, footer, sidebar, page template, etc.). In order for it to work, the user must be logged in. So we need to use
 How to sort posts by post expiration date in WordPress
Apr 19, 2025 pm 11:48 PM
How to sort posts by post expiration date in WordPress
Apr 19, 2025 pm 11:48 PM
In the past, we have shared how to use the PostExpirator plugin to expire posts in WordPress. Well, when creating the activity list website, we found this plugin to be very useful. We can easily delete expired activity lists. Secondly, thanks to this plugin, it is also very easy to sort posts by post expiration date. In this article, we will show you how to sort posts by post expiration date in WordPress. Updated code to reflect changes in the plugin to change the custom field name. Thanks Tajim for letting us know in the comments. In our specific project, we use events as custom post types. Now
 Is WordPress easy for beginners?
Apr 03, 2025 am 12:02 AM
Is WordPress easy for beginners?
Apr 03, 2025 am 12:02 AM
WordPress is easy for beginners to get started. 1. After logging into the background, the user interface is intuitive and the simple dashboard provides all the necessary function links. 2. Basic operations include creating and editing content. The WYSIWYG editor simplifies content creation. 3. Beginners can expand website functions through plug-ins and themes, and the learning curve exists but can be mastered through practice.
 How to display query count and page loading time in WordPress
Apr 19, 2025 pm 11:51 PM
How to display query count and page loading time in WordPress
Apr 19, 2025 pm 11:51 PM
One of our users asked other websites how to display the number of queries and page loading time in the footer. You often see this in the footer of your website, and it may display something like: "64 queries in 1.248 seconds". In this article, we will show you how to display the number of queries and page loading time in WordPress. Just paste the following code anywhere you like in the theme file (e.g. footer.php). queriesin
 How to Automate WordPress and Social Media with IFTTT (and more)
Apr 18, 2025 am 11:27 AM
How to Automate WordPress and Social Media with IFTTT (and more)
Apr 18, 2025 am 11:27 AM
Are you looking for ways to automate your WordPress website and social media accounts? With automation, you will be able to automatically share your WordPress blog posts or updates on Facebook, Twitter, LinkedIn, Instagram and more. In this article, we will show you how to easily automate WordPress and social media using IFTTT, Zapier, and Uncanny Automator. Why Automate WordPress and Social Media? Automate your WordPre
