

Tips | Python crawler tool Selenium from entry to advanced

selenium, we will talk about these contents in general
seleniumIntroduction and installationPositioning of page elements Browser Control Mouse control Keyboard control -
Set element wait Get cookiesCall JavaScriptseleniumAdvanced
Introduction and installation of selenium
selenium is the most widely used open source Web UI One of the automated test suites, the languages it supports include C , Java, Perl, PHP, Python和Ruby is also a powerful tool in data capture, which can solve the anti-crawling measures of most web pages. Of course, it is not omnipotent. One of the more obvious points is that it is relatively slow. , if the amount of data collected every day is not very high, you can use this framework. So when it comes to installation, you can directly use pip to install
pip install selenium
At the same time, we also need to install a browser driver. Different browsers need to be installed. Different drivers, the editor here mainly recommends the following two
FirefoxBrowser driver:geckodriver##Chrome Browser driver:chromedriver
chromedriver, so here I will use Chrome Browser is an example. Since the version of chromedriver needs to be consistent with the version of the browser, let’s first confirm what the version of the browser is? Look at the picture below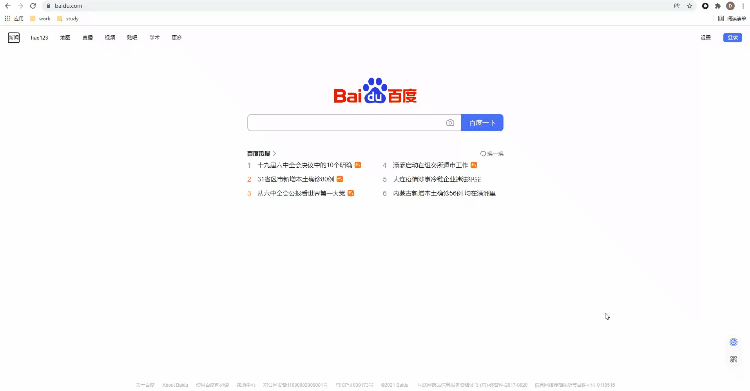
, of course it must also correspond to your computer’s operating system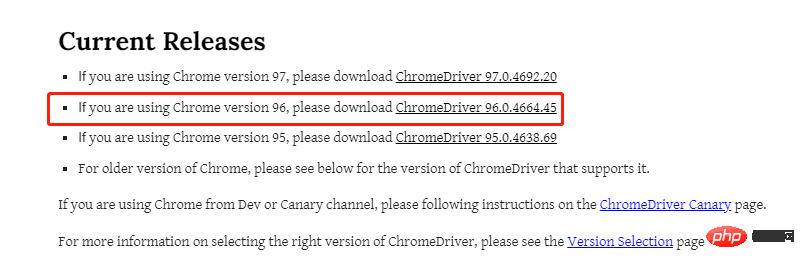
Positioning of page elements
When talking about the positioning of page elements, the editor assumes that readers have the most basic front-end knowledge, such asHTML, CSS, etc.
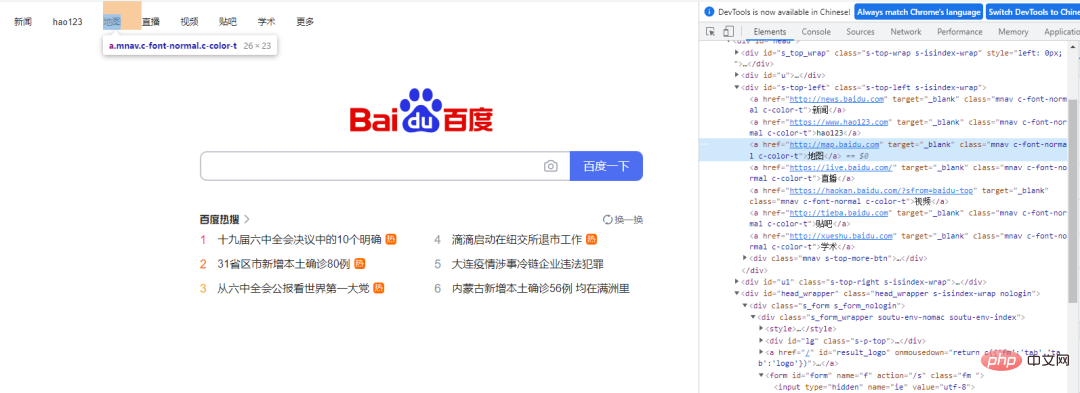
ID标签的定位
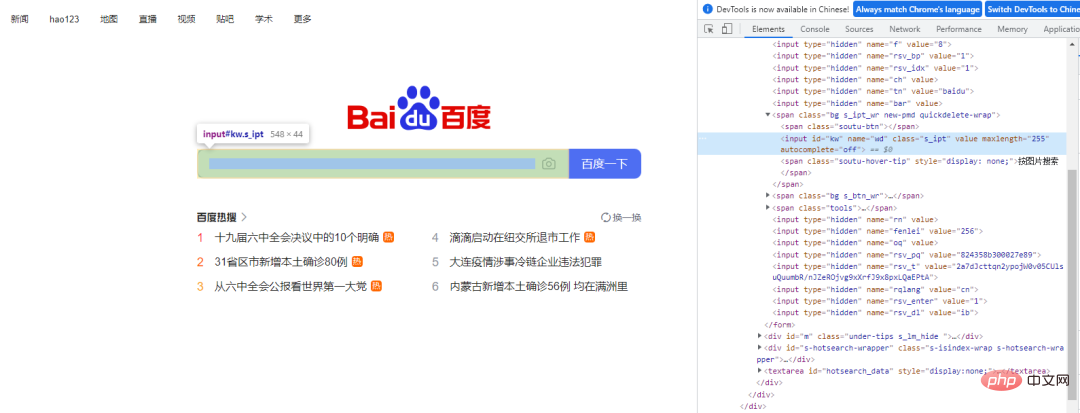
HTML当中,ID属性是唯一标识一个元素的属性,因此在selenium当中,通过ID来进行元素的定位也作为首选,我们以百度首页为例,搜索框的HTML代码如下,其ID为“kw”,而“百度一下”这个按钮的ID为“su”,我们用Python脚本通过ID的标签来进行元素的定位driver.find_element_by_id("kw")
driver.find_element_by_id("su")NAME标签的定位
HTML当中,Name属性和ID属性的功能基本相同,只是Name属性并不是唯一的,如果遇到没有ID标签的时候,我们可以考虑通过Name标签来进行定位,代码如下driver.find_element_by_name("wd")Xpath定位
Xpath方式来定位几乎涵盖了页面上的任意元素,那什么是Xpath呢?Xpath是一种在XML和HTML文档中查找信息的语言,当然通过Xpath路径来定位元素的时候也是分绝对路径和相对路径。/来表示,相对路径是以//来表示,而涉及到Xpath路径的编写,小编这里偷个懒,直接选择复制/粘贴的方式,例如针对下面的HTML代码<!DOCTYPE html>
<html lang="en">
<head>
<meta charset="UTF-8">
<title>Test</title>
</head>
<body>
<form id="loginForm">
<input name="username" type="text" />
<input name="password" type="password" />
<input name="continue" type="submit" value="Login" />
<input name="continue" type="button" value="Clear" />
</form>
</body>
</html>
Xpath来进行页面元素的定位,代码如下driver.find_element_by_xpath('//*[@id="kw"]')
className标签定位
class属性来定位元素,尤其是当我们看到有多个并列的元素如list表单,class用的都是共用同一个,如:driver.find_element_by_class_name("classname")class属性来定位元素,该方法返回的是一个list列表,而当我们想要定位列表当中的第n个元素时,则可以这样来安排driver.find_elements_by_class_name("classname")[n]find_elements_by_class_name()方法而不是find_element_by_class_name()方法,这里我们还是通过百度首页的例子,通过className标签来定位搜索框这个元素driver.find_element_by_class_name('s_ipt')
CssSelector()方法定位
Selenium官网当中是更加推荐CssSelector()方法来进行页面元素的定位的,原因在于相比较于Xpath定位速度更快,Css定位分为四类:ID值、Class属性、TagName值等等,我们依次来看ID方式来定位
TagName的值,另外一种则是不加,代码如下driver.find_element_by_css_selector("#id_value") # 不添加前面的`TagName`值
driver.find_element_by_css_selector("tag_name.class_value") # 不添加前面的`TagName`值TagName的值非常的冗长,中间可能还有空格,那么这当中的空格就需要用点“.”来替换driver.find_element_by_css_selector("tag_name.class_value1.calss_value2.class_value3") # 不添加前面的`TagName`值我们仍然以百度首页的搜索框为例,它的HTML代码如下
CssSelector的.class()方式来实现元素的定位的话,Python代码该这样来实现,和上面Xpath()的方法一样,可以稍微偷点懒,通过复制/粘贴的方式从开发者工具当中来获取元素的位置
代码如下
driver.find_element_by_css_selector('#kw')
linkText()方式来定位
这个方法直接通过链接上面的文字来定位元素,案例如下
通过linkText()方法来定位“地图”这个元素,代码如下
driver.find_element_by_link_text("地图").click()浏览器的控制
修改浏览器窗口的大小
set_window_size()这个方法来修改浏览器窗口的大小,代码如下# 修改浏览器的大小 driver.set_window_size(500, 900)
同时还有maxmize_window()方法是用来实现浏览器全屏显示,代码如下
# 全屏显示
driver.maximize_window()
浏览器的前进与后退
前进与后退用到的方法分别是forward()和back(),代码如下
# 前进与后退
driver.forward()
driver.back()
浏览器的刷新
刷新用到的方法是refresh(),代码如下
# 刷新页面
driver.refresh()
除了上面这些,webdriver的常见操作还有
关闭浏览器: get()清除文本: clear()单击元素: click()提交表单: submit()模拟输入内容: send_keys()
我们可以尝试着用上面提到的一些方法来写段程序
from selenium import webdriver
from time import sleep

driver = webdriver.Chrome(executable_path="chromedriver.exe")
driver.get("https://www.baidu.com")
sleep(3)
driver.maximize_window()
sleep(1)
driver.find_element_by_xpath('//*[@id="s-top-loginbtn"]').click()
sleep(3)
driver.find_element_by_xpath('//*[@id="TANGRAM__PSP_11__userName"]').send_keys('12121212')
sleep(1)
driver.find_element_by_xpath('//*[@id="TANGRAM__PSP_11__password"]').send_keys('testtest')
sleep(2)
driver.refresh()
sleep(3)
driver.quit()output

鼠标的控制
鼠标的控制都是封装在ActionChains类当中,常见的有以下几种
引入action_chains类
from selenium.webdriver.common.action_chains import ActionChains
# 右击
ActionChains(driver).context_click(element).perform()
# 双击
ActionChains(driver).double_click(element).perform()
# 拖放
ActionChains(driver).drag_and_drop(Start, End).perform()
# 悬停
ActionChains(driver).move_to_element(Above).perform()
# 按下
ActionChains(driver).click_and_hold(leftclick).perform()
# 执行指定的操作
键盘的控制
webdriver中的Keys()类,提供了几乎所有按键的方法,常用的如下
# 删除键
driver.find_element_by_id('xxx').send_keys(Keys.BACK_SPACE)
# 空格键
driver.find_element_by_id('xxx').send_keys(Keys.SPACE)
# 回车键
driver.find_element_by_id('xxx').send_keys(Keys.ENTER)
# Ctrl + A 全选内容
driver.find_element_by_id('xxx').send_keys(Keys.CONTROL, 'a')
# Ctrl + C/V 复制/粘贴内容
driver.find_element_by_id('xxx').send_keys(Keys.CONTROL, 'c')
driver.find_element_by_id('xxx').send_keys(Keys.CONTROL, 'v')
其他的一些键盘操作
向上箭头: Keys.ARROW_UP向下箭头: Keys.ARROW_DOWN向左/向右箭头: Keys.ARROW_LEFT/Keys.ARROW_RIGHTShift键: Keys.SHIFTF1键: Keys.F1
元素的等待
有显示等待和隐式等待两种
显示等待
TimeoutException),需要用到的是WebDriverWait()方法,同时配合until和not until方法WebDriverWait(driver, timeout, poll_frequency=0.5, ignored_exceptions=None)
其中的参数:
timeout: 最长超时时间,默认以秒为单位 poll_frequency: 检测的时间间隔,默认是0.5s ignored_exceptions: 指定忽略的异常,默认忽略的有 NoSuchElementException这个异常
我们来看下面的案例
driver = webdriver.Chrome()
driver.get("http://somedomain/url_that_delays_loading")
try:
    element = WebDriverWait(driver, 10).until(
        EC.presence_of_element_located((By.ID, "myDynamicElement")))
finally:
driver.quit()隐式等待
主要使用的是implicitly_wait()来实现
browser = webdriver.Chrome(path)
# 隐式等待3秒
browser.implicitly_wait(3)
获取Cookie
Cookie是用来识别用户身份的关键,我们通常也是通过selenium先模拟登录网页获取Cookie,然后再通过requests携带Cookie来发送请求。webdriver提供了cookies的几种操作,我们挑选几个常用的来说明
get_cookies():以字典的形式返回当前会话中可见的cookie信息get_cookies(name): 返回cookie字典中指定的的cookie信息add_cookie(cookie_dict): 将cookie添加到当前会话中
下面看一个简单的示例代码
driver=webdriver.Chrome(executable_path="chromedriver.exe")
driver.get(url=url)
time.sleep(1)

cookie_list=driver.get_cookies()
cookies =";".join([item["name"] +"=" + item["value"] + "" for item in cookie_list])
session=requests.session()

headers = {
    'User-Agent':'Mozilla/5.0 (Windows NT 10.0; Win64; x64) AppleWebKit/537.36 (KHTML, like Gecko) Chrome/83.0.4103.106 Safari/537.36',
    'cookie': cookies
}

response=session.get(url=url,headers=headers)
soup=BeautifulSoup(response.text,'lxml')调用JavaScript
webdriver当中可以使用execut_script()方法来实现JavaScript的执行,下面我们来看一个简单的例子from selenium import webdriver
import time
bro=webdriver.Chrome(executable_path='./chromedriver')
bro.get("https://www.baidu.com")
# 执行js代码
bro.execute_script('alert(10)')
time.sleep(3)
bro.close()除此之外,我们还可以通过selenium执行JavaScript来实现屏幕上下滚动
from selenium import webdriver
bro=webdriver.Chrome(executable_path='./chromedriver')
bro.get("https://www.baidu.com")
# 执行js代码
bro.execute_script('window.scrollTo(0,document.body.scrollHeight)')selenium进阶
selenium启动的浏览器,会非常容易的被检测出来,通常可以通过window.navigator.webdriver的值来查看,如果是true则说明是使用了selenium模拟浏览器,如果是undefined则通常会被认为是正常的浏览器。window.navigator.webdriver最后返回的值driver.execute_script(
'Object.defineProperties(navigator,{webdriver:{get:()=>false}})'
)JavaScript程序已经通过读取window.navigator.webdriver知道你使用的是模拟浏览器了。所以我们有两种办法来解决这个缺陷。在Chrome当中添加实验性功能参数
代码如下
from selenium.webdriver import Chrome
from selenium.webdriver import ChromeOptions

option = ChromeOptions()
option.add_experimental_option('excludeSwitches',['enable-automation'])
driver=Chrome(options=option)
调用chrome当中的开发工具协议的命令
Chrome浏览器在打开页面,还没有运行网页自带的JavaScript代码时,先来执行我们给定的代码,通过execute_cdp_cmd()方法,driver.execute_cdp_cmd("Page.addScriptToEvaluateOnNewDocument", {
"source": """
Object.defineProperty(navigator, 'webdriver', {
get: () => undefined
})
"""
})当然为了更好隐藏指纹特征,我们可以将上面两种方法想结合
from selenium import webdriver
options = webdriver.ChromeOptions()
options.add_experimental_option("excludeSwitches", ["enable-automation"])
options.add_experimental_option('useAutomationExtension', False)
driver = webdriver.Chrome(options=options, executable_path='./chromedriver')
driver.execute_cdp_cmd("Page.addScriptToEvaluateOnNewDocument", {
    "source": """
        Object.defineProperty(navigator, 'webdriver', {
            get: () => undefined
        })
    """
})
driver.get(url)stealth.min.js文件来实现隐藏selenium模拟浏览器的特征,这个文件之前是给puppeteer用的,使得其隐藏浏览器的指纹特征,而让Python使用时,需要先导入这份JS文件import time
from selenium.webdriver import Chrome
option = webdriver.ChromeOptions()
option.add_argument("--headless")
# 无头浏览器需要添加user-agent来隐藏特征
option.add_argument('user-agent=.....')
driver = Chrome(options=option)
driver.implicitly_wait(5)
with open('stealth.min.js') as f:
js = f.read()
driver.execute_cdp_cmd("Page.addScriptToEvaluateOnNewDocument", {
"source": js
})
driver.get(url)The above is the detailed content of Tips | Python crawler tool Selenium from entry to advanced. For more information, please follow other related articles on the PHP Chinese website!

Hot AI Tools

Undresser.AI Undress
AI-powered app for creating realistic nude photos

AI Clothes Remover
Online AI tool for removing clothes from photos.

Undress AI Tool
Undress images for free

Clothoff.io
AI clothes remover

Video Face Swap
Swap faces in any video effortlessly with our completely free AI face swap tool!

Hot Article
Hot Tools

Notepad++7.3.1
Easy-to-use and free code editor

SublimeText3 Chinese version
Chinese version, very easy to use

Zend Studio 13.0.1
Powerful PHP integrated development environment

Dreamweaver CS6
Visual web development tools

SublimeText3 Mac version
God-level code editing software (SublimeText3)
Hot Topics
 1655
1655
 14
1413
52
1306
25
1252
29
1226
24
14
1413
52
1306
25
1252
29
1226
24

 PHP and Python: Different Paradigms Explained
Apr 18, 2025 am 12:26 AM
PHP and Python: Different Paradigms Explained
Apr 18, 2025 am 12:26 AM
PHP is mainly procedural programming, but also supports object-oriented programming (OOP); Python supports a variety of paradigms, including OOP, functional and procedural programming. PHP is suitable for web development, and Python is suitable for a variety of applications such as data analysis and machine learning.
 Choosing Between PHP and Python: A Guide
Apr 18, 2025 am 12:24 AM
Choosing Between PHP and Python: A Guide
Apr 18, 2025 am 12:24 AM
PHP is suitable for web development and rapid prototyping, and Python is suitable for data science and machine learning. 1.PHP is used for dynamic web development, with simple syntax and suitable for rapid development. 2. Python has concise syntax, is suitable for multiple fields, and has a strong library ecosystem.
 PHP and Python: A Deep Dive into Their History
Apr 18, 2025 am 12:25 AM
PHP and Python: A Deep Dive into Their History
Apr 18, 2025 am 12:25 AM
PHP originated in 1994 and was developed by RasmusLerdorf. It was originally used to track website visitors and gradually evolved into a server-side scripting language and was widely used in web development. Python was developed by Guidovan Rossum in the late 1980s and was first released in 1991. It emphasizes code readability and simplicity, and is suitable for scientific computing, data analysis and other fields.
 Python vs. JavaScript: The Learning Curve and Ease of Use
Apr 16, 2025 am 12:12 AM
Python vs. JavaScript: The Learning Curve and Ease of Use
Apr 16, 2025 am 12:12 AM
Python is more suitable for beginners, with a smooth learning curve and concise syntax; JavaScript is suitable for front-end development, with a steep learning curve and flexible syntax. 1. Python syntax is intuitive and suitable for data science and back-end development. 2. JavaScript is flexible and widely used in front-end and server-side programming.
 How to run sublime code python
Apr 16, 2025 am 08:48 AM
How to run sublime code python
Apr 16, 2025 am 08:48 AM
To run Python code in Sublime Text, you need to install the Python plug-in first, then create a .py file and write the code, and finally press Ctrl B to run the code, and the output will be displayed in the console.
 Can vs code run in Windows 8
Apr 15, 2025 pm 07:24 PM
Can vs code run in Windows 8
Apr 15, 2025 pm 07:24 PM
VS Code can run on Windows 8, but the experience may not be great. First make sure the system has been updated to the latest patch, then download the VS Code installation package that matches the system architecture and install it as prompted. After installation, be aware that some extensions may be incompatible with Windows 8 and need to look for alternative extensions or use newer Windows systems in a virtual machine. Install the necessary extensions to check whether they work properly. Although VS Code is feasible on Windows 8, it is recommended to upgrade to a newer Windows system for a better development experience and security.
 Where to write code in vscode
Apr 15, 2025 pm 09:54 PM
Where to write code in vscode
Apr 15, 2025 pm 09:54 PM
Writing code in Visual Studio Code (VSCode) is simple and easy to use. Just install VSCode, create a project, select a language, create a file, write code, save and run it. The advantages of VSCode include cross-platform, free and open source, powerful features, rich extensions, and lightweight and fast.
 How to run python with notepad
Apr 16, 2025 pm 07:33 PM
How to run python with notepad
Apr 16, 2025 pm 07:33 PM
Running Python code in Notepad requires the Python executable and NppExec plug-in to be installed. After installing Python and adding PATH to it, configure the command "python" and the parameter "{CURRENT_DIRECTORY}{FILE_NAME}" in the NppExec plug-in to run Python code in Notepad through the shortcut key "F6".
