

Android screen keeps getting darker – here's the fix that works

Android has a feature called Adaptive Brightness that dims your phone screen. But what if your phone screen keeps going dark? This can be a real problem, especially if you're outside, in the sun, desperately looking for a number. Adaptive brightness settings generally manage phone brightness based on the ambient light around you.
Fix 1 – Just do a normal phone restart
Just do a normal phone restart. Sometimes, this is just a normal error among phone Android errors. So if the phone dims automatically, just restart the phone and if it's just a bug, your phone's brightness won't automatically go down like usual.
Fix 2 – Turn off Adaptive Brightness Settings
Adaptive Brightness Settings is the real reason behind this issue and turning it off should help you resolve the issue.
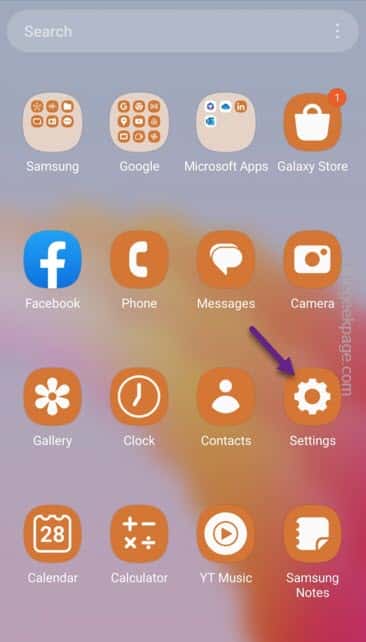
Step 1 –Find the Settings button and slide it up once. Look for the gear-shaped "⚙️" button to open it.
Step 2 –Go straight and turn on the “Show” option.
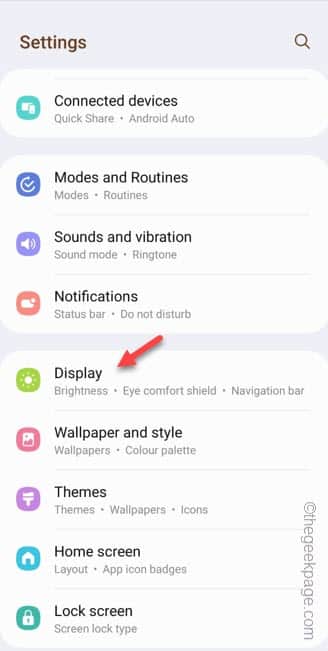
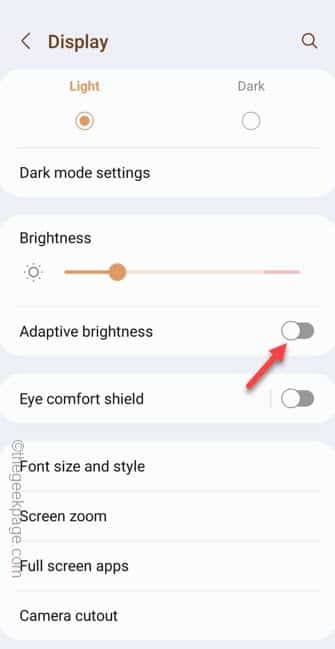
Step 3 –On the Display page, simply set “Adaptive Brightness” to “Close" mode.
This adaptive brightness is the reason why the phone keeps getting darker.
Step 4 –After this, adjust the brightness to the higher side.
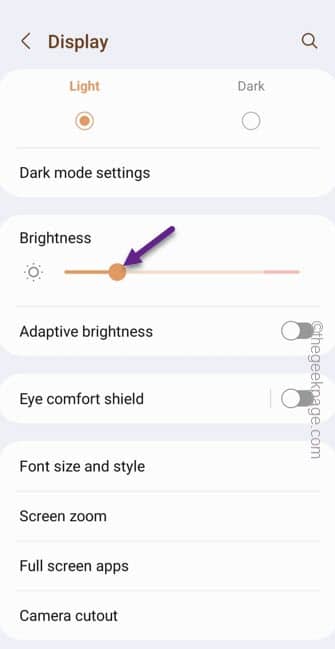
In this way, the dimming issue should be solved, as the phone will not automatically reduce the screen brightness at all.
If this does not help, follow the next solution by resetting the security lock function.
Fix 3 – Reset Security Lock Settings
Resetting Security Lock settings to a higher setting should help you resolve the dimming screen issue on your phone.
Step 1 –Just scroll down to find “⚙️” to open it.
Step 2 –In all other settings, scroll to “Security Lock Settings” to turn it on.
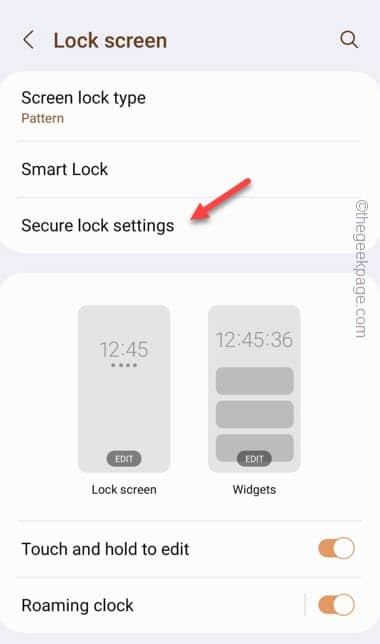
Step 3 – Enter your lock screen password (PIN or password) to enter the Security Lock settings page.
Step 4 –Here you will find the options related to the auto-lock feature on your phone. So, turn on the "Automatically lock when screen is off" setting to access it.
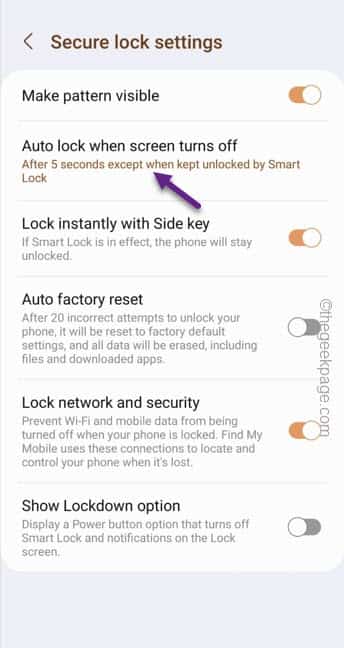
Step 5 –Now you will find several Time Limits here. Choose a time limit to impose so that the screen doesn't dim and turn off.
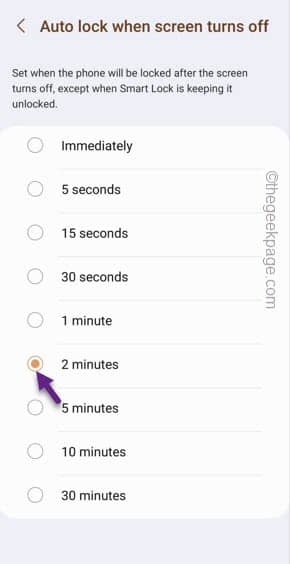
This way, the screen won't dim until the time runs out and the screen is locked.
Fix 4 – Increase screen off time
Maybe your phone screen turns off too early. So, increase the time limiter before your phone screen dims and turns off.
Step 1 –Quickly open Settings on your phone.
Step 2 –If you look carefully, you can access it by turning on the “Display” setting.
Step 3 – On the Display page, if you scroll down, you will find “Screen Timeout” to open it.
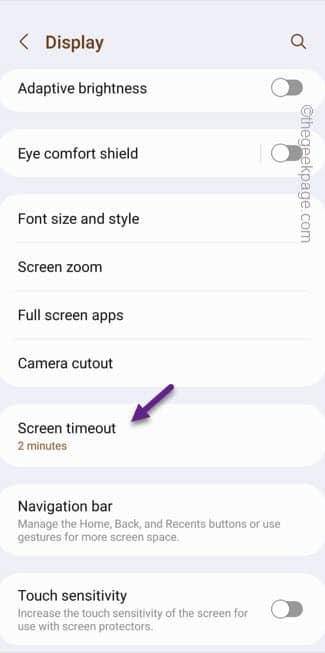
Step 4 –On the next page, you will see the option to choose from the available timeout limits.
So, choose the time limit you want to impose on your phone (not less than 2 minutes).

That's it! This way, your phone won't dim and the screen brightness won't be affected even if you leave it alone for a few minutes.
Fix 5 – Disable Battery Saver Mode
Battery saver mode or battery saver mode is designed to save battery power when needed. Therefore, it dims the phone brightness.
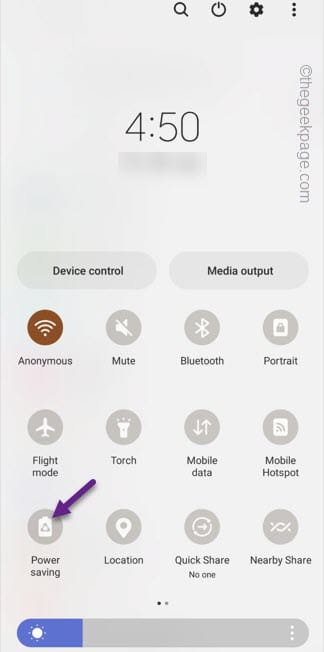
Step 1 –Just swipe down once to find Notification Center.
Step 2 –Swipe down again to open the full list of items on Control Center.
Step 3 –Look for “Power SavingPower Mode” or “Power Saving” and save it to Off Mode.
Alternative Method –
If you want to do this from the Settings page, follow Follow these steps –
1. Start the “Setup” utility.
2. Swipe down and find "Battery & Device Care" to access it.
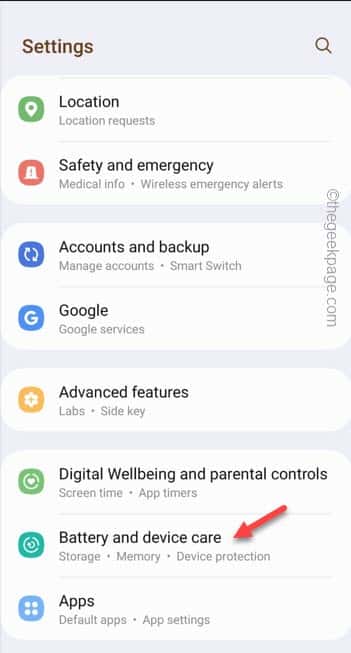
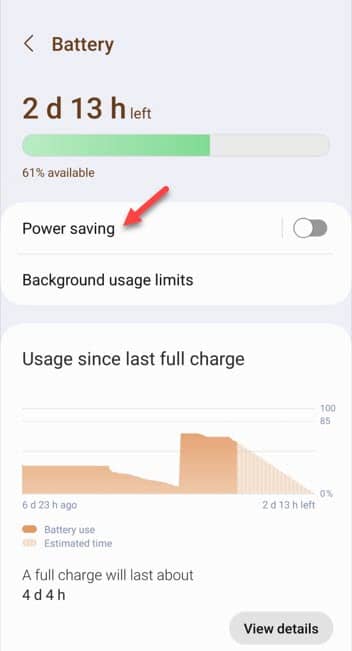
3. Open the "Battery" section to access it.

4. Turn on the "Power Saving" mode to activate it.
5. Set it to "Off" mode.
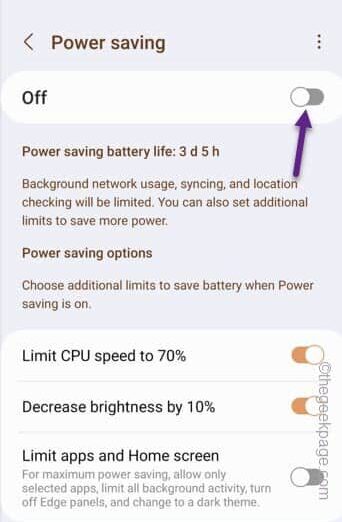
# Turning on power saving mode will ensure that your screen automatically dims again and again.
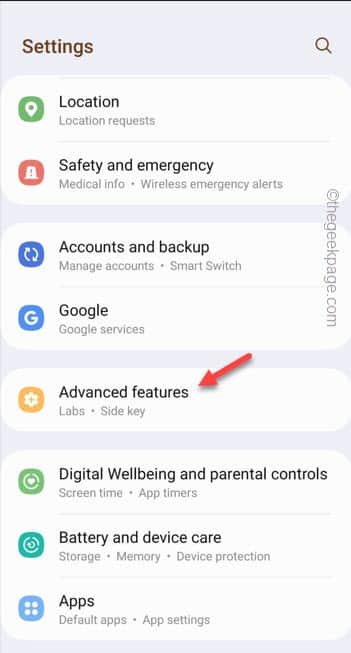
Fix 6 – Turn off double tap lock functionality
There are several other gestures such as double lock and unlock that can cause this dimming issue.
Step 1 –Open Settings on your phone.
Step 2 –Just go down until you find “Advanced Features”. Open it.
Open the “Actions and Gestures” option .
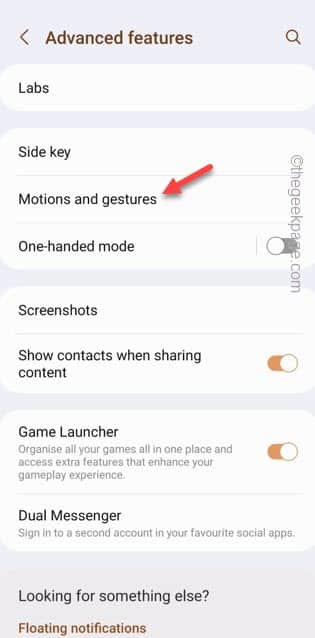
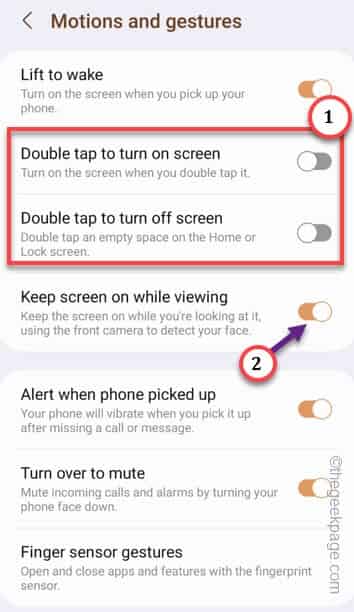
You will find several gestures there. Make sure both features are set to "Off" mode. Double tap to turn on screen
Double tap to turn off screen
Also, adjust “Keep screen on while watching” to “On” mode.
 Exit
Exit
. In this way, any gesture will not have any impact on the dimming problem.
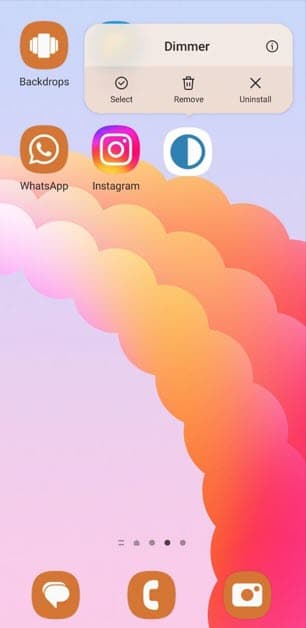
Fix 7 – Uninstall Dimmer or Related Apps
Do you have Dimmer or any other related apps installed on your phone that can access your phone’s brightness settings.
Step 1 –Just find “Dimmer” or any other brightness related app on your phone.
Step 2 –Then, press and hold the app and use the “Uninstall” option to uninstall it from your phone.
 You should restart your phone once.
This should fix the brightness issue on your phone.
The above is the detailed content of Android screen keeps getting darker – here's the fix that works. For more information, please follow other related articles on the PHP Chinese website!

Hot AI Tools

Undresser.AI Undress
AI-powered app for creating realistic nude photos

AI Clothes Remover
Online AI tool for removing clothes from photos.

Undress AI Tool
Undress images for free

Clothoff.io
AI clothes remover

Video Face Swap
Swap faces in any video effortlessly with our completely free AI face swap tool!

Hot Article
Hot Tools

Notepad++7.3.1
Easy-to-use and free code editor

SublimeText3 Chinese version
Chinese version, very easy to use

Zend Studio 13.0.1
Powerful PHP integrated development environment

Dreamweaver CS6
Visual web development tools

SublimeText3 Mac version
God-level code editing software (SublimeText3)
Hot Topics
 1666
1666
 14
1425
52
1327
25
1273
29
1252
24
14
1425
52
1327
25
1273
29
1252
24

 How to make Google Maps the default map in iPhone
Apr 17, 2024 pm 07:34 PM
How to make Google Maps the default map in iPhone
Apr 17, 2024 pm 07:34 PM
The default map on the iPhone is Maps, Apple's proprietary geolocation provider. Although the map is getting better, it doesn't work well outside the United States. It has nothing to offer compared to Google Maps. In this article, we discuss the feasible steps to use Google Maps to become the default map on your iPhone. How to Make Google Maps the Default Map in iPhone Setting Google Maps as the default map app on your phone is easier than you think. Follow the steps below – Prerequisite steps – You must have Gmail installed on your phone. Step 1 – Open the AppStore. Step 2 – Search for “Gmail”. Step 3 – Click next to Gmail app
 Steps to upgrade to the latest version of WeChat (Easily master the upgrade method to the latest version of WeChat)
Jun 01, 2024 pm 10:24 PM
Steps to upgrade to the latest version of WeChat (Easily master the upgrade method to the latest version of WeChat)
Jun 01, 2024 pm 10:24 PM
WeChat is one of the social media platforms in China that continuously launches new versions to provide a better user experience. Upgrading WeChat to the latest version is very important to keep in touch with family and colleagues, to stay in touch with friends, and to keep abreast of the latest developments. 1. Understand the features and improvements of the latest version. It is very important to understand the features and improvements of the latest version before upgrading WeChat. For performance improvements and bug fixes, you can learn about the various new features brought by the new version by checking the update notes on the WeChat official website or app store. 2. Check the current WeChat version We need to check the WeChat version currently installed on the mobile phone before upgrading WeChat. Click to open the WeChat application "Me" and then select the menu "About" where you can see the current WeChat version number. 3. Open the app
 This Apple ID is not yet in use in the iTunes Store: Fix
Jun 10, 2024 pm 05:42 PM
This Apple ID is not yet in use in the iTunes Store: Fix
Jun 10, 2024 pm 05:42 PM
When logging into iTunesStore using AppleID, this error saying "This AppleID has not been used in iTunesStore" may be thrown on the screen. There are no error messages to worry about, you can fix them by following these solution sets. Fix 1 – Change Shipping Address The main reason why this prompt appears in iTunes Store is that you don’t have the correct address in your AppleID profile. Step 1 – First, open iPhone Settings on your iPhone. Step 2 – AppleID should be on top of all other settings. So, open it. Step 3 – Once there, open the “Payment & Shipping” option. Step 4 – Verify your access using Face ID. step
 Shazam app not working in iPhone: Fix
Jun 08, 2024 pm 12:36 PM
Shazam app not working in iPhone: Fix
Jun 08, 2024 pm 12:36 PM
Having issues with the Shazam app on iPhone? Shazam helps you find songs by listening to them. However, if Shazam isn't working properly or doesn't recognize the song, you'll have to troubleshoot it manually. Repairing the Shazam app won't take long. So, without wasting any more time, follow the steps below to resolve issues with Shazam app. Fix 1 – Disable Bold Text Feature Bold text on iPhone may be the reason why Shazam is not working properly. Step 1 – You can only do this from your iPhone settings. So, open it. Step 2 – Next, open the “Display & Brightness” settings there. Step 3 – If you find that “Bold Text” is enabled
 iPhone screenshots not working: How to fix it
May 03, 2024 pm 09:16 PM
iPhone screenshots not working: How to fix it
May 03, 2024 pm 09:16 PM
Screenshot feature not working on your iPhone? Taking a screenshot is very easy as you just need to hold down the Volume Up button and the Power button at the same time to grab your phone screen. However, there are other ways to capture frames on the device. Fix 1 – Using Assistive Touch Take a screenshot using the Assistive Touch feature. Step 1 – Go to your phone settings. Step 2 – Next, tap to open Accessibility settings. Step 3 – Open Touch settings. Step 4 – Next, open the Assistive Touch settings. Step 5 – Turn on Assistive Touch on your phone. Step 6 – Open “Customize Top Menu” to access it. Step 7 – Now you just need to link any of these functions to your screen capture. So click on the first
 Clock app missing in iPhone: How to fix it
May 03, 2024 pm 09:19 PM
Clock app missing in iPhone: How to fix it
May 03, 2024 pm 09:19 PM
Is the clock app missing from your phone? The date and time will still appear on your iPhone's status bar. However, without the Clock app, you won’t be able to use world clock, stopwatch, alarm clock, and many other features. Therefore, fixing missing clock app should be at the top of your to-do list. These solutions can help you resolve this issue. Fix 1 – Place the Clock App If you mistakenly removed the Clock app from your home screen, you can put the Clock app back in its place. Step 1 – Unlock your iPhone and start swiping to the left until you reach the App Library page. Step 2 – Next, search for “clock” in the search box. Step 3 – When you see “Clock” below in the search results, press and hold it and
 Can't change Apple ID country on iPhone: Fix
Apr 20, 2024 am 08:22 AM
Can't change Apple ID country on iPhone: Fix
Apr 20, 2024 am 08:22 AM
The country or region of your Apple ID cannot be changed. In many cases, you cannot change the region of your Apple ID. We have discussed all these conditions and their respective solutions so that you can change AppleID on iPhone. Fix 1 – Cancel all active subscriptions Apple does not allow you to perform region modification operations if you already have active subscriptions. Typically, these apps have different subscription plans, tiers, and fees (currencies) in different regions. Step 1 – You have to go to Settings. Step 2 – You will find your Apple ID at the top of the Settings page. Step 3 – Click once to open it. Step 4 – On the next page, open the Subscriptions menu. Step 5 – You can view it in
 WiFi calling not working on iPhone: Fix
Jun 03, 2024 am 11:16 AM
WiFi calling not working on iPhone: Fix
Jun 03, 2024 am 11:16 AM
Can't enable Wi-Fi calling on iPhone? Call quality is improved and you can communicate even from remote locations where cellular networks are not as strong. Wi-Fi Calling also improves standard call and video call quality. So, if you can't use Wi-Fi calling on your phone, these solutions might help you fix the problem. Fix 1 – Enable Wi-Fi Calling Manually You must enable the Wi-Fi Calling feature in your iPhone settings. Step 1 – For this, you have to open Settings. Step 2 – Next, just scroll down to find and open the “Phone” settings Step 3 – In the phone settings, scroll down and open the “Wi-Fi Calling” setting. Step 4 – In the Wi-Fi Calling page, change “This iPhone