

An introduction to what the windows10 optimization settings tutorial is

Most of my friends installed the win10 system when their computer configurations were quite good, but they found that it did not run very quickly, leaving everyone wondering what to do. In fact, for this problem, we To understand the cause of computer system lag, we can make a series of settings. Today I will tell you about the introduction of the Windows 10 optimization settings tutorial. Let's take a look.
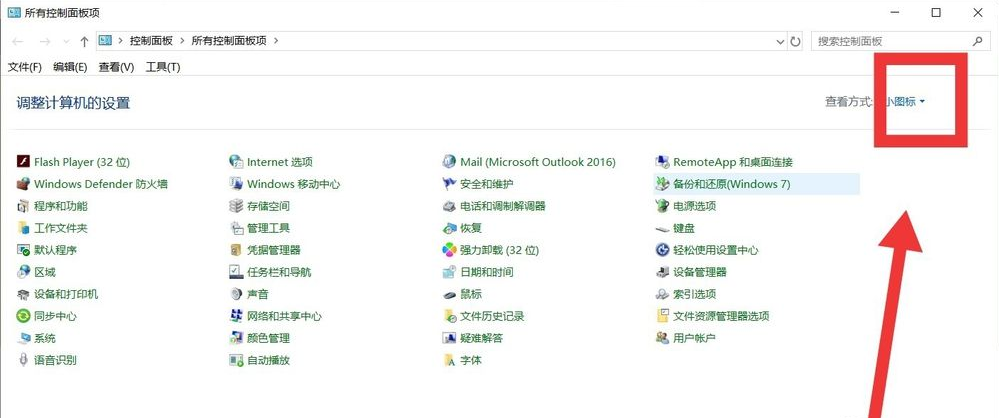
1. The first optimization is that we need to close the family group. Because homegroup consumes a lot of CPU resources, we open the "Control Panel", enter the page, click the view mode on the right and select the "Small Icons" option.
2. Then we click the "Management Tools" option, enter the page and find the "Services" option, click to enter, we need to delete all services starting with "HomeGroup" closure.
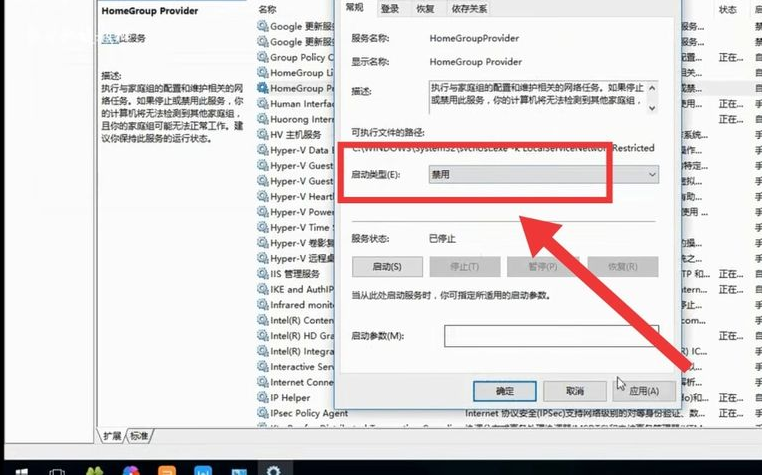
3. Right-click with the mouse to stop, then right-click to select the [Properties] button, click the "Disable" option in the startup type, and then click [Apply] in the lower right corner The button is done.
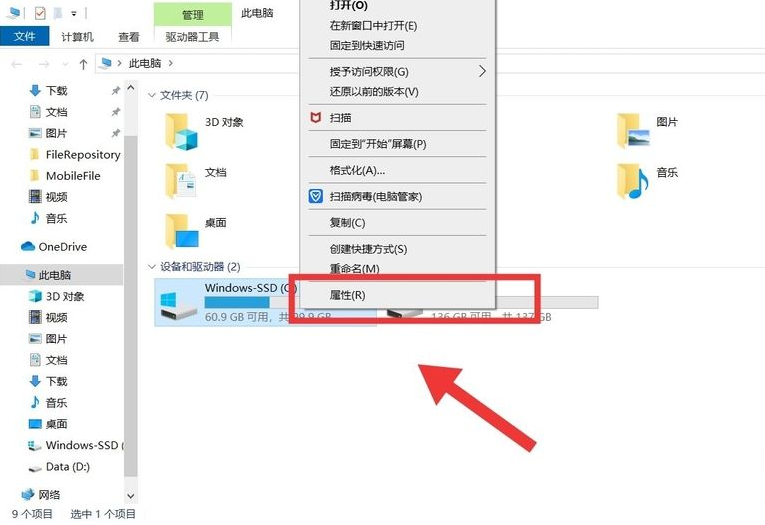
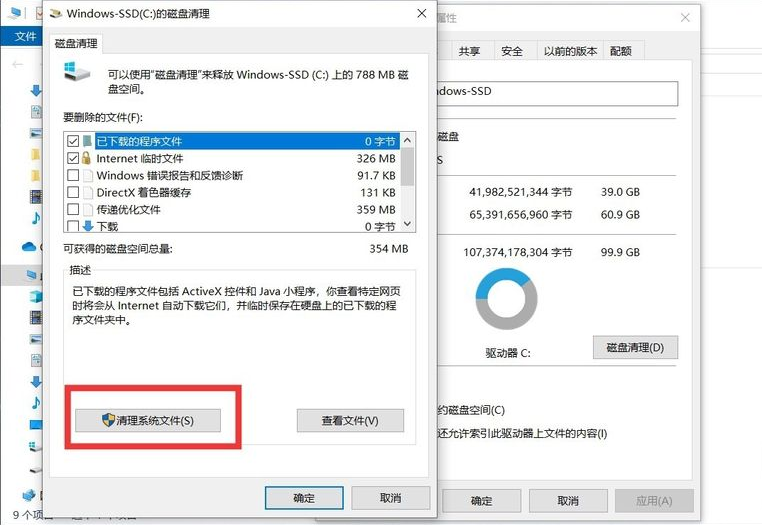
#4. The second optimization is to clean up the Windows.old folder. Click This Computer to find the C drive, right-click to find the [Properties] button, and click the "Disk Defragment" option.
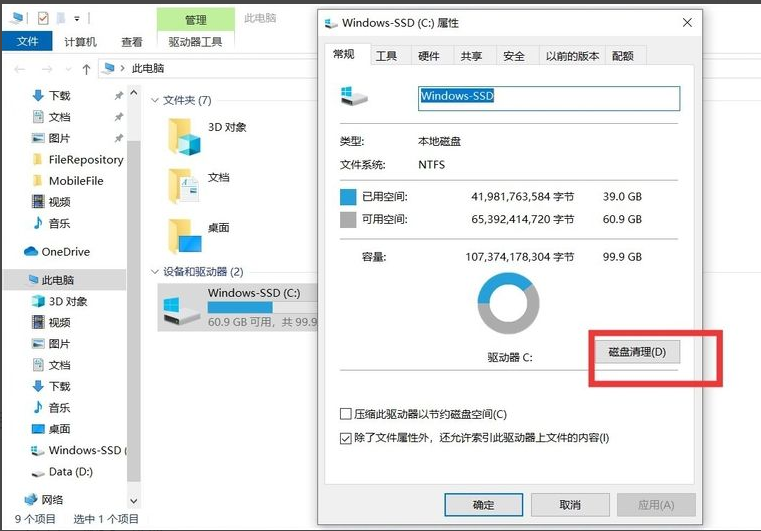
5. Then click the [Clean System Files] button in the left column, then check the "Windows Update Cleanup" in "Files to be deleted" and click Click the [OK] button.
The above is an introduction to what the windows10 optimization settings tutorial is. I hope it can help everyone.
The above is the detailed content of An introduction to what the windows10 optimization settings tutorial is. For more information, please follow other related articles on the PHP Chinese website!

Hot AI Tools

Undresser.AI Undress
AI-powered app for creating realistic nude photos

AI Clothes Remover
Online AI tool for removing clothes from photos.

Undress AI Tool
Undress images for free

Clothoff.io
AI clothes remover

Video Face Swap
Swap faces in any video effortlessly with our completely free AI face swap tool!

Hot Article
Hot Tools

Notepad++7.3.1
Easy-to-use and free code editor

SublimeText3 Chinese version
Chinese version, very easy to use

Zend Studio 13.0.1
Powerful PHP integrated development environment

Dreamweaver CS6
Visual web development tools

SublimeText3 Mac version
God-level code editing software (SublimeText3)
Hot Topics


 Learn about Xiaomi Do Not Disturb mode and how to set it up on Xiaomi Mi 11
Jan 03, 2024 pm 05:48 PM
Learn about Xiaomi Do Not Disturb mode and how to set it up on Xiaomi Mi 11
Jan 03, 2024 pm 05:48 PM
There is a function on Xiaomi mobile phones called Do Not Disturb mode. Many friends have discovered this function, but they don’t know what it means. Today we will share some popular science about what Do Not Disturb mode is, and we will also share the specific method on how to set Do Not Disturb mode on Xiaomi Mi 11. Do Not Disturb mode is a feature that allows your phone to be undisturbed for a specific period of time. When Do Not Disturb mode is turned on, the phone will automatically block notifications such as incoming calls and text messages to avoid disturbing the user's normal life or work. This is great for those who want to be undisturbed while sleeping, in meetings, or focusing on work. To set the Do Not Disturb mode on Xiaomi Mi 11, you can follow the steps below: 1. Open the settings menu of your phone. 2. Find the "Sounds and Vibration" option in the settings menu and click
 Teach you how to set the Win11 taskbar to the right
Dec 25, 2023 pm 04:15 PM
Teach you how to set the Win11 taskbar to the right
Dec 25, 2023 pm 04:15 PM
In the win11 system, we can not only set the taskbar to the left, but also set the taskbar to the right. In the previous system, you only needed to drag the taskbar, but in win11, you need to set up the registry. Let's follow the editor to set it up. How to move the win11 taskbar to the right: 1. First press "win+r" on the keyboard to open run, enter "regedit" and press Enter to confirm. 2. Find the following location in the registry: "Computer\HKEY_CURRENT_USER\Software\Microsoft\Windows\CurrentVersion\Explorer\StuckRects3" 3. Then double-click to open it
 Windows 10 environment variable setting tutorial
Jul 15, 2023 pm 06:09 PM
Windows 10 environment variable setting tutorial
Jul 15, 2023 pm 06:09 PM
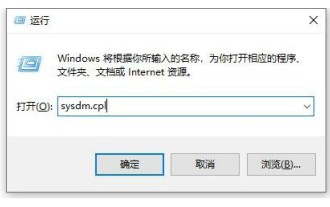
Environment variables are an important setting in the operating system, but some Windows 10 users still don’t know how to set environment variables. In fact, the method is very simple. Open the run window, call up the system characteristics window through the sysdm.cpl command, and then switch to the advanced tab. You will see a button for environment variables. Click this button to enter the setting of environment variables. interface, and then just set it up according to actual needs. How to set environment variables in Windows 10: 1. First open the run window on the computer, then enter sysdm.cpl in the window and press Enter. 2. Select Advanced in the system properties interface, and then click Environment Variables. 3. Here we can see the variables displayed, and we can create a new one on a single machine.
 Simple tutorial to set win11 charging limit
Dec 27, 2023 pm 11:01 PM
Simple tutorial to set win11 charging limit
Dec 27, 2023 pm 11:01 PM
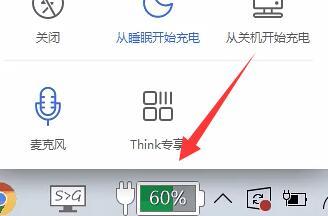
Some laptops support charging thresholds and can protect battery health by not fully charging them. So after updating the system, how to set the charging limit in win11? In fact, different computers have different setting methods. Win11 charging limit setting tutorial: 1. Lenovo computers need to download and install Lenovo Computer Manager first. 2. Then open it and click the "Battery Charging" icon at the bottom. 3. Then click "Change Battery Threshold" at the top. 4. After opening it, turn on the switch of the battery charging threshold, and you can modify the charging limit settings below. 5. ASUS notebooks can open the "myasus" software. 6. Find the "Battery Healthy Charging" function and click to enter. 7. Then turn on "Maintenance Mode" to set charging limits.
 How to set up Screen Time in Windows 11
Dec 25, 2023 pm 01:13 PM
How to set up Screen Time in Windows 11
Dec 25, 2023 pm 01:13 PM
In the win11 system, we can set the screen time to automatically sleep after a certain period of inactivity, which can protect our computer screen and power use. We only need to find the power option in the settings. Follow the steps below. Let’s set it up together. How to set screen time in win11 1. First, click the Windows button below to open the start menu. 2. Then enter the system settings in the start menu. 3. Find "Power" in the system settings and enter. 4. Expand Screen and Sleep, where you can set screen time. 5. In addition, we can also right-click the Start menu and open "Power Options" there.
 Windows 11 Transparent Window Configuration Guide
Dec 30, 2023 pm 12:34 PM
Windows 11 Transparent Window Configuration Guide
Dec 30, 2023 pm 12:34 PM
Microsoft has redesigned the windows and interface of win11. Therefore, many users do not like the new window color and want to set the window to a transparent state to improve the visual effect. In fact, we only need to find the personalized color settings in the settings. Let’s take a look at them together. How to set up the transparent window in win11: 1. First, we click on the start menu in the taskbar to enter "Settings" 2. On the left side of the setting interface, you can find and enter "Personalization" 3. Then click on the right side of Personalization "Color" enters the theme color settings. 4. Then find "Transparency Effect" and turn on the switch on the right side of it to set a transparent window.
 Learn how to set up Apple shortcuts
Feb 19, 2024 pm 02:57 PM
Learn how to set up Apple shortcuts
Feb 19, 2024 pm 02:57 PM
Apple Shortcut Command Settings Tutorial With the advancement of technology, we have gradually discovered many convenient and fast tools and functions, which make our lives more convenient. Apple's Shortcuts are one of them. Shortcuts is an application launched by Apple in the iOS12 system. It allows users to customize commands to use iOS devices more efficiently. This article will introduce you to how to set up Apple shortcuts, hoping to help you make better use of this feature. 1. Download and install
 How to set frosted glass background in win11 system
Jan 03, 2024 am 11:23 AM
How to set frosted glass background in win11 system
Jan 03, 2024 am 11:23 AM
In the win11 system, Microsoft has added a new frosted glass special effect, which can make our interface window transparent and more beautiful. However, many users may not know how to set the frosted glass background. In fact, you only need to set it in personalization. , let’s take a look below. How to set the frosted glass background in win11 system 1. First, we click the windows button below, and then find "Settings" 2. Open the settings interface and select "Personalization" as shown in the figure 3. In the left column of Personalization Find and select "Color" 4. After clicking the color option, find "More Options" on the right and turn on "Transparency Effect".