

How SpringBoot implements parameter verification through custom annotations

1. 为什么要进行参数校验
在后端进行工作时,需要接收前端传来的数据去数据库查询,但是如果有些数据过于离谱,我们就可以直接把它pass掉,不让这种垃圾数据接触数据库,减小数据库的压力。
有时候会有不安分的人通过一些垃圾数据攻击咱们的程序,让咱们的服务器或数据库崩溃,这种攻击虽然低级但不得不防,就像QQ进行登录请求时,它们向后端发送 账号=123,密码=123 的数据,一秒钟还发1w次,这很明显就是找事的好吧,什么人类的手速能达到1秒1万次?
解决方法是:一方面我们可以通过Redis记录ip/账号的方式拒绝一部分请求,例如1s中同一个ip/账号最多请求100次。在数据校验过程中,有一部分数据被通过了,但在这100条数据中有多少是垃圾数据,另一方面需要考虑。这样就可以尽量减小服务器数据库的压力。
2. 如何实现参数校验
实现参数校验说实话方式还挺多,个人使用过直接在Controller代码里面写、AOP+自定义注解、ConstraintValidator。本篇博客讲的是ConstraintValidator实现。
在Controller代码内直接编写这段代码虽然容易,但代码体积庞大,耦合度高,最主要的是缺乏优雅性。
AOP实现有难度,代码繁琐,显得逻辑杂乱。
所以我建议使用ConstraintValidator。
在这里先提供一个工具类进行参数校验,提供了对于手机号、邮箱、验证码、密码、身份证号的验证方法,可以直接copy来用。等下进行参数校验时我使用的就是这个类里的校验方法。
/**
 * @description : 验证手机号、身份证号、密码、验证码、邮箱的工具类
 * @author : 小何
 */
public class VerifyUtils {
    /**
     * 手机号正则
     */
    public static final String PHONE_REGEX = "^1([38][0-9]|4[579]|5[0-3,5-9]|6[6]|7[0135678]|9[89])\\d{8}$";

    /**
     * 邮箱正则
     */
    public static final String EMAIL_REGEX = "^[a-zA-Z0-9_-]+@[a-zA-Z0-9_-]+(\\.[a-zA-Z0-9_-]+)+$";

    /**
     * 密码正则。4~32位的字母、数字、下划线
     */
    public static final String PASSWORD_REGEX = "^\\w{4,32}$";

    /**
     * 验证码正则, 6位数字或字母
     */
    public static final String VERIFY_CODE_REGEX = "^[a-zA-Z\\d]{6}$";

    /**
     * 身份证号正则
     */
    public static final String ID_CARD_NUMBER_REGEX_18 = "^[1-9]\\d{5}(18|19|([23]\\d))\\d{2}((0[1-9])|(10|11|12))(([0-2][1-9])|10|20|30|31)\\d{3}[0-9Xx]$";
    public static final String ID_CARD_NUMBER_REGEX_15 = "^[1-9]\\d{5}\\d{2}((0[1-9])|(10|11|12))(([0-2][1-9])|10|20|30|31)\\d{2}$";


    /**
     * 手机号是否合法
     * @param phone 要校验的手机号
     * @return true:符合,false:不符合
     */
    public static boolean isPhoneLegal(String phone){
        return match(phone, PHONE_REGEX);
    }
    /**
     * 是否是无效邮箱格式
     * @param email 要校验的邮箱
     * @return true:符合,false:不符合
     */
    public static boolean isEmailLegal(String email){
        return match(email, EMAIL_REGEX);
    }

    /**
     * 是否是无效验证码格式
     * @param code 要校验的验证码
     * @return true:符合,false:不符合
     */
    public static boolean isCodeLegal(String code){
        return match(code, VERIFY_CODE_REGEX);
    }

    // 校验是否不符合正则格式
    private static boolean match(String str, String regex){
        if (str == null || "".equals(str)) {
            return false;
        }
        return str.matches(regex);
    }

    /**
     * 验证身份证号是否合法
     * @param idCard 身份证号
     * @return true: 合法;    false:不合法
     */
    public static boolean isIdCardLegal(String idCard) {
        if (idCard.length() == 18) {
            return match(idCard, ID_CARD_NUMBER_REGEX_18);
        } else {
            return match(idCard, ID_CARD_NUMBER_REGEX_15);
        }
    }
}使用案例:
public static void main(String[] args) {
    String phone = "15039469595";
    boolean phoneLegal = VerifyUtils.isPhoneLegal(phone);
    System.out.println(phoneLegal);
}3. 注解实现参数校验
首先导入依赖:
<dependency>
    <groupId>org.springframework.boot</groupId>
    <artifactId>spring-boot-starter-validation</artifactId>
</dependency>导入依赖后可以尝试使用一下它自带的参数校验注解:@NotNull 非空校验
先来说一下这注解实现参数校验的使用步骤。
在平时写的demo中,本人比较喜欢对接口另外定义vo来接收数据,例如前端传的数据是user对象里的username和password,我们的user里有很多字段,如果单纯使用user就太浪费了,而且如果直接在实体类上进行自定义注解会对实体类造成代码污染。所以个人认为定义vo类是很有必要的。
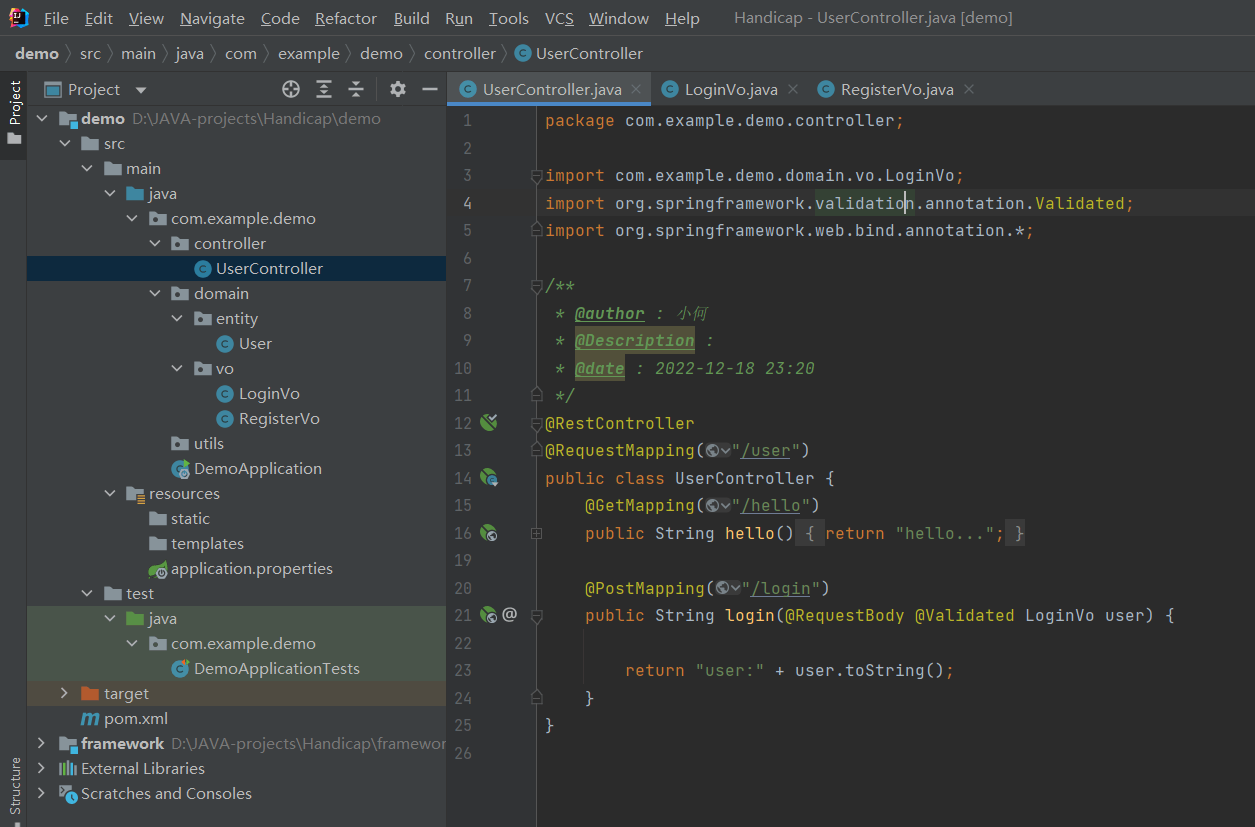
以下是我的登录接口:
@PostMapping("/login")
public String login(@RequestBody @Validated LoginVo user) {

    return "user:" + user.toString();
}以下是我登录接口的vo类:
@Data
public class LoginVo {
    // 邮箱
    @NotNull(message = "邮箱不能为空")
    private String email;
    // 密码
    private String password;
}大家可能注意到我多写了两个注解:@Validated、@NotNull(message = “邮箱不能为空”)
对,使用注解进行参数校验就分为两步:
在需要进行校验的字段上加对应校验方式,如@NotNull
在需要进行校验的接口参数前加@Validated,告诉Spring,这个类你给我看一下,里面有的字段加了校验注解,符合要求就放行,不符合要求就报错。
如图所示:

使用postman发起请求,故意使得邮箱为空:
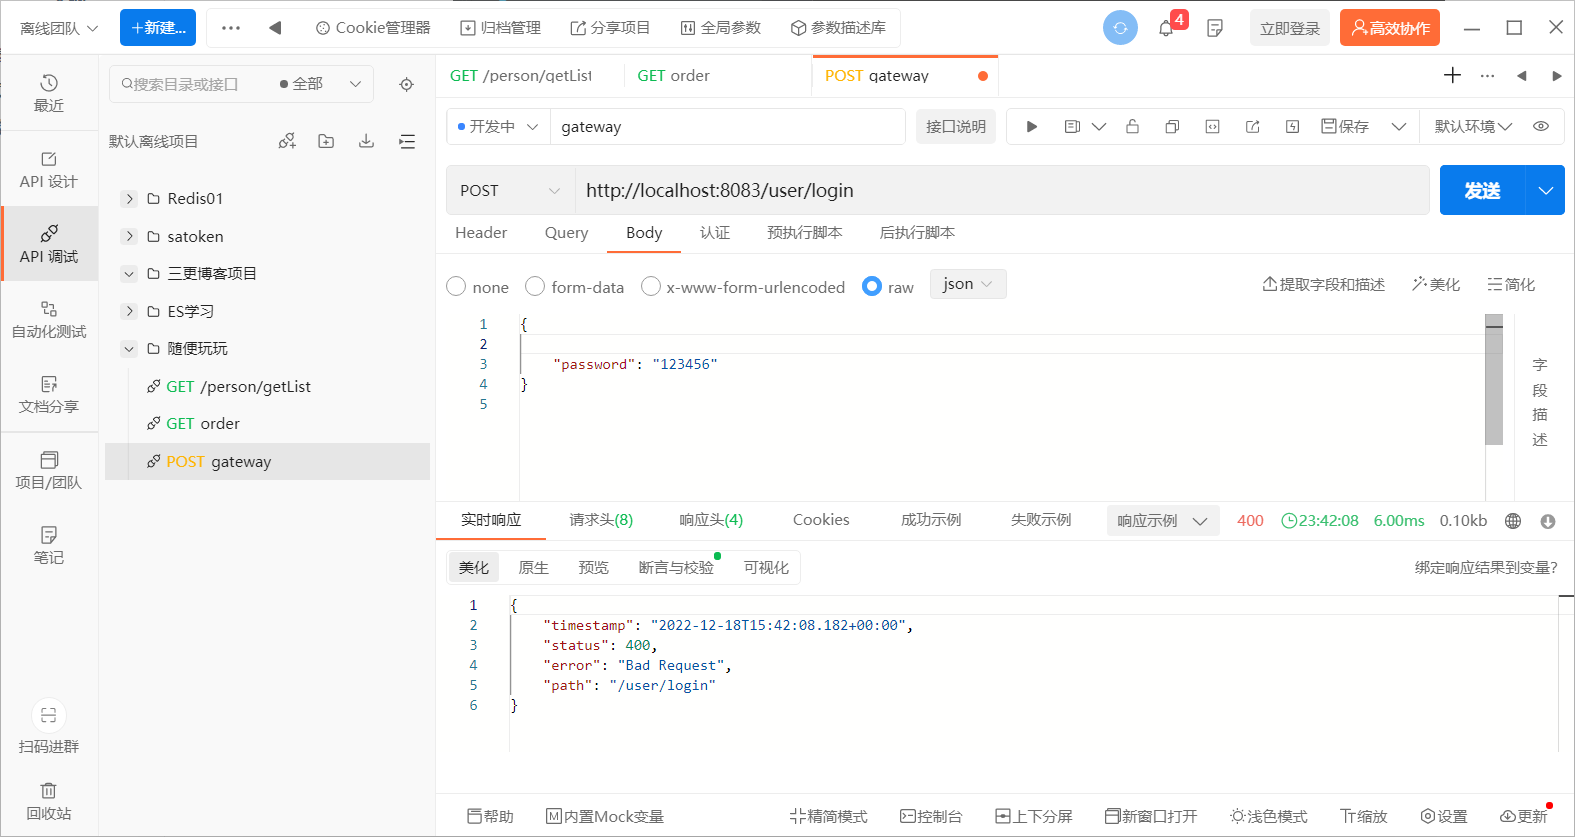
会发现报错:
Resolved [org.springframework.web.bind.MethodArgumentNotValidException:
Validation failed for argument [0] in public java.lang.String com.example.demo.controller.UserController.login(com.example.demo.domain.vo.LoginVo):
[Field error in object 'loginVo' on field 'email': rejected value [null]; codes [NotNull.loginVo.email,NotNull.email,NotNull.java.lang.String,NotNull]; arguments [org.springframework.context.support.DefaultMessageSourceResolvable: codes [loginVo.email,email]; arguments [];
default message [email]];
default message [邮箱不能为空]] ]
出现这个异常:MethodArgumentNotValidException,我们就可以在全局异常处理器中捕获它,返回一个较为规范的信息。
4. 自定义注解实现参数校验
学习了如何使用注解进行参数校验,我们就可以进行接下来的工作:自定义注解。
由于需求的复杂,我们现在需要完成注册接口,注册时需要身份证号、电话号码、邮箱、密码,这些字段的注解校验Spring并没有帮我们实现,此时就需要DIY注解满足需求。
如何实现自定义注解?我们先模仿,先来看看@NotNull注解里面有什么:
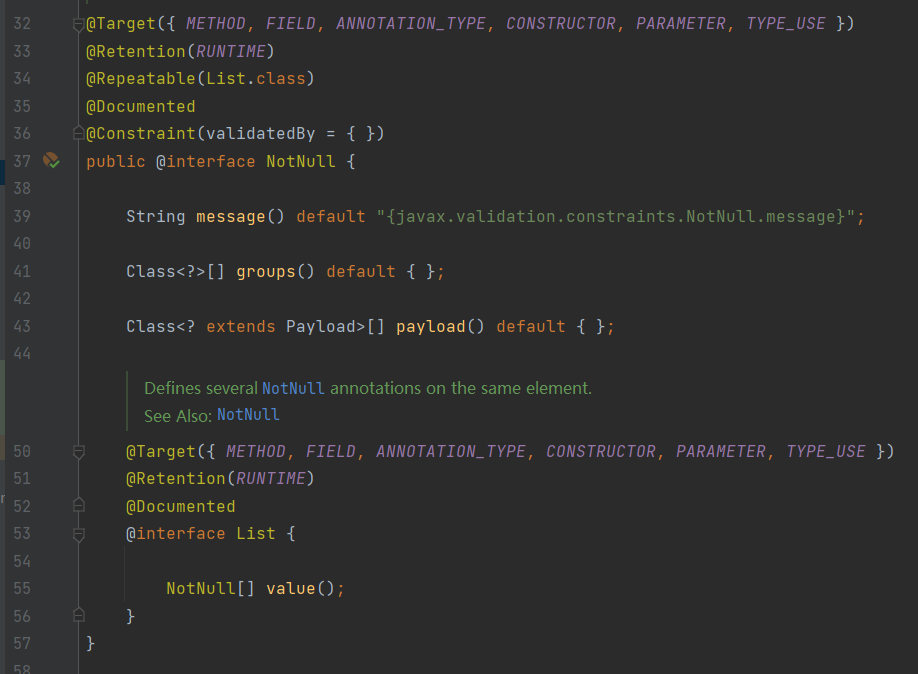
@Target、@Retention、@Repeatable、@Documented这些常用的注解就不再解释,
@Constraint:表示此注解是一个参数校验的注解,validateBy指定校验规则实现类,这里需要填实现类.class。
各个字段的含义:
message :数据不符合校验规则后的报错信息。如果需要校验多个字段,建议实现文件形式,以字符串或文件形式传递数据均可。
groups :指定注解使用场景,例如新增、删除
payload :往往对Bean使用
以上这三个字段都是必须的,每一个使用ConstraintValidator完成参数校验都要有这三个字段。
后面的那个List是NotNull专属的,所以不必关心。
那么我们大可以模仿@NotNull来实现自定义注解。
第一步:实现校验类:
需要实现一个接口:ConstraintValidator
# ConstraintValidator
第一个参数是自定义注解
第二个参数是需要进行校验的数据的数据类型
例如想对手机号校验,第一个参数是Phone,第二个参数是String
这个接口提供了一个方法:
boolean isValid(T value, ConstraintValidatorContext context);
第一个参数就是前端传来的数据。我们可以对这个数据进行判断,返回一个布尔值
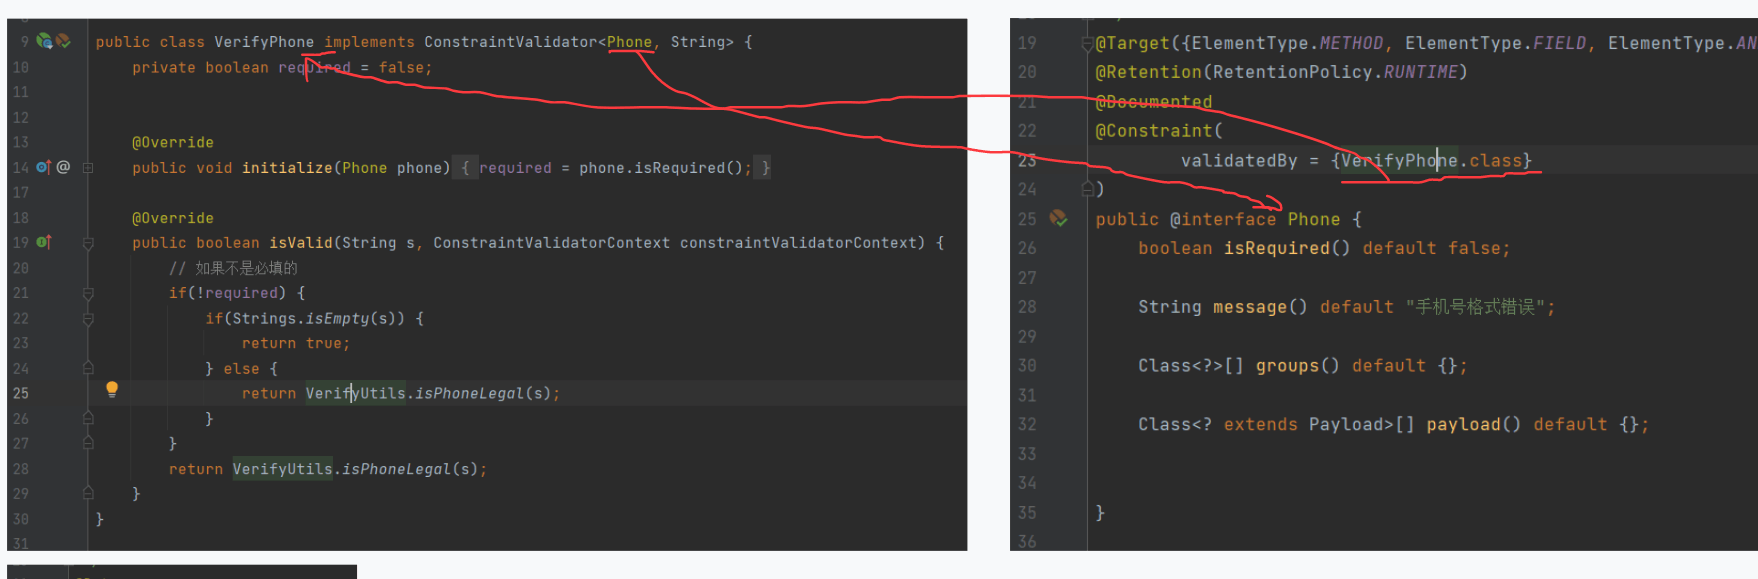
public class VerifyPhone implements ConstraintValidator<Phone, String> {

    @Override
    public boolean isValid(String s, ConstraintValidatorContext constraintValidatorContext) {
       // 判断手机号是否合法
        return VerifyUtils.isPhoneLegal(s);
    }
}第二步:实现注解,这个注解的名称需要与ConstraintValidator的第一个参数保持一致。
特别注意的是,@Constraint注解里面的validatedBy的值是第一步的Class实例。
@Target({ElementType.METHOD, ElementType.FIELD, ElementType.ANNOTATION_TYPE, ElementType.CONSTRUCTOR, ElementType.PARAMETER, ElementType.TYPE_USE})
@Retention(RetentionPolicy.RUNTIME)
@Documented
@Constraint(
        validatedBy = {VerifyPhone.class}
)
public @interface Phone {
    boolean isRequired() default false;

    String message() default "手机号格式错误";

    Class<?>[] groups() default {};

    Class<? extends Payload>[] payload() default {};

}第三步:在字段上加上相应注解。
@Data
public class RegisterVo {
    private String name;
    // 身份证号
    private String id;
    // 电话号码
    @Phone
    private String phone;
    // 邮箱
    private String email;
    // 密码
    private String password;
}第四步:在参数前加上@Validated。
@PutMapping("/register")
public String register(@RequestBody @Validated RegisterVo user) {
    return "user: " + user.toString();
}这样一来,就优雅的实现了参数校验。如果你不想在每个controller里都这样写,那么请不要认为我们分这么多类很麻烦
@PutMapping("/register")
public String register(@RequestBody @Validated RegisterVo user) {
    if (VerifyUtils.isPhoneLegal("xxx")) {
        return "手机号格式错误";
    }
    if (VerifyUtils.isCodeLegal("xxx")) {
        return "验证码格式错误";
    }
    if (VerifyUtils.isIdCardLegal("xxx")) {
        return "身份证格式错误";
    }
    if (VerifyUtils.isEmailLegal("xxx")) {
        return "邮箱格式错误";
    }
    return "user: " + user.toString();
}真的很low很麻烦好吗。
可能步骤有点繁琐,不过也就4步,画张图加强一下记忆:
The above is the detailed content of How SpringBoot implements parameter verification through custom annotations. For more information, please follow other related articles on the PHP Chinese website!

Hot AI Tools

Undresser.AI Undress
AI-powered app for creating realistic nude photos

AI Clothes Remover
Online AI tool for removing clothes from photos.

Undress AI Tool
Undress images for free

Clothoff.io
AI clothes remover

Video Face Swap
Swap faces in any video effortlessly with our completely free AI face swap tool!

Hot Article
Hot Tools

Notepad++7.3.1
Easy-to-use and free code editor

SublimeText3 Chinese version
Chinese version, very easy to use

Zend Studio 13.0.1
Powerful PHP integrated development environment

Dreamweaver CS6
Visual web development tools

SublimeText3 Mac version
God-level code editing software (SublimeText3)
Hot Topics


 How Springboot integrates Jasypt to implement configuration file encryption
Jun 01, 2023 am 08:55 AM
How Springboot integrates Jasypt to implement configuration file encryption
Jun 01, 2023 am 08:55 AM
Introduction to Jasypt Jasypt is a java library that allows a developer to add basic encryption functionality to his/her project with minimal effort and does not require a deep understanding of how encryption works. High security for one-way and two-way encryption. , standards-based encryption technology. Encrypt passwords, text, numbers, binaries... Suitable for integration into Spring-based applications, open API, for use with any JCE provider... Add the following dependency: com.github.ulisesbocchiojasypt-spring-boot-starter2. 1.1Jasypt benefits protect our system security. Even if the code is leaked, the data source can be guaranteed.
 How to use Redis to implement distributed locks in SpringBoot
Jun 03, 2023 am 08:16 AM
How to use Redis to implement distributed locks in SpringBoot
Jun 03, 2023 am 08:16 AM
1. Redis implements distributed lock principle and why distributed locks are needed. Before talking about distributed locks, it is necessary to explain why distributed locks are needed. The opposite of distributed locks is stand-alone locks. When we write multi-threaded programs, we avoid data problems caused by operating a shared variable at the same time. We usually use a lock to mutually exclude the shared variables to ensure the correctness of the shared variables. Its scope of use is in the same process. If there are multiple processes that need to operate a shared resource at the same time, how can they be mutually exclusive? Today's business applications are usually microservice architecture, which also means that one application will deploy multiple processes. If multiple processes need to modify the same row of records in MySQL, in order to avoid dirty data caused by out-of-order operations, distribution needs to be introduced at this time. The style is locked. Want to achieve points
 How SpringBoot integrates Redisson to implement delay queue
May 30, 2023 pm 02:40 PM
How SpringBoot integrates Redisson to implement delay queue
May 30, 2023 pm 02:40 PM
Usage scenario 1. The order was placed successfully but the payment was not made within 30 minutes. The payment timed out and the order was automatically canceled. 2. The order was signed and no evaluation was conducted for 7 days after signing. If the order times out and is not evaluated, the system defaults to a positive rating. 3. The order is placed successfully. If the merchant does not receive the order for 5 minutes, the order is cancelled. 4. The delivery times out, and push SMS reminder... For scenarios with long delays and low real-time performance, we can Use task scheduling to perform regular polling processing. For example: xxl-job Today we will pick
 How to solve the problem that springboot cannot access the file after reading it into a jar package
Jun 03, 2023 pm 04:38 PM
How to solve the problem that springboot cannot access the file after reading it into a jar package
Jun 03, 2023 pm 04:38 PM
Springboot reads the file, but cannot access the latest development after packaging it into a jar package. There is a situation where springboot cannot read the file after packaging it into a jar package. The reason is that after packaging, the virtual path of the file is invalid and can only be accessed through the stream. Read. The file is under resources publicvoidtest(){Listnames=newArrayList();InputStreamReaderread=null;try{ClassPathResourceresource=newClassPathResource("name.txt");Input
 How to implement Springboot+Mybatis-plus without using SQL statements to add multiple tables
Jun 02, 2023 am 11:07 AM
How to implement Springboot+Mybatis-plus without using SQL statements to add multiple tables
Jun 02, 2023 am 11:07 AM
When Springboot+Mybatis-plus does not use SQL statements to perform multi-table adding operations, the problems I encountered are decomposed by simulating thinking in the test environment: Create a BrandDTO object with parameters to simulate passing parameters to the background. We all know that it is extremely difficult to perform multi-table operations in Mybatis-plus. If you do not use tools such as Mybatis-plus-join, you can only configure the corresponding Mapper.xml file and configure The smelly and long ResultMap, and then write the corresponding sql statement. Although this method seems cumbersome, it is highly flexible and allows us to
 How SpringBoot customizes Redis to implement cache serialization
Jun 03, 2023 am 11:32 AM
How SpringBoot customizes Redis to implement cache serialization
Jun 03, 2023 am 11:32 AM
1. Customize RedisTemplate1.1, RedisAPI default serialization mechanism. The API-based Redis cache implementation uses the RedisTemplate template for data caching operations. Here, open the RedisTemplate class and view the source code information of the class. publicclassRedisTemplateextendsRedisAccessorimplementsRedisOperations, BeanClassLoaderAware{//Declare key, Various serialization methods of value, the initial value is empty @NullableprivateRedisSe
 Comparison and difference analysis between SpringBoot and SpringMVC
Dec 29, 2023 am 11:02 AM
Comparison and difference analysis between SpringBoot and SpringMVC
Dec 29, 2023 am 11:02 AM
SpringBoot and SpringMVC are both commonly used frameworks in Java development, but there are some obvious differences between them. This article will explore the features and uses of these two frameworks and compare their differences. First, let's learn about SpringBoot. SpringBoot was developed by the Pivotal team to simplify the creation and deployment of applications based on the Spring framework. It provides a fast, lightweight way to build stand-alone, executable
 How to get the value in application.yml in springboot
Jun 03, 2023 pm 06:43 PM
How to get the value in application.yml in springboot
Jun 03, 2023 pm 06:43 PM
In projects, some configuration information is often needed. This information may have different configurations in the test environment and the production environment, and may need to be modified later based on actual business conditions. We cannot hard-code these configurations in the code. It is best to write them in the configuration file. For example, you can write this information in the application.yml file. So, how to get or use this address in the code? There are 2 methods. Method 1: We can get the value corresponding to the key in the configuration file (application.yml) through the ${key} annotated with @Value. This method is suitable for situations where there are relatively few microservices. Method 2: In actual projects, When business is complicated, logic
