

How to use cPanel to configure Nginx reverse proxy in CentOS 7

cPanel is the most powerful, easiest to use, and most popular virtual host control system in the world. Many foreign hosts use this control panel.

First, we need to install the EPEL library to start this process
Step one: Install the EPEL library
root@server1 [/usr]# yum -y install epel-releaseLoaded plugins: fastestmirror, tsflags, universal-hooks
Loading mirror speeds from cached hostfile
* EA4: 66.23.237.210
* base: mirrors.linode.com
* extras: mirrors.linode.com
* updates: mirrors.linode.com
Resolving Dependencies
--> Running transaction check
---> Package epel-release.noarch 0:7-5 will be installed
--> Finished Dependency Resolution

Dependencies Resolved

========================================================================================
   Package Arch Version Repository Size
========================================================================================
Installing:
epel-release noarch 7-5 extras 14 k
Step 2: Install nDeploy's CentOS RPM library
You can install nDeploy's CentOS RPM library to install the nDeploy Web class software and Nginx plug-in we need
root@server1 [/usr]# yum -y install http://rpm.piserve.com/nDeploy-release-centos-1.0-1.noarch.rpmLoaded plugins: fastestmirror, tsflags, universal-hooks
nDeploy-release-centos-1.0-1.noarch.rpm | 1.7 kB 00:00:00
Examining /var/tmp/yum-root-ei5tWJ/nDeploy-release-centos-1.0-1.noarch.rpm: nDeploy-release-centos-1.0-1.noarch
Marking /var/tmp/yum-root-ei5tWJ/nDeploy-release-centos-1.0-1.noarch.rpm to be installed
Resolving Dependencies
--> Running transaction check
---> Package nDeploy-release-centos.noarch 0:1.0-1 will be installed
--> Finished Dependency Resolution

Dependencies Resolved

========================================================================================
Package Arch Version Repository Size
========================================================================================
Installing:
nDeploy-release-centos noarch 1.0-1 /nDeploy-release-centos-1.0-1.noarch 110
Third Step: Install nDeploy and Nginx nDeploy plug-in
root@server1 [/usr]# yum --enablerepo=ndeploy install nginx-nDeploy nDeployLoaded plugins: fastestmirror, tsflags, universal-hooks
epel/x86_64/metalink | 9.9 kB 00:00:00
epel | 4.3 kB 00:00:00
ndeploy | 2.9 kB 00:00:00
(1/4): ndeploy/7/x86_64/primary_db | 14 kB 00:00:00
(2/4): epel/x86_64/group_gz | 169 kB 00:00:00
(3/4): epel/x86_64/primary_db | 3.7 MB 00:00:02

Dependencies Resolved

========================================================================================
Package Arch Version Repository Size
========================================================================================
Installing:
nDeploy noarch 2.0-11.el7 ndeploy 80 k
nginx-nDeploy x86_64 1.8.0-34.el7 ndeploy 36 M
Installing for dependencies:
PyYAML x86_64 3.10-11.el7 base 153 k
libevent x86_64 2.0.21-4.el7 base 214 k
memcached x86_64 1.4.15-9.el7 base 84 k
python-inotify noarch 0.9.4-4.el7 base 49 k
python-lxml x86_64 3.2.1-4.el7 base 758 k

Transaction Summary
========================================================================================
Install 2 Packages (+5 Dependent packages)
We installed the Nginx plug-in on our server and completed the installation according to the above steps. Now we can configure Nginx as a reverse proxy and create a virtual host for the existing cPanel user account, for which we can run the following script.
Step 4: Start Nginx as the default front-end web server and create the default configuration file
root@server1 [/usr]# /opt/nDeploy/scripts/cpanel-nDeploy-setup.sh enableModifying apache http and https port in cpanel

httpd restarted successfully.
Created symlink from /etc/systemd/system/multi-user.target.wants/nginx.service to /usr/lib/systemd/system/nginx.service.
Created symlink from /etc/systemd/system/multi-user.target.wants/ndeploy_watcher.service to /usr/lib/systemd/system/ndeploy_watcher.service.
Created symlink from /etc/systemd/system/multi-user.target.wants/ndeploy_backends.service to /usr/lib/systemd/system/ndeploy_backends.service.
ConfGen:: saheetha
ConfGen:: satest
You can see that this script will modify the Apache port from 80 to another port to use Nginx as a front-end web server and create a virtual host profile for existing cPanel users. Once completed, confirm the status of Apache and Nginx.
Apache status:
root@server1 [/var/run/httpd]# systemctl status httpd● httpd.service - Apache Web Server
Loaded: loaded (/usr/lib/systemd/system/httpd.service; enabled; vendor preset: disabled)
Active: active (running) since Mon 2016-01-18 06:34:23 UTC; 12s ago
Process: 25606 ExecStart=/usr/sbin/apachectl start (code=exited, status=0/SUCCESS)
Main PID: 24760 (httpd)
CGroup: /system.slice/httpd.service
‣ 24760 /usr/local/apache/bin/httpd -k start

Jan 18 06:34:23 server1.centos7-test.com systemd[1]: Starting Apache Web Server...
Jan 18 06:34:23 server1.centos7-test.com apachectl[25606]: httpd (pid 24760) already running
Jan 18 06:34:23 server1.centos7-test.com systemd[1]: Started Apache Web Server.
Nginx status:
root@server1 [~]# systemctl status nginx● nginx.service - nginx-nDeploy - high performance web server
Loaded: loaded (/usr/lib/systemd/system/nginx.service; enabled; vendor preset: disabled)
Active: active (running) since Sun 2016-01-17 17:18:29 UTC; 13h ago
Docs: http://nginx.org/en/docs/
Main PID: 3833 (nginx)
CGroup: /system.slice/nginx.service
├─ 3833 nginx: master process /usr/sbin/nginx -c /etc/nginx/nginx.conf
├─25473 nginx: worker process
├─25474 nginx: worker process
└─25475 nginx: cache manager process

Jan 17 17:18:29 server1.centos7-test.com systemd[1]: Starting nginx-nDeploy - high performance web server...
Jan 17 17:18:29 server1.centos7-test.com nginx[3804]: nginx: the configuration file /etc/nginx/nginx.conf syntax is ok
Jan 17 17:18:29 server1.centos7-test.com nginx[3804]: nginx: configuration file /etc/nginx/nginx.conf test is successful
Jan 17 17:18:29 server1.centos7-test.com systemd[1]: Started nginx-nDeploy - high performance web server.
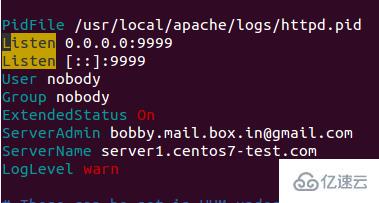
Nginx runs as a front-end server on port 80, and the Apache configuration is Change to listen on http port 9999 and https port 4430. Please take a look at their situation:
root@server1 [/usr/local/src]# netstat -plan | grep httpdtcp 0 0 0.0.0.0:4430 0.0.0.0:* LISTEN 17270/httpd
tcp 0 0 0.0.0.0:9999 0.0.0.0:* LISTEN 17270/httpd
tcp6 0 0 :::4430 :::* LISTEN 17270/httpd
tcp6 0 0 :::9999 :::* LISTEN 17270/httpd
root@server1 [/usr/local/src]# netstat -plan | grep nginxtcp 0 0 127.0.0.1:80 0.0.0.0:* LISTEN 17802/nginx: master
tcp 0 0 45.79.183.73:80 0.0.0.0:* LISTEN 17802/nginx: master
The configuration file of the virtual host created for an existing user is in "/etc/nginx/sites-enabled". This file path contains the main Nginx configuration files.
root@server1 [/etc/nginx/sites-enabled]# ll | grep .conf-rw-r--r-- 1 root root 311 Jan 17 09:02 saheetha.com.conf-rw-r--r-- 1 root root 336 Jan 17 09:02 saheethastest.com.conf
Example virtual host of a domain name:
server {

listen 45.79.183.73:80;#CPIPVSIX:80;# ServerNamesserver_name saheetha.com www.saheetha.com;
access_log /usr/local/apache/domlogs/saheetha.com main;
access_log /usr/local/apache/domlogs/saheetha.com-bytes_log bytes_log;

include /etc/nginx/sites-enabled/saheetha.com.include;

}We can start the browser to view the website to determine the working status of the web server. After installation, read the web service information on the server.
root@server1 [/home]# ip a | grep -i eth03: eth0:  mtu 1500 qdisc pfifo_fast state UP qlen 1000
inet 45.79.183.73/24 brd 45.79.183.255 scope global dynamic eth0
root@server1 [/home]# nginx -vnginx version: nginx/1.8.0
Rewrite this sentence to get: For all newly created accounts in cPanel, Nginx will create virtual hosts for them. With these simple steps, we can configure Nginx as a reverse proxy on a CentOS 7 / cPanel server.
Advantages of Nginx as a reverse proxy
Easy to install and configure.
High efficiency and good performance.
Prevent Ddos attacks.
Support using .htaccess as a rewrite rule for PHP.
The above is the detailed content of How to use cPanel to configure Nginx reverse proxy in CentOS 7. For more information, please follow other related articles on the PHP Chinese website!

Hot AI Tools

Undresser.AI Undress
AI-powered app for creating realistic nude photos

AI Clothes Remover
Online AI tool for removing clothes from photos.

Undress AI Tool
Undress images for free

Clothoff.io
AI clothes remover

Video Face Swap
Swap faces in any video effortlessly with our completely free AI face swap tool!

Hot Article
Hot Tools

Notepad++7.3.1
Easy-to-use and free code editor

SublimeText3 Chinese version
Chinese version, very easy to use

Zend Studio 13.0.1
Powerful PHP integrated development environment

Dreamweaver CS6
Visual web development tools

SublimeText3 Mac version
God-level code editing software (SublimeText3)
Hot Topics


 How to optimize CentOS HDFS configuration
Apr 14, 2025 pm 07:15 PM
How to optimize CentOS HDFS configuration
Apr 14, 2025 pm 07:15 PM
Improve HDFS performance on CentOS: A comprehensive optimization guide to optimize HDFS (Hadoop distributed file system) on CentOS requires comprehensive consideration of hardware, system configuration and network settings. This article provides a series of optimization strategies to help you improve HDFS performance. 1. Hardware upgrade and selection resource expansion: Increase the CPU, memory and storage capacity of the server as much as possible. High-performance hardware: adopts high-performance network cards and switches to improve network throughput. 2. System configuration fine-tuning kernel parameter adjustment: Modify /etc/sysctl.conf file to optimize kernel parameters such as TCP connection number, file handle number and memory management. For example, adjust TCP connection status and buffer size
 How to check the name of the docker container
Apr 15, 2025 pm 12:21 PM
How to check the name of the docker container
Apr 15, 2025 pm 12:21 PM
You can query the Docker container name by following the steps: List all containers (docker ps). Filter the container list (using the grep command). Gets the container name (located in the "NAMES" column).
 Centos shutdown command line
Apr 14, 2025 pm 09:12 PM
Centos shutdown command line
Apr 14, 2025 pm 09:12 PM
The CentOS shutdown command is shutdown, and the syntax is shutdown [Options] Time [Information]. Options include: -h Stop the system immediately; -P Turn off the power after shutdown; -r restart; -t Waiting time. Times can be specified as immediate (now), minutes ( minutes), or a specific time (hh:mm). Added information can be displayed in system messages.
 Centos stops maintenance 2024
Apr 14, 2025 pm 08:39 PM
Centos stops maintenance 2024
Apr 14, 2025 pm 08:39 PM
CentOS will be shut down in 2024 because its upstream distribution, RHEL 8, has been shut down. This shutdown will affect the CentOS 8 system, preventing it from continuing to receive updates. Users should plan for migration, and recommended options include CentOS Stream, AlmaLinux, and Rocky Linux to keep the system safe and stable.
 How to install mysql in centos7
Apr 14, 2025 pm 08:30 PM
How to install mysql in centos7
Apr 14, 2025 pm 08:30 PM
The key to installing MySQL elegantly is to add the official MySQL repository. The specific steps are as follows: Download the MySQL official GPG key to prevent phishing attacks. Add MySQL repository file: rpm -Uvh https://dev.mysql.com/get/mysql80-community-release-el7-3.noarch.rpm Update yum repository cache: yum update installation MySQL: yum install mysql-server startup MySQL service: systemctl start mysqld set up booting
 How to create containers for docker
Apr 15, 2025 pm 12:18 PM
How to create containers for docker
Apr 15, 2025 pm 12:18 PM
Create a container in Docker: 1. Pull the image: docker pull [mirror name] 2. Create a container: docker run [Options] [mirror name] [Command] 3. Start the container: docker start [Container name]
 How to check CentOS HDFS configuration
Apr 14, 2025 pm 07:21 PM
How to check CentOS HDFS configuration
Apr 14, 2025 pm 07:21 PM
Complete Guide to Checking HDFS Configuration in CentOS Systems This article will guide you how to effectively check the configuration and running status of HDFS on CentOS systems. The following steps will help you fully understand the setup and operation of HDFS. Verify Hadoop environment variable: First, make sure the Hadoop environment variable is set correctly. In the terminal, execute the following command to verify that Hadoop is installed and configured correctly: hadoopversion Check HDFS configuration file: The core configuration file of HDFS is located in the /etc/hadoop/conf/ directory, where core-site.xml and hdfs-site.xml are crucial. use
 How to start containers by docker
Apr 15, 2025 pm 12:27 PM
How to start containers by docker
Apr 15, 2025 pm 12:27 PM
Docker container startup steps: Pull the container image: Run "docker pull [mirror name]". Create a container: Use "docker create [options] [mirror name] [commands and parameters]". Start the container: Execute "docker start [Container name or ID]". Check container status: Verify that the container is running with "docker ps".
