

How to remove time from date in Excel

Change date format in Excel using number format
The easiest way to remove time from a date in Excel is to change the number format.
This does not remove the time from the timestamp - it just prevents it from displaying in your cell. If you use these cells in calculations, the time and date are still included.
To change the date format in Excel using number format:
- Open your Excel spreadsheet.
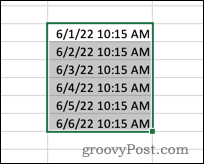
- Select the cell containing your timestamp.

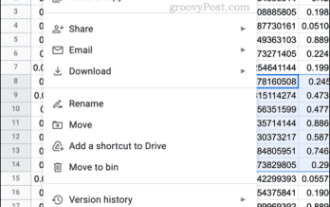
- In the main menu, select the down arrow at the end of the Number Format box.
- Choose a date format.

After you change the format, the time will stop appearing in your cells. 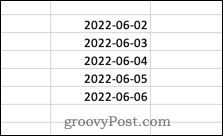
If you click on one of the cells, the time format is still visible in the formula bar. 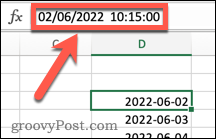
Change the date format in Excel using cell format
The above method only gives you two time/date options to choose from. If you want more control over how your data is displayed, you'll want to use the "Set CellFormat" method.
To change the date format in Excel using advanced cell formatting:
- Open your Excel spreadsheet.
- Select the cell or cells that contain your timestamp.
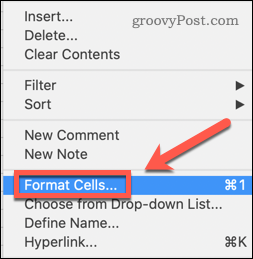
- Right-click and select Set CellFormat. Alternatively, you can use the shortcut Ctrl 1 on Windows or Cmd 1 on Mac.
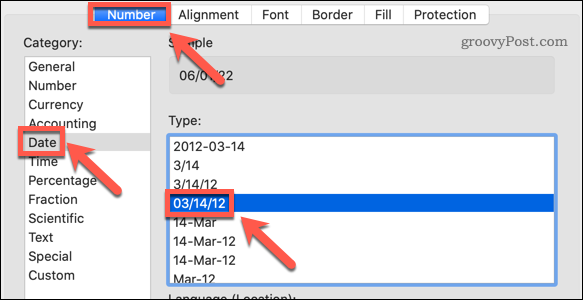
- In the Numbers tab, click Date and select a date format that does not include time.
- Click "OK" to confirm.
The date is now displayed without the time, but if you click the cell, the time is still displayed in the formula bar.
Removing time from date using INT function
To completely remove time information, you can use the INT function. That's because timestamps are in decimal form. The number before the decimal point represents the date, and the number after the decimal point represents the time.
INT function deletes everything after the decimal point, removes time information but retains date information.
To remove time from a date using INT in Excel:
- Click on the cell where you want the edited date to appear.
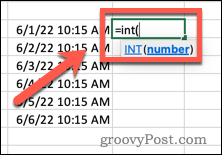
- Enter=INT(
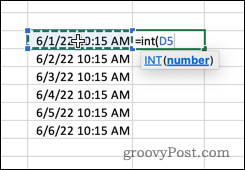
- Select the cell containing the timestamp (or type the cell reference manually).
- Type the last closing bracket and press Enter.
Your results will now show a time of 12:00 AM. This is because the cell is still Takes a format that displays the date and time. Since the time portion is now zero, it displays it as 12:00 AM.
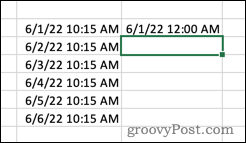
To completely remove the time, follow the previous section Follow the steps in to change the date format to one that does not include the time.
Making the Change in Excel
Knowing how to remove time from a date in Excel can allow you to display exactly what you want of data.
You can provide more detailed date information by adding the month in Excel. If your timestamp displays as text, you can also convert the text to a date. In Excel, you can Cut text to remove unnecessary parts.
The above is the detailed content of How to remove time from date in Excel. For more information, please follow other related articles on the PHP Chinese website!

Hot AI Tools

Undresser.AI Undress
AI-powered app for creating realistic nude photos

AI Clothes Remover
Online AI tool for removing clothes from photos.

Undress AI Tool
Undress images for free

Clothoff.io
AI clothes remover

Video Face Swap
Swap faces in any video effortlessly with our completely free AI face swap tool!

Hot Article
Hot Tools

Notepad++7.3.1
Easy-to-use and free code editor

SublimeText3 Chinese version
Chinese version, very easy to use

Zend Studio 13.0.1
Powerful PHP integrated development environment

Dreamweaver CS6
Visual web development tools

SublimeText3 Mac version
God-level code editing software (SublimeText3)
Hot Topics


 How to set the print area in Google Sheets?
May 08, 2023 pm 01:28 PM
How to set the print area in Google Sheets?
May 08, 2023 pm 01:28 PM
How to Set GoogleSheets Print Area in Print Preview Google Sheets allows you to print spreadsheets with three different print areas. You can choose to print the entire spreadsheet, including each individual worksheet you create. Alternatively, you can choose to print a single worksheet. Finally, you can only print a portion of the cells you select. This is the smallest print area you can create since you could theoretically select individual cells for printing. The easiest way to set it up is to use the built-in Google Sheets print preview menu. You can view this content using Google Sheets in a web browser on your PC, Mac, or Chromebook. To set up Google
 5 Tips to Fix Stdole32.tlb Excel Error in Windows 11
May 09, 2023 pm 01:37 PM
5 Tips to Fix Stdole32.tlb Excel Error in Windows 11
May 09, 2023 pm 01:37 PM
When you start Microsoft Word or Microsoft Excel, Windows very tediously tries to set up Office 365. At the end of the process, you may receive a Stdole32.tlbExcel error. Since there are many bugs in the Microsoft Office suite, launching any of its products can sometimes be a nightmare. Microsoft Office is a software that is used regularly. Microsoft Office has been available to consumers since 1990. Starting from Office 1.0 version and developing to Office 365, this
 How to embed a PDF document in an Excel worksheet
May 28, 2023 am 09:17 AM
How to embed a PDF document in an Excel worksheet
May 28, 2023 am 09:17 AM
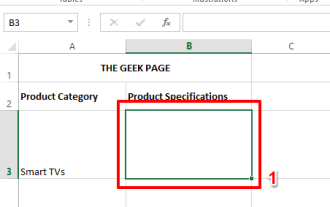
It is usually necessary to insert PDF documents into Excel worksheets. Just like a company's project list, we can instantly append text and character data to Excel cells. But what if you want to attach the solution design for a specific project to its corresponding data row? Well, people often stop and think. Sometimes thinking doesn't work either because the solution isn't simple. Dig deeper into this article to learn how to easily insert multiple PDF documents into an Excel worksheet, along with very specific rows of data. Example Scenario In the example shown in this article, we have a column called ProductCategory that lists a project name in each cell. Another column ProductSpeci
 How to use the SIGN function in Excel to determine the sign of a value
May 07, 2023 pm 10:37 PM
How to use the SIGN function in Excel to determine the sign of a value
May 07, 2023 pm 10:37 PM
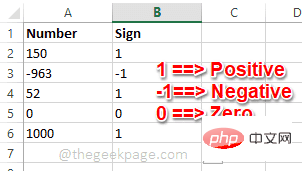
The SIGN function is a very useful function built into Microsoft Excel. Using this function you can find out the sign of a number. That is, whether the number is positive. The SIGN function returns 1 if the number is positive, -1 if the number is negative, and zero if the number is zero. Although this sounds too obvious, if you have a large column containing many numbers and we want to find the sign of all the numbers, it is very useful to use the SIGN function and get the job done in a few seconds. In this article, we explain 3 different methods on how to easily use the SIGN function in any Excel document to calculate the sign of a number. Read on to learn how to master this cool trick. start up
 How to prevent Excel from removing leading zeros
Feb 29, 2024 am 10:00 AM
How to prevent Excel from removing leading zeros
Feb 29, 2024 am 10:00 AM
Is it frustrating to automatically remove leading zeros from Excel workbooks? When you enter a number into a cell, Excel often removes the leading zeros in front of the number. By default, it treats cell entries that lack explicit formatting as numeric values. Leading zeros are generally considered irrelevant in number formats and are therefore omitted. Additionally, leading zeros can cause problems in certain numerical operations. Therefore, zeros are automatically removed. This article will teach you how to retain leading zeros in Excel to ensure that the entered numeric data such as account numbers, zip codes, phone numbers, etc. are in the correct format. In Excel, how to allow numbers to have zeros in front of them? You can preserve leading zeros of numbers in an Excel workbook, there are several methods to choose from. You can set the cell by
 How to make a box plot in Excel
May 19, 2023 am 09:44 AM
How to make a box plot in Excel
May 19, 2023 am 09:44 AM
<h2id="What’saBoxPlot?">What is a boxplot? </h2><p>For descriptive statistics, boxplots are one of the best ways to show how data is distributed. It displays numbers in quartiles, highlighting averages and outliers. From comparing medical trial results to comparing test scores of different teachers, statistical analysis uses boxplots. </p><p>The basis of a boxplot is to display data based on five-digit summaries. This means displaying: <
 Golang time processing: How to convert timestamp to string in Golang
Feb 24, 2024 pm 10:42 PM
Golang time processing: How to convert timestamp to string in Golang
Feb 24, 2024 pm 10:42 PM
Golang time conversion: How to convert timestamp to string In Golang, time operation is one of the very common operations. Sometimes we need to convert the timestamp into a string for easy display or storage. This article will introduce how to use Golang to convert timestamps to strings and provide specific code examples. 1. Conversion of timestamps and strings In Golang, timestamps are usually expressed in the form of integer numbers, which represent the number of seconds from January 1, 1970 to the current time. The string is
 How to sum columns in Excel
May 16, 2023 pm 03:26 PM
How to sum columns in Excel
May 16, 2023 pm 03:26 PM
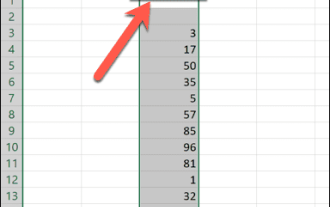
How to Quickly View the Total of a Column in Excel If you just want to know the total of a column without adding that information to your spreadsheet, you can use the Excel status bar to quickly view the total of a column or any range of cells. To see the sum of a column using the Excel status bar: Highlight the data you want to summarize. To select an entire column, click the column name. Otherwise, drag cells to select your range. At the bottom of the screen, you'll see information about your selection, such as the average of all values and the number of data points in the range. You will also see the sum of all values in the selected cells. How to sum columns in Excel using AutoSum If you wish to add the sum of a column to a spreadsheet, there are many situations