
 Operation and Maintenance
Nginx
How to achieve high availability by combining keepalived with nginx
Operation and Maintenance
Nginx
How to achieve high availability by combining keepalived with nginx
How to achieve high availability by combining keepalived with nginx

1. Introduction
keepalived is a high-availability solution for lvs services based on the vrrp protocol, which can be used to avoid single points of failure. An LVS service will have two servers running keepalived, one as the main server (master) and one as the backup server (backup), but it appears as a virtual IP to the outside world. The main server will send specific messages to the backup server. When the backup server When the server cannot receive this message, that is, when the main server goes down, the backup server will take over the virtual IP and continue to provide services, thereby ensuring high availability. Keepalived is the perfect implementation of vrrp, so before introducing keepalived, let’s first introduce the principle of vrrp.
1. Introduction to vrrp protocol
In a real network environment, two hosts that need to communicate do not have a direct physical connection in most cases. For such a situation, how to choose the route between them? How does the host select the next hop route to the destination host? There are two common solutions to this problem:
Use dynamic routing protocols (rip, ospf, etc.) on the host
Configuring static routing on the host
Obviously, configuring dynamic routing on the host is very impractical because of the management and maintenance costs and Whether it is supported and many other questions. Configuring static routes has become very popular, but the router (or default gateway) often becomes a single point of failure. The purpose of vrrp is to solve the single point of failure problem of static routing. vrrp uses an election protocol to dynamically assign routing tasks to a certain vrrp router among the virtual routers in the lan.
2.vrrp working mechanism
In a vrrp virtual router, there are multiple physical vrrp routers, but these multiple physical machines cannot work at the same time. , but one called the master is responsible for routing work, and the others are backups. The master is not static. vrrp allows each vrrp router to participate in the election, and the master is the winner in the end. The master has some privileges. For example, it has the IP address of the virtual router. Our host uses this IP address as a static route. The privileged master is responsible for forwarding packets sent to the gateway address and responding to arp requests.
vrrp implements the function of a virtual router through the election protocol. All protocol messages are sent in the form of ip multicast (multicast) packets (multicast address 224.0.0.18). A virtual router consists of a vrid (range 0-255) and a set of IP addresses, which appear to the outside world as a well-known mac address. Therefore, in a virtual router, no matter who is the master, the external mac and ip are the same (called vip). The client host does not need to modify its routing configuration due to changes in the master. For the client, this master-slave switching is transparent.
In a virtual router, only the vrrp router as the master will always send vrrp notification messages (vrrpadvertisement messages), and the backup will not preempt the master unless its priority is higher. When the master is unavailable (the backup cannot receive notification information), the one with the highest priority among multiple backups will be preempted to become the master. This preemption is very fast (
3.vrrp workflow
(1).Initialization:
When the router starts, if the priority of the router is 255( The highest priority, the router has the router address), to send vrrp notification information, and send broadcast arp information to notify the mac address corresponding to the router ip address is the routing virtual mac, set the notification information timer to prepare to send vrrp notification information regularly, and transfer to the master state ; Otherwise, enter the backup state and set a timer to check whether the notification information from the master is received regularly.
(2).master
Set the scheduled notification timer;
Use the vrrp virtual mac address to respond to the router ip address arp request;
Forward the packet whose destination mac is vrrp virtual mac;
If it is the owner of the virtual router ip, it will be accepted The data packet whose destination address is the virtual router IP will be discarded otherwise;
When a shutdown event is received, the scheduled notification timer will be deleted, a notification packet with a priority level of 0 will be sent, and the initialization will be performed. Status;
If the scheduled notification timer times out, vrrp notification information is sent;
When vrrp notification information is received, if the priority is 0, send vrrp notification information; otherwise, determine whether the priority of the data is higher than that of the local machine, or whether it is equal and the actual IP address is greater than the actual local IP, set the scheduled notification timer, reset the host timeout timer, and transfer to the backup state; otherwise, discard it The notification packet;
(3).backup
Set the host timeout timer;
Cannot respond to the arp request information for the virtual router IP;
Discard all packets whose destination mac address is the virtual router mac address;
Do not accept all data packets destined for the virtual router IP;
When receiving a shutdown event, delete the host timeout timer and transfer to the initialization state;
When the host timeout timer times out, it sends vrrp notification information, broadcasts arp address information, and switches to the master state;
When it receives vrrp notification information, If the priority is 0, it means entering the master election; otherwise, determine whether the priority of the data is higher than the local machine. If it is high, admit the master is valid and reset the host timeout timer; otherwise, discard the notification packet;
4.arp query processing
When the internal host queries the mac address corresponding to the virtual router ip address through arp, the mac address replied by the master router is the virtual vrrp mac address, rather than the mac address of the actual network card, so that the internal network machine cannot detect it when the router switches; and when the router restarts, it cannot actively send the actual mac address of the local network card. If the arp proxy (proxy_arp) function is enabled on the virtual router, the proxy's arp response also responds to the vrrp virtual mac address.
2. Build the environment
1. Server 1: 10.63.0.154 Install keeplived and set the priority value to 100
2. Server 2: 10.63.0.155 Install keepalived and set the priority value to 98
3. Set the virtual IP corresponding to the two servers to: 10.63.0.158
3. Install the keepalived master node
This installation of keepalived adopts yum mode and is installed on server 1. The main steps are as follows:
1. Install ipvsadm, command: yum install ipvsadm. After the installation is completed, you can Command ipvsadm –v to view the version number.
2. Install keepalived, command: yum install keepalived. After the installation is completed, you can check the version number through the command keepalived –v.
3. Create the /usr/local/nginx/nginx_check.sh script. The content of the script is as follows:
#!/bin/bash
#判断nginx服务是否启动,如果不存在,调用nginx启用命令,并停止2秒,若#启动失败,杀掉keepalived
a=`ps -c nginx --no-header |wc -l`
if [ $a -eq 0 ];then
 /usr/sbin/nginx
 sleep 2
 if [ `ps -c nginx --no-header |wc -l` -eq 0 ];then
  killall keepalived
 fi
fi
Set nginx_check.sh permissions. The setting command is: chmod 777 /usr/local/nginx/nginx_check.sh
4. Configure keepalived node information, default The configuration file is /etc/keepalived/keepalived.conf. The keepalived.conf configuration file is as follows:
! configuration file for keepalived

global_defs {
 router_id nginx_master154
}

vrrp_script chk_nginx {
 script "/usr/local/nginx/nginx_check.sh"
 interval 2
 weight 20
}
vrrp_instance vi_1 {
 state master
 interface eth0
 virtual_router_id 154
 mcast_src_ip 10.63.0.154
 priority 100
 nopreempt
 advert_int 1
 authentication {
  auth_type pass
  auth_pass 1111
 }
 track_script {
  chk_nginx
 }
 virtual_ipaddress {
  10.63.0.158
 }
}
}Configuration file key parameter description:
router_id //Define the node name
-
vrrp_script chk_nginx { script "/etc/keepalived/nginx_check.sh" interval 2 weight -20 } //Execute the /etc/keepalived/nginx_check.sh script every 2 seconds. This check will continue from the beginning Go on, interval represents the interval, and weight -20 means that when the script is executed to determine an exception, the priority of the node 10.63.0.154 is reduced by 20.
state master //Indicates that the node role is defined as master
virtual_router_id 154 //Define the virtual node ID
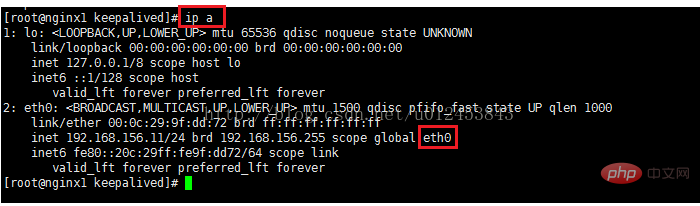
interface eth0 //Define the network card name to view the server network card name through the command: ifconfig or ip a, as shown in the figure:
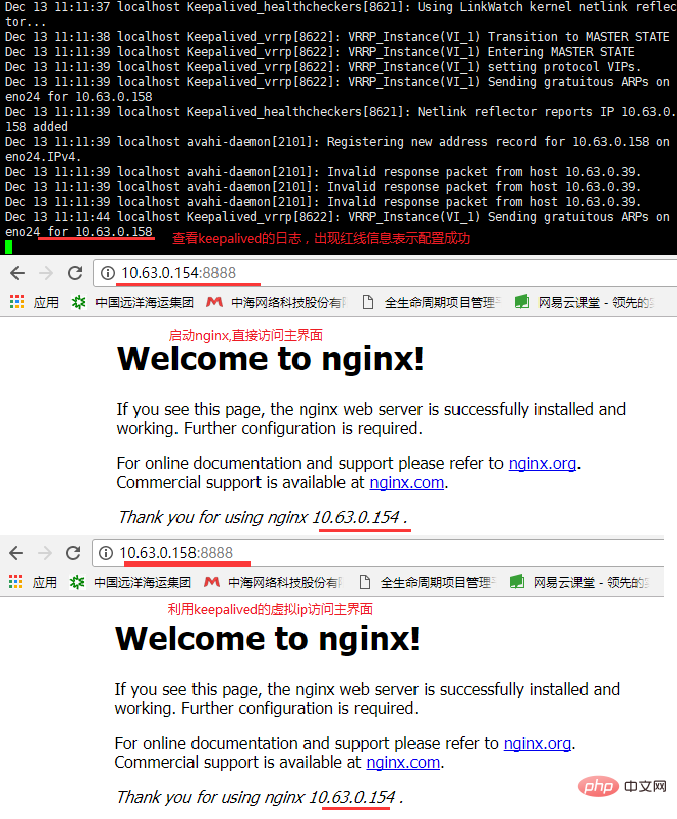
After the above configuration file is completed, start nginx and start keepalived to test whether nginx can be accessed by the virtual IP address. Start the keepalived command: systemctl start keepalived.service. After starting, you can check the status through the command systemctl status keepalived.service. The screenshot of the main interface of nginx using virtual IP is as follows:
3. Install keepalived backup node
Install keepalived on server 2 The method is exactly the same as that of server 1. You only need to modify three places in the keepalived.conf configuration file:
interface eth0 //Define the network card name to view the network card of server 2. For example, the network card name is eno24 , then it is defined as: interface eno24
priority //The priority value is set to 98
mcast_src_ip 10.63.0.155
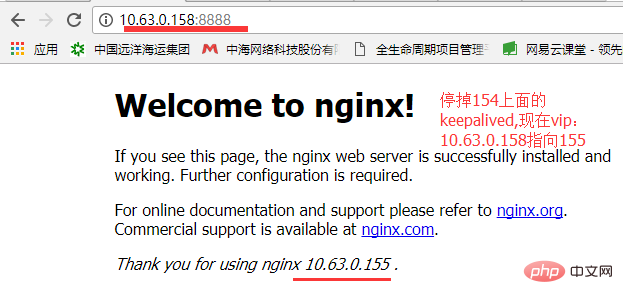
After the keepalived installation on the two servers was successful, through the virtual ip10.63.0.158 call test, it was found that the page of the primary node was always the page of the backup node and the page of the backup node was not called. After setting up keepalived on server 1 and calling it again, the main interface of the standby node will appear, as shown below:
4.linux service management tool systemctl
In Linux, there are two commands, service and chkconfig, to manage services. systemctl is the main tool for managing services. It integrates chkconfig and service functions. (You can use this command to manage the yum installation software and set whether to start at startup)
systemctl is-enabled servicename.service #Query whether the service is started at startup
-
systemctl enable *.service #Start and run the service
systemctl disable *.service #Cancel the boot and run
systemctl start *.service #Start service
systemctl stop *.service #Stop service
systemctl restart *.service #重启服务
systemctl reload *.service #重新加载服务配置文件
systemctl status *.service #查询服务运行状态
systemctl --failed #显示启动失败的服务
注:*代表某个服务的名字,如http的服务名为httpd
例如在centos 7 上安装http
[root@centos7 ~]# yum -y install httpd
启动服务(等同于service httpd start) systemctl start httpd.service
停止服务(等同于service httpd stop) systemctl stop httpd.service
重启服务(等同于service httpd restart) systemctl restart httpd.service
查看服务是否运行(等同于service httpd status) systemctl status httpd.service 开机自启动服务(等同于chkconfig httpd on) systemctl enable httpd.service
开机时禁用服务(等同于chkconfig httpd on) systemctl disable httpd.service
ps -ef | grep nginx #查看服务进程
#非systemctl配置开机启动:chmod +x /etc/rc.d/rc.local
#打开rc.localvi /etc/rc.local
#加入启动脚本其中路径一定要用全路径如:/usr/local/nginx/sbin/nginx
The above is the detailed content of How to achieve high availability by combining keepalived with nginx. For more information, please follow other related articles on the PHP Chinese website!

Hot AI Tools

Undresser.AI Undress
AI-powered app for creating realistic nude photos

AI Clothes Remover
Online AI tool for removing clothes from photos.

Undress AI Tool
Undress images for free

Clothoff.io
AI clothes remover

Video Face Swap
Swap faces in any video effortlessly with our completely free AI face swap tool!

Hot Article
Hot Tools

Notepad++7.3.1
Easy-to-use and free code editor

SublimeText3 Chinese version
Chinese version, very easy to use

Zend Studio 13.0.1
Powerful PHP integrated development environment

Dreamweaver CS6
Visual web development tools

SublimeText3 Mac version
God-level code editing software (SublimeText3)
Hot Topics


 How to check the name of the docker container
Apr 15, 2025 pm 12:21 PM
How to check the name of the docker container
Apr 15, 2025 pm 12:21 PM
You can query the Docker container name by following the steps: List all containers (docker ps). Filter the container list (using the grep command). Gets the container name (located in the "NAMES" column).
 How to configure nginx in Windows
Apr 14, 2025 pm 12:57 PM
How to configure nginx in Windows
Apr 14, 2025 pm 12:57 PM
How to configure Nginx in Windows? Install Nginx and create a virtual host configuration. Modify the main configuration file and include the virtual host configuration. Start or reload Nginx. Test the configuration and view the website. Selectively enable SSL and configure SSL certificates. Selectively set the firewall to allow port 80 and 443 traffic.
 How to configure cloud server domain name in nginx
Apr 14, 2025 pm 12:18 PM
How to configure cloud server domain name in nginx
Apr 14, 2025 pm 12:18 PM
How to configure an Nginx domain name on a cloud server: Create an A record pointing to the public IP address of the cloud server. Add virtual host blocks in the Nginx configuration file, specifying the listening port, domain name, and website root directory. Restart Nginx to apply the changes. Access the domain name test configuration. Other notes: Install the SSL certificate to enable HTTPS, ensure that the firewall allows port 80 traffic, and wait for DNS resolution to take effect.
 How to check whether nginx is started
Apr 14, 2025 pm 01:03 PM
How to check whether nginx is started
Apr 14, 2025 pm 01:03 PM
How to confirm whether Nginx is started: 1. Use the command line: systemctl status nginx (Linux/Unix), netstat -ano | findstr 80 (Windows); 2. Check whether port 80 is open; 3. Check the Nginx startup message in the system log; 4. Use third-party tools, such as Nagios, Zabbix, and Icinga.
 How to check nginx version
Apr 14, 2025 am 11:57 AM
How to check nginx version
Apr 14, 2025 am 11:57 AM
The methods that can query the Nginx version are: use the nginx -v command; view the version directive in the nginx.conf file; open the Nginx error page and view the page title.
 How to create containers for docker
Apr 15, 2025 pm 12:18 PM
How to create containers for docker
Apr 15, 2025 pm 12:18 PM
Create a container in Docker: 1. Pull the image: docker pull [mirror name] 2. Create a container: docker run [Options] [mirror name] [Command] 3. Start the container: docker start [Container name]
 How to start nginx server
Apr 14, 2025 pm 12:27 PM
How to start nginx server
Apr 14, 2025 pm 12:27 PM
Starting an Nginx server requires different steps according to different operating systems: Linux/Unix system: Install the Nginx package (for example, using apt-get or yum). Use systemctl to start an Nginx service (for example, sudo systemctl start nginx). Windows system: Download and install Windows binary files. Start Nginx using the nginx.exe executable (for example, nginx.exe -c conf\nginx.conf). No matter which operating system you use, you can access the server IP
 How to start containers by docker
Apr 15, 2025 pm 12:27 PM
How to start containers by docker
Apr 15, 2025 pm 12:27 PM
Docker container startup steps: Pull the container image: Run "docker pull [mirror name]". Create a container: Use "docker create [options] [mirror name] [commands and parameters]". Start the container: Execute "docker start [Container name or ID]". Check container status: Verify that the container is running with "docker ps".
