How to configure Nginx server to prevent Flood attacks
Test
I will briefly tell you how to configure nginx's restricted request module and how it protects your website from being attacked by DDoS or other http-based Denial of service attack.
In this test, I saved the sample page in blitz.io (now a free service) and named it about.html to test the limit_req directive.
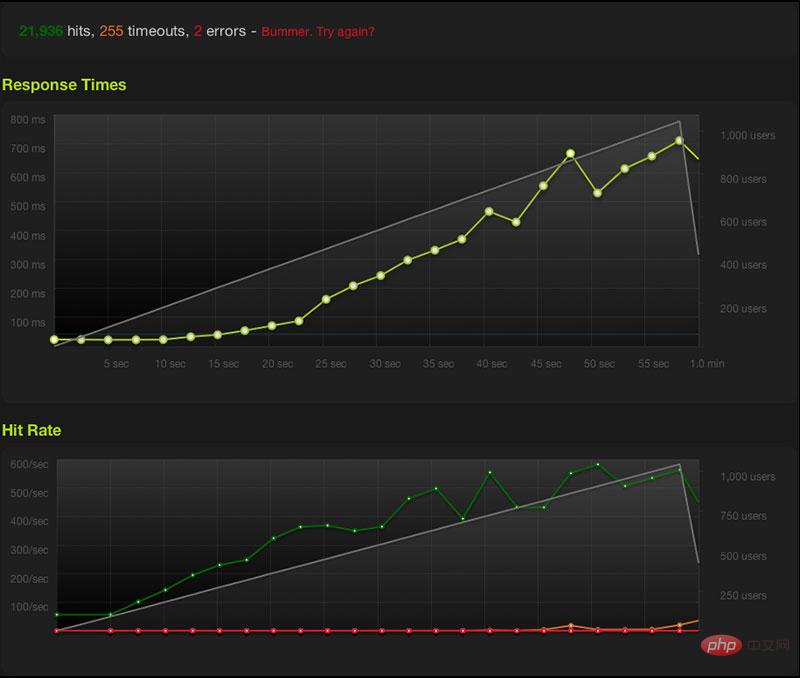
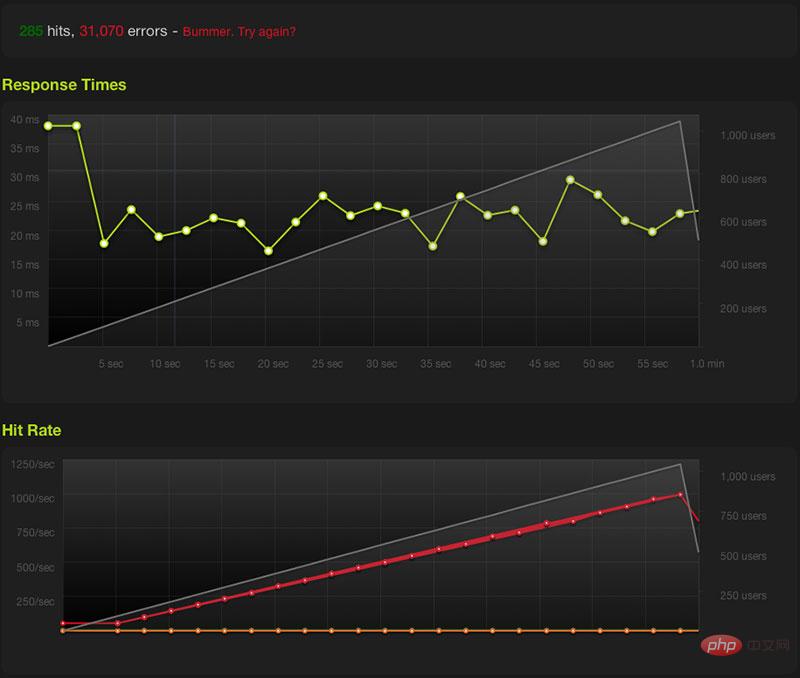
First, I saved it on blitz Use the following command to initiate 1075 concurrent requests and last for one minute. The response timeout is set to 2 minutes, the region is California, and all other states except status 200 are set to abnormal status. Even 503 is considered It was unsuccessful.
-p 1-1075:60 --status 200 -t 2000 -r california http://kbeezie.com/about.html

Ran Zhou defines these rules in the server:Copy the code The code is as follows:location = /about.html {
limit_req zone=blitz nodelay;
}
Then reload the nginx configuration and see the effect:

php Apply Request Limits
If you want to restrict all For PHP application limits, you can do this: Copy code The code is as follows:location ~ \.php { limit_req zone=flood;
include php_params.conf;
fastcgi_pass unix:/tmp/php5-fpm.sock;
}
Note:
It is difficult for me to implement a real high-traffic network or ddos (distributed denial of service attack). This is why the number of users we successfully access is not the same as ip Very large. Server load will also affect the number of visits or regions of test users. With the free version, the maximum number of concurrent users you can access is 50. Of course, you can spend $49 per day to allow 1,000 users to visit your website.
Better alternative
Without going into more details here, if you are serious about preventing DDoS or multi-service attacks from attacking your server, there are other great software tools like iptables (linux), pf (packet filter for bsd), or if your server provides hardware, you can use your hardware firewall. The above restriction module will only prevent flood attacks through http requests. It will not prevent ping packet flood attacks or other vulnerabilities. For these In this case, you can close unnecessary services and unnecessary ports to prevent others from breaking through.For example, the only ports my server exposes to the external network are http/https and ssh. Among services such as mysql Bind local connections. You can also set some common services to ports that are not commonly used so that they will not be sniffed (iptables/pf will help in this situation).The above is the detailed content of How to configure Nginx server to prevent Flood attacks. For more information, please follow other related articles on the PHP Chinese website!

Hot AI Tools

Undresser.AI Undress
AI-powered app for creating realistic nude photos

AI Clothes Remover
Online AI tool for removing clothes from photos.

Undress AI Tool
Undress images for free

Clothoff.io
AI clothes remover

Video Face Swap
Swap faces in any video effortlessly with our completely free AI face swap tool!

Hot Article

Hot Tools

Notepad++7.3.1
Easy-to-use and free code editor

SublimeText3 Chinese version
Chinese version, very easy to use

Zend Studio 13.0.1
Powerful PHP integrated development environment

Dreamweaver CS6
Visual web development tools

SublimeText3 Mac version
God-level code editing software (SublimeText3)

Hot Topics
 How to check the name of the docker container
Apr 15, 2025 pm 12:21 PM
You can query the Docker container name by following the steps: List all containers (docker ps). Filter the container list (using the grep command). Gets the container name (located in the "NAMES" column).
 How to configure cloud server domain name in nginx
Apr 14, 2025 pm 12:18 PM
How to configure an Nginx domain name on a cloud server: Create an A record pointing to the public IP address of the cloud server. Add virtual host blocks in the Nginx configuration file, specifying the listening port, domain name, and website root directory. Restart Nginx to apply the changes. Access the domain name test configuration. Other notes: Install the SSL certificate to enable HTTPS, ensure that the firewall allows port 80 traffic, and wait for DNS resolution to take effect.
 How to check nginx version
Apr 14, 2025 am 11:57 AM
The methods that can query the Nginx version are: use the nginx -v command; view the version directive in the nginx.conf file; open the Nginx error page and view the page title.
 How to configure nginx in Windows
Apr 14, 2025 pm 12:57 PM
How to configure Nginx in Windows? Install Nginx and create a virtual host configuration. Modify the main configuration file and include the virtual host configuration. Start or reload Nginx. Test the configuration and view the website. Selectively enable SSL and configure SSL certificates. Selectively set the firewall to allow port 80 and 443 traffic.
 How to start nginx server
Apr 14, 2025 pm 12:27 PM
Starting an Nginx server requires different steps according to different operating systems: Linux/Unix system: Install the Nginx package (for example, using apt-get or yum). Use systemctl to start an Nginx service (for example, sudo systemctl start nginx). Windows system: Download and install Windows binary files. Start Nginx using the nginx.exe executable (for example, nginx.exe -c conf\nginx.conf). No matter which operating system you use, you can access the server IP
 How to create containers for docker
Apr 15, 2025 pm 12:18 PM
Create a container in Docker: 1. Pull the image: docker pull [mirror name] 2. Create a container: docker run [Options] [mirror name] [Command] 3. Start the container: docker start [Container name]
 How to check whether nginx is started
Apr 14, 2025 pm 01:03 PM
How to confirm whether Nginx is started: 1. Use the command line: systemctl status nginx (Linux/Unix), netstat -ano | findstr 80 (Windows); 2. Check whether port 80 is open; 3. Check the Nginx startup message in the system log; 4. Use third-party tools, such as Nagios, Zabbix, and Icinga.
 How to start containers by docker
Apr 15, 2025 pm 12:27 PM
Docker container startup steps: Pull the container image: Run "docker pull [mirror name]". Create a container: Use "docker create [options] [mirror name] [commands and parameters]". Start the container: Execute "docker start [Container name or ID]". Check container status: Verify that the container is running with "docker ps".


