

How nginx configures HSTS

Netcraft recently published their research on testing SSL/TLS websites and noted that only 5% of users correctly implemented HTTP Strict Transport Security HSTS.
What is HSTS
HTTPS (SSL and TLS) ensures security during communication between users and websites, making it difficult for attackers to intercept, modify and impersonate. When the user manually enters a domain name or http:// link, the first request to the website is unencrypted, using plain http. The most secure websites immediately send back a redirect directing the user to an https connection. However, a man-in-the-middle attacker may be able to intercept the initial http request and thereby control the user's subsequent responses.
Naturally HSTS came into being to solve this potential security problem. Even if the user enters a domain name or http connection, the browser will strictly upgrade to an https connection.
How HSTS Works
HSTS policies are published in the HTTP response headers sent from secure HTTPS sites.
Strict-Transport-Security: max-age=31536000
When the browser sees this header from an HTTPS site, it knows that the domain name can only be accessed through HTTPS (SSL or TLS). And cache this information to 31536000, which is 1 year.
The optional parameter includeSubDomains tells the browser that the policy applies to all subdomains under the current domain.
Strict-Transport-Security: max-age=31536000; includeSubDomains
nginx configuration HSTS
Set the HSTS response header on the nginx configuration file. The
add_header Strict-Transport-Security "max-age=31536000; includeSubDomains" always;
always parameter ensures that all responses set this header, including internally generated error responses. nginx versions earlier than 1.7.5 do not support the always parameter and internally generated error responses do not set this header information.
add_header directive inheritance rules:
nginx configuration block inherits the encapsulation block where the add_header directive is located, so you only need to place the add_header directive in the top-level server block. There is an important exception. If a block contains the add_header directive itself, it will not inherit the header from the enclosing block and you will need to redefine all add_header directives.
server {
    listen 443 ssl;

    add_header Strict-Transport-Security "max-age=31536000; includeSubDomains" always;

    # This 'location' block inherits the STS header
    location / {
        root /usr/share/nginx/html;
    }

    # Because this 'location' block contains another 'add_header' directive,
    # we must redeclare the STS header
    location /servlet {
        add_header X-Served-By "My Servlet Handler";
        add_header Strict-Transport-Security "max-age=31536000; includeSubDomains" always;
        proxy_pass http://localhost:8080;
    }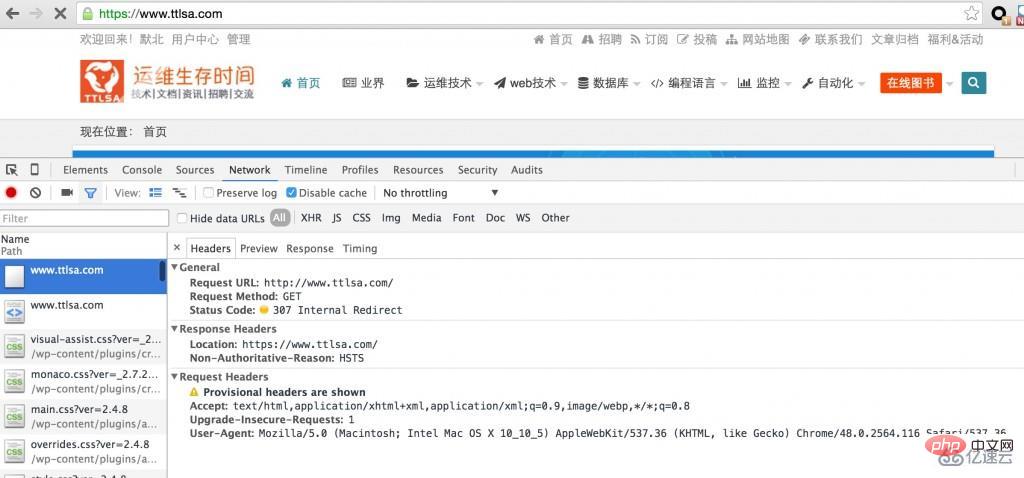
}Test HTTP Strict Transport Security:
Once the user proposes the HSTS policy, its cache information period is specified by max-age. During this time, the browser will deny access to the web service via unencrypted HTTP and refuse to give exceptions for certificate errors (if the website previously submitted a valid and trusted certificate). If an includeSubDomanis parameter is specified, these restrictions also apply to all subdomains under the current domain.
When you test HSTS, set the max-age time shorter.
Whether each HTTPS response needs to have an STS header:
Our goal is to present the HSTS policy as quickly as possible when the user starts an HTTPS session. If they receive HSTS policies during the session, they are still vulnerable to HTTP hijacking attacks. The browser only has to look at the STS header once, so it's not strictly necessary to add it to every location block and every response. However, just adding it to the homepage or login page may not be enough, if you only add it to the cached response, the client may not see it. Make sure to cover as much of your URL as is reasonable, paying special attention to dynamic content.
HTTP and HTTPS in parallel
Sometimes the website needs to run under HTTP and HTTPS at the same time
server {
    listen  80;
    listen  443 ssl;
    ...
}Sometimes, http requests need to be redirected to https
server {
    listen 80 default_server;
    listen [::]:80 default_server;
    server_name _;

    # Discourage deep links by using a permanent redirect to home page of HTTPS site
    return 301 https://$host;

    # Alternatively, redirect all HTTP links to the matching HTTPS page
    # return 301 https://$host$request_uri;
}

server {
    listen 443 ssl;
    server_name www.ttlsa.com;

    add_header Strict-Transport-Security "max-age=31536000; includeSubDomains" always;
}Enhanced HSTS
Protects the client from HTTP interception from the time it sees the STS header to the declared max-age. However, HSTS is not a perfect solution for HTTP session hijacking. Users are still vulnerable if they access an HSTS-protected website over HTTP:
Have never visited the website before
Recently revisited Installed its operating system
Recently reinstalled its browser
Switched to a new browser
Switch to a new device such as a mobile phone
Delete browser cache
Have not visited the site recently and max -age expired
In order to solve this problem, Google insisted on maintaining a "HSTS preload list" site domain name and subdomain name, and submitted it through https://hstspreload.appspot.com/ its domain name. This list of domain names is distributed and hard-coded into major web browsers. Clients accessing domain names in this list will actively use HTTPS and deny access to the site using HTTP.
Once the STS header is set or your domain is submitted to the HSTS preload list, it is impossible to remove it. This is a one-way decision to make your domain name available over HTTPS.
The above is the detailed content of How nginx configures HSTS. For more information, please follow other related articles on the PHP Chinese website!

Hot AI Tools

Undresser.AI Undress
AI-powered app for creating realistic nude photos

AI Clothes Remover
Online AI tool for removing clothes from photos.

Undress AI Tool
Undress images for free

Clothoff.io
AI clothes remover

Video Face Swap
Swap faces in any video effortlessly with our completely free AI face swap tool!

Hot Article
Hot Tools

Notepad++7.3.1
Easy-to-use and free code editor

SublimeText3 Chinese version
Chinese version, very easy to use

Zend Studio 13.0.1
Powerful PHP integrated development environment

Dreamweaver CS6
Visual web development tools

SublimeText3 Mac version
God-level code editing software (SublimeText3)
Hot Topics


 How to check the name of the docker container
Apr 15, 2025 pm 12:21 PM
How to check the name of the docker container
Apr 15, 2025 pm 12:21 PM
You can query the Docker container name by following the steps: List all containers (docker ps). Filter the container list (using the grep command). Gets the container name (located in the "NAMES" column).
 How to check nginx version
Apr 14, 2025 am 11:57 AM
How to check nginx version
Apr 14, 2025 am 11:57 AM
The methods that can query the Nginx version are: use the nginx -v command; view the version directive in the nginx.conf file; open the Nginx error page and view the page title.
 How to configure cloud server domain name in nginx
Apr 14, 2025 pm 12:18 PM
How to configure cloud server domain name in nginx
Apr 14, 2025 pm 12:18 PM
How to configure an Nginx domain name on a cloud server: Create an A record pointing to the public IP address of the cloud server. Add virtual host blocks in the Nginx configuration file, specifying the listening port, domain name, and website root directory. Restart Nginx to apply the changes. Access the domain name test configuration. Other notes: Install the SSL certificate to enable HTTPS, ensure that the firewall allows port 80 traffic, and wait for DNS resolution to take effect.
 How to configure nginx in Windows
Apr 14, 2025 pm 12:57 PM
How to configure nginx in Windows
Apr 14, 2025 pm 12:57 PM
How to configure Nginx in Windows? Install Nginx and create a virtual host configuration. Modify the main configuration file and include the virtual host configuration. Start or reload Nginx. Test the configuration and view the website. Selectively enable SSL and configure SSL certificates. Selectively set the firewall to allow port 80 and 443 traffic.
 How to check whether nginx is started
Apr 14, 2025 pm 01:03 PM
How to check whether nginx is started
Apr 14, 2025 pm 01:03 PM
How to confirm whether Nginx is started: 1. Use the command line: systemctl status nginx (Linux/Unix), netstat -ano | findstr 80 (Windows); 2. Check whether port 80 is open; 3. Check the Nginx startup message in the system log; 4. Use third-party tools, such as Nagios, Zabbix, and Icinga.
 How to start containers by docker
Apr 15, 2025 pm 12:27 PM
How to start containers by docker
Apr 15, 2025 pm 12:27 PM
Docker container startup steps: Pull the container image: Run "docker pull [mirror name]". Create a container: Use "docker create [options] [mirror name] [commands and parameters]". Start the container: Execute "docker start [Container name or ID]". Check container status: Verify that the container is running with "docker ps".
 How to start nginx server
Apr 14, 2025 pm 12:27 PM
How to start nginx server
Apr 14, 2025 pm 12:27 PM
Starting an Nginx server requires different steps according to different operating systems: Linux/Unix system: Install the Nginx package (for example, using apt-get or yum). Use systemctl to start an Nginx service (for example, sudo systemctl start nginx). Windows system: Download and install Windows binary files. Start Nginx using the nginx.exe executable (for example, nginx.exe -c conf\nginx.conf). No matter which operating system you use, you can access the server IP
 How to create containers for docker
Apr 15, 2025 pm 12:18 PM
How to create containers for docker
Apr 15, 2025 pm 12:18 PM
Create a container in Docker: 1. Pull the image: docker pull [mirror name] 2. Create a container: docker run [Options] [mirror name] [Command] 3. Start the container: docker start [Container name]
