

How docker nginx deploys multiple projects

Prerequisites
1. Docker has been installed on the local computer and server. You can download it on Google.
2. Already have an account on docker hub, register and send it Door:
3. You need to be familiar with docker and understand some instructions in dockerfile
Use dockerfile to make images
If this machine There is a project called web
Create a new dockerfile in the web root directory and write the following content
from nginx:1.13.6-alpine
label maintainer="lilywang <lilywang.cd@gmail.com>"

arg tz="asia/shanghai"

env tz ${tz}

run apk upgrade --update \
 && apk add bash tzdata \
 && ln -sf /usr/share/zoneinfo/${tz} /etc/localtime \
 && echo ${tz} > /etc/timezone \
 && rm -rf /var/cache/apk/*

copy dist /usr/share/nginx/html

cmd ["nginx", "-g", "daemon off;"]At this time, the file structure in the web is:
.
|____dockerfile
|____dist // 为项目打包后的文件
| |____index.html
Next, enter the web directory in bash
cd web

docker build -t lilywang711/web .
If you see the following in the print information, it means that the image has been built successfully
successfully built 4c050212ce0d
successfully tagged lilywang711/web: latest
You can also enter docker images to view the current image list
Then enter the command docker push lilywang711/web to The image just built is uploaded to docker hub so that we can pull the image on the server later.
If there are multiple projects that need to be deployed, just follow the above steps and repeat them. How many projects are there? Just build as many mirrors
Server-side deployment
Ssh log in to the server, create a new nginx folder in the current user directory (I am the root directory), and put it in it Create new nginx.conf
Write the following content in nginx.conf
user nginx;
worker_processes 2;
error_log /var/log/nginx/error.log warn;
pid  /var/run/nginx.pid;
events {
 use epoll;
 worker_connections 2048;
}
http {
 include /etc/nginx/mime.types;
 # include /etc/nginx/conf.d/*.conf;
 root /usr/share/nginx/html;
 index index.html index.htm;
 server {
  listen 80;
  server_name a.yourdomain.cn;
  location / {
  }
 }
 server {
  listen 80;
  server_name b.yourdomain.cn;
  location / {
   proxy_pass http://your_vps_ip:81;
  }
 }
 server {
  listen 80;
  server_name localhost;
  location / {
  }
 }
}Next
Start docker systemctl start docker
Pull The two images just created and uploaded
docker pull lilywang711/web
docker pull lilywang711/web1
Enter The following command starts the container
docker run -itd --name web -p 80:80 -v /root/nginx/nginx.conf:/etc/nginx/nginx.conf lilywang711/web
// -i 交互模式运行容器, -t 为容器分配一个伪终端,-d 后台运行容器,可直接连写 -itd
// --name 是给该容器起个叫web的名字,方便辨识
// -p 是绑定端口 本机端口80:容器端口80
// -v 声明volume,意思是将容器中的/etc/nginx/nginx.conf 挂载到 宿主机里的/root/nginx/nginx.conf,以后配置nginx只需要修改/root/nginx/nginx.conf就行了
The same goes for the other lilywang711/web1 image, just change the port and name
docker run -itd --name web1 -p 81: 80 -v /root/nginx/nginx.conf:/etc/nginx/nginx.conf lilywang711/web1
At this time, enter docker ps to see these two The container is already running
Dockerized the project and deployed it on nginx.
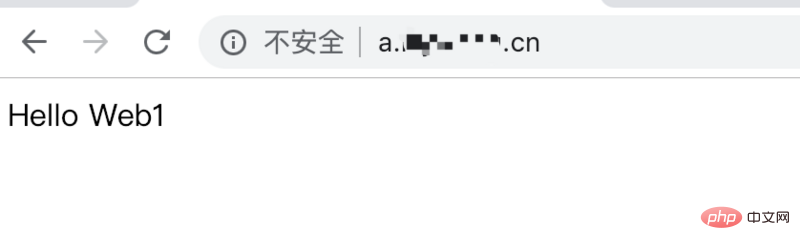
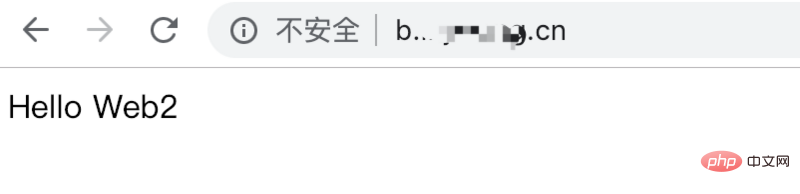
Enter http://a.yourdomain.cn and http://b in the browser .yourdomain.cn you can see the effect, corresponding to the web and web1 projects in the local computer respectively
The above is the detailed content of How docker nginx deploys multiple projects. For more information, please follow other related articles on the PHP Chinese website!

Hot AI Tools

Undresser.AI Undress
AI-powered app for creating realistic nude photos

AI Clothes Remover
Online AI tool for removing clothes from photos.

Undress AI Tool
Undress images for free

Clothoff.io
AI clothes remover

Video Face Swap
Swap faces in any video effortlessly with our completely free AI face swap tool!

Hot Article
Hot Tools

Notepad++7.3.1
Easy-to-use and free code editor

SublimeText3 Chinese version
Chinese version, very easy to use

Zend Studio 13.0.1
Powerful PHP integrated development environment

Dreamweaver CS6
Visual web development tools

SublimeText3 Mac version
God-level code editing software (SublimeText3)
Hot Topics


 How to exit the container by docker
Apr 15, 2025 pm 12:15 PM
How to exit the container by docker
Apr 15, 2025 pm 12:15 PM
Four ways to exit Docker container: Use Ctrl D in the container terminal Enter exit command in the container terminal Use docker stop <container_name> Command Use docker kill <container_name> command in the host terminal (force exit)
 How to check the name of the docker container
Apr 15, 2025 pm 12:21 PM
How to check the name of the docker container
Apr 15, 2025 pm 12:21 PM
You can query the Docker container name by following the steps: List all containers (docker ps). Filter the container list (using the grep command). Gets the container name (located in the "NAMES" column).
 How to copy files in docker to outside
Apr 15, 2025 pm 12:12 PM
How to copy files in docker to outside
Apr 15, 2025 pm 12:12 PM
Methods for copying files to external hosts in Docker: Use the docker cp command: Execute docker cp [Options] <Container Path> <Host Path>. Using data volumes: Create a directory on the host, and use the -v parameter to mount the directory into the container when creating the container to achieve bidirectional file synchronization.
 How to restart docker
Apr 15, 2025 pm 12:06 PM
How to restart docker
Apr 15, 2025 pm 12:06 PM
How to restart the Docker container: get the container ID (docker ps); stop the container (docker stop <container_id>); start the container (docker start <container_id>); verify that the restart is successful (docker ps). Other methods: Docker Compose (docker-compose restart) or Docker API (see Docker documentation).
 How to start mysql by docker
Apr 15, 2025 pm 12:09 PM
How to start mysql by docker
Apr 15, 2025 pm 12:09 PM
The process of starting MySQL in Docker consists of the following steps: Pull the MySQL image to create and start the container, set the root user password, and map the port verification connection Create the database and the user grants all permissions to the database
 How to update the image of docker
Apr 15, 2025 pm 12:03 PM
How to update the image of docker
Apr 15, 2025 pm 12:03 PM
The steps to update a Docker image are as follows: Pull the latest image tag New image Delete the old image for a specific tag (optional) Restart the container (if needed)
 How to start containers by docker
Apr 15, 2025 pm 12:27 PM
How to start containers by docker
Apr 15, 2025 pm 12:27 PM
Docker container startup steps: Pull the container image: Run "docker pull [mirror name]". Create a container: Use "docker create [options] [mirror name] [commands and parameters]". Start the container: Execute "docker start [Container name or ID]". Check container status: Verify that the container is running with "docker ps".
 How to create containers for docker
Apr 15, 2025 pm 12:18 PM
How to create containers for docker
Apr 15, 2025 pm 12:18 PM
Create a container in Docker: 1. Pull the image: docker pull [mirror name] 2. Create a container: docker run [Options] [mirror name] [Command] 3. Start the container: docker start [Container name]
