

macOS Ventura: How to share tabs and collaborate with others in Safari

How to make a tag group
First of all, before you can share a tag group with others, you first need to create a tag group. To recap: a tab group is a collection of different tabs that persist in Safari. You can switch between multiple groups and return to your tab set later.
You can create a new tab group in Safari on Mac by selecting File -> New Tab Group. Give the tab group a suitable and memorable name. You can move an existing open tab by right-clicking on the tab and selecting "Move to tab group" -> [tab group name].
How to quickly send a list of tabbed links to other people

If you don’t need the fancy new collaboration and real-time sync features, you can share links via List to quickly share static snapshots of tab groups. To do this, right-click the tab group in the sidebar and click Copy Link. (In Safari on iOS, you can view the tab group from the overview screen and long-press to find the Copy Link action.)
This copies a bulleted list of links to the clipboard. You can then send an email or open any messaging app and paste that list of links into any app you want.
What can you do with shared tab groups?
If you want to move beyond a static linked list, shared tab groups are the answer. A common tab group syncs across all your personal devices with iCloud. Shared tab groups extend this concept. Shared tab groups extend this by making these same tabs available to others as well, such as your friends or colleagues or anyone you choose to invite.
As part of a shared group, new tabs you add will automatically appear to everyone else. Other participants can also add tabs to the group so you can see them. It's a great tool to help plan a family trip, recommend dinner recipes, or collaborate with colleagues on a work project.
How to create a shared tab group
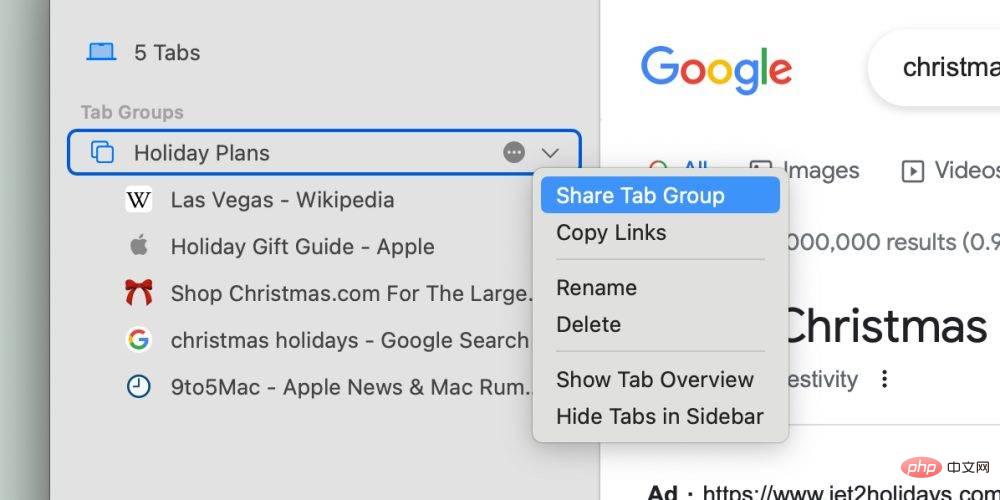
Start with a personal tab group. To make it shareable, open the Safari sidebar and right-click the tab group you want to share. Select "Share Label Group". This will open a sharing menu.
Safari will first prompt you to share with your contacts via Messages. However, after the tag group is shared, you can open the newly displayed collaboration menu and simply find an invitation link to share. This is a special link that anyone can click to join the tag group. (Note: This feature is only available to Mac, iPhone, and iPad users running macOS Ventura, iOS 16, or iPadOS 16, respectively.)

When a shared tab group is active, anyone in the group can view, add, or delete tabs in the group. Safari displays a badge avatar indicator in the tab bar when someone else is currently viewing it. A notification bannerer will also pop up to let you know when there is activity in the tab group.
How to manage and end a shared tag group

The creator of a shared tag group is considered the "owner"; only the owner can manage who has access Tab group. As the owner, click the Share Tab Group menu item in the upper right corner of the toolbar. Click Manage Shared Tab Groups. You can invite more participants, revoke access from some participants, and quickly start a group messaging conversation or FaceTime call. Shared tag groups work well with the FaceTime SharePlay feature.
When you're done and ready to finish collaborating, simply press the Stop Sharing button to turn your shared tab group back into a private, personal tab group. When this happens, all other participants will completely lose access to the tab group.
The above is the detailed content of macOS Ventura: How to share tabs and collaborate with others in Safari. For more information, please follow other related articles on the PHP Chinese website!

Hot AI Tools

Undresser.AI Undress
AI-powered app for creating realistic nude photos

AI Clothes Remover
Online AI tool for removing clothes from photos.

Undress AI Tool
Undress images for free

Clothoff.io
AI clothes remover

Video Face Swap
Swap faces in any video effortlessly with our completely free AI face swap tool!

Hot Article
Hot Tools

Notepad++7.3.1
Easy-to-use and free code editor

SublimeText3 Chinese version
Chinese version, very easy to use

Zend Studio 13.0.1
Powerful PHP integrated development environment

Dreamweaver CS6
Visual web development tools

SublimeText3 Mac version
God-level code editing software (SublimeText3)
Hot Topics


 No response when entering password on mac keyboard?
Feb 20, 2024 pm 01:33 PM
No response when entering password on mac keyboard?
Feb 20, 2024 pm 01:33 PM
Introduction: In this article, this website will introduce to you the relevant content about the Mac keyboard not responding when entering passwords. I hope it will be helpful to you, let’s take a look. How to solve the problem that the password cannot be entered on the Apple Mac system? You can also try to connect this keyboard to other computers to see if it works normally. If the same problem occurs on another computer, it's most likely a fault with the keyboard itself. You may consider replacing the keyboard or repairing it. The first time you log in to Alipay with your Mac computer, you will find the login interface and cannot enter your password. The password input field displays: "Please click here to install the control", so Alipay login requires the installation of security controls. Security controls can encrypt and protect the information you enter (amount, password, etc.) to improve account security. Tie
 3 tips to easily customize your Mac computer name, host name and Bonjour name
Mar 06, 2024 pm 12:20 PM
3 tips to easily customize your Mac computer name, host name and Bonjour name
Mar 06, 2024 pm 12:20 PM
Many Mac users tend to keep the default name of their device and may never consider changing it. Many people choose to stick with the name from the initial setup, such as "Johnny's MacBook Air" or simply "iMac." Learning how to change the name of your Mac is a very useful skill, especially when you have multiple devices, as it can help you quickly distinguish and manage them. Next, we will teach you step by step how to change the computer name, host name and Bonjour name (local host name) in macOS system. Why should you change your Mac name? Changing the name of your Mac can not only show your personality, but also help improve the user experience: Personalize your Mac: The default name may not be to your taste, change it to a name you like.
 How to disable private browsing mode in Safari on iPhone
Feb 23, 2024 am 08:34 AM
How to disable private browsing mode in Safari on iPhone
Feb 23, 2024 am 08:34 AM
Apple allows iPhone users to browse anonymously using private tabs on Safari. When "Incognito Mode" is enabled, Safari does not save the addresses of websites you visit, your search history, or Autofill information. If you use private browsing mode frequently in Safari, you may have noticed that the mode operates differently than other browsers. This article will detail how to disable Private Browsing Mode on iPhone and what happens when Private Browsing Mode is enabled when Safari is closed. How to Disable Private Browsing Mode on Safari Required: iPhone running iOS 17 or later. If you have found out how to enable and use private browsing in Safari
 Safari zoom issue on iPhone: Here's the fix
Apr 20, 2024 am 08:08 AM
Safari zoom issue on iPhone: Here's the fix
Apr 20, 2024 am 08:08 AM
If you don't have control over the zoom level in Safari, getting things done can be tricky. So if Safari looks zoomed out, that might be a problem for you. Here are a few ways you can fix this minor zoom issue in Safari. 1. Cursor magnification: Select "Display" > "Cursor magnification" in the Safari menu bar. This will make the cursor more visible on the screen, making it easier to control. 2. Move the mouse: This may sound simple, but sometimes just moving the mouse to another location on the screen may automatically return it to normal size. 3. Use Keyboard Shortcuts Fix 1 – Reset Zoom Level You can control the zoom level directly from the Safari browser. Step 1 – When you are in Safari
 pkg file to install on mac?
Feb 20, 2024 pm 03:21 PM
pkg file to install on mac?
Feb 20, 2024 pm 03:21 PM
Preface: Today, this site will share with you the relevant content about installing pkg files on Mac. If it can solve the problem you are facing now, don’t forget to follow this site and start now! The previous version of macos pkg cannot be installed to upgrade the operating system: If your laptop is using an older operating system version, it is recommended to upgrade to the latest operating system version. Because older versions may not support installation of the latest macOS system. Select "Erase" in Disk Utility, then select the Macos extension in the format, do not check the encryption option, and do not select the apfs format, and finally click the "Erase" button to solve the problem of being unable to complete the macOS installation. Drag the application's icon to the file starting with App
 How to set up WeChat Mac to automatically convert voice messages into text - How to set up voice to text conversion
Mar 19, 2024 am 08:28 AM
How to set up WeChat Mac to automatically convert voice messages into text - How to set up voice to text conversion
Mar 19, 2024 am 08:28 AM
Recently, some friends have consulted the editor about how to set up WeChat Mac to automatically convert voice messages into text. The following is a method for setting up WeChat Mac to automatically convert voice messages into text. Friends in need can come and learn more. Step 1: First, open the Mac version of WeChat. As shown in the picture: Step 2: Next, click "Settings". As shown in the picture: Step 3: Then, click "General". As shown in the picture: Step 4: Then check the option "Automatically convert voice messages in chat to text". As shown in the picture: Step 5: Finally, close the window. As shown in the picture:
 3 Ways to Convert HEIC Photos to JPG on Mac
Mar 15, 2024 pm 08:43 PM
3 Ways to Convert HEIC Photos to JPG on Mac
Mar 15, 2024 pm 08:43 PM
By default, iPhone takes photos from the camera in HEIC format. HEIC stands for High Efficiency Image Container and can hold more pixel data than PNG or JPG files, taking up significantly less space on iPhone storage compared to other formats. These files work best on iPhones but are not widely accepted on the internet because they often result in blurry/grainy pictures when you share them with non-Apple devices. To ensure that HEIC images are compatible on other devices, you may need to convert them to JPG format. This article will introduce how to convert HEIC images to JPG on Mac. How to Convert HEIC Photos to JPG on Mac [3 Methods] Method
 Mac configuration file does not take effect?
Feb 20, 2024 pm 02:00 PM
Mac configuration file does not take effect?
Feb 20, 2024 pm 02:00 PM
Introduction: This article will introduce to you the relevant content about the mac configuration file not taking effect. I hope it will be helpful to you, let's take a look. The solution to the problem that environment variables cannot take effect under Mac. After configuring environment variables in the Mac system, it is found that they are only effective in the current terminal and will become invalid once the terminal is switched. After inquiry, it was found that the Mac system is pre-installed with a tool called ultimate shell-zsh, and the reading of environment variables needs to be set in the .zshrc file. 2. In order for our configuration file to take effect, we can only add the above configuration in .zshrc. If you don’t make the above settings, you will find that it will only take effect every time you source ~/.bash_profile. Re-open z next time.