
 Backend Development
Python Tutorial
How to use Python Celery to dynamically add scheduled tasks
Backend Development
Python Tutorial
How to use Python Celery to dynamically add scheduled tasks
How to use Python Celery to dynamically add scheduled tasks

1. Background
In actual work, there will be some time-consuming asynchronous tasks that need to be scheduled, such as sending emails, pulling data, and executing scheduled tasks. Script
The main idea of implementing scheduling through celery is to introduce the middleman redis, start workers for task execution, and celery-beat for scheduled task data storage
2. Official document of Celery dynamically adding scheduled tasks
celery documentation: https://docs.celeryproject.org/en/latest/userguide/periodic-tasks.html#beat-custom-schedulers
celery custom scheduling class description:
Custom scheduler classes can be specified on the command line (--scheduler parameter)
django-celery-beat documentation: https://pypi.org/project/django-celery-beat/
Instructions about the django-celery-beat plugin:
This extension enables you to store periodic task schedules in the database. Periodic tasks can be managed from the Django admin interface, where you can Create, edit and delete periodic tasks and how often they should run
3. Celery is simple and practical
3.1 Basic environment configuration
1. Install the latest version Django
pip3 install django #当前我安装的版本是 3.0.6
2. Create project
django-admin startproject typeidea
django-admin startapp blog
3. Install celery
pip3 install django-celery
pip3 install -U Celery
pip3 install "celery[librabbitmq,redis,auth,msgpack]"
pip3 install django-celery-beat # 用于动态添加定时任务
pip3 install django-celery-results
pip3 install redis
3.2 Test using Celery application
1. Create Blog directory, create new tasks.py
First create a blog folder in the Django project, and create the tasks.py module under the blog folder, as follows:
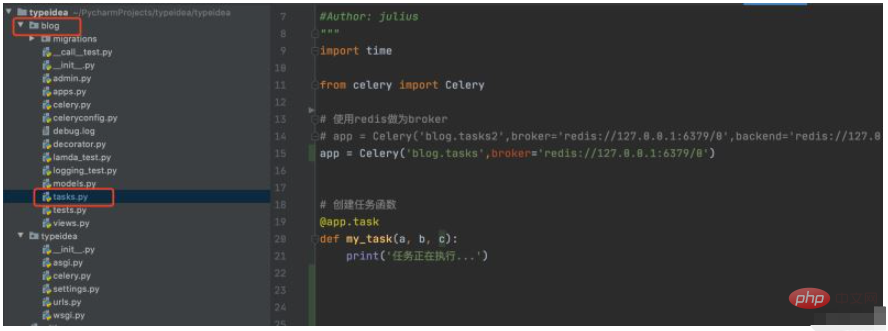
The tasks.py code is as follows:
#!/usr/bin/env python
# -*- coding: UTF-8 -*-

"""
#File: tasks.py
#Time: 2022/3/30 2:26 下午
#Author: julius
"""
from celery import Celery

# 使用redis做为broker
app = Celery('blog.tasks2',broker='redis://127.0.0.1:6379/0')

# 创建任务函数
@app.task
def my_task():
print('任务正在执行...')The first parameter of Celery is to set a name for it. The second parameter is to set a middleman broker. Here we use Redis as the middleman. The my_task function is a task function we wrote. By adding the decorator app.task, it is registered in the broker's queue.
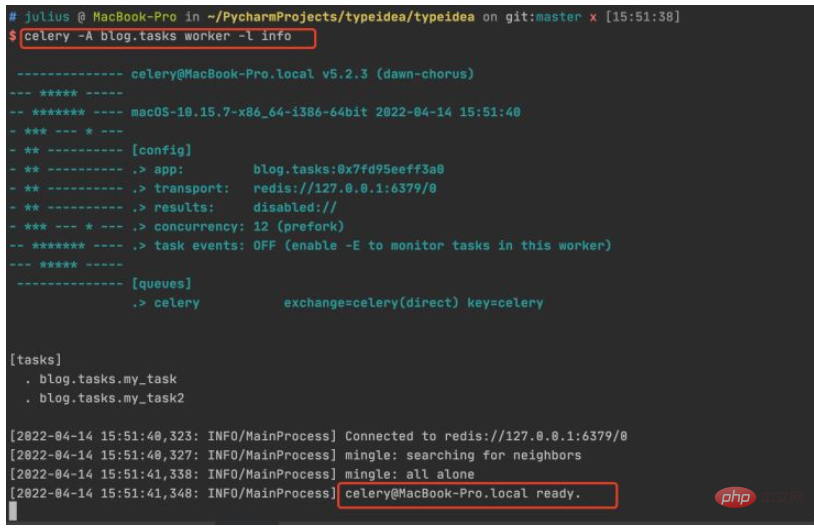
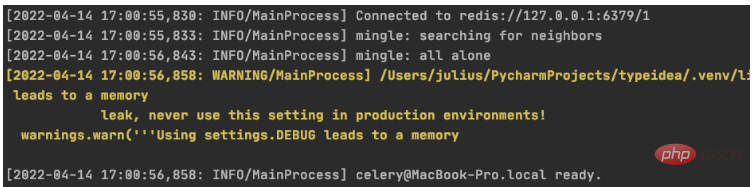
2. Start redis and create a worker
Now we are creating a worker and waiting to process the tasks in the queue.
Enter the root directory of the project and execute the command: celery -A celery_tasks.tasks worker -l info
##3. Call the task
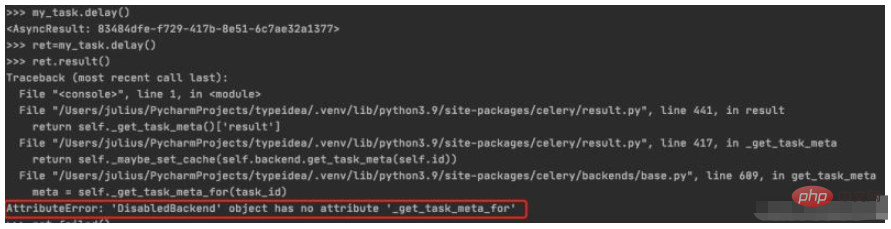
Let’s test the function, create a task, add it to the task queue, and provide worker execution. Enter the python terminal and execute the following code:$ python manage.py shell >>> from blog.tasks import my_task >>> my_task.delay() <AsyncResult: 83484dfe-f729-417b-8e51-6c7ae32a1377>
4. Check the results
Check the task execution status in the worker terminal. You can see that the 83484dfe-f729-417b-8e51-6c7ae32a1377 task has been received and printed. Get the task execution information
5. Store and view the task execution status
Assign the task execution result to ret, and then call result () will generate a DisabledBackend error. It can be seen that the status information of task execution cannot be saved when backend storage is not configured. In the next section, we will talk about how to configure backend to save task execution results$ python manage.py shell >>> from blog.tasks import my_task >>> ret=my_task.delay() >>> ret.result()
1. Add the backend parameter
In this example we use Redis as the solution for storing results, and set the task result storage address through Celery's backend parameter. We modified the tasks module as follows:from celery import Celery
# 使用redis作为broker以及backend
app = Celery('celery_tasks.tasks',
broker='redis://127.0.0.1:6379/8',
backend='redis://127.0.0.1:6379/9')
# 创建任务函数
@app.task
def my_task(a, b):
print("任务函数正在执行....")
return a + b2. Call the task/View the task execution result
Let’s call the task again and see.$ python manage.py shell >>> from blog.tasks import my_task >>> res=my_task.delay(10,40) >>> res.result 50 >>> res.failed() False

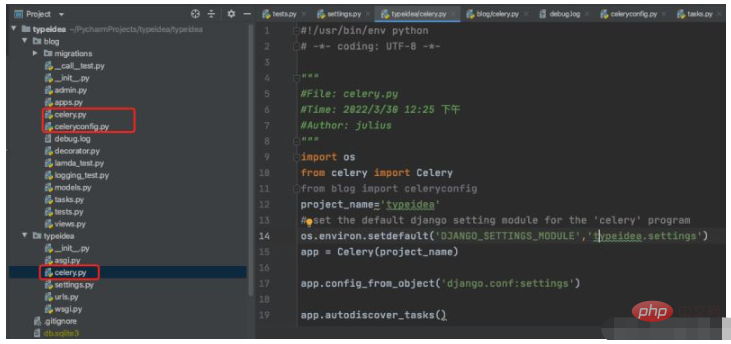 ##$ vim typeidea/celery.py (Celery application file)
#!/usr/bin/env python
# -*- coding: UTF-8 -*-

"""
#File: celery.py
#Time: 2022/3/30 12:25 下午
#Author: julius
"""
import os
from celery import Celery
from blog import celeryconfig
project_name='typeidea'
# set the default django setting module for the 'celery' program
os.environ.setdefault('DJANGO_SETTINGS_MODULE','typeidea.settings')
app = Celery(project_name)

app.config_from_object('django.conf:settings')

app.autodiscover_tasks()
vim blog/celeryconfig.py (配置Celery的参数文件)
#!/usr/bin/env python
# -*- coding: UTF-8 -*-

"""
#File: celeryconfig.py
#Time: 2022/3/30 2:54 下午
#Author: julius
"""

# 设置结果存储
from typeidea import settings
import os

os.environ.setdefault("DJANGO_SETTINGS_MODULE", "typeidea.settings")
CELERY_RESULT_BACKEND = 'redis://127.0.0.1:6379/0'
# 设置代理人broker
BROKER_URL = 'redis://127.0.0.1:6379/1'
# celery 的启动工作数量设置
CELERY_WORKER_CONCURRENCY = 20
# 任务预取功能,就是每个工作的进程/线程在获取任务的时候,会尽量多拿 n 个,以保证获取的通讯成本可以压缩。
CELERYD_PREFETCH_MULTIPLIER = 20
# 非常重要,有些情况下可以防止死锁
CELERYD_FORCE_EXECV = True
# celery 的 worker 执行多少个任务后进行重启操作
CELERY_WORKER_MAX_TASKS_PER_CHILD = 100
# 禁用所有速度限制,如果网络资源有限,不建议开足马力。
CELERY_DISABLE_RATE_LIMITS = True

CELERY_ENABLE_UTC = False
CELERY_TIMEZONE = settings.TIME_ZONE
DJANGO_CELERY_BEAT_TZ_AWARE = False
CELERY_BEAT_SCHEDULER = 'django_celery_beat.schedulers:DatabaseScheduler'vim blog/tasks.py (tasks 任务文件)
import time
from blog.celery import app

# 创建任务函数
@app.task
def my_task(a, b, c):
    print('任务正在执行...')
    print('任务1函数休眠10s')
    time.sleep(10)
return a + b + c五、开始使用django-celery-beat调度器
使用 django-celery-beat 动态添加定时任务 celery 4.x 版本在 django 框架中是使用 django-celery-beat 进行动态添加定时任务的。前面虽然已经安装了这个库,但是还要再说明一下。
1. 安装 django-celery-beat
pip3 install django-celery-beat
2.在项目的 settings 文件配置 django-celery-beat
INSTALLED_APPS = [
    'blog',
    'django_celery_beat',
    ...
]

# Django设置时区
LANGUAGE_CODE = 'zh-hans'  # 使用中国语言
TIME_ZONE = 'Asia/Shanghai'  # 设置Django使用中国上海时间
# 如果USE_TZ设置为True时,Django会使用系统默认设置的时区,此时的TIME_ZONE不管有没有设置都不起作用
# 如果USE_TZ 设置为False,TIME_ZONE = 'Asia/Shanghai', 则使用上海的UTC时间。
USE_TZ = False3. 创建 django-celery-beat 相关表
执行Django数据库迁移: python manage.py migrate

4. 配置Celery使用 django-celery-beat
配置 celery.py
import os

from celery import Celery

from blog import celeryconfig

# 为celery 设置环境变量
os.environ.setdefault("DJANGO_SETTINGS_MODULE","typeidea.settings")
# 创建celery app
app = Celery('blog')
# 从单独的配置模块中加载配置
app.config_from_object(celeryconfig)

# 设置app自动加载任务
app.autodiscover_tasks([
    'blog',
])配置 celeryconfig.py
# 设置结果存储
from typeidea import settings
import os

os.environ.setdefault("DJANGO_SETTINGS_MODULE", "typeidea.settings")
CELERY_RESULT_BACKEND = 'redis://127.0.0.1:6379/0'
# 设置代理人broker
BROKER_URL = 'redis://127.0.0.1:6379/1'
# celery 的启动工作数量设置
CELERY_WORKER_CONCURRENCY = 20
# 任务预取功能,就是每个工作的进程/线程在获取任务的时候,会尽量多拿 n 个,以保证获取的通讯成本可以压缩。
CELERYD_PREFETCH_MULTIPLIER = 20
# 非常重要,有些情况下可以防止死锁
CELERYD_FORCE_EXECV = True
# celery 的 worker 执行多少个任务后进行重启操作
CELERY_WORKER_MAX_TASKS_PER_CHILD = 100
# 禁用所有速度限制,如果网络资源有限,不建议开足马力。
CELERY_DISABLE_RATE_LIMITS = True

CELERY_ENABLE_UTC = False
CELERY_TIMEZONE = settings.TIME_ZONE
DJANGO_CELERY_BEAT_TZ_AWARE = False
CELERY_BEAT_SCHEDULER = 'django_celery_beat.schedulers:DatabaseScheduler'编写任务 tasks.py
import time
from celery import Celery
from blog.celery import app

# 使用redis做为broker
# app = Celery('blog.tasks2',broker='redis://127.0.0.1:6379/0',backend='redis://127.0.0.1:6379/1')

# 创建任务函数
@app.task
def my_task(a, b, c):
    print('任务正在执行...')
    print('任务1函数休眠10s')
    time.sleep(10)
    return a + b + c

@app.task
def my_task2():
    print("任务2函数正在执行....")
    print('任务2函数休眠10s')
time.sleep(10)5. 启动定时任务work
启动定时任务首先需要有一个work执行异步任务,然后再启动一个定时器触发任务。
启动任务 work
$ celery -A blog worker -l info
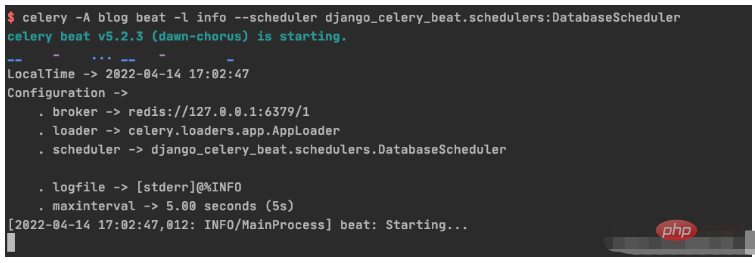
启动定时器触发 beat
celery -A blog beat -l info --scheduler django_celery_beat.schedulers:DatabaseScheduler
六、具体操作演练
6.1 创建基于间隔时间的周期性任务
1. 初始化周期间隔对象interval 对象
>>> from django_celery_beat.models import PeriodicTask, IntervalSchedule
>>> schedule, created = IntervalSchedule.objects.get_or_create(
...       every=10,
...       period=IntervalSchedule.SECONDS,
...  )
>>> IntervalSchedule.objects.all()
<QuerySet [<IntervalSchedule: every 10 seconds>]>
2.创建一个无参数的周期性间隔任务
>>>PeriodicTask.objects.create(interval=schedule,name='my_task2',task='blog.tasks.my_task2',)
<PeriodicTask: my_task2: every 10 seconds>
beat 调度服务日志显示如下:

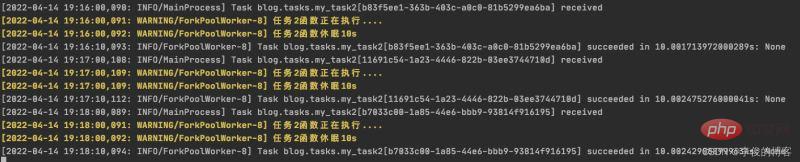
worker 服务日志显示如下:

3.创建一个带参数的周期性间隔任务
>>> PeriodicTask.objects.create(interval=schedule,name='my_task',task='blog.tasks.my_task',args=json.dumps([10,20,30]))
<PeriodicTask: my_task: every 10 seconds>
beat 调度服务日志结果:

worker 服务日志结果:

4.如何高并发执行任务
需要并行执行任务的时候,就需要设置多个worker来执行任务。
6.2 创建一个不带参数的周期性间隔任务
1.初始化 crontab 的调度对象
>>> import pytz
>>> schedule, _ = CrontabSchedule.objects.get_or_create(
... minute='*',
... hour='*',
... day_of_week='*',
... day_of_month='*',
... timezone=pytz.timezone('Asia/Shanghai')
... )
2. 创建不带参数的定时任务
PeriodicTask.objects.create(crontab=schedule,name='my_task2_crontab',task='blog.tasks.my_task2',)
beat 调度服务执行结果

worker 执行服务结果
6.3 周期性任务的查询、删除操作
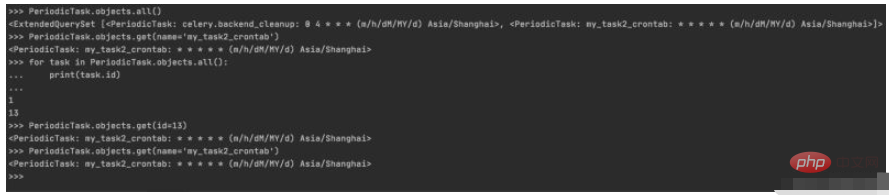
1. 周期性任务的查询
>>> PeriodicTask.objects.all() <ExtendedQuerySet [<PeriodicTask: celery.backend_cleanup: 0 4 * * * (m/h/dM/MY/d) Asia/Shanghai>, <PeriodicTask: my_task2_crontab: * * * * * (m/h/dM/MY/d) Asia/Shanghai>]> >>> PeriodicTask.objects.get(name='my_task2_crontab') <PeriodicTask: my_task2_crontab: * * * * * (m/h/dM/MY/d) Asia/Shanghai> >>> for task in PeriodicTask.objects.all(): ... print(task.id) ... 1 13 >>> PeriodicTask.objects.get(id=13) <PeriodicTask: my_task2_crontab: * * * * * (m/h/dM/MY/d) Asia/Shanghai> >>> PeriodicTask.objects.get(name='my_task2_crontab') <PeriodicTask: my_task2_crontab: * * * * * (m/h/dM/MY/d) Asia/Shanghai>
控制台实际操作记录
2.周期性任务的暂停/启动
2.1 设置my_taks2_crontab 暂停任务
>>> my_task2_crontab = PeriodicTask.objects.get(id=13)
>>> my_task2_crontab.enabled
True
>>> my_task2_crontab.enabled=False
>>> my_task2_crontab.save()
查看worker输出:

可以看到worker从19:31以后已经没有输出了,说明已经成功吧my_task2_crontab 任务暂停
2.2 设置my_task2_crontab 开启任务
把任务的 enabled 为 True 即可:
>>> my_task2_crontab.enabled
False
>>> my_task2_crontab.enabled=True
>>> my_task2_crontab.save()
查看worker输出:
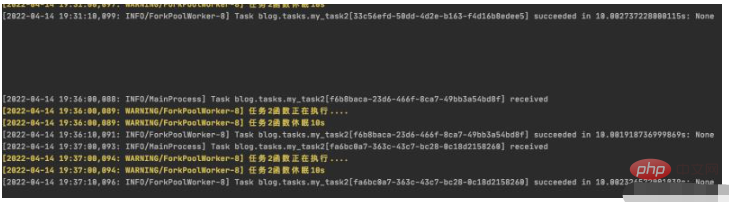
可以看到worker从19:36开始有输出,说明已把my_task2_crontab 任务重新启动
3. 周期性任务的删除
获取到指定的任务后调用delete(),再次查询指定任务会发现已经不存在了
PeriodicTask.objects.get(name='my_task2_crontab').delete()
>>> PeriodicTask.objects.get(name='my_task2_crontab')
Traceback (most recent call last):
  File "<console>", line 1, in <module>
  File "/Users/julius/PycharmProjects/typeidea/.venv/lib/python3.9/site-packages/django/db/models/manager.py", line 85, in manager_method
    return getattr(self.get_queryset(), name)(*args, **kwargs)
  File "/Users/julius/PycharmProjects/typeidea/.venv/lib/python3.9/site-packages/django/db/models/query.py", line 435, in get
    raise self.model.DoesNotExist(
django_celery_beat.models.PeriodicTask.DoesNotExist: PeriodicTask matching query does not exist.The above is the detailed content of How to use Python Celery to dynamically add scheduled tasks. For more information, please follow other related articles on the PHP Chinese website!

Hot AI Tools

Undresser.AI Undress
AI-powered app for creating realistic nude photos

AI Clothes Remover
Online AI tool for removing clothes from photos.

Undress AI Tool
Undress images for free

Clothoff.io
AI clothes remover

Video Face Swap
Swap faces in any video effortlessly with our completely free AI face swap tool!

Hot Article
Hot Tools

Notepad++7.3.1
Easy-to-use and free code editor

SublimeText3 Chinese version
Chinese version, very easy to use

Zend Studio 13.0.1
Powerful PHP integrated development environment

Dreamweaver CS6
Visual web development tools

SublimeText3 Mac version
God-level code editing software (SublimeText3)
Hot Topics


 PHP and Python: Different Paradigms Explained
Apr 18, 2025 am 12:26 AM
PHP and Python: Different Paradigms Explained
Apr 18, 2025 am 12:26 AM
PHP is mainly procedural programming, but also supports object-oriented programming (OOP); Python supports a variety of paradigms, including OOP, functional and procedural programming. PHP is suitable for web development, and Python is suitable for a variety of applications such as data analysis and machine learning.
 Choosing Between PHP and Python: A Guide
Apr 18, 2025 am 12:24 AM
Choosing Between PHP and Python: A Guide
Apr 18, 2025 am 12:24 AM
PHP is suitable for web development and rapid prototyping, and Python is suitable for data science and machine learning. 1.PHP is used for dynamic web development, with simple syntax and suitable for rapid development. 2. Python has concise syntax, is suitable for multiple fields, and has a strong library ecosystem.
 PHP and Python: A Deep Dive into Their History
Apr 18, 2025 am 12:25 AM
PHP and Python: A Deep Dive into Their History
Apr 18, 2025 am 12:25 AM
PHP originated in 1994 and was developed by RasmusLerdorf. It was originally used to track website visitors and gradually evolved into a server-side scripting language and was widely used in web development. Python was developed by Guidovan Rossum in the late 1980s and was first released in 1991. It emphasizes code readability and simplicity, and is suitable for scientific computing, data analysis and other fields.
 Python vs. JavaScript: The Learning Curve and Ease of Use
Apr 16, 2025 am 12:12 AM
Python vs. JavaScript: The Learning Curve and Ease of Use
Apr 16, 2025 am 12:12 AM
Python is more suitable for beginners, with a smooth learning curve and concise syntax; JavaScript is suitable for front-end development, with a steep learning curve and flexible syntax. 1. Python syntax is intuitive and suitable for data science and back-end development. 2. JavaScript is flexible and widely used in front-end and server-side programming.
 How to run sublime code python
Apr 16, 2025 am 08:48 AM
How to run sublime code python
Apr 16, 2025 am 08:48 AM
To run Python code in Sublime Text, you need to install the Python plug-in first, then create a .py file and write the code, and finally press Ctrl B to run the code, and the output will be displayed in the console.
 Can vs code run in Windows 8
Apr 15, 2025 pm 07:24 PM
Can vs code run in Windows 8
Apr 15, 2025 pm 07:24 PM
VS Code can run on Windows 8, but the experience may not be great. First make sure the system has been updated to the latest patch, then download the VS Code installation package that matches the system architecture and install it as prompted. After installation, be aware that some extensions may be incompatible with Windows 8 and need to look for alternative extensions or use newer Windows systems in a virtual machine. Install the necessary extensions to check whether they work properly. Although VS Code is feasible on Windows 8, it is recommended to upgrade to a newer Windows system for a better development experience and security.
 Can visual studio code be used in python
Apr 15, 2025 pm 08:18 PM
Can visual studio code be used in python
Apr 15, 2025 pm 08:18 PM
VS Code can be used to write Python and provides many features that make it an ideal tool for developing Python applications. It allows users to: install Python extensions to get functions such as code completion, syntax highlighting, and debugging. Use the debugger to track code step by step, find and fix errors. Integrate Git for version control. Use code formatting tools to maintain code consistency. Use the Linting tool to spot potential problems ahead of time.
 Where to write code in vscode
Apr 15, 2025 pm 09:54 PM
Where to write code in vscode
Apr 15, 2025 pm 09:54 PM
Writing code in Visual Studio Code (VSCode) is simple and easy to use. Just install VSCode, create a project, select a language, create a file, write code, save and run it. The advantages of VSCode include cross-platform, free and open source, powerful features, rich extensions, and lightweight and fast.
