
 Operation and Maintenance
Nginx
How to enable multi-site support and Nginx rewrite rule configuration in WordPress
Operation and Maintenance
Nginx
How to enable multi-site support and Nginx rewrite rule configuration in WordPress
How to enable multi-site support and Nginx rewrite rule configuration in WordPress

在wordpress3.0及以上版本可以直接使用多站点,它可以:
1、只安装一个wordpress程序即可创建多个wordpress站点,可以是子域名也可以是子目录。
2、可以有独立的博客后台,独立的博客地址。
3、管理员可设置开放哪些主题给站点使用。
4、管理员可配置插件给每个站点使用。
5、多个站点之间共用“用户数据库表”,也就是表 wp_usermeta 和 wp_users,其他的为独立数据库表。
wordpress多站点的配置方法:
1、首先,备份网站的数据库,以防出现意外时恢复(一般可忽略)。
2、打开wordpress的根目录下的wp-config.php文件,在
require_once(abspath . 'wp-settings.php');
前面加上以下代码:
define('wp_allow_multisite',true);
3、进入wordpress后台,”工具”-> 点击”配置网络”
ps:如果您要使用二级域名的形式,可以到“设置”->“常规”里面,把站点地址(url)的www.去掉。
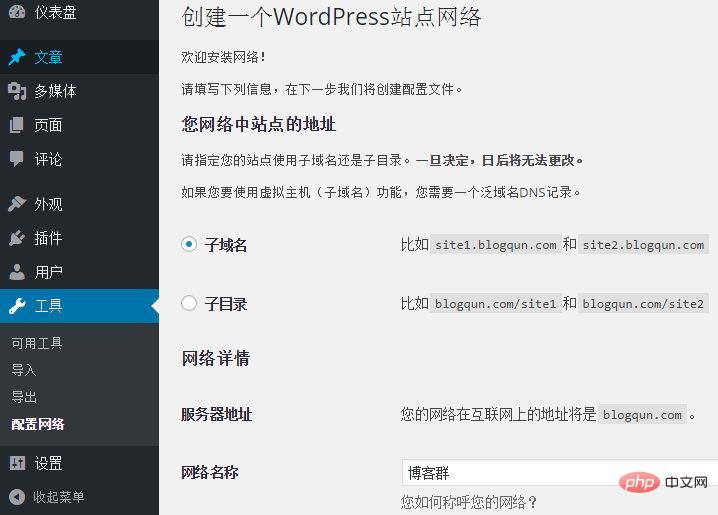
4、点击安装后,按照提示做好相关的配置
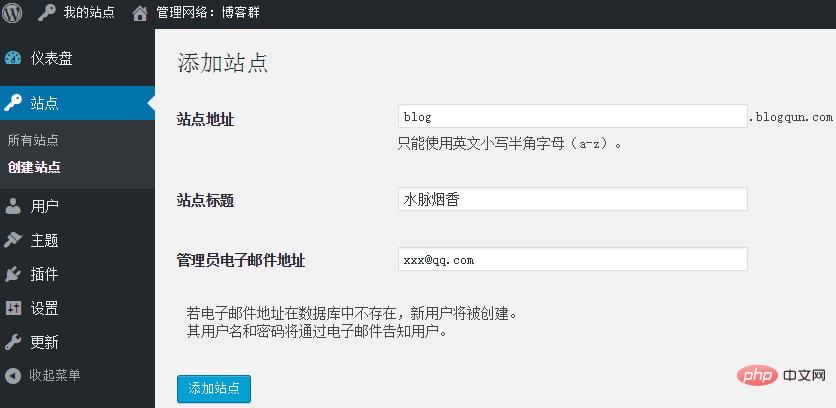
5、配置好,再次进入后台,在头部将出现“我的站点”->“管理网络”的选项菜单,接下来您可以管理或者创建站点,也可以开启主题或者插件给其他站点使用。
6、如果要给站点绑定其他域名,可以安装 wordpress mu domain mapping 插件。
nginx多站点rewrite(重写)规则
wordpress多站点模式可以被应用在多种方式上。其中最常用的是在”子目录”模式或者”二级域名”模式上。
nginx提供了两种特殊的指令:”x-accel-redirect”和”map”,使用这两个指令可以使得wordpress多站点的网络服务实现伪静态功能。
wordpress多站点使用子目录重写规则:
配置中jb51.net修改为自己的站点域名。
map $uri $blogname{
 ~^(?p<blogpath>/[^/]+/)files/(.*) $blogpath ;
}

map $blogname $blogid{
 default -999;

 #ref: http://wordpress.org/extend/plugins/nginx-helper/
 #include /var/www/wordpress/wp-content/plugins/nginx-helper/map.conf ;
}

server {
 server_name jb51.net ;

 root /var/www/jb51.net/htdocs;
 index index.php;

 #多站点配置
 location ~ ^(/[^/]+/)?files/(.+) {
 try_files /wp-content/blogs.dir/$blogid/files/$2 /wp-includes/ms-files.php?file=$2 ;
 access_log off; log_not_found off; expires max;
 }

 #avoid php readfile()
 location ^~ /blogs.dir {
 internal;
 alias /var/www/jb51.net/htdocs/wp-content/blogs.dir ;
 access_log off; log_not_found off; expires max;
 }

 if (!-e $request_filename) {
 rewrite /wp-admin$ $scheme://$host$uri/ permanent;
 rewrite ^(/[^/]+)?(/wp-.*) $2 last;
 rewrite ^(/[^/]+)?(/.*\.php) $2 last;
 }

 location / {
 try_files $uri $uri/ /index.php?$args ;
 }

 location ~ \.php$ {
 try_files $uri =404;
 include fastcgi_params;
 fastcgi_pass php;
 }

 #此处可以继续添加伪静态规则
}wordpress多站二级域名重写规则:
配置中jb51.net修改为自己的站点域名。
map $http_host $blogid {
 default  -999;

 #ref: http://wordpress.org/extend/plugins/nginx-helper/
 #include /var/www/wordpress/wp-content/plugins/nginx-helper/map.conf ;

}

server {
 server_name jb51.net *.jb51.net ;

 root /var/www/jb51.net/htdocs;
 index index.php;

 location / {
 try_files $uri $uri/ /index.php?$args ;
 }

 location ~ \.php$ {
 try_files $uri =404;
 include fastcgi_params;
 fastcgi_pass php;
 }

 #wpmu files
  location ~ ^/files/(.*)$ {
    try_files /wp-content/blogs.dir/$blogid/$uri /wp-includes/ms-files.php?file=$1 ;
    access_log off; log_not_found off;  expires max;
  }

 #wpmu x-sendfile to avoid php readfile()
 location ^~ /blogs.dir {
 internal;
 alias /var/www/jb51.net/htdocs/wp-content/blogs.dir;
 access_log off; log_not_found off; expires max;
 }

 #此处可以继续添加伪静态规则
}备注
“map”部分可以应用于小站点。大站点的多站点应用可以使用 nginx-helper wordpress插件 。
如果想进一步优化wordpress的性能可以使用nginx的fastcgi_cache,当使用fastcgi_cache配置需要在编译nginx时加上ngx_cache_purge模块以及使用wordpress的缓存插件等等
The above is the detailed content of How to enable multi-site support and Nginx rewrite rule configuration in WordPress. For more information, please follow other related articles on the PHP Chinese website!

Hot AI Tools

Undresser.AI Undress
AI-powered app for creating realistic nude photos

AI Clothes Remover
Online AI tool for removing clothes from photos.

Undress AI Tool
Undress images for free

Clothoff.io
AI clothes remover

Video Face Swap
Swap faces in any video effortlessly with our completely free AI face swap tool!

Hot Article
Hot Tools

Notepad++7.3.1
Easy-to-use and free code editor

SublimeText3 Chinese version
Chinese version, very easy to use

Zend Studio 13.0.1
Powerful PHP integrated development environment

Dreamweaver CS6
Visual web development tools

SublimeText3 Mac version
God-level code editing software (SublimeText3)
Hot Topics


 How to adjust the wordpress article list
Apr 20, 2025 am 10:48 AM
How to adjust the wordpress article list
Apr 20, 2025 am 10:48 AM
There are four ways to adjust the WordPress article list: use theme options, use plugins (such as Post Types Order, WP Post List, Boxy Stuff), use code (add settings in the functions.php file), or modify the WordPress database directly.
 What are the plugins for wordpress blocking ip
Apr 20, 2025 am 08:27 AM
What are the plugins for wordpress blocking ip
Apr 20, 2025 am 08:27 AM
WordPress IP blocking plugin selection is crucial. The following types can be considered: based on .htaccess: efficient, but complex operation; database operation: flexible, but low efficiency; firewall: high security performance, but complex configuration; self-written: highest control, but requires more technical level.
 How to write a header of a wordpress
Apr 20, 2025 pm 12:09 PM
How to write a header of a wordpress
Apr 20, 2025 pm 12:09 PM
The steps to create a custom header in WordPress are as follows: Edit the theme file "header.php". Add your website name and description. Create a navigation menu. Add a search bar. Save changes and view your custom header.
 How to cancel the editing date of wordpress
Apr 20, 2025 am 10:54 AM
How to cancel the editing date of wordpress
Apr 20, 2025 am 10:54 AM
WordPress editing dates can be canceled in three ways: 1. Install the Enable Post Date Disable plug-in; 2. Add code in the functions.php file; 3. Manually edit the post_modified column in the wp_posts table.
 How to change the head image of the wordpress theme
Apr 20, 2025 am 10:00 AM
How to change the head image of the wordpress theme
Apr 20, 2025 am 10:00 AM
A step-by-step guide to replacing a header image of WordPress: Log in to the WordPress dashboard and navigate to Appearance >Theme. Select the topic you want to edit and click Customize. Open the Theme Options panel and look for the Site Header or Header Image options. Click the Select Image button and upload a new head image. Crop the image and click Save and Crop. Click the Save and Publish button to update the changes.
 WordPress website account login
Apr 20, 2025 am 09:06 AM
WordPress website account login
Apr 20, 2025 am 09:06 AM
To log in to a WordPress website account: Visit the login page: Enter the website URL plus "/wp-login.php". Enter your username and password. Click "Login". Verification Two-step Verification (optional). After successfully logging in, you will see the website dashboard.
 What to do if there is an error in wordpress
Apr 20, 2025 am 11:57 AM
What to do if there is an error in wordpress
Apr 20, 2025 am 11:57 AM
WordPress Error Resolution Guide: 500 Internal Server Error: Disable the plug-in or check the server error log. 404 Page not found: Check permalink and make sure the page link is correct. White Screen of Death: Increase the server PHP memory limit. Database connection error: Check the database server status and WordPress configuration. Other tips: enable debug mode, check error logs, and seek support. Prevent errors: regularly update WordPress, install only necessary plugins, regularly back up your website, and optimize website performance.
 How to display wordpress comments
Apr 20, 2025 pm 12:06 PM
How to display wordpress comments
Apr 20, 2025 pm 12:06 PM
Enable comments in WordPress website: 1. Log in to the admin panel, go to "Settings" - "Discussions", and check "Allow comments"; 2. Select a location to display comments; 3. Customize comments; 4. Manage comments, approve, reject or delete; 5. Use <?php comments_template(); ?> tags to display comments; 6. Enable nested comments; 7. Adjust comment shape; 8. Use plugins and verification codes to prevent spam comments; 9. Encourage users to use Gravatar avatar; 10. Create comments to refer to
