

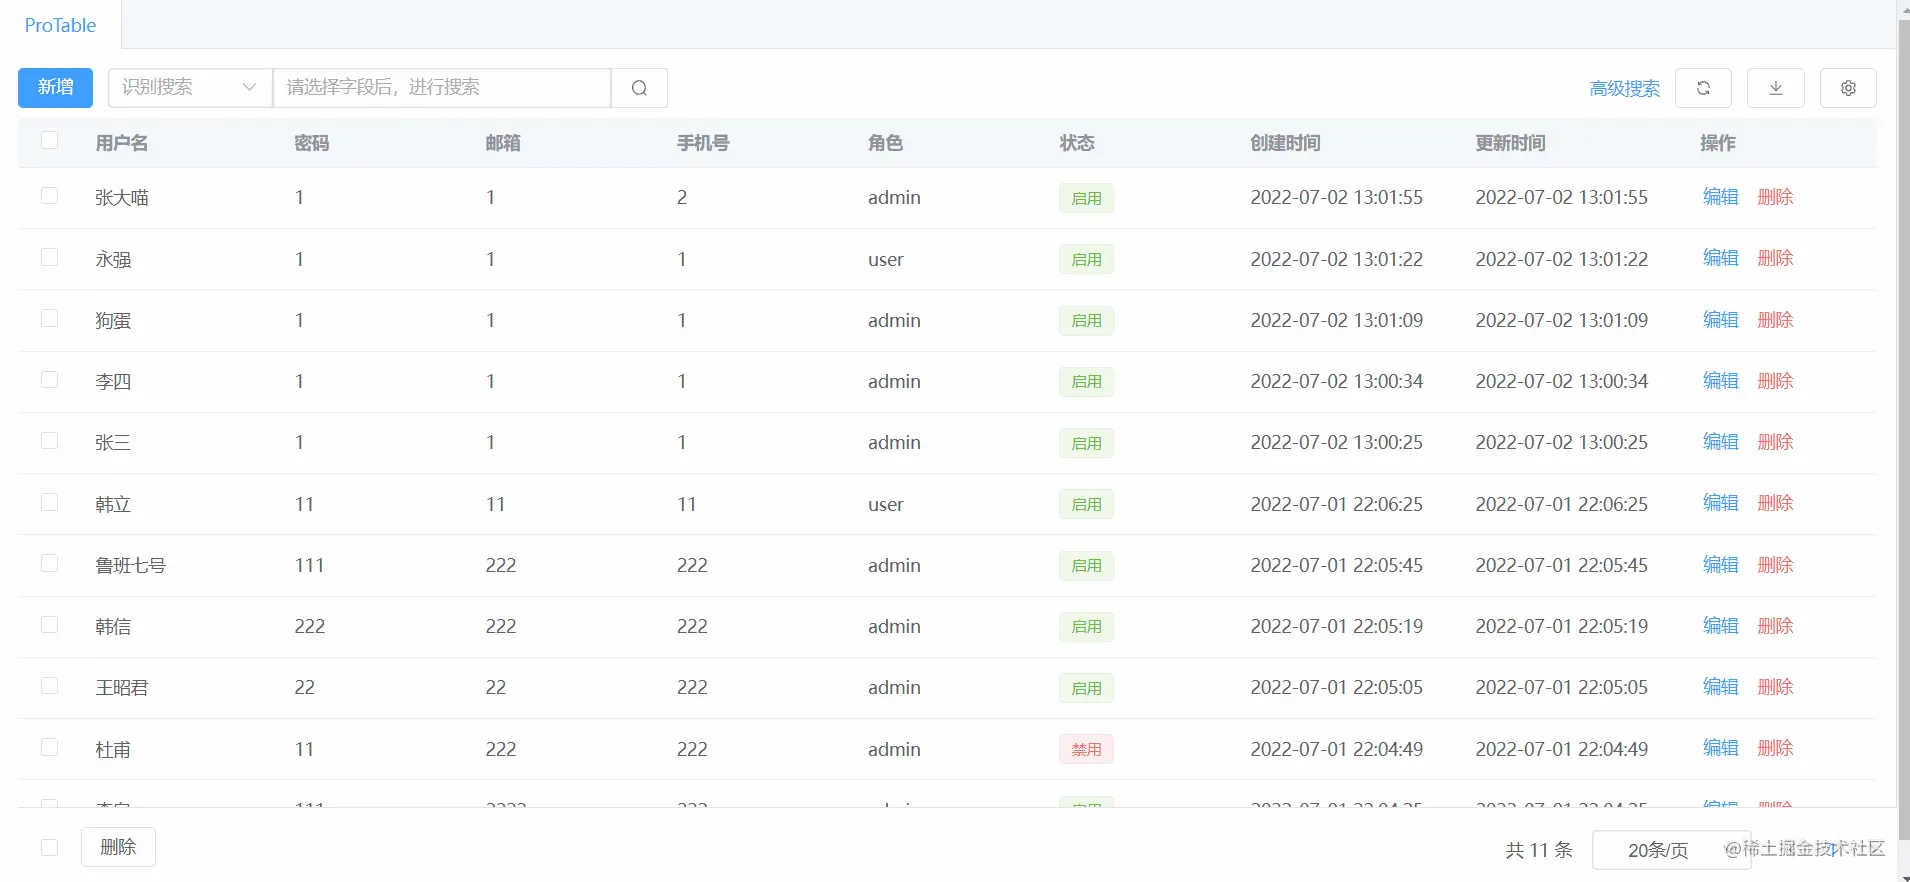
How to use Vue3+ts to develop ProTable

Front desk implementation
Achievement effect
Technology stack
vue3 typescript element-plus
Usage method
<template>
<el-tabs type="border-card" v-model="activeName">
<el-tab-pane
:label="item.label"
v-for="(item, index) in templateConfig"
:key="index" :name="item.name"
lazy
>
<!--所有的 slot内容都在表格内部处理好, columnsType进行区分-->
<pro-table
:columns="item.columns"
:type="item.name"
:request-url="requestUrl"
>
</pro-table>
</el-tab-pane>
</el-tabs>
</template>
<script lang="ts" setup>
import { ref } from 'vue'
import ProTable from './components/ProTable/index.vue'
import { ColumnProps, RequestUrl } from './components/ProTable/types'
import { projectConfig, projectConfigBatchDelete } from './service/api'
const activeName = ref('user')
interface TemplateConfig {
name: string
label: string
columns: ColumnProps[],
}
const requestUrl: RequestUrl = {
create: projectConfig,
list: projectConfig,
update: projectConfig,
destroy: projectConfig,
batchDelete: projectConfigBatchDelete
}
const templateConfig = ref<TemplateConfig[]>([
{
label: 'ProTable',
name: 'user',
columns: [
{
key: 'userName',
title: '用户名',
searchType: 'el-input'
},
{
key: 'password',
title: '密码',
searchType: 'el-input'
},
{
key: 'email',
title: '邮箱',
searchType: 'el-input'
},
{
key: 'phone',
title: '手机号',
searchType: 'el-input'
},
{
key: 'role',
title: '角色',
searchType: 'z-select',
attrs: {
options: [
{
label: '管理员',
value: 'admin'
},
{
label: '普通用户',
value: 'user'
}
]
}
},
{
key: 'status',
title: '状态',
searchType: 'z-select',
attrs: {
options: [
{
label: '启用',
value: 1
},
{
label: '禁用',
value: 0
}
]
},
columnType: 'status'
},
{
key: 'hasUseArray',
title: '是否使用数组参数?',
search: false,
searchType: 'useExpandField',
show: false,
add: false
},
{
key: 'arrayParams',
title: '数组参数',
searchType: 'z-array',
search: false,
width: 120,
add: false,
show: false
},
{
key: 'hasUseArray',
title: '是否使用JSON参数?',
search: false,
searchType: 'useExpandField',
show: false,
add: false
},
{
key: 'jsonParams',
title: 'JSON参数',
searchType: 'z-json',
search: false,
width: 120,
add: false,
show: false
},
{
key: 'createdAt',
title: '创建时间',
width: 180,
searchType: 'el-date-picker',
add: false
},
{
key: 'updatedAt',
title: '更新时间',
width: 180,
searchType: 'el-date-picker',
add: false
},
{
key: 'action',
title: '操作',
search: false,
add: false,
width: 150
}
]
}
])
</script>
<style lang="less">
</style>ProTable design idea
The page is divided into 5 areas,
Form search area
Table function button area
Operation area in the upper right corner of the table
Table theme area
Table pagination area
What issues should be considered?
Which areas should support incoming slots?
Should the original slot of the table be handed over to the user for delivery, or should it be encapsulated internally? For example, when
columis a status, it needs to be mapped totag, when it is anarraytype, it needs to be mapped to a table, when it isjson, it needs to be clicked check the details? It would be too troublesome to process each table. We hope to control it through a field.Does a certain column in
columnneed to be copied?Column fields need to be edited?
What are the details in the implementation process?
For the height of the table, let the user control the size of the visible area of the table, and put the batch operation button at the bottom (
fixedpositioning). This way the user can see the contents of the table in the largest area.
Coding style
If there are more than three attributes on the component, wrap them in new lines
Use eslint The style is
standard.
css Tips
<div class='box'> <div class='z'></div> </div>
*{
  box-sizing: border-box;
}
.box{
  display: inline-block;
    vertical-align: top;
}
.z{
  height: 32px;
  border: 1px solid;
  width: 100px;
  display: inline-block;
}If the box is turned into an inline element, if it is still an inline element, a gap will occur , which will cause its height to be different from the height of the parent element. as follows.

The solution is also very simple, you need to set the vertical-align attribute of its child elements, or set font-size: 0, the fundamental reason is because the text element in the middle also takes up space. Alternatively, instead of using inline-block, use the inline-flex attribute. There is no problem at all, because this is also widely used in the element-plus component library. Properties and compatibility are also very nice.
These solutions have been known for a long time, but the relationship with vertical-algin and line-height is still a bit vague, and I haven’t found any yet. Go find out.

Put two articles
CSS vertical-align attribute
I also think of baselineThis thing is in flex, align-items attribute: An attribute on the cross axis is very similar.
Detailed explanation of flex layout syntax tutorial
Table operation
After adding data, when re-acquiring the data
pageIndexReset It is 1, and the same is true when deleting data.When editing data,
pageIndexdoes not change, it is still the current page number.To summarize, when the number of data items changes,
pageIndexwill be reset to1. When user operations do not affect the total number of data,pageSizeremains unchanged.
Summary
Used a library that can monitor changes in the size of dom elements, resize-observer-polyfill.
In 3.x, if an element defines both
v-bind="object"and an identical independent attribute. Developers can choose which one to keep.
Document address# v-bind merge behavior
Reference article
JavaScript API——ResizeObserver usage
Later functions Extension
#The processing of correlation between fields has not been thought out yet.
Expand
slotand so on. .
Iterating....

Background implementation
Database mysql
I The one installed here is xampp, let’s check the version. What version is this? It’s fake, is it really 10? Don't worry about it for now, as long as it works.

Build table
CREATE TABLE `project_config`  (
  `id` int NOT NULL AUTO_INCREMENT COMMENT '主键',
  `type` varchar(255) CHARACTER SET utf8mb4 COLLATE utf8mb4_general_ci NOT NULL COMMENT '配置类型',
  `value` text CHARACTER SET utf8mb4 COLLATE utf8mb4_general_ci NOT NULL COMMENT '配置的json字符串',
  `created_at` datetime NOT NULL,
  `updated_at` datetime NOT NULL DEFAULT '0000-00-00 00:00:00' ON UPDATE CURRENT_TIMESTAMP,
  PRIMARY KEY (`id`) USING BTREE
) ENGINE = InnoDB AUTO_INCREMENT = 65 CHARACTER SET = utf8mb4 COLLATE = utf8mb4_general_ci ROW_FORMAT = COMPACT;
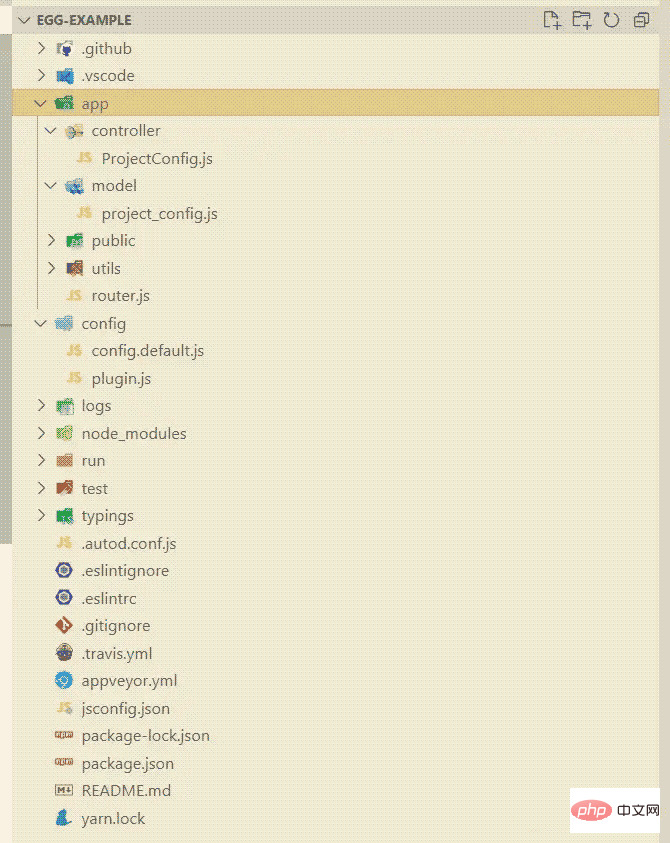
New project
npm init egg --type=simple
The project directory is roughly as follows,
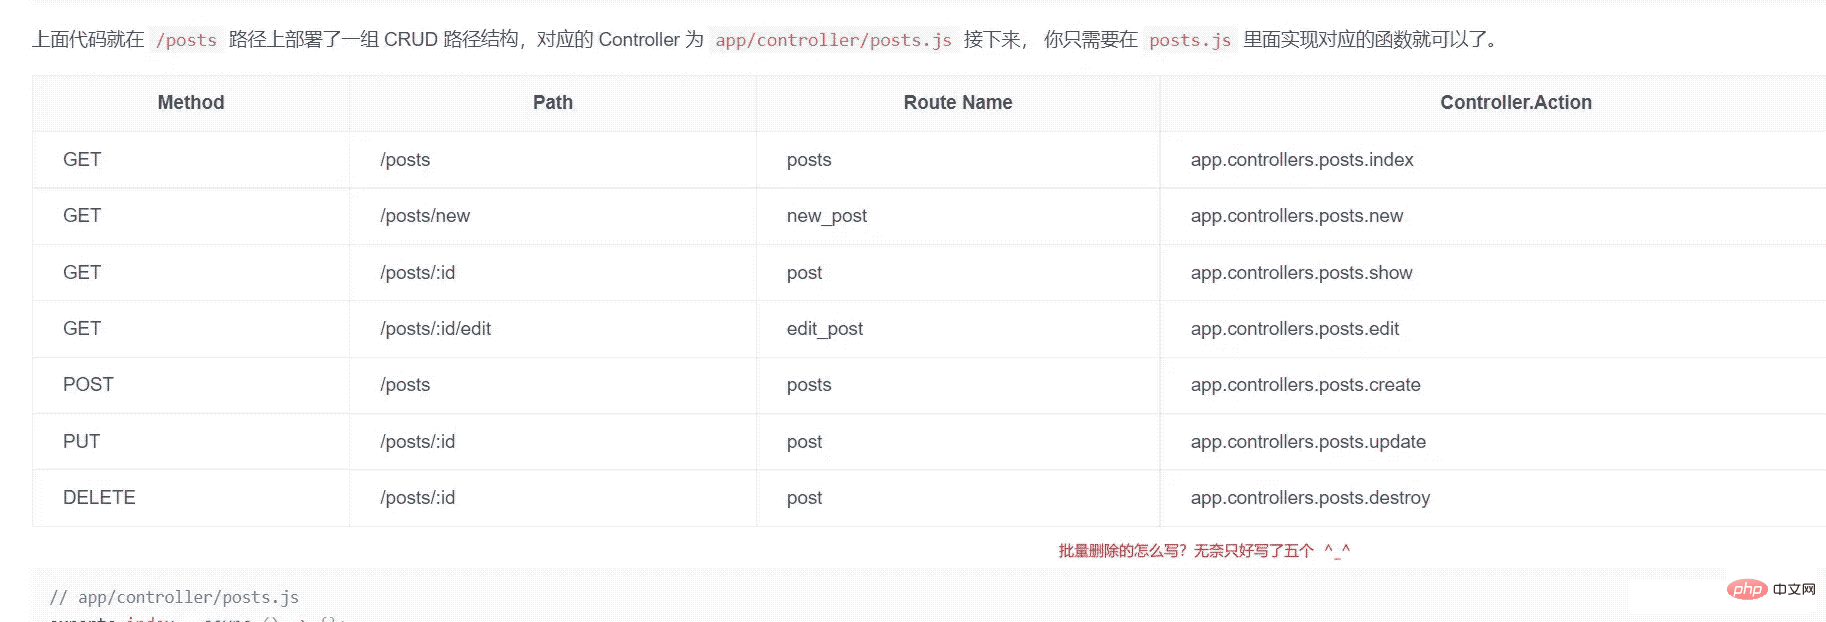
RESTful 风格的 URL 定义
Sequelize
npm install --save egg-sequelize mysql2
在
config/plugin.js中引入 egg-sequelize 插件, 这里我们引入了一个库egg-cors来帮我们实现cors。
'use strict';
/** @type Egg.EggPlugin */
exports.sequelize = {
  enable: true,
  package: 'egg-sequelize',
};
exports.cors = {
  enable: true,
  package: 'egg-cors',
};在
config/config.default.js中编写 sequelize 配置
/* eslint valid-jsdoc: "off" */
'use strict';
/**
 * @param {Egg.EggAppInfo} appInfo app info
 */
module.exports = appInfo => {
  /**
   * built-in config
   * @type {Egg.EggAppConfig}
   **/
  const config = exports = {};
  // use for cookie sign key, should change to your own and keep security
  config.keys = appInfo.name + '_1655529530112_7627';
  // add your middleware config here
  config.middleware = [];
  config.security = {
    csrf: {
      enable: false,
      ignoreJSON: true,
    },
  };
  config.cors = {
    origin: '*',
    allowMethods: 'GET,HEAD,PUT,POST,DELETE,PATCH',
  };
  // add your user config here
  const userConfig = {
    // myAppName: 'egg',
  };
  // sequelize
  const sequelize = {
    dialect: 'mysql',
    host: '127.0.0.1',
    port: 3306,
    username: 'root',
    password: '123456',
    database: 'test_database',
    timezone: '+08:00',
    dialectOptions: {
      dateStrings: true,
      typeCast: true,
    },
    define: {
      freezeTableName: true, // 模型名强制和表明一致
      underscored: true, // 字段以下划线(_)来分割(默认是驼峰命名风格)
    },
  };
  return {
    ...config,
    ...userConfig,
    sequelize,
  };
};1、时间格式化
类型需要采用:Sequelize.DATE
初始化Sequelize的时候传入dialectOptions参数,及timezone
timezone: '+08:00',  // 改为标准时区
dialectOptions: {
  dateStrings: true,
  typeCast: true,
},下面就开始编写
controller
对这块需要安装lodash,懂的都懂。
controller/ProjectConfig.js
'use strict';
const { success } = require('../utils/res');
const { omit, pick } = require('lodash');
const Controller = require('egg').Controller;
class ProjectConfigController extends Controller {
  async index() {
    const { ctx } = this;
    const { pageSize, pageIndex } = ctx.query;
    const { Op, fn, col, where, literal } = this.app.Sequelize;
    // 固定的查询参数
    const stableQuery = pick(ctx.query, [ 'type', 'createdAt', 'updatedAt' ]);
    const stableQueryArgs = Object.keys(stableQuery)
      .filter(key => Boolean(stableQuery[key]))
      .map(key => {
        return {
          [key]: stableQuery[key],
        };
      });
    const whereCondition = omit(ctx.query, [ 'pageIndex', 'pageSize', 'type', 'createdAt', 'updatedAt' ]);
    // 需要模糊查询的参数
    const whereArgs = Object.keys(whereCondition)
      .filter(key => Boolean(whereCondition[key]))
      .map(key => {
        return where(fn('json_extract', col('value'), literal(`\'$.${key}\'`)), {
          [Op.like]: `%${whereCondition[key]}%`,
        });
      });
    const query = {
      where: {
        [Op.and]: [
          ...stableQueryArgs,
          ...whereArgs,
        ],
      },
      order: [
        [ 'createdAt', 'DESC' ],
      ],
      limit: Number(pageSize), // 每页显示数量
      offset: (pageIndex - 1) * pageSize, // 当前页数
    };
    const data = await ctx.model.ProjectConfig.findAndCountAll(query);
    ctx.body = success(data);
  }
  async create() {
    const { ctx } = this;
    const { type, value } = ctx.request.body;
    const data = await ctx.model.ProjectConfig.create({ type, value });
    ctx.body = success(data);
  }
  async update() {
    const { ctx } = this;
    const { type, value } = ctx.request.body;
    const { id } = ctx.params;
    const data = await ctx.model.ProjectConfig.update({ type, value }, { where: { id } });
    ctx.body = success(data);
  }
  async destroy() {
    const { ctx } = this;
    const { id } = ctx.params;
    console.log(id);
    const data = await ctx.model.ProjectConfig.destroy({ where: { id } });
    ctx.body = success(data);
  }
  async batchDestroy() {
    const { ctx } = this;
    const { ids } = ctx.request.body;
    console.log(ids);
    const { Op } = this.app.Sequelize;
    const data = await ctx.model.ProjectConfig.destroy({
      where: {
        id: {
          [Op.in]: ids,
        },
      },
    });
    ctx.body = success(data);
  }
}
module.exports = ProjectConfigController;模糊查询
SELECT json_extract(字段名,'$.json结构') FROM 表名;
sequelize高级查询
Post.findAll({
  where: sequelize.where(sequelize.fn('char_length', sequelize.col('content')), 7)
});
// SELECT ... FROM "posts" AS "post" WHERE char_length("content") = 7中文文档,英文看的吃力,看中文的也无妨,不寒碜。^_^
model
model/project_config.js
'use strict';
module.exports = app => {
  const { STRING, INTEGER, TEXT, DATE } = app.Sequelize;
  const ProjectConfig = app.model.define('project_config', {
    id: { type: INTEGER, primaryKey: true, autoIncrement: true },
    type: { type: STRING },
    value: {
      type: TEXT,
      get() {
        return this.getDataValue('value') ? JSON.parse(this.getDataValue('value')) : null;
      },
      set(value) {
        this.setDataValue('value', JSON.stringify(value));
      },
    },
    createdAt: { type: DATE },
    updatedAt: { type: DATE },
  });
  return ProjectConfig;
};router.js
'use strict';
/**
 * @param {Egg.Application} app - egg application
 */
module.exports = app => {
  const { router, controller } = app;
  router.get('/api/projectConfig', controller.projectConfig.index);
  router.post('/api/projectConfig', controller.projectConfig.create);
  router.put('/api/projectConfig/:id', controller.projectConfig.update);
  router.delete('/api/projectConfig/:id', controller.projectConfig.destroy);
  router.post('/api/projectConfig/batchDelete', controller.projectConfig.batchDestroy);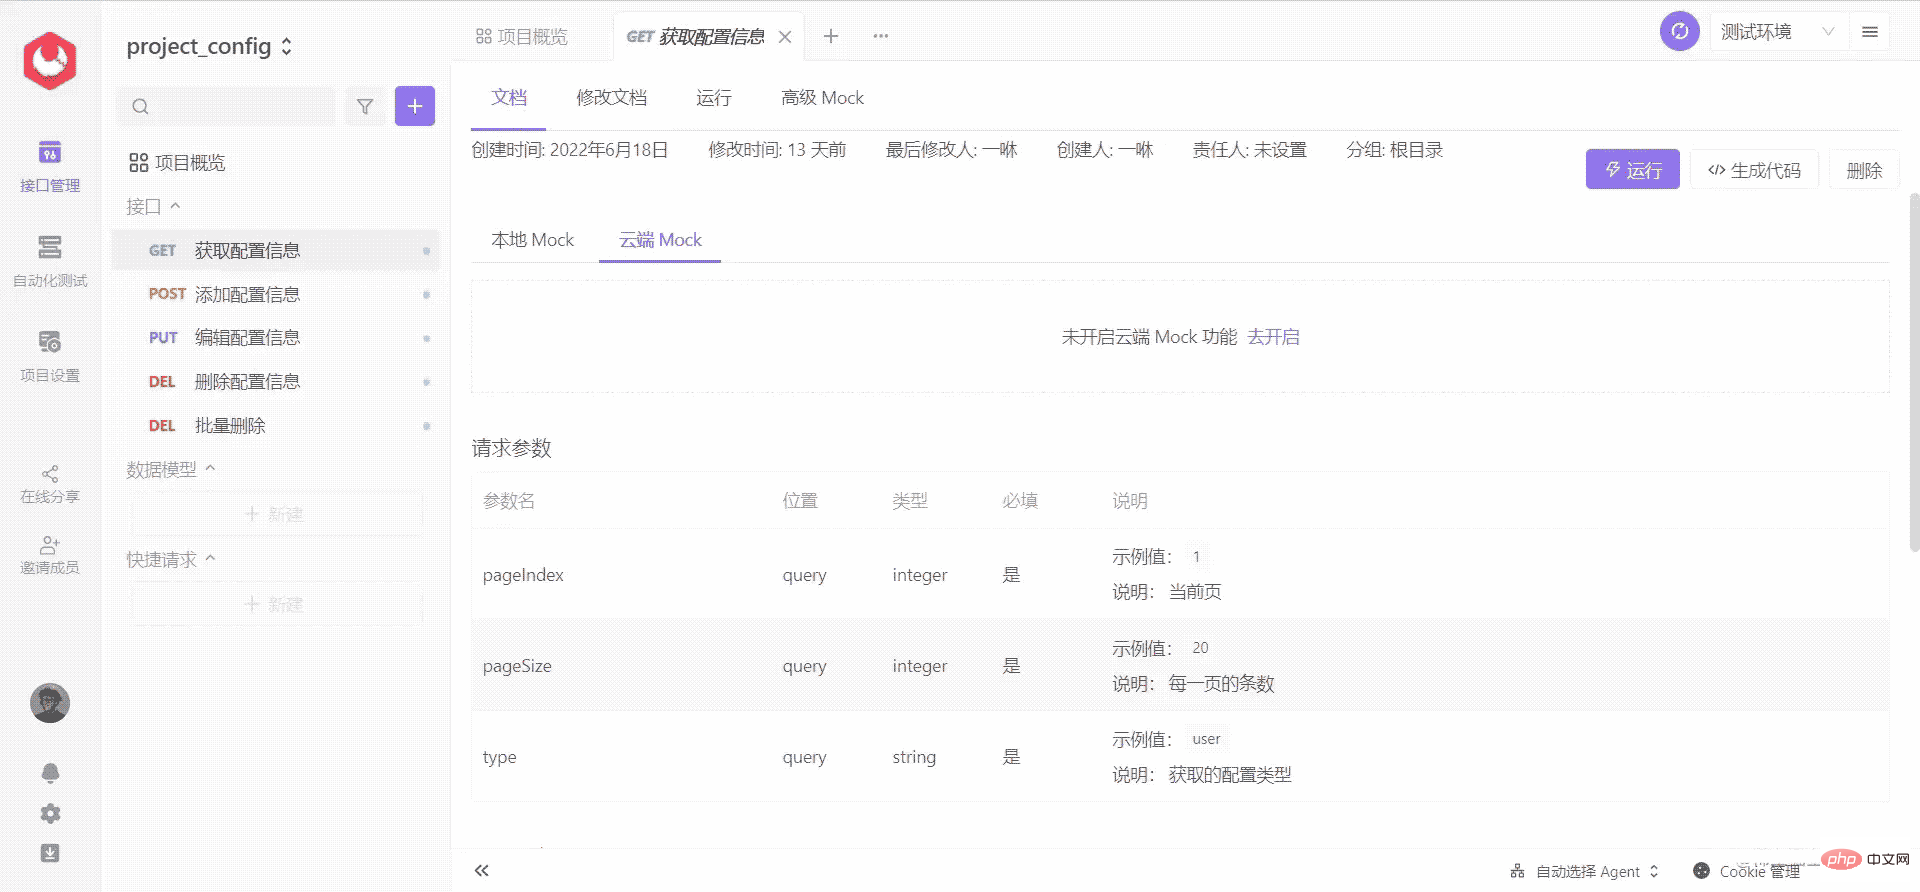
};API 文档 Apifox
先快速测试一把,然后去对前端代码。
ts用到的一些
在类型别名(type alias)的声明中可以使用
keyof、typeof、in等关键字来进行一些强大的类型操作
interface A {
  x: number;
  y: string;
}
// 拿到 A 类型的 key 字面量枚举类型,相当于 type B = 'x' | 'y'
type B = keyof A;
const json = { foo: 1, bar: 'hi' };
// 根据 ts 的类型推论生成一个类型。此时 C 的类型为 { foo: number; bar: string; }
type C = typeof json;
// 根据已有类型生成相关新类型,此处将 A 类型的所有成员变成了可选项,相当于 type D = { x?: number; y?: string; };
type D = {
  [T in keyof A]?: A[T];
};在比如用一个联合类型来约束对象的key,用interface我就没实现,貌似.
export type FormItemType = 'el-input' | 'z-select' | 'el-date-picker'
// 目前发现 interface 的key 只能是三种 string number symbol   keyof any
type IPlaceholderMapping = {
  [key in FormItemType]: string
}
export const placeholderMapping: IPlaceholderMapping = {
  'el-input': '请输入',
  'z-select': '请选择',
  'el-date-picker': '请选择日期'
}The above is the detailed content of How to use Vue3+ts to develop ProTable. For more information, please follow other related articles on the PHP Chinese website!

Hot AI Tools

Undresser.AI Undress
AI-powered app for creating realistic nude photos

AI Clothes Remover
Online AI tool for removing clothes from photos.

Undress AI Tool
Undress images for free

Clothoff.io
AI clothes remover

Video Face Swap
Swap faces in any video effortlessly with our completely free AI face swap tool!

Hot Article
Hot Tools

Notepad++7.3.1
Easy-to-use and free code editor

SublimeText3 Chinese version
Chinese version, very easy to use

Zend Studio 13.0.1
Powerful PHP integrated development environment

Dreamweaver CS6
Visual web development tools

SublimeText3 Mac version
God-level code editing software (SublimeText3)
Hot Topics


 Vue3+TS+Vite development skills: how to optimize SEO
Sep 10, 2023 pm 07:33 PM
Vue3+TS+Vite development skills: how to optimize SEO
Sep 10, 2023 pm 07:33 PM
Vue3+TS+Vite development skills: How to perform SEO optimization SEO (SearchEngineOptimization) refers to optimizing the structure, content and keywords of the website to rank it higher in search engines, thereby increasing the website's traffic and exposure. . In the development of modern front-end technologies such as Vue3+TS+Vite, how to optimize SEO is a very important issue. This article will introduce some Vue3+TS+Vite development techniques and methods to help
 How to use tinymce in vue3 project
May 19, 2023 pm 08:40 PM
How to use tinymce in vue3 project
May 19, 2023 pm 08:40 PM
tinymce is a fully functional rich text editor plug-in, but introducing tinymce into vue is not as smooth as other Vue rich text plug-ins. tinymce itself is not suitable for Vue, and @tinymce/tinymce-vue needs to be introduced, and It is a foreign rich text plug-in and has not passed the Chinese version. You need to download the translation package from its official website (you may need to bypass the firewall). 1. Install related dependencies npminstalltinymce-Snpminstall@tinymce/tinymce-vue-S2. Download the Chinese package 3. Introduce the skin and Chinese package. Create a new tinymce folder in the project public folder and download the
 vue3+vite: How to solve the error when using require to dynamically import images in src
May 21, 2023 pm 03:16 PM
vue3+vite: How to solve the error when using require to dynamically import images in src
May 21, 2023 pm 03:16 PM
vue3+vite:src uses require to dynamically import images and error reports and solutions. vue3+vite dynamically imports multiple images. If vue3 is using typescript development, require will introduce image errors. requireisnotdefined cannot be used like vue2 such as imgUrl:require(' .../assets/test.png') is imported because typescript does not support require, so import is used. Here is how to solve it: use awaitimport
 How to refresh partial content of the page in Vue3
May 26, 2023 pm 05:31 PM
How to refresh partial content of the page in Vue3
May 26, 2023 pm 05:31 PM
To achieve partial refresh of the page, we only need to implement the re-rendering of the local component (dom). In Vue, the easiest way to achieve this effect is to use the v-if directive. In Vue2, in addition to using the v-if instruction to re-render the local dom, we can also create a new blank component. When we need to refresh the local page, jump to this blank component page, and then jump back in the beforeRouteEnter guard in the blank component. original page. As shown in the figure below, how to click the refresh button in Vue3.X to reload the DOM within the red box and display the corresponding loading status. Since the guard in the component in the scriptsetup syntax in Vue3.X only has o
 Vue3+TS+Vite development skills: how to carry out front-end security protection
Sep 09, 2023 pm 04:19 PM
Vue3+TS+Vite development skills: how to carry out front-end security protection
Sep 09, 2023 pm 04:19 PM
Vue3+TS+Vite development skills: How to carry out front-end security protection. With the continuous development of front-end technology, more and more companies and individuals are beginning to use Vue3+TS+Vite for front-end development. However, the security risks that come with it have also attracted people's attention. In this article, we will discuss some common front-end security issues and share some tips on how to protect front-end security during the development process of Vue3+TS+Vite. Input validation User input is often one of the main sources of front-end security vulnerabilities. exist
 Vue3+TS+Vite development skills: how to optimize cross-domain requests and network requests
Sep 09, 2023 pm 04:40 PM
Vue3+TS+Vite development skills: how to optimize cross-domain requests and network requests
Sep 09, 2023 pm 04:40 PM
Vue3+TS+Vite development skills: How to optimize cross-domain requests and network requests Introduction: In front-end development, network requests are a very common operation. How to optimize network requests to improve page loading speed and user experience is one of the issues that our developers need to think about. At the same time, for some scenarios that require sending requests to different domain names, we need to solve cross-domain issues. This article will introduce how to make cross-domain requests and optimization techniques for network requests in the Vue3+TS+Vite development environment. 1. Cross-domain request solution
 How Vue3 parses markdown and implements code highlighting
May 20, 2023 pm 04:16 PM
How Vue3 parses markdown and implements code highlighting
May 20, 2023 pm 04:16 PM
Vue implements the blog front-end and needs to implement markdown parsing. If there is code, it needs to implement code highlighting. There are many markdown parsing libraries for Vue, such as markdown-it, vue-markdown-loader, marked, vue-markdown, etc. These libraries are all very similar. Marked is used here, and highlight.js is used as the code highlighting library. The specific implementation steps are as follows: 1. Install dependent libraries. Open the command window under the vue project and enter the following command npminstallmarked-save//marked to convert markdown into htmlnpmins
 Vue3+TS+Vite development skills: how to encrypt and store data
Sep 10, 2023 pm 04:51 PM
Vue3+TS+Vite development skills: how to encrypt and store data
Sep 10, 2023 pm 04:51 PM
Vue3+TS+Vite development tips: How to encrypt and store data. With the rapid development of Internet technology, data security and privacy protection are becoming more and more important. In the Vue3+TS+Vite development environment, how to encrypt and store data is a problem that every developer needs to face. This article will introduce some common data encryption and storage techniques to help developers improve application security and user experience. 1. Data Encryption Front-end Data Encryption Front-end encryption is an important part of protecting data security. Commonly used
