
 Java
javaTutorial
How SpringBoot integrates Mybatis and thymleft to implement add, delete, modify and check functions
Java
javaTutorial
How SpringBoot integrates Mybatis and thymleft to implement add, delete, modify and check functions
How SpringBoot integrates Mybatis and thymleft to implement add, delete, modify and check functions

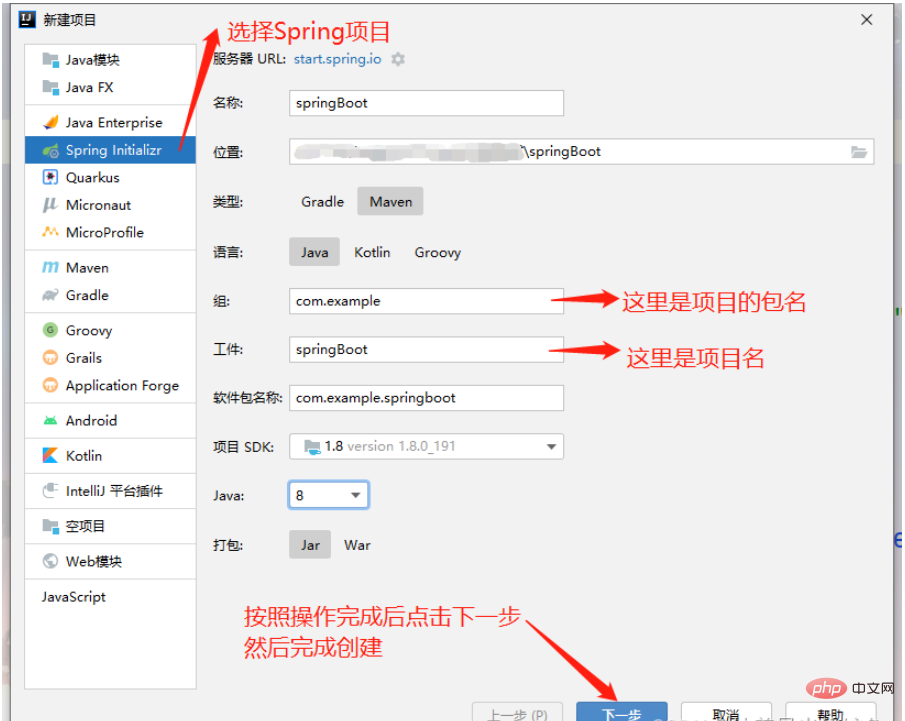
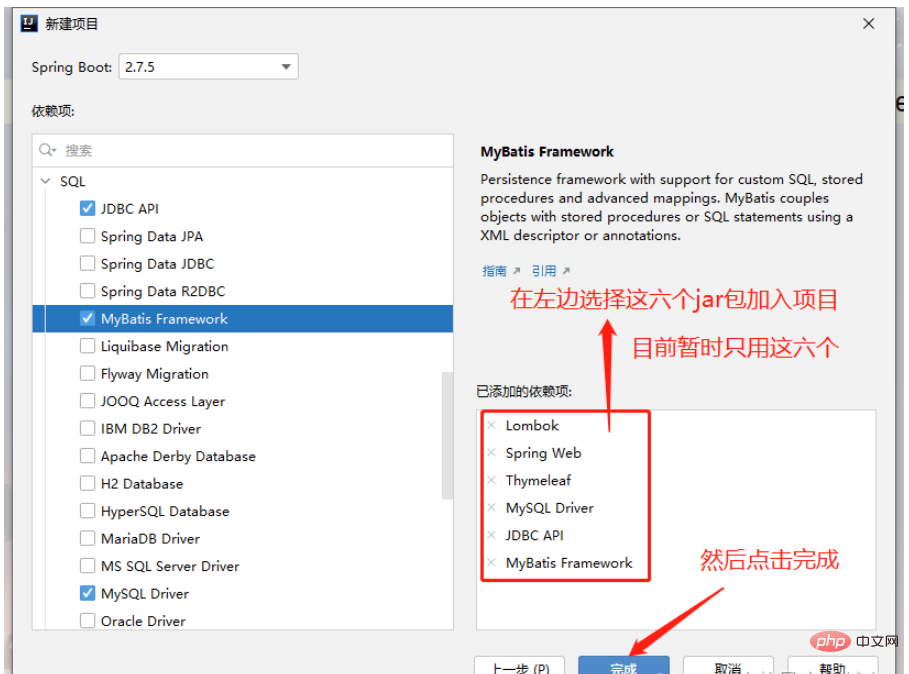
First we create the project. Note: When creating the SpringBoot project, you must be connected to the Internet otherwise an error will be reported.
After the project is created, we first Compile application.yml
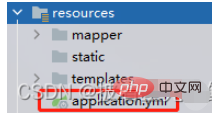
#Specify port number
server:
port: 8888
#Configure mysql data source
spring:
datasource:
driver-class-name: com.mysql.cj.jdbc.Driver
url: jdbc:mysql://localhost:3306/nba?serverTimezone=Asia/Shanghai
username: root
password: root
#Configure template engine thymeleaf
thymeleaf:
mode: HTML5
cache: false
suffix: .html
prefix: classpath:/templates /
mybatis:
mapper-locations: classpath:/mapper/*.xml
type-aliases-package: com.bdqn.springboot #Put the package name
Note: There must be a space after:. This is its syntax. If there is no space, an error will be reported when running.
Next, we will build the project and create the following packages. You can create other tool packages according to your actual needs. Class
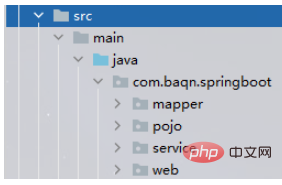
mapper: used to store dao layer interface
pojo: used to store entity classes
service: used to store service Layer interface, and service layer implementation class
web: used to store the controller control layer
Next we start writing code
The first is the entity class, today we are doing one Simple addition, deletion, modification and query of two tables
package com.baqn.springboot.pojo;
import lombok.Data;
@Data
public class Clubs {
    private int cid;
    private String cname;
    private String city;
}package com.baqn.springboot.pojo;
import lombok.Data;
@Data
public class Players {
private int pid;
private String pname;
private String birthday;
private int height;
private int weight;
private String position;
private int cid;
private String cname;
private String city;
}Using @Data annotation can effectively reduce the amount of code in the entity class and reduce the writing of get/set and toString
Then the mapper layer
package com.baqn.springboot.mapper;
import com.baqn.springboot.pojo.Players;
import org.apache.ibatis.annotations.Mapper;
import org.apache.ibatis.annotations.Param;
import org.springframework.stereotype.Repository;
import java.util.List;
@Mapper
@Repository
public interface PlayersMapper {
    /**
     * 查询所有
     * @return
     */
    List<Players> findAll();
    /**
     * 根据ID查询
     * @return
     */
    Players findById(Integer id);
    /**
     * 新增
     * @param players
     * @return
     */
    Integer add(Players players);
    /**
     * 删除
     * @param pid
     * @return
     */
    Integer delete(Integer pid);
    /**
     * 修改
     * @param players
     * @return
     */
    Integer update(Players players);
}After using @mapper, there is no need to set the scanning address in the spring configuration. Through the namespace attribute in mapper.xml corresponding to the relevant mapper class, spring will dynamically generate the bean and inject it into Servicelmpl.
Then the service layer
package com.baqn.springboot.service;
import com.baqn.springboot.pojo.Players;
import org.apache.ibatis.annotations.Param;
import java.util.List;
public interface PlayersService {
    List<Players> findAll();
    Players findById(Integer pid);
    Integer add(Players players);
    Integer delete(Integer pid);
    Integer update(Players players);
}package com.baqn.springboot.service;
import com.baqn.springboot.mapper.PlayersMapper;
import com.baqn.springboot.pojo.Players;
import org.springframework.beans.factory.annotation.Autowired;
import org.springframework.stereotype.Service;
import java.util.List;
@Service
public class PlayersServiceImpl implements PlayersService{
@Autowired
private PlayersMapper mapper;
@Override
public List<Players> findAll() {
return mapper.findAll();
}
@Override
public Players findById(Integer pid) {
return mapper.findById(pid);
}
@Override
public Integer add(Players players) {
return mapper.add(players);
}
@Override
public Integer delete(Integer pid) {
return mapper.delete(pid);
}
@Override
public Integer update(Players players) {
return mapper.update(players);
}
}Finally the controller control class of the web layer
package com.baqn.springboot.web;
import com.baqn.springboot.pojo.Players;
import com.baqn.springboot.service.PlayersServiceImpl;
import org.springframework.beans.factory.annotation.Autowired;
import org.springframework.stereotype.Controller;
import org.springframework.ui.Model;
import org.springframework.web.bind.annotation.PathVariable;
import org.springframework.web.bind.annotation.RequestMapping;
import java.util.List;
@Controller
public class PlayersController {
    @Autowired
    private PlayersServiceImpl service;
    @RequestMapping("/findAll")
    public String findAll(Model model) {
        List<Players> allList = service.findAll();
        model.addAttribute("allList",allList);
        return "index";
    }
    @RequestMapping("/findById/{pid}")
    public String findById(Model model,@PathVariable("pid") Integer pid) {
        Players list = service.findById(pid);
        //System.out.println("---------------"+list.toString());
        model.addAttribute("list",list);
        return "update.html";
    }
    @RequestMapping("/add")
    public String add(Model model, Players players){
        Integer count = service.add(players);
        if (count>0){
            return "redirect:/findAll";
        }
        return "add";
    }
    @RequestMapping("/delete/{pid}")
    public String delete(Model model,@PathVariable("pid") Integer pid){
        Integer count = service.delete(pid);
        if (count>0){
            return "redirect:/findAll";
        }
        return null;
    }
    @RequestMapping("/a1")
    public String a1(Model model, Players players){
        return "add.html";
    }
    @RequestMapping("/update")
    public String update(Model model,Players plays){
        Integer count = service.update(plays);
        if (count>0){
            return "redirect:/findAll";
        }
        return null;
    }
}Note: The a1 method is only used to jump to the page and has no other effect. If If you have a better jump method, please leave me a message.
Now that the preparations are done, you can start writing SQL statements
mapper.xml can be written in the resources below or in In the above mapper layer
, if it is written above, you need to write a resource filter in the pom. If you are interested, you can go to Baidu
<?xml version="1.0" encoding="UTF-8" ?>
<!DOCTYPE mapper
        PUBLIC "-//mybatis.org//DTD Mapper 3.0//EN"
        "http://mybatis.org/dtd/mybatis-3-mapper.dtd">
<!--namespace=绑定一个对应的Dao/Mapper接口-->
<mapper namespace="com.baqn.springboot.mapper.PlayersMapper">
    <select id="findAll" resultType="com.baqn.springboot.pojo.Players">
        select * from clubs c , players p
        where c.cid = p.cid
    </select>
    <select id="findById" resultType="com.baqn.springboot.pojo.Players">
        select * from clubs c , players p
        where c.cid = p.cid and p.pid=#{pid}
    </select>
    <insert id="add" parameterType="com.baqn.springboot.pojo.Players">
        INSERT INTO `nba`.`players`(pname, birthday, height, weight, position, cid)
        VALUES (#{pname}, #{birthday}, #{height}, #{weight}, #{position}, #{cid});
    </insert>
    <delete id="delete" parameterType="int">
        delete from players where pid = #{pid}
    </delete>
    <update id="update" parameterType="com.baqn.springboot.pojo.Players">
        UPDATE `nba`.`players`
        <set>
            <if test="pname != null">pname=#{pname},</if>
            <if test="birthday != null">birthday=#{birthday},</if>
            <if test="height != null">height=#{height},</if>
            <if test="weight != null">weight=#{weight},</if>
            <if test="position != null">position=#{position},</if>
            <if test="cid != null">cid=#{cid}</if>
        </set>
        WHERE `pid` = #{pid};
    </update>
</mapper>Note: The corresponding id in mapper.xml It is the method of the mapper layer interface. You must not write it wrong.
Up to now, our back-end code has been completely completed. The front-end page is as follows
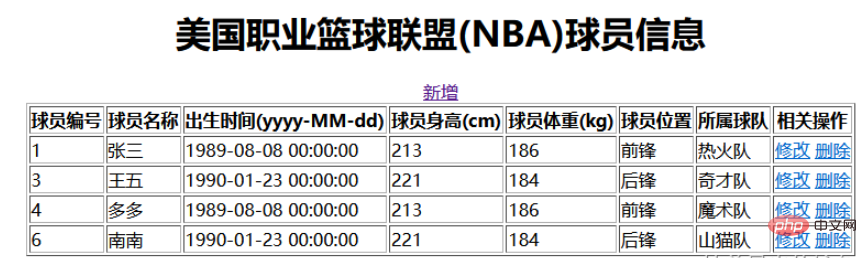
Homepageindex.html
<html>
<head>
<title>Title</title>
</head>
<body>
<div align="center">
<table border="1">
<h2 id="美国职业篮球联盟-NBA-球员信息">美国职业篮球联盟(NBA)球员信息</h2>
<a th:href="@{/a1}" rel="external nofollow" >新增</a>
<tr>
<th>球员编号</th>
<th>球员名称</th>
<th>出生时间(yyyy-MM-dd)</th>
<th>球员身高(cm)</th>
<th>球员体重(kg)</th>
<th>球员位置</th>
<th>所属球队</th>
<th>相关操作</th>
</tr>
<!--/*@thymesVar id="abc" type=""*/-->
<tr th:each="list : ${allList}">
<td th:text="${list.pid}"></td>
<td th:text="${list.pname}"></td>
<td th:text="${list.birthday}"></td>
<td th:text="${list.height}">${list.height}</td>
<td th:text="${list.weight}"></td>
<td th:text="${list.position}"></td>
<td th:text="${list.cname}"></td>
<td>
<a th:href="@{'/findById/'+${list.pid}}" rel="external nofollow" >修改</a>
<a th:href="@{'/delete/'+${list.pid}}" rel="external nofollow" >删除</a>
</td>
</tr>
</c:forEach>
</table>
</div>
</body>
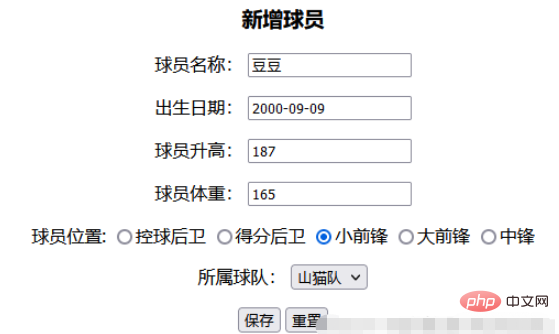
</html>New page add.html
<!DOCTYPE html>
<html>
      <head>
      <title>Title</title>
</head>
<body>
<div align="center">
  <h4 id="新增球员">新增球员</h4>
  <form action="/add">
    <p>
      球员名称:
      <input name="pname" id="pname">
    </p >
    <p>
      出生日期:
      <input name="birthday" id="birthday">
    </p >
    <p>
      球员升高:
      <input name="height" id="height">
    </p >
    <p>
      球员体重:
      <input name="weight" id="weight">
    </p >
    <p>
      球员位置:
      <input type="radio"  name="position" value="控球后卫"/>控球后卫
      <input type="radio"  name="position" value="得分后卫"/>得分后卫
      <input type="radio"  name="position" value="小前锋" />小前锋
      <input type="radio"  name="position" value="大前锋" />大前锋
      <input type="radio"  name="position" value="中锋"/>中锋
    </p >
    <p>
      所属球队:
      <select name="cid">
        <option value="1">热火队</option>
        <option value="2">奇才队</option>
        <option value="3">魔术队</option>
        <option value="4">山猫队</option>
        <option value="5">老鹰队</option>
      </select>
    </p >
    <input type="submit" value="保存">
    <input type="reset" value="重置">
  </form>
</div>
</body>
</html>Modify page update.html
<!DOCTYPE html>
<html  xmlns:th="http://www.thymeleaf.org">
<head>
  <meta charset="UTF-8">
  <title>Title</title>
</head>
<body class="container">
    <div align="center">
      <h2 id="修改球员信息">修改球员信息</h2>
      <br/>
      <form action="/update" method="get" id="form2">
        <table>
          <tr>
            <td colspan="2"></td>
          </tr>
          <tr>
            <td>球员编号:</td>
            <td><input type="text" name="pid"
                                    id="pid" th:value="${list.pid}"/></td>
          </tr>
          <tr>
            <td>球员姓名:</td>
            <td><input type="text" name="pname"
                                    id="pname" th:value="${list.pname}"/></td>
          </tr>
          <tr>
            <td>出身日期:</td>
            <td><input type="text" name="birthday"
                                    id="birthday" th:value="${list.birthday}"/></td>
          </tr>
          <tr>
            <td>球员身高:</td>
            <td><input type="text" name="height"
                                    id="height" th:value="${list.height}"/></td>
          </tr>
          <tr>
            <td>球员体重:</td>
            <td><input type="text" name="weight"
                                    id="weight" th:value="${list.weight}"/></td>
          </tr>
          <tr>
            <td>球员位置:</td>
            <td><input type="text" name="position"
                                    id="position" th:value="${list.position}"/></td>
          </tr>
          <tr>
            <td>所属球队:</td>
            <td>
              <select name="cid" id="cid" th:value="${list.cid}"/>
              <option value="">--请选择球队--</option>
              <option value="1">热火队</option>
              <option value="2">奇才队</option>
              <option value="3">魔术队</option>
              <option value="4">山猫队</option>
              <option value="5">老鹰队</option>
              </select></td>
          </tr>
          <tr>
            <td colspan="2"><input type="submit" id="btn2" value="保存"/>
              <input type="reset" id="wrap-clera" value="重置"/>
              <a th:href="@{/index.html}" rel="external nofollow" ><input type="button" id="btn1" value="返回"/></a>
            </td>
          </tr>
        </table>
      </form>
    </div>
</body>
</html>Database creation source code--Note: I am using MySQL database
create table clubs(
		cid int primary key auto_increment,
		cname varchar(50) not null,
		city varchar(50) not null
)
create table players(
		pid int primary key auto_increment,
		pname varchar(50) not null,
		birthday datetime not null,
		height int not null,
		weight int not null,
		position varchar(50) not null,
		cid int not null
)
alter  table  players  add  constraint  players_cid
foreign key(cid)  references  clubs(cid);
insert into clubs values
(1,'热火队','迈阿密'),
(2,'奇才队','华盛顿'),
(3,'魔术队','奥兰多'),
(4,'山猫队','夏洛特'),
(5,'老鹰队','亚特兰大')
insert into players values
(4,'多多','1989-08-08',213,186,'前锋',1),
(5,'西西','1987-10-16',199,162,'中锋',1),
(6,'南南','1990-01-23',221,184,'后锋',1)
Finally for everyone to see The following page is displayed
Enter in the address bar: http://localhost:8888/findAll Enter all query methods and then jump to idnex.html for display
Click Add to jump to the new page
Enter the parameters
Then click Save and jump to idnex.html after successful addition and display the data
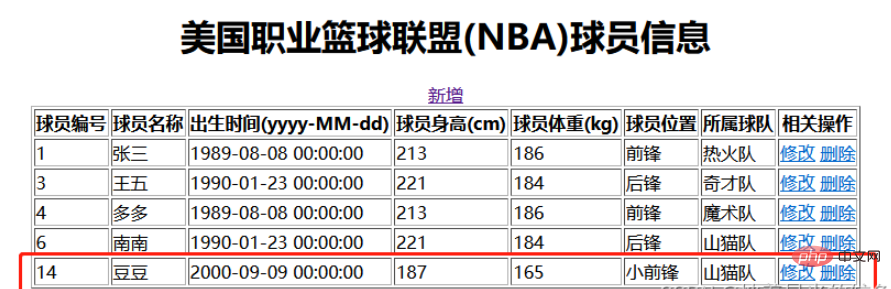
The front-end data display surface was successfully added
Click to modify to find the data according to the findById method, and jump to the update.htnl page for display
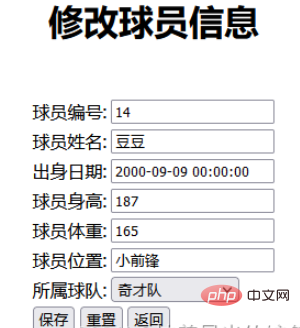
We change the team to be the Wizards and click save
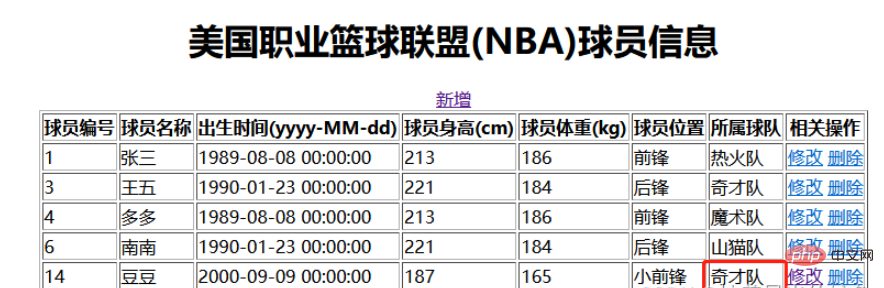
Jump to the index.html page and the data is successfully modified
The above is the detailed content of How SpringBoot integrates Mybatis and thymleft to implement add, delete, modify and check functions. For more information, please follow other related articles on the PHP Chinese website!

Hot AI Tools

Undresser.AI Undress
AI-powered app for creating realistic nude photos

AI Clothes Remover
Online AI tool for removing clothes from photos.

Undress AI Tool
Undress images for free

Clothoff.io
AI clothes remover

Video Face Swap
Swap faces in any video effortlessly with our completely free AI face swap tool!

Hot Article
Hot Tools

Notepad++7.3.1
Easy-to-use and free code editor

SublimeText3 Chinese version
Chinese version, very easy to use

Zend Studio 13.0.1
Powerful PHP integrated development environment

Dreamweaver CS6
Visual web development tools

SublimeText3 Mac version
God-level code editing software (SublimeText3)
Hot Topics


 iBatis vs. MyBatis: Which one is better for you?
Feb 19, 2024 pm 04:38 PM
iBatis vs. MyBatis: Which one is better for you?
Feb 19, 2024 pm 04:38 PM
iBatis vs. MyBatis: Which should you choose? Introduction: With the rapid development of the Java language, many persistence frameworks have emerged. iBatis and MyBatis are two popular persistence frameworks, both of which provide a simple and efficient data access solution. This article will introduce the features and advantages of iBatis and MyBatis, and give some specific code examples to help you choose the appropriate framework. Introduction to iBatis: iBatis is an open source persistence framework
 Detailed explanation of the Set tag function in MyBatis dynamic SQL tags
Feb 26, 2024 pm 07:48 PM
Detailed explanation of the Set tag function in MyBatis dynamic SQL tags
Feb 26, 2024 pm 07:48 PM
Interpretation of MyBatis dynamic SQL tags: Detailed explanation of Set tag usage MyBatis is an excellent persistence layer framework. It provides a wealth of dynamic SQL tags and can flexibly construct database operation statements. Among them, the Set tag is used to generate the SET clause in the UPDATE statement, which is very commonly used in update operations. This article will explain in detail the usage of the Set tag in MyBatis and demonstrate its functionality through specific code examples. What is Set tag Set tag is used in MyBati
 Comparative analysis of the functions and performance of JPA and MyBatis
Feb 19, 2024 pm 05:43 PM
Comparative analysis of the functions and performance of JPA and MyBatis
Feb 19, 2024 pm 05:43 PM
JPA and MyBatis: Function and Performance Comparative Analysis Introduction: In Java development, the persistence framework plays a very important role. Common persistence frameworks include JPA (JavaPersistenceAPI) and MyBatis. This article will conduct a comparative analysis of the functions and performance of the two frameworks and provide specific code examples. 1. Function comparison: JPA: JPA is part of JavaEE and provides an object-oriented data persistence solution. It is passed annotation or X
 Various ways to implement batch deletion operations in MyBatis
Feb 19, 2024 pm 07:31 PM
Various ways to implement batch deletion operations in MyBatis
Feb 19, 2024 pm 07:31 PM
Several ways to implement batch deletion statements in MyBatis require specific code examples. In recent years, due to the increasing amount of data, batch operations have become an important part of database operations. In actual development, we often need to delete records in the database in batches. This article will focus on several ways to implement batch delete statements in MyBatis and provide corresponding code examples. Use the foreach tag to implement batch deletion. MyBatis provides the foreach tag, which can easily traverse a set.
 Detailed explanation of how to use MyBatis batch delete statements
Feb 20, 2024 am 08:31 AM
Detailed explanation of how to use MyBatis batch delete statements
Feb 20, 2024 am 08:31 AM
Detailed explanation of how to use MyBatis batch delete statements requires specific code examples. Introduction: MyBatis is an excellent persistence layer framework that provides rich SQL operation functions. In actual project development, we often encounter situations where data needs to be deleted in batches. This article will introduce in detail how to use MyBatis batch delete statements, and attach specific code examples. Usage scenario: When deleting a large amount of data in the database, it is inefficient to execute the delete statements one by one. At this point, you can use the batch deletion function of MyBatis
 Detailed explanation of MyBatis cache mechanism: understand the cache storage principle in one article
Feb 23, 2024 pm 04:09 PM
Detailed explanation of MyBatis cache mechanism: understand the cache storage principle in one article
Feb 23, 2024 pm 04:09 PM
Detailed explanation of MyBatis caching mechanism: One article to understand the principle of cache storage Introduction When using MyBatis for database access, caching is a very important mechanism, which can effectively reduce access to the database and improve system performance. This article will introduce the caching mechanism of MyBatis in detail, including cache classification, storage principles and specific code examples. 1. Cache classification MyBatis cache is mainly divided into two types: first-level cache and second-level cache. The first-level cache is a SqlSession-level cache. When
 Detailed explanation of MyBatis first-level cache: How to improve data access efficiency?
Feb 23, 2024 pm 08:13 PM
Detailed explanation of MyBatis first-level cache: How to improve data access efficiency?
Feb 23, 2024 pm 08:13 PM
Detailed explanation of MyBatis first-level cache: How to improve data access efficiency? During the development process, efficient data access has always been one of the focuses of programmers. For persistence layer frameworks like MyBatis, caching is one of the key methods to improve data access efficiency. MyBatis provides two caching mechanisms: first-level cache and second-level cache. The first-level cache is enabled by default. This article will introduce the mechanism of MyBatis first-level cache in detail and provide specific code examples to help readers better understand
 In-depth understanding of the batch Insert implementation principle in MyBatis
Feb 21, 2024 pm 04:42 PM
In-depth understanding of the batch Insert implementation principle in MyBatis
Feb 21, 2024 pm 04:42 PM
MyBatis is a popular Java persistence layer framework that is widely used in various Java projects. Among them, batch insertion is a common operation that can effectively improve the performance of database operations. This article will deeply explore the implementation principle of batch Insert in MyBatis, and analyze it in detail with specific code examples. Batch Insert in MyBatis In MyBatis, batch Insert operations are usually implemented using dynamic SQL. By constructing a line S containing multiple inserted values
