
 Backend Development
Python Tutorial
How to install and use Python lightweight performance tool Locust
Backend Development
Python Tutorial
How to install and use Python lightweight performance tool Locust
How to install and use Python lightweight performance tool Locust

Locust is based on python's coroutine mechanism, which breaks the limitations of thread processes and can run high concurrency on a test machine
Basics of performance testing
1. Speed: measure the performance of the system Processing efficiency: response time
2. How much: measures the processing capacity of the system: how many transactions (tps) can be processed per unit time
Performance testing is based on the most common points of test requirements For the following three categories
1 Load testing load testing
Continuously pressurize the server, worthy of predetermined indicators or some system resources reaching bottlenecks, the purpose is to find the maximum load capacity of the system
2 Stress test
Verify whether the system is stable through high load for a long time
3 Concurrency test:
Submit requests to the server at the same time, and the purpose is discovered Whether there is transaction conflict or lock escalation in the system
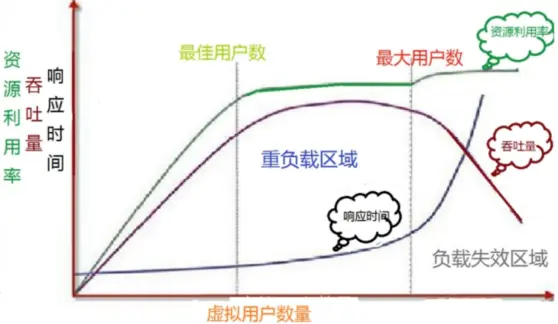
Performance load model
locust installation
Installation exists Question, you can download the locust template through Douban source
pip install locust
locust template
Basically in most scenarios we can make modifications based on this template read.py
from locust import HttpUser, TaskSet, task, tag, events
# 启动locust时运行
@events.test_start.add_listener
def setup(environment, **kwargs):
    # print("task setup")
# 停止locust时运行
@events.test_stop.add_listener
def teardown(environment, **kwargs):
    print("task teardown")
class UserBehavor(TaskSet):
    #虚拟用户启用task运行
    def on_start(self):
        print("start")
        locusts_spawned.wait()
    #虚拟用户结束task运行
    def on_stop(self):
        print("stop")
    @tag('test1')
    @task(2)
    def index(self):
        self.client.get('/yetangjian/p/17320268.html')
    @task(1)
    def info(self):
        self.client.get("/yetangjian/p/17253215.html")
class WebsiteUser(HttpUser):
    def setup(self):
        print("locust setup")
    def teardown(self):
        print("locust teardown")
    host = "https://www.cnblogs.com"
    task_set = task(UserBehavor)
    min_wait = 3000
max_wait = 5000Note: Here we A webhost is given so that we can open locust directly in the browser
Rendezvous lr_rendezvous
Of course we can put the rendezvous operation into the setup of the above template to run it
locusts_spawned = Semaphore()
locusts_spawned.acquire()
def on_hatch_complete(**kwargs):
    """
    select_task类的钩子函数
    :param kwargs:
    :return:
    """
    locusts_spawned.release()
events.spawning_complete.add_listener(on_hatch_complete)
n = 0
class UserBehavor(TaskSet):
    def login(self):
        global n
        n += 1
        print(f"第{n}个用户登陆")
    def on_start(self):
        self.login()
        locusts_spawned.wait()
    @task
    def test1(self):
        #catch_response获取返回
        with self.client.get("/yetangjian/p/17253215.html",catch_response=True):
            print("查询结束")
class WebsiteUser(HttpUser):
    host = "https://www.cnblogs.com"
    task_set = task(UserBehavor)
    wait_time = between(1,3)
if __name__ == '__main__':
os.system('locust -f read.py --web-host="127.0.0.1"')Common usage
We have seen some in the above two examples, such as the decorator events.test_start.add_listener; events.test_stop.add_listener is used to perform some operations before and after the load test. Another example is on_start, on_stop, which runs before and after task execution. Another example is task, which can be used to allocate the weight of the task.
Waiting time
# wait between 3.0 and 10.5 seconds after each task
#wait_time = between(3.0, 10.5)
#固定时间等待
# wait_time = constant(3)
#确保每秒运行多少次
constant_throughput(task_runs_per_second)
#确保每多少秒运行一次
constant_pacing(wait_time)
can also be used in the User class Issue rewritten wait_time to achieve custom
tag tag
@tag('test1')
@task(2)
def index(self):
self.client.get('/yetangjian/p/17320268.html')By tagging tasks, you can execute certain tasks at runtime:
#只执行标记test1
os.system('locust -f read.py --tags test1 --web-host="127.0.0.1"')
#不执行标记过的
os.system('locust -f read.py --exclude-tags --web-host="127.0.0.1"')
#除去test1执行所有
os.system('locust -f read.py --exclude-tags test1 --web-host="127.0.0.1"')
Customization failed
#定义响应时间超过0.1就为失败
with self.client.get("/yetangjian/p/17253215.html", catch_response=True) as response:
    if response.elapsed.total_seconds() > 0.1:
        response.failure("Request took too long")
#定义响应码是200就为失败
with self.client.get("/yetangjian/p/17320268.html", catch_response=True) as response:
    if response.status_code == 200:
        response.failure("响应码200,但我定义为失败")
## Custom load shape
Customize a shape. py inherits LoadTestShape and overrides tick. This shape class will increase the number of users in units of 100 blocks at a rate of 20, and then stop the load test after 10 minutes (user_count will increase from the 51st second after running round to 100)from locust import LoadTestShape
class MyCustomShape(LoadTestShape):
time_limit = 600
spawn_rate = 20
def tick(self):
run_time = self.get_run_time()
if run_time < self.time_limit:
# User count rounded to nearest hundred.
user_count = round(run_time, -2)
return (user_count, self.spawn_rate)
return None
os.system('locust -f read.py,shape.py --web-host="127.0.0.1"')
at different time stages Example
from locust import LoadTestShape
class StagesShapeWithCustomUsers(LoadTestShape):
    stages = [
        {"duration": 10, "users": 10, "spawn_rate": 10},
        {"duration": 30, "users": 50, "spawn_rate": 10},
        {"duration": 60, "users": 100, "spawn_rate": 10},
        {"duration": 120, "users": 100, "spawn_rate": 10}]
    def tick(self):
        run_time = self.get_run_time()
        for stage in self.stages:
            if run_time < stage["duration"]:
                tick_data = (stage["users"], stage["spawn_rate"])
                return tick_data
return NoneThe above is the detailed content of How to install and use Python lightweight performance tool Locust. For more information, please follow other related articles on the PHP Chinese website!

Hot AI Tools

Undresser.AI Undress
AI-powered app for creating realistic nude photos

AI Clothes Remover
Online AI tool for removing clothes from photos.

Undress AI Tool
Undress images for free

Clothoff.io
AI clothes remover

Video Face Swap
Swap faces in any video effortlessly with our completely free AI face swap tool!

Hot Article
Hot Tools

Notepad++7.3.1
Easy-to-use and free code editor

SublimeText3 Chinese version
Chinese version, very easy to use

Zend Studio 13.0.1
Powerful PHP integrated development environment

Dreamweaver CS6
Visual web development tools

SublimeText3 Mac version
God-level code editing software (SublimeText3)
Hot Topics


 PHP and Python: Different Paradigms Explained
Apr 18, 2025 am 12:26 AM
PHP and Python: Different Paradigms Explained
Apr 18, 2025 am 12:26 AM
PHP is mainly procedural programming, but also supports object-oriented programming (OOP); Python supports a variety of paradigms, including OOP, functional and procedural programming. PHP is suitable for web development, and Python is suitable for a variety of applications such as data analysis and machine learning.
 Choosing Between PHP and Python: A Guide
Apr 18, 2025 am 12:24 AM
Choosing Between PHP and Python: A Guide
Apr 18, 2025 am 12:24 AM
PHP is suitable for web development and rapid prototyping, and Python is suitable for data science and machine learning. 1.PHP is used for dynamic web development, with simple syntax and suitable for rapid development. 2. Python has concise syntax, is suitable for multiple fields, and has a strong library ecosystem.
 PHP and Python: A Deep Dive into Their History
Apr 18, 2025 am 12:25 AM
PHP and Python: A Deep Dive into Their History
Apr 18, 2025 am 12:25 AM
PHP originated in 1994 and was developed by RasmusLerdorf. It was originally used to track website visitors and gradually evolved into a server-side scripting language and was widely used in web development. Python was developed by Guidovan Rossum in the late 1980s and was first released in 1991. It emphasizes code readability and simplicity, and is suitable for scientific computing, data analysis and other fields.
 Python vs. JavaScript: The Learning Curve and Ease of Use
Apr 16, 2025 am 12:12 AM
Python vs. JavaScript: The Learning Curve and Ease of Use
Apr 16, 2025 am 12:12 AM
Python is more suitable for beginners, with a smooth learning curve and concise syntax; JavaScript is suitable for front-end development, with a steep learning curve and flexible syntax. 1. Python syntax is intuitive and suitable for data science and back-end development. 2. JavaScript is flexible and widely used in front-end and server-side programming.
 Can vs code run in Windows 8
Apr 15, 2025 pm 07:24 PM
Can vs code run in Windows 8
Apr 15, 2025 pm 07:24 PM
VS Code can run on Windows 8, but the experience may not be great. First make sure the system has been updated to the latest patch, then download the VS Code installation package that matches the system architecture and install it as prompted. After installation, be aware that some extensions may be incompatible with Windows 8 and need to look for alternative extensions or use newer Windows systems in a virtual machine. Install the necessary extensions to check whether they work properly. Although VS Code is feasible on Windows 8, it is recommended to upgrade to a newer Windows system for a better development experience and security.
 Can visual studio code be used in python
Apr 15, 2025 pm 08:18 PM
Can visual studio code be used in python
Apr 15, 2025 pm 08:18 PM
VS Code can be used to write Python and provides many features that make it an ideal tool for developing Python applications. It allows users to: install Python extensions to get functions such as code completion, syntax highlighting, and debugging. Use the debugger to track code step by step, find and fix errors. Integrate Git for version control. Use code formatting tools to maintain code consistency. Use the Linting tool to spot potential problems ahead of time.
 How to run python with notepad
Apr 16, 2025 pm 07:33 PM
How to run python with notepad
Apr 16, 2025 pm 07:33 PM
Running Python code in Notepad requires the Python executable and NppExec plug-in to be installed. After installing Python and adding PATH to it, configure the command "python" and the parameter "{CURRENT_DIRECTORY}{FILE_NAME}" in the NppExec plug-in to run Python code in Notepad through the shortcut key "F6".
 How to run sublime code python
Apr 16, 2025 am 08:48 AM
How to run sublime code python
Apr 16, 2025 am 08:48 AM
To run Python code in Sublime Text, you need to install the Python plug-in first, then create a .py file and write the code, and finally press Ctrl B to run the code, and the output will be displayed in the console.
