

Python: How to create and visualize point clouds

1. Introduction
Point cloud applications are everywhere: robots, self-driving cars, assistance systems, healthcare, etc. Point cloud is a 3D representation suitable for processing real-world data, especially when the geometry of the scene/object is required, such as the distance, shape and size of the object.
A point cloud is a set of points that represent a scene in the real world or an object in space. It is a discrete representation of geometric objects and scenes. In other words, a point cloud PCD is a collection of n points, where each point Pi is represented by its 3D coordinates:

Note that it is also Add some other features to describe the point cloud, such as RGB color, normals, etc. For example, RGB colors can be added to provide color information.
2. Point cloud generation
Point clouds are usually generated using 3D scanners (laser scanners, time-of-flight scanners and structured light scanners) or computer-aided design (CAD) models. In this tutorial, we will first create and visualize a random point cloud. We will then use the Open3D library to sample points from the 3D surface to generate it from the 3D model. Finally, we'll see how to create them from RGB-D data.
Let’s start by importing the Python library:
import numpy as np
import matplotlib.pyplot as plt
import open3d as o3d
2.1 Random Point Cloud
The easiest way is to randomly create a point cloud. Note that we generally do not create random points to process except when creating noise for a GAN (Generative Adversarial Network).
Usually, point clouds are represented by (n×3) arrays, where n is the number of points. Let's create a point cloud with 5 random points:
number_points = 5
pcd = np.random.rand(number_points, 3)# uniform distribution over [0, 1)
print(pcd)
We could print the points directly, but it's not very efficient, especially in most applications if the number of points is large. A better approach is to display them in 3D space. Let’s visualize it using the Matplotlib library:
# Create Figure:
fig, ax = plt.subplots(subplot_kw={"projection": "3d"})
ax.scatter3D(pcd[:, 0], pcd[:, 1], pcd[:, 2])
# label the axes
ax.set_xlabel("X")
ax.set_ylabel("Y")
ax.set_zlabel("Z")
ax.set_title("Random Point Cloud")
# display:
plt.show()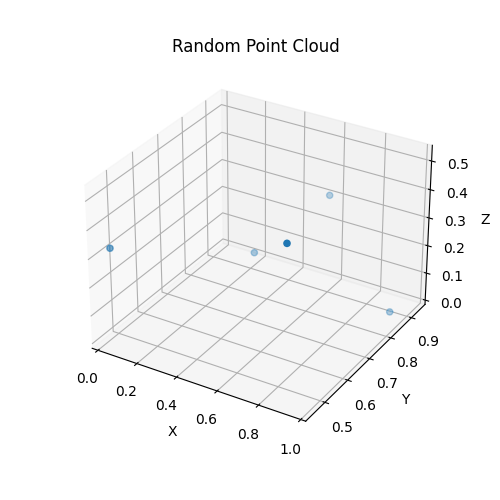
Random Point Cloud Visualization
2.2 Sampling Point Cloud
Required for direct processing of 3D models time. Therefore, sampling point clouds from their three-dimensional surfaces is a potential solution. Let's start by importing the bunny model from the Open3D dataset:
bunny = o3d.data.BunnyMesh()
mesh = o3d.io.read_triangle_mesh(bunny.path)
Or import it as follows:
mesh = o3d.io.read_triangle_mesh("data/bunny.ply")Next, display the 3D model to see how it looks. You can move your mouse to view from different viewpoints.
# Visualize:
mesh.compute_vertex_normals() # compute normals for vertices or faces
o3d.visualization.draw_geometries([mesh])
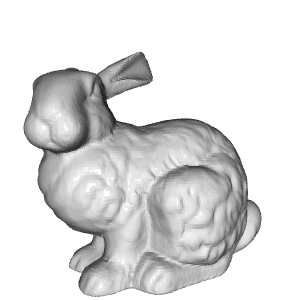
Rabbit 3D Model
To sample a point cloud, there are several methods. In this example, we uniformly sample 1000 points from the imported mesh and visualize them:
# Sample 1000 points:
pcd = mesh.sample_points_uniformly(number_of_points=1000)


# visualize:
o3d.visualization.draw_geometries([pcd])
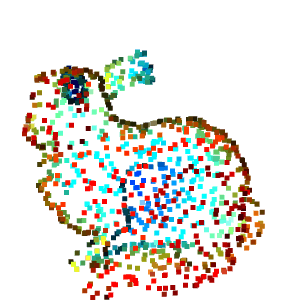
Rabbit Point Cloud
We can save the created point cloud in .ply format as follows:
# Save into ply file:
o3d.io.write_point_cloud("output/bunny_pcd.ply", pcd)2.3 Point cloud from RGB-D data
RGB-D data is generated using RGB -D sensor (such as Microsoft Kinect) collected, which provides both RGB images and depth images. RGB-D sensors are widely used in indoor navigation, obstacle avoidance and other fields. Since RGB images provide pixel colors, each pixel of the depth image represents its distance from the camera.
Open3D provides a set of functions for RGB-D image processing. To create a point cloud from RGB-D data using Open3D functions, simply import two images, create an RGB-D image object, and finally calculate the point cloud as follows:
# read the color and the depth image:
color_raw = o3d.io.read_image("../data/rgb.jpg")
depth_raw = o3d.io.read_image("../data/depth.png")


# create an rgbd image object:
rgbd_image = o3d.geometry.RGBDImage.create_from_color_and_depth(
color_raw, depth_raw, convert_rgb_to_intensity=False)
# use the rgbd image to create point cloud:
pcd = o3d.geometry.PointCloud.create_from_rgbd_image(
rgbd_image,
o3d.camera.PinholeCameraIntrinsic(
o3d.camera.PinholeCameraIntrinsicParameters.PrimeSenseDefault))


# visualize:
o3d.visualization.draw_geometries([pcd])
Colored point clouds generated from RGB-D images
3, Open3D and NumPy
Sometimes you need to switch between Open3D and NumPy. For example, let's say we want to convert a NumPy point cloud to an Open3D.PointCloud object for visualization, and use Matplotlib to visualize a 3D model of a rabbit.
3.1 From NumPy to Open3D
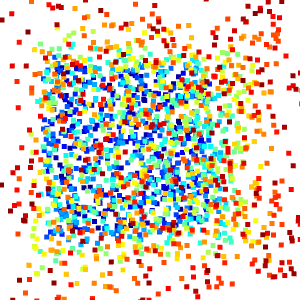
In this example, we create 2000 random points using the NumPy.random.rand() function, which starts from the uniform distribution of [0,1] Create a random sample. We then create an Open3D.PointCloud object and set its Open3D.PointCloud.points feature to random points using the Open3D.utility.Vector3dVector() function.
# Create numpy pointcloud:
number_points = 2000
pcd_np = np.random.rand(number_points, 3)


# Convert to Open3D.PointCLoud:
pcd_o3d = o3d.geometry.PointCloud()# create point cloud object
pcd_o3d.points = o3d.utility.Vector3dVector(pcd_np)# set pcd_np as the point cloud points


# Visualize:
o3d.visualization.draw_geometries([pcd_o3d])
3.2 从 Open3D到NumPy
这里,我们首先使用Open3D.io.read_point_cloud()函数从.ply文件中读取点云,该函数返回一个Open3D.PointCloud对象。现在我们只需要使用NumPy.asarray()函数将表示点的Open3D.PointCloud.points特征转换为NumPy数组。最后,我们像上面那样显示获得的数组。
# Read the bunny point cloud file:
pcd_o3d = o3d.io.read_point_cloud("../data/bunny_pcd.ply")


# Convert the open3d object to numpy:
pcd_np = np.asarray(pcd_o3d.points)


# Display using matplotlib:
fig, ax = plt.subplots(subplot_kw={"projection": "3d"})
ax.scatter3D(pcd_np[:, 0], pcd_np[:, 2], pcd_np[:, 1])
# label the axes
ax.set_xlabel("X")
ax.set_ylabel("Y")
ax.set_zlabel("Z")
ax.set_title("Bunny Point Cloud")
# display:
plt.show()
使用 Matplotlib 显示的兔子点云
4、最后
在本教程中,我们学习了如何创建和可视化点云。在接下来的教程中,我们将学习如何处理它们。
The above is the detailed content of Python: How to create and visualize point clouds. For more information, please follow other related articles on the PHP Chinese website!

Hot AI Tools

Undresser.AI Undress
AI-powered app for creating realistic nude photos

AI Clothes Remover
Online AI tool for removing clothes from photos.

Undress AI Tool
Undress images for free

Clothoff.io
AI clothes remover

Video Face Swap
Swap faces in any video effortlessly with our completely free AI face swap tool!

Hot Article
Hot Tools

Notepad++7.3.1
Easy-to-use and free code editor

SublimeText3 Chinese version
Chinese version, very easy to use

Zend Studio 13.0.1
Powerful PHP integrated development environment

Dreamweaver CS6
Visual web development tools

SublimeText3 Mac version
God-level code editing software (SublimeText3)
Hot Topics


 PHP and Python: Different Paradigms Explained
Apr 18, 2025 am 12:26 AM
PHP and Python: Different Paradigms Explained
Apr 18, 2025 am 12:26 AM
PHP is mainly procedural programming, but also supports object-oriented programming (OOP); Python supports a variety of paradigms, including OOP, functional and procedural programming. PHP is suitable for web development, and Python is suitable for a variety of applications such as data analysis and machine learning.
 Choosing Between PHP and Python: A Guide
Apr 18, 2025 am 12:24 AM
Choosing Between PHP and Python: A Guide
Apr 18, 2025 am 12:24 AM
PHP is suitable for web development and rapid prototyping, and Python is suitable for data science and machine learning. 1.PHP is used for dynamic web development, with simple syntax and suitable for rapid development. 2. Python has concise syntax, is suitable for multiple fields, and has a strong library ecosystem.
 PHP and Python: A Deep Dive into Their History
Apr 18, 2025 am 12:25 AM
PHP and Python: A Deep Dive into Their History
Apr 18, 2025 am 12:25 AM
PHP originated in 1994 and was developed by RasmusLerdorf. It was originally used to track website visitors and gradually evolved into a server-side scripting language and was widely used in web development. Python was developed by Guidovan Rossum in the late 1980s and was first released in 1991. It emphasizes code readability and simplicity, and is suitable for scientific computing, data analysis and other fields.
 Python vs. JavaScript: The Learning Curve and Ease of Use
Apr 16, 2025 am 12:12 AM
Python vs. JavaScript: The Learning Curve and Ease of Use
Apr 16, 2025 am 12:12 AM
Python is more suitable for beginners, with a smooth learning curve and concise syntax; JavaScript is suitable for front-end development, with a steep learning curve and flexible syntax. 1. Python syntax is intuitive and suitable for data science and back-end development. 2. JavaScript is flexible and widely used in front-end and server-side programming.
 How to run sublime code python
Apr 16, 2025 am 08:48 AM
How to run sublime code python
Apr 16, 2025 am 08:48 AM
To run Python code in Sublime Text, you need to install the Python plug-in first, then create a .py file and write the code, and finally press Ctrl B to run the code, and the output will be displayed in the console.
 Can vs code run in Windows 8
Apr 15, 2025 pm 07:24 PM
Can vs code run in Windows 8
Apr 15, 2025 pm 07:24 PM
VS Code can run on Windows 8, but the experience may not be great. First make sure the system has been updated to the latest patch, then download the VS Code installation package that matches the system architecture and install it as prompted. After installation, be aware that some extensions may be incompatible with Windows 8 and need to look for alternative extensions or use newer Windows systems in a virtual machine. Install the necessary extensions to check whether they work properly. Although VS Code is feasible on Windows 8, it is recommended to upgrade to a newer Windows system for a better development experience and security.
 Where to write code in vscode
Apr 15, 2025 pm 09:54 PM
Where to write code in vscode
Apr 15, 2025 pm 09:54 PM
Writing code in Visual Studio Code (VSCode) is simple and easy to use. Just install VSCode, create a project, select a language, create a file, write code, save and run it. The advantages of VSCode include cross-platform, free and open source, powerful features, rich extensions, and lightweight and fast.
 Can visual studio code be used in python
Apr 15, 2025 pm 08:18 PM
Can visual studio code be used in python
Apr 15, 2025 pm 08:18 PM
VS Code can be used to write Python and provides many features that make it an ideal tool for developing Python applications. It allows users to: install Python extensions to get functions such as code completion, syntax highlighting, and debugging. Use the debugger to track code step by step, find and fix errors. Integrate Git for version control. Use code formatting tools to maintain code consistency. Use the Linting tool to spot potential problems ahead of time.
