

How do I use text-to-speech and speech recognition technology on Windows 11?

Like Windows 10, Windows 11 computers have text-to-speech functionality. Also known as TTS, text-to-speech allows you to write in your own voice. When you speak into the microphone, the computer uses a combination of text recognition and speech synthesis to write text on the screen.
This is a great tool if you have trouble reading or writing because you can perform stream of consciousness while speaking. You can overcome writer's block with this handy tool.
TTS can also help if you want to generate a voiceover script for a video, check the pronunciation of certain words, or hear text out loud with Microsoft Narrator. Additionally, the software is good at adding proper punctuation, so you can learn good grammar as well.
What about voice input tools?
Speech Input Tool is an application on Windows 11 that utilizes the text-to-speech feature. The application can be used with any text box such as editor, word processor, chat program, email, as long as you can write on your computer.
It has an automatic punctuation feature that punctuates your text accurately and correctly with appropriate periods and commands. The voice input tool also supports multiple languages other than English, including Spanish, Simplified Chinese, and German.
#This tutorial will address other aspects of text-to-speech on Windows 11 besides the voice input tool. It'll show you how to turn on text-to-speech, configure it, and learn about some features that most people may not know about.
How to use text-to-speech on Windows 11?
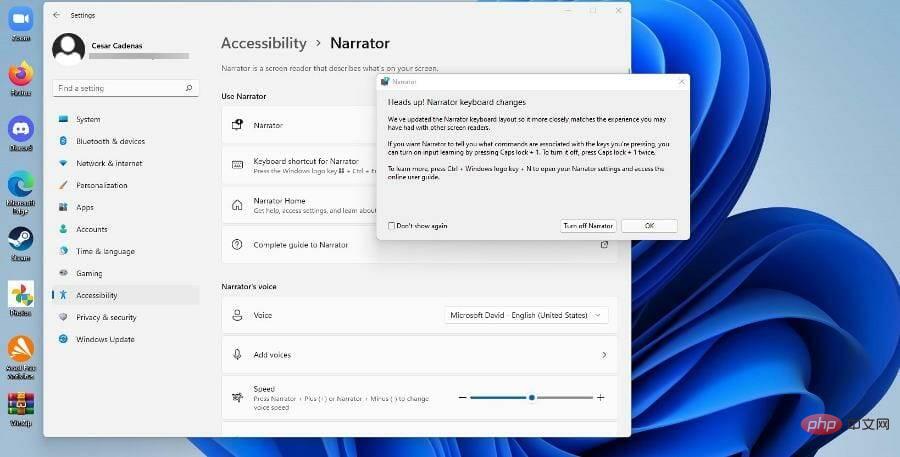
1. Open the Narrator option
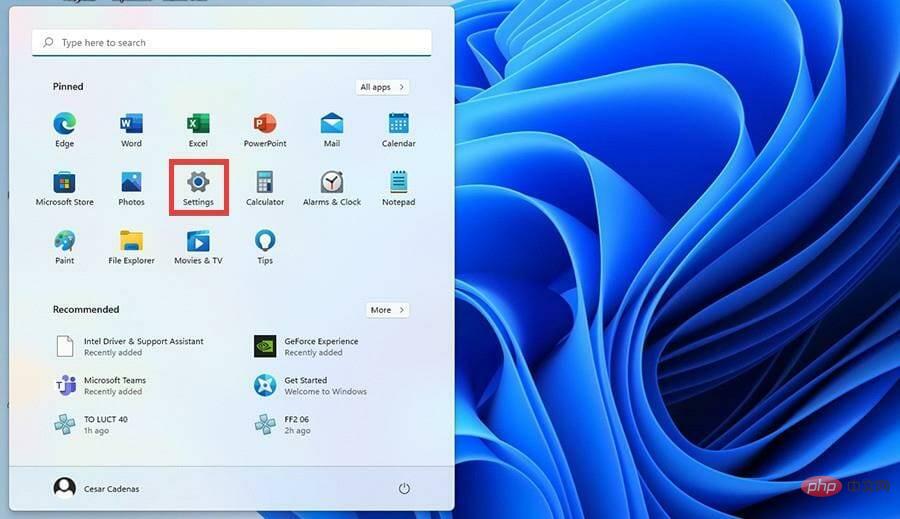
- Click on the Start menu.
- In the Start menu, click the Settings icon.

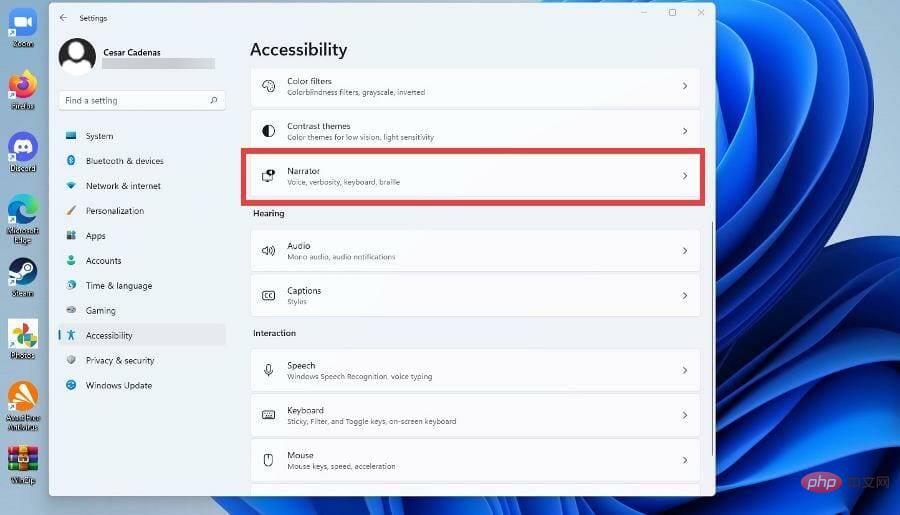
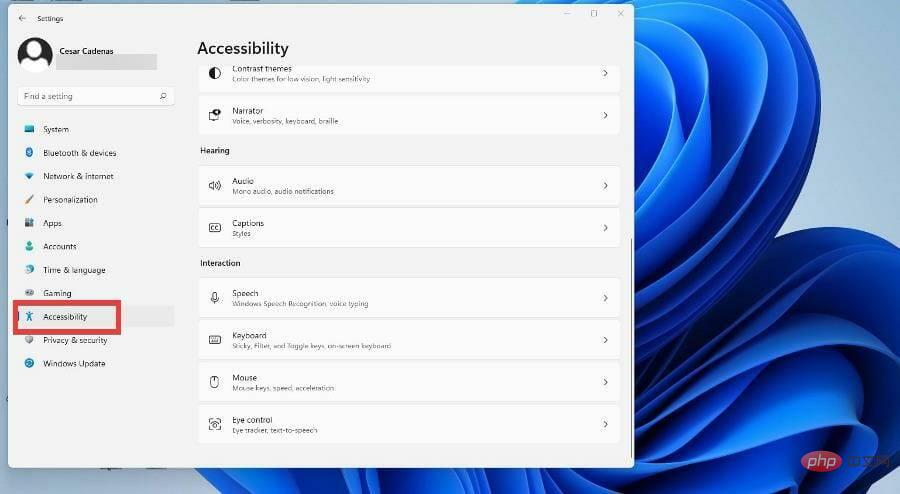
- In the Settings menu, click Accessibility.
- Click on the narrator option.
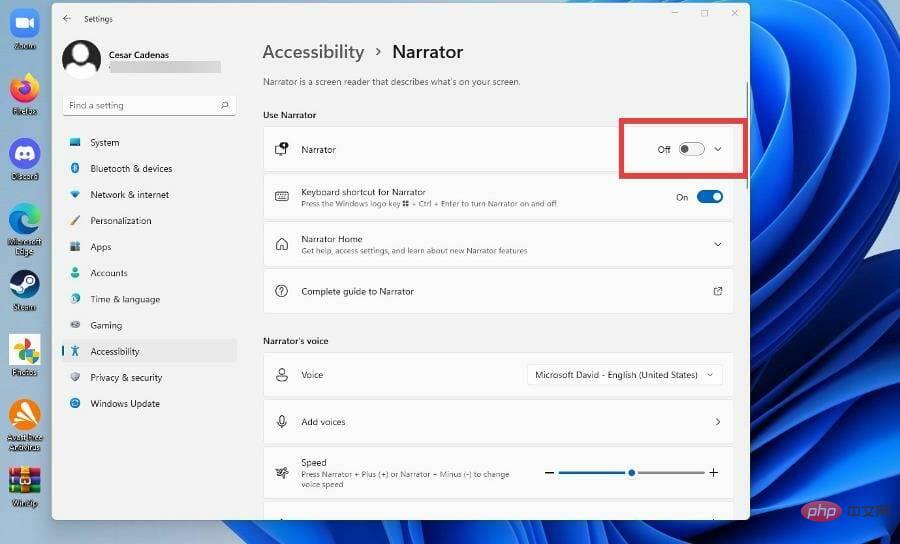
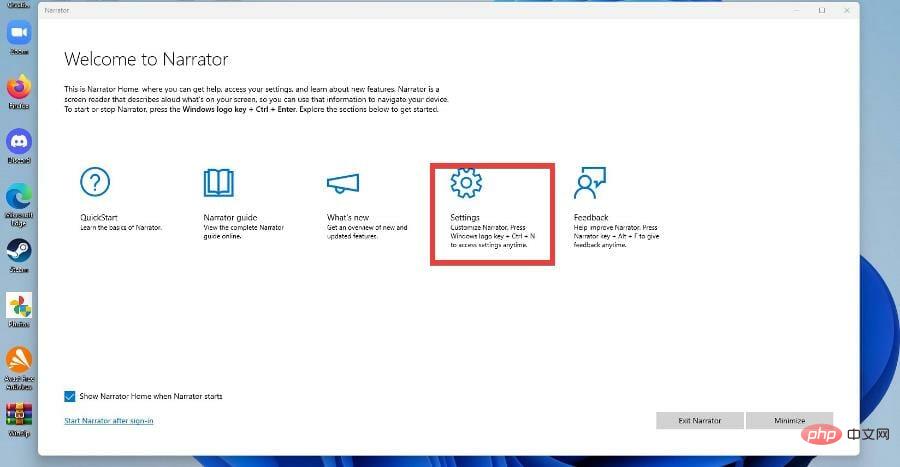
- Toggle the Narrator switch to turn it on. Once completed, the Narrator application menu will open.
- The Narrator app is now open. To configure it, click OK.
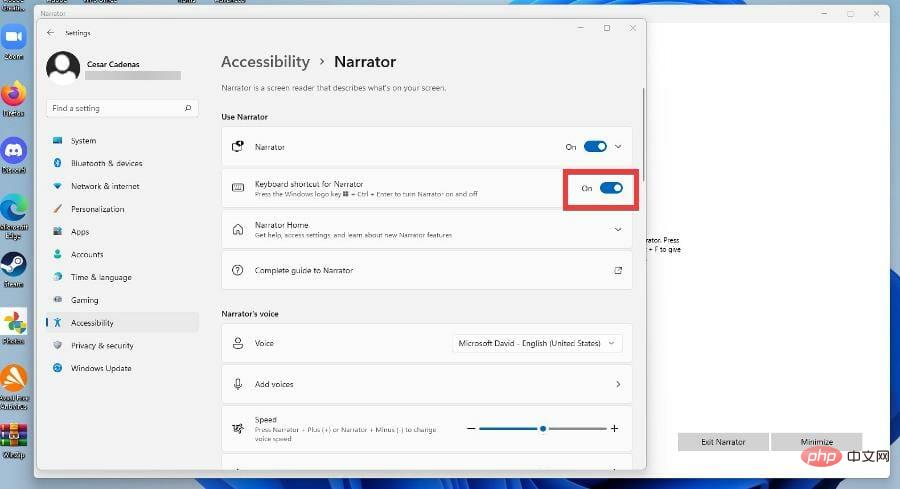
- The Narrator settings menu is open. Click Settings.
- In the next window, make sure Keyboard Shortcuts is turned on.
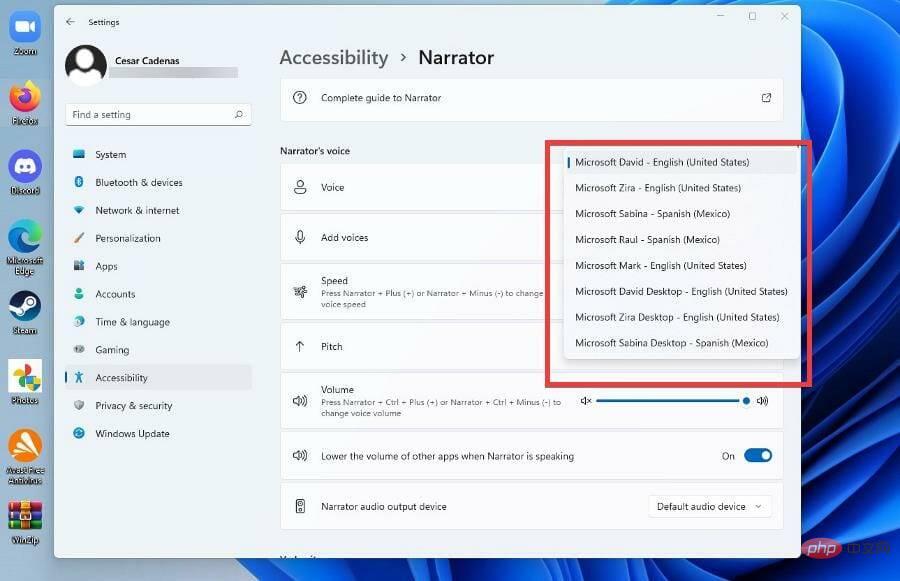
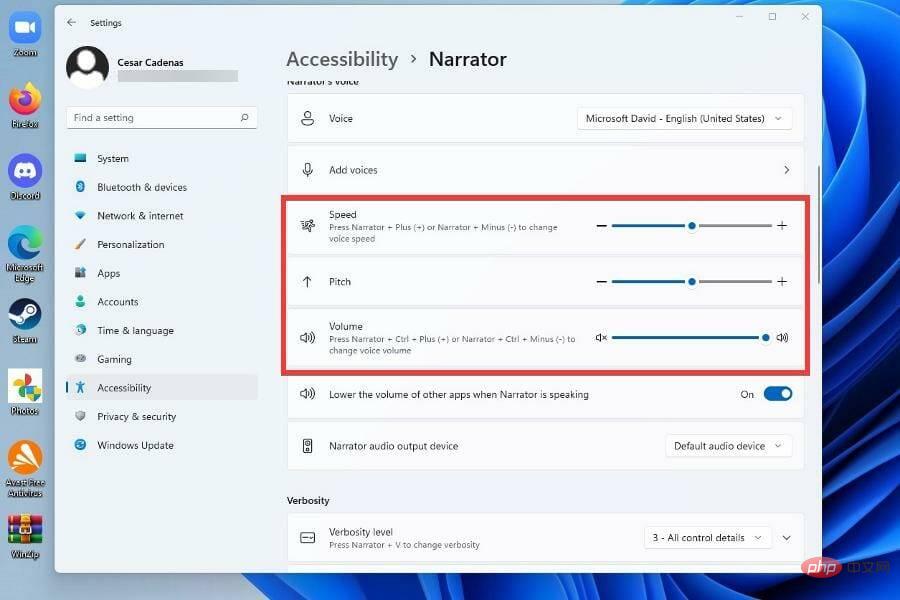
- To change the narrator's voice, click the drop-down menu next to Voice and select an option.
- You can change the speed, pitch, and volume of Narrator's voice by changing the levels next to their respective configurations.

2. Open the text-to-speech option
- Click on the Start menu.
- In the Start menu, click the Settings icon.
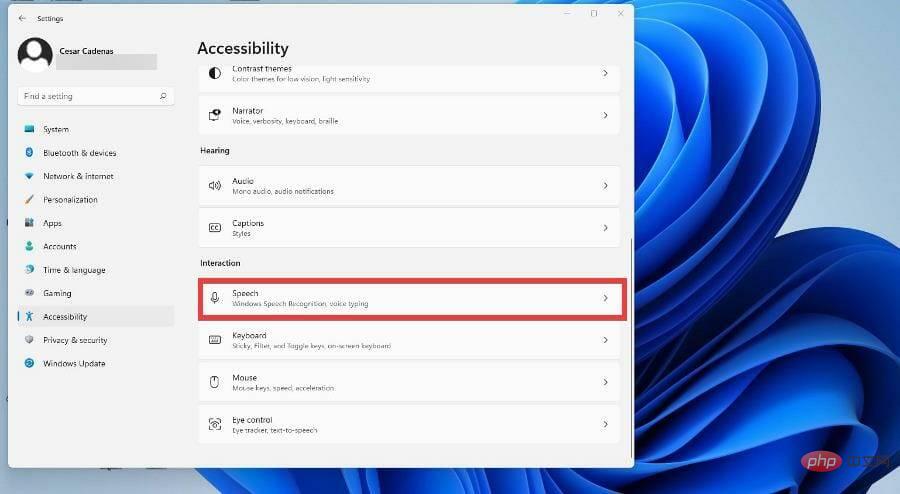
- In the Settings menu, click Accessibility.
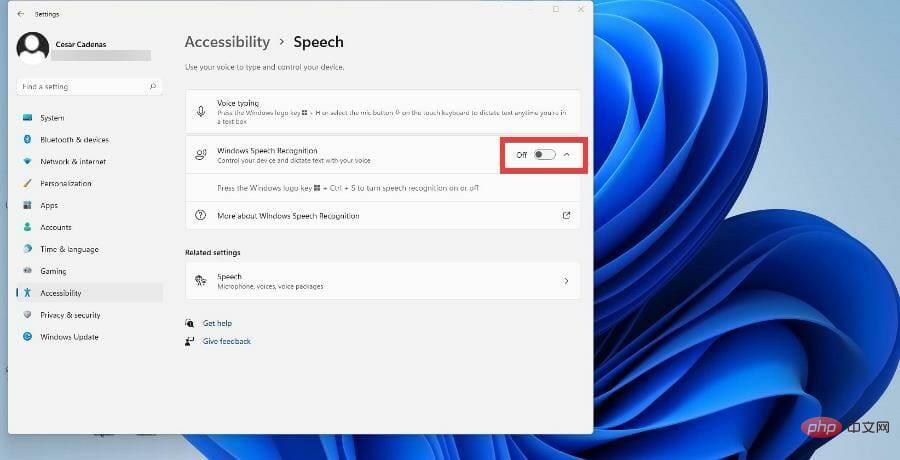
- Scroll down and click Voice.
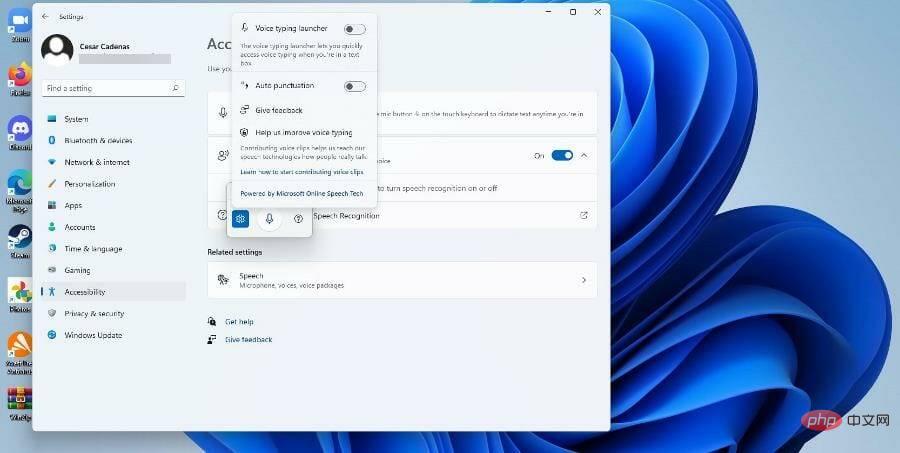
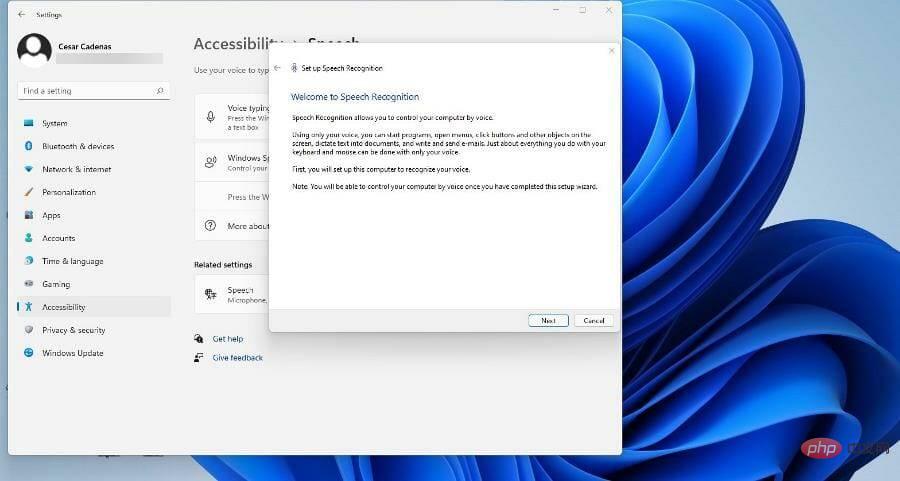
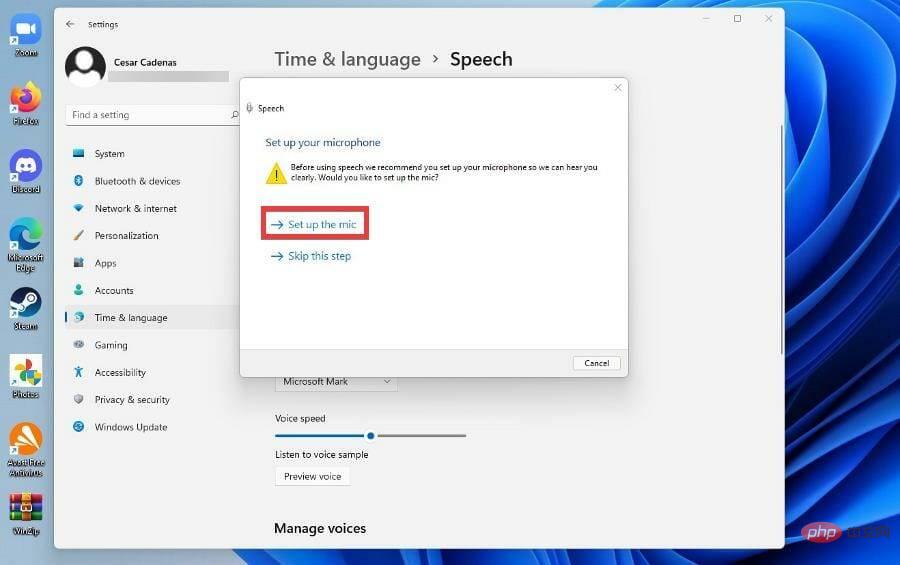
- In this new window, you can toggle Windows Speech Recognition by flipping the switch from off to on.
- After flipping the switch, the "Set up Speech Recognition" wizard will appear, where you can set it up according to your preferences and connect the microphone.
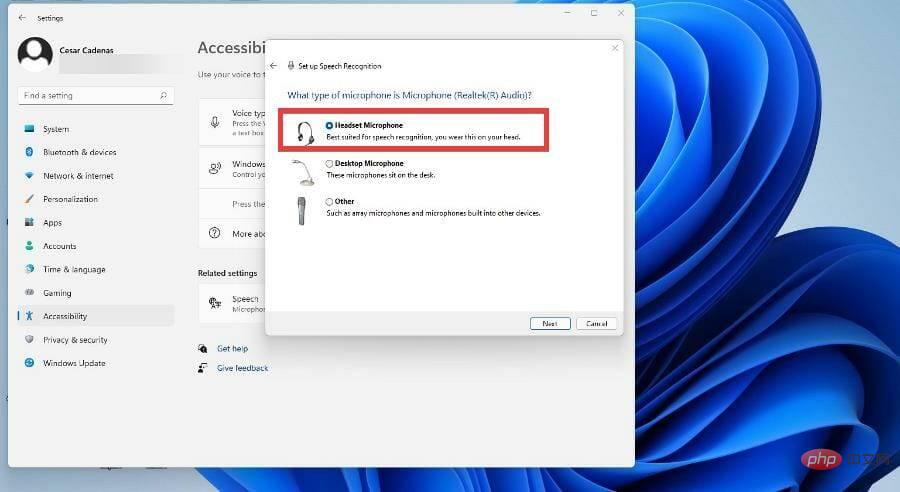
- After clicking Next, the wizard will ask you which microphone you want to use. For this tutorial, the headset will be selected, but the instructions are the same.
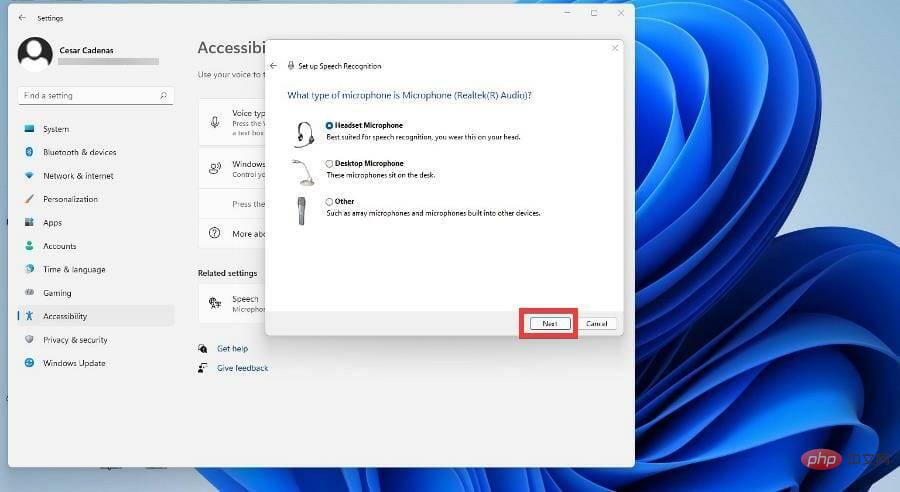
- After selecting your device, select Next.
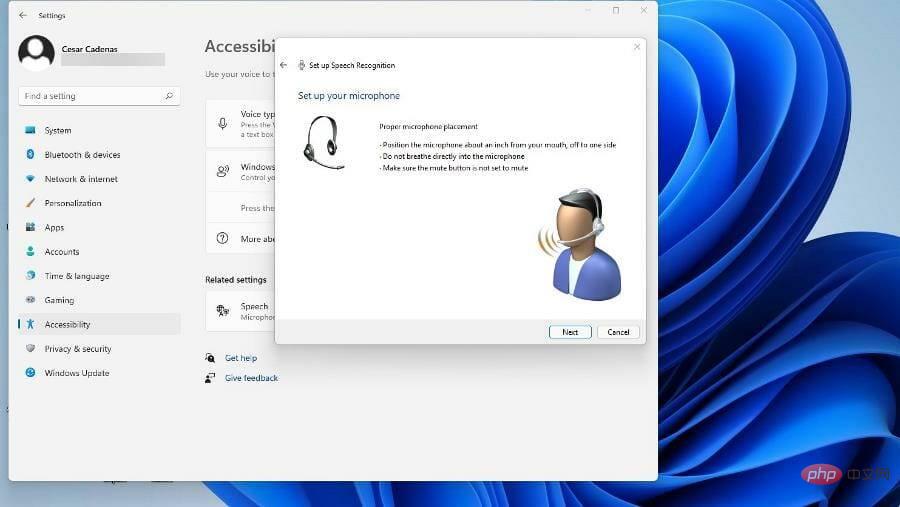
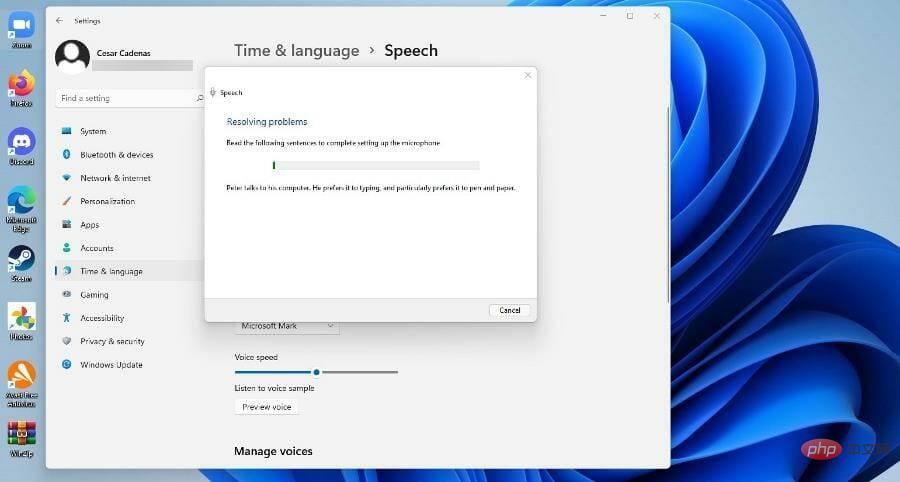
- At this point, the wizard will set up your microphone by asking you to hold it at a set distance so that it can configure the software. When you're ready, click Next.
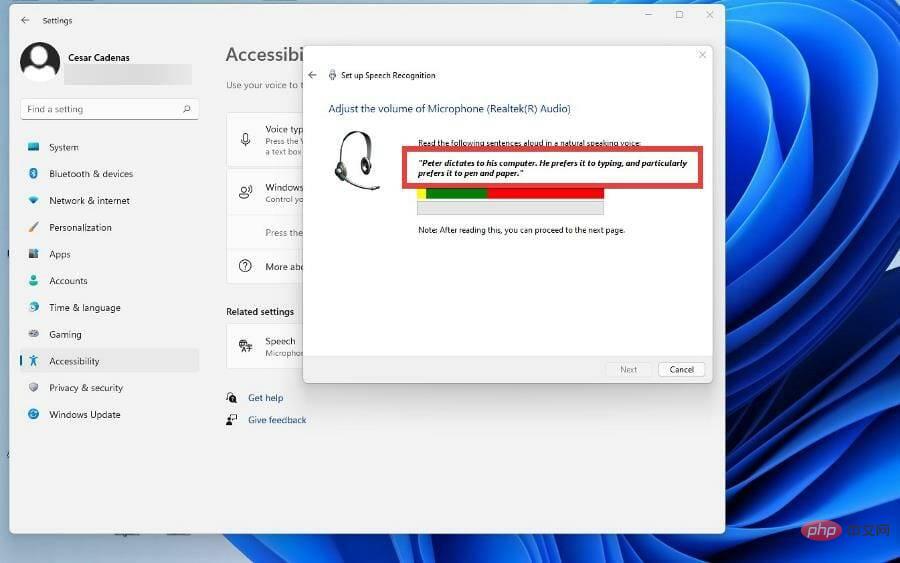
- Read the sentences that appear so the software can get examples, then click Next.
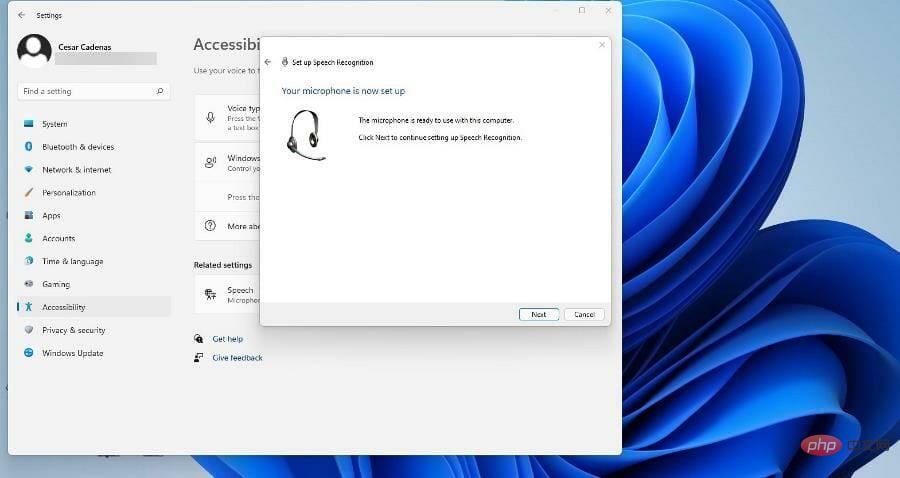
- Now you have set up your microphone. Click Next to continue.
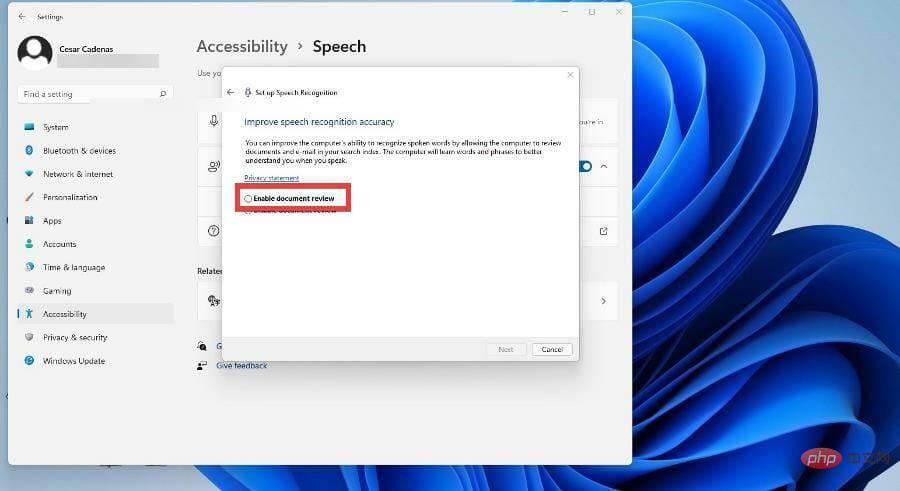
- Click Enable Document Review to allow your Windows 11 computer to read the document before transcribing it to speech. Then click Next.
- Here you can select the activation mode. If you select Manual, the text-to-speech feature will not activate until you open the app. If you select voice-activated mode, the computer will listen for commands to turn on the feature.
- This tutorial will select Use manual activation mode and click Next.
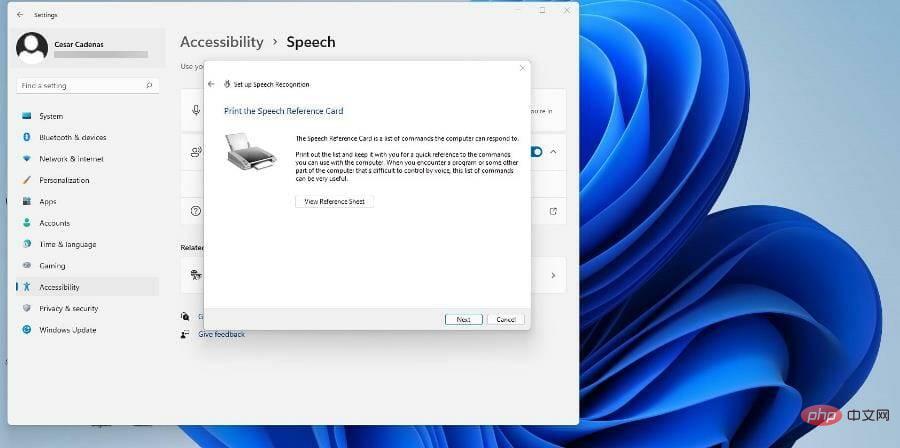
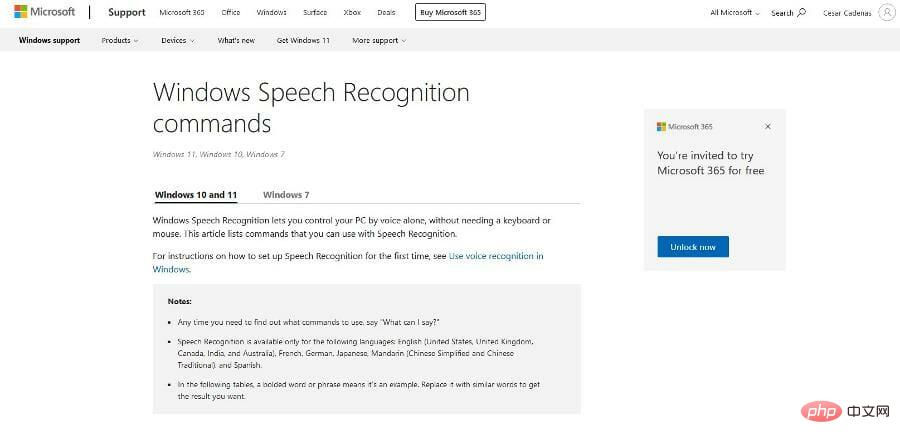
- If you have not set up a printer, click View Reference Table to go to the page on the Microsoft website that lists all the commands.
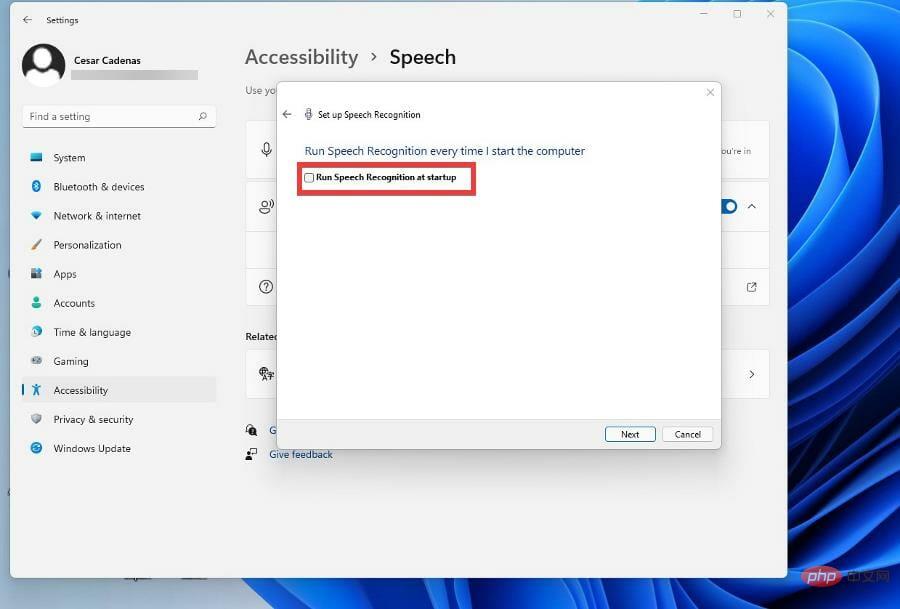
- After clicking Next, you can choose to opt in or out of running speech recognition every time you turn on your computer.
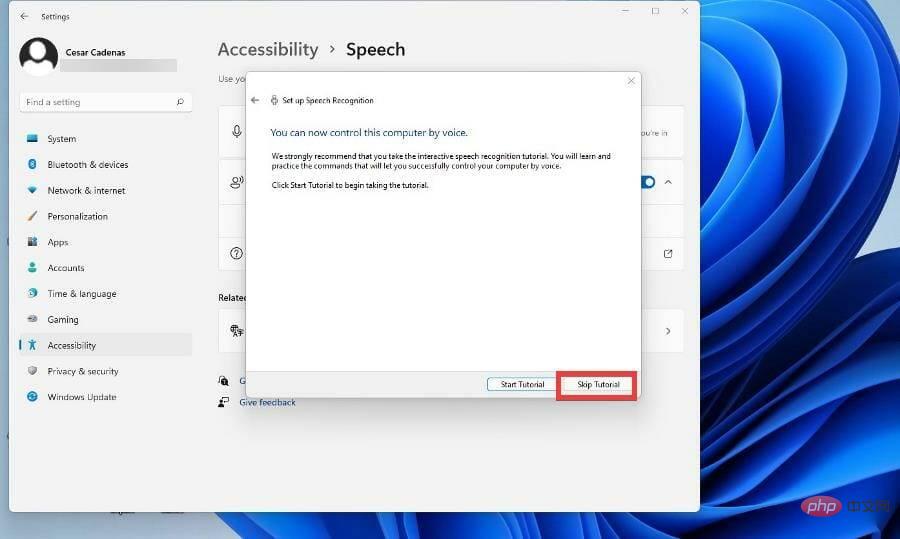
- If you want to learn more, Windows 11 gives you the opportunity to learn how to use text-to-speech through tutorials.Otherwise, skip it.
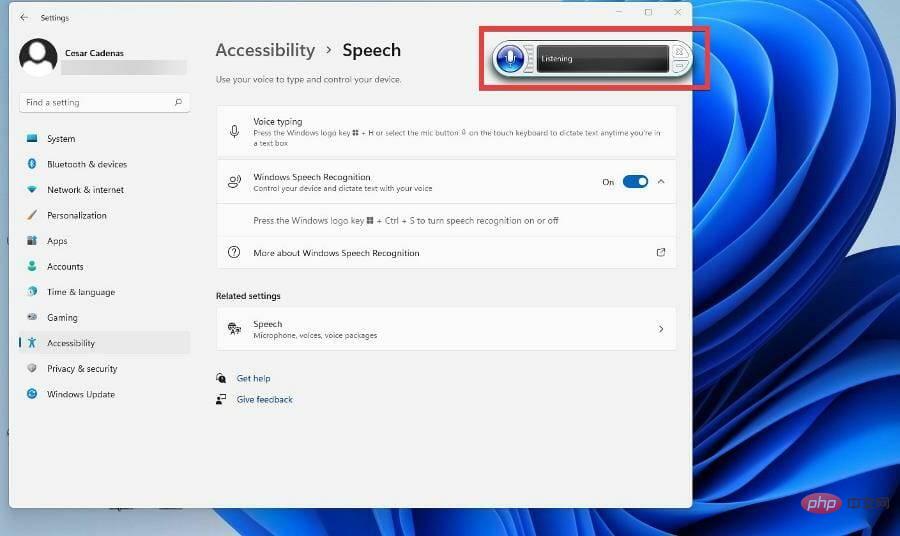
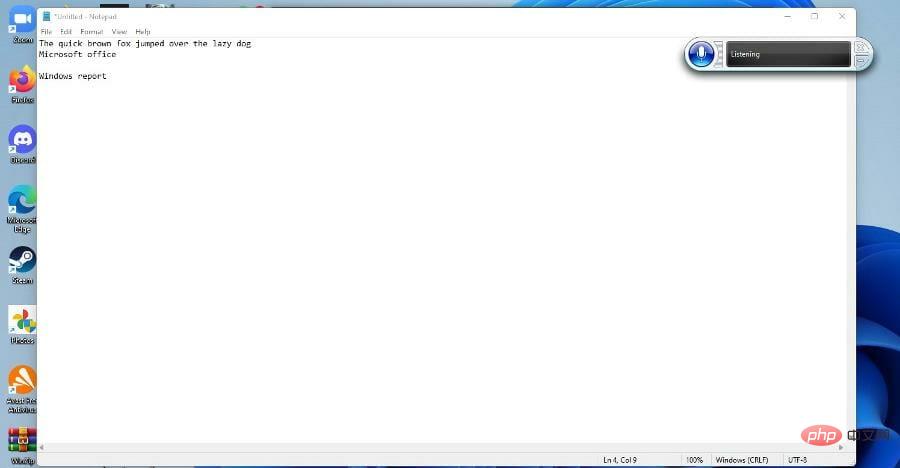
- A new window will appear at the top of the screen, which is a text-to-speech application listening for your commands. Press the microphone button to turn it on and off.
- You can try text-to-speech by opening Windows Notepad and starting speaking to start writing.

3. Configure Text-to-Speech
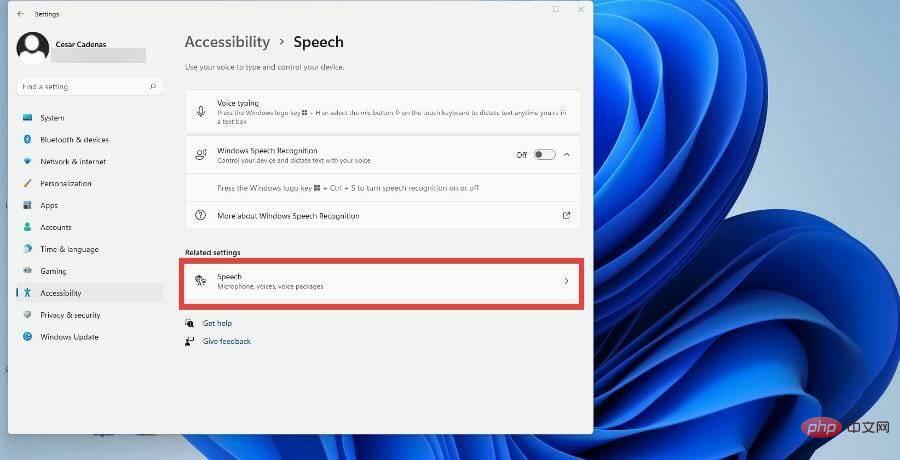
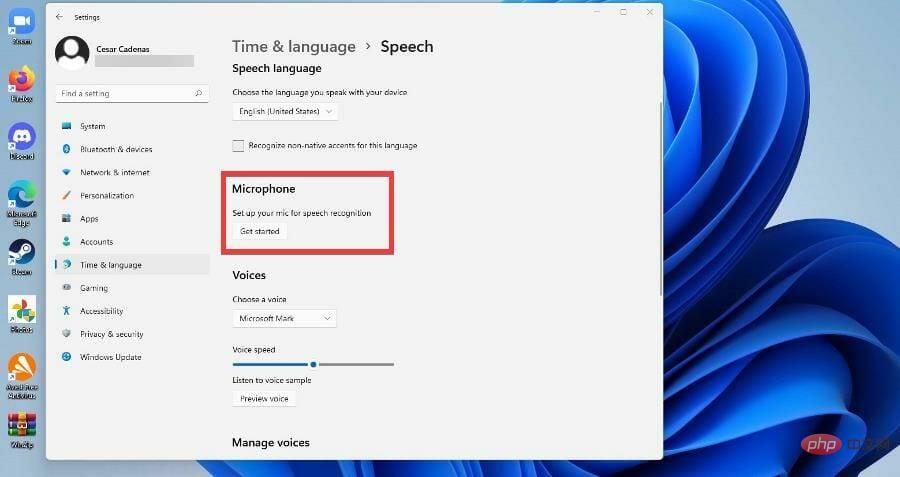
- Return to the Accessibility panel on the Windows 11 Settings menu and select Speech.
- Click Voice under the relevant settings.
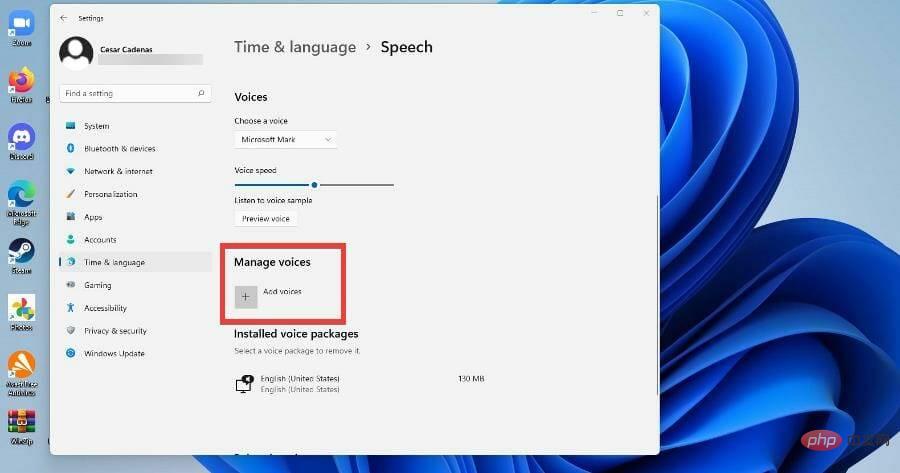
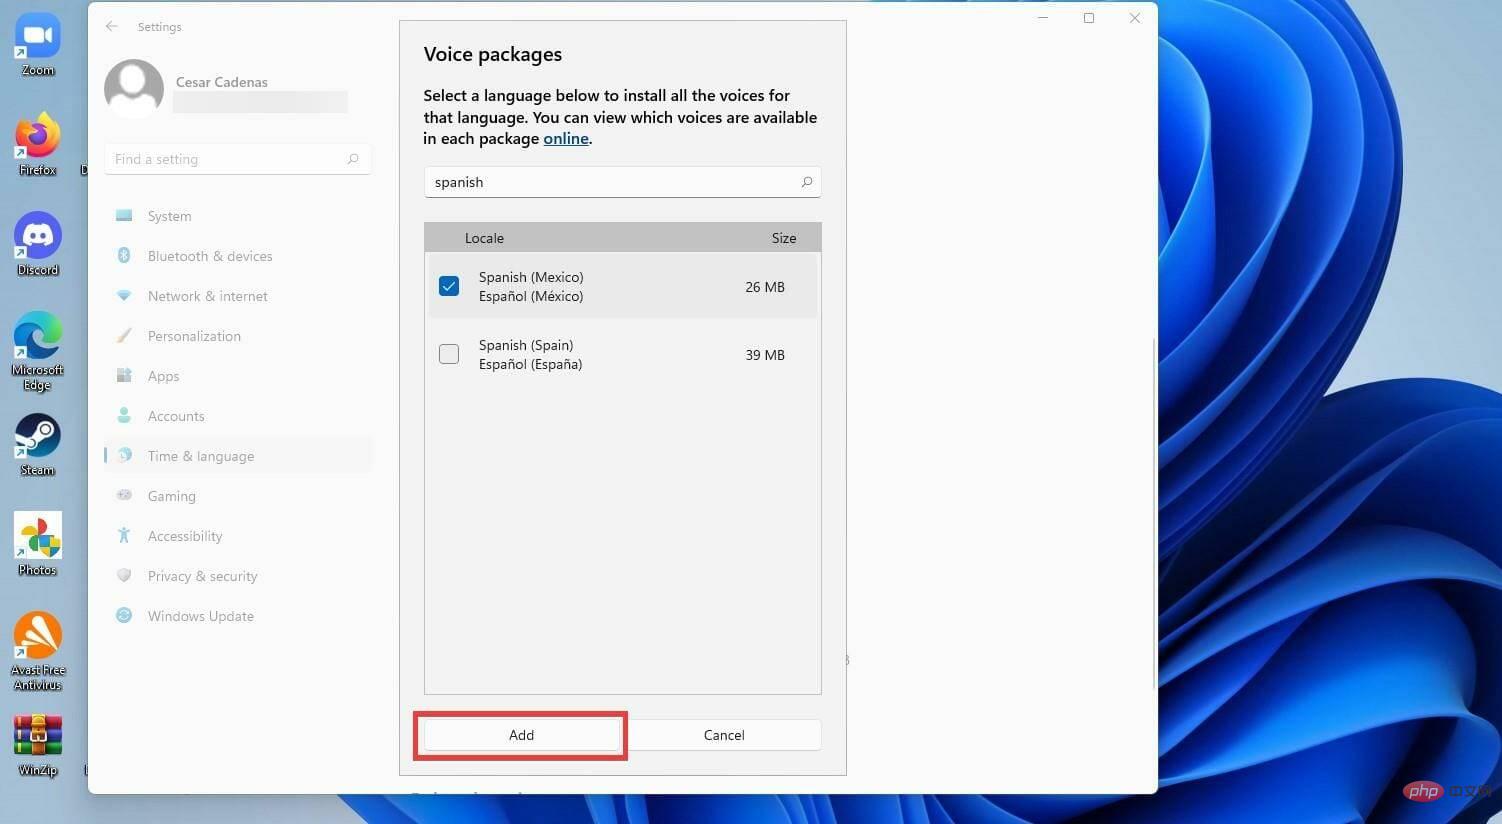
- To add more languages, scroll down to Manage Voices and select Add Voices.
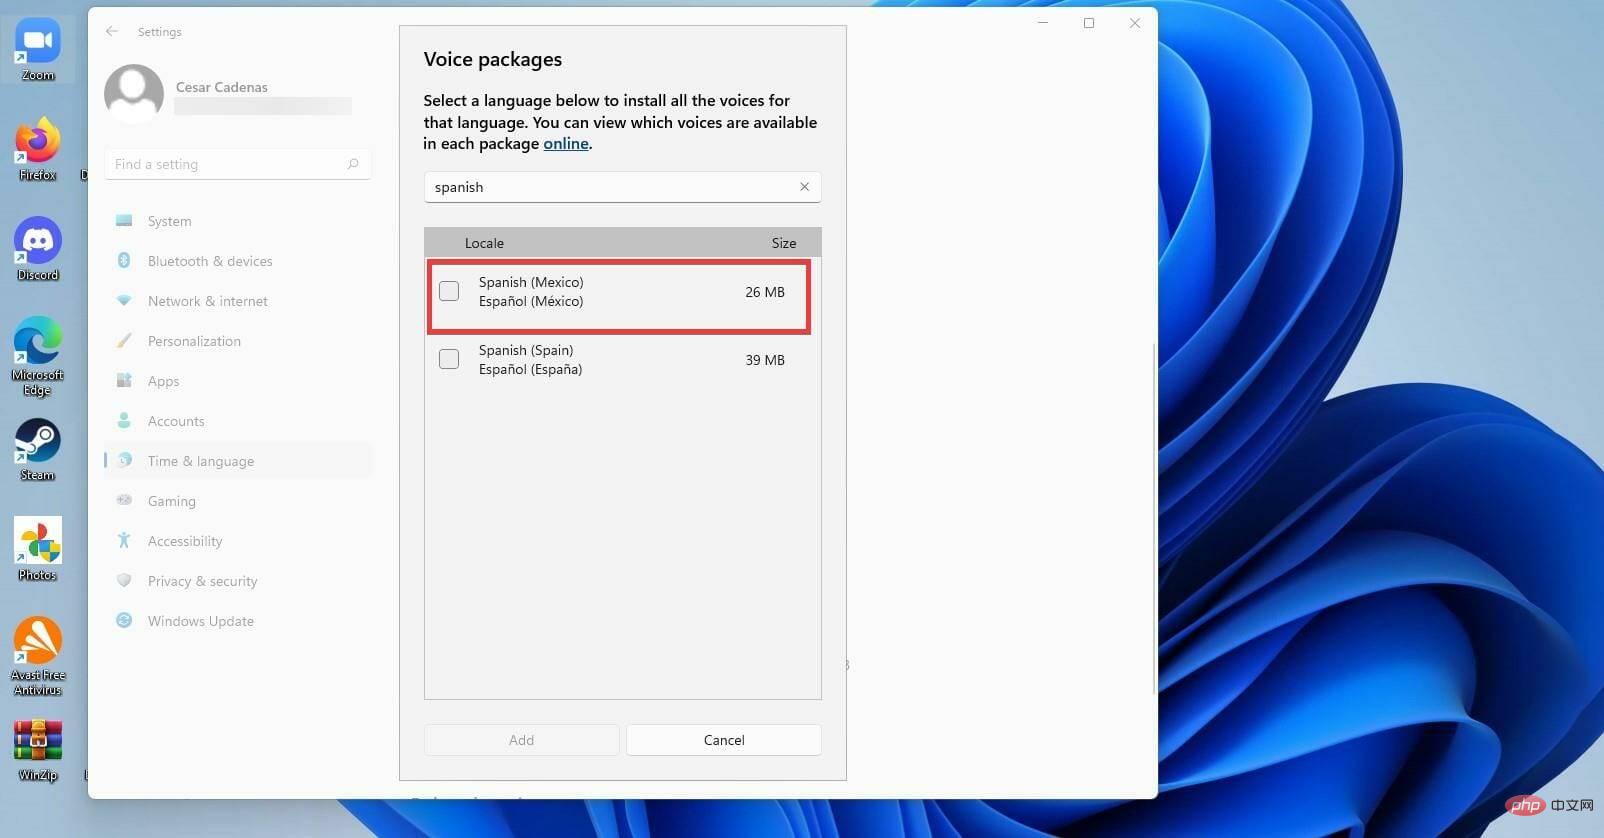
- Select the language you want to add or search for a language.
- Click the box next to Language and select Add at the bottom.
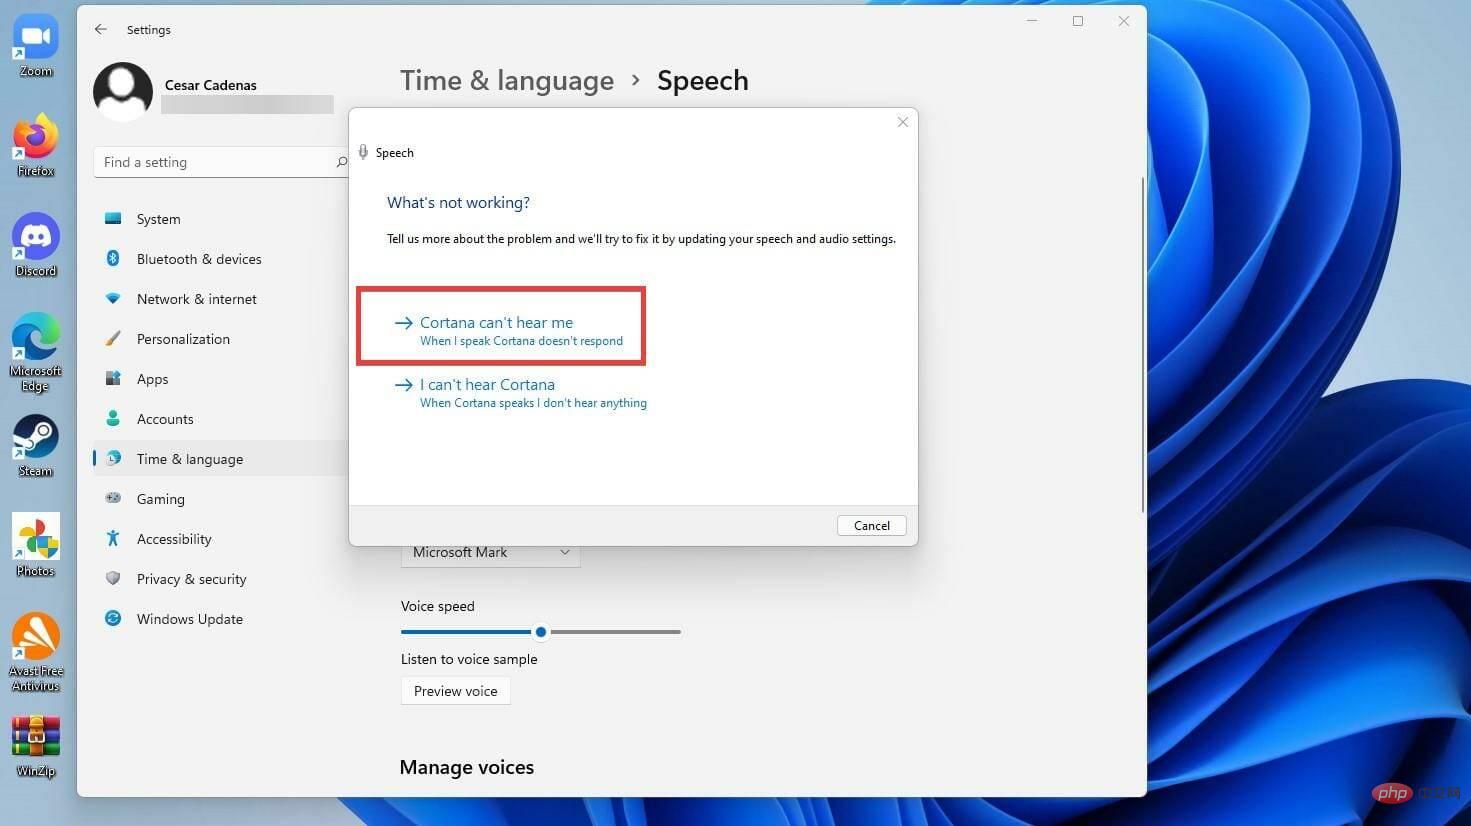
- To add a new microphone, click Get Started under Microphone.
- In a new window, selectCortana can't hear me.
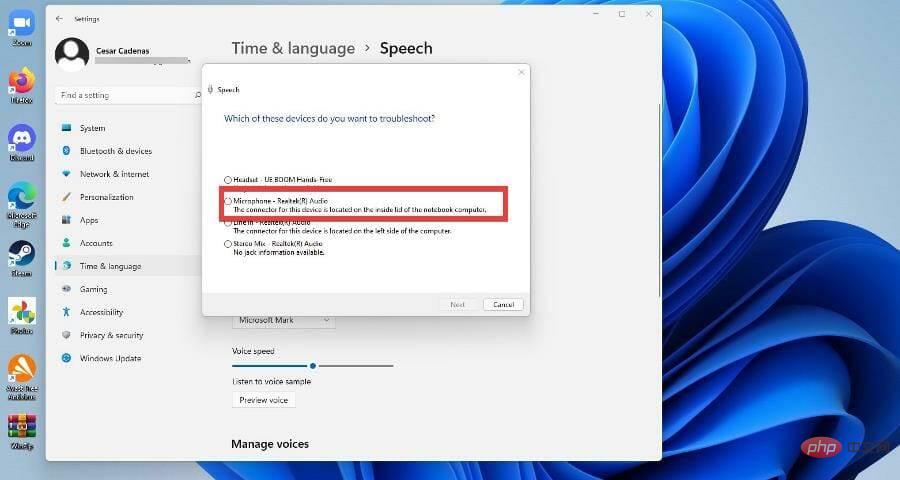
- Select the device you want to add and click Next.
- Select Set Microphone.
- You will be asked to recite the same sentences as before to calibrate your new equipment.

The above is the detailed content of How do I use text-to-speech and speech recognition technology on Windows 11?. For more information, please follow other related articles on the PHP Chinese website!

Hot AI Tools

Undresser.AI Undress
AI-powered app for creating realistic nude photos

AI Clothes Remover
Online AI tool for removing clothes from photos.

Undress AI Tool
Undress images for free

Clothoff.io
AI clothes remover

Video Face Swap
Swap faces in any video effortlessly with our completely free AI face swap tool!

Hot Article
Hot Tools

Notepad++7.3.1
Easy-to-use and free code editor

SublimeText3 Chinese version
Chinese version, very easy to use

Zend Studio 13.0.1
Powerful PHP integrated development environment

Dreamweaver CS6
Visual web development tools

SublimeText3 Mac version
God-level code editing software (SublimeText3)
Hot Topics


 Hyperx headset microphone has no sound
Feb 16, 2024 am 09:12 AM
Hyperx headset microphone has no sound
Feb 16, 2024 am 09:12 AM
The quality of hyperx headphones has always been very good, but some users find that the microphone of the headphones has no sound when using it. There are many possible reasons for this situation. Here are some of them. Several kinds. There is no sound from the hyperx headset microphone. 1. Connect and check whether the microphone is fully inserted into the headphone jack. You can try plugging and unplugging it a few times. 2. If other equipment conditions permit, you can plug the headset into other normally operating equipment to see if it can be used normally and whether the audio link is normal. 3. Audio settings Check the audio settings to make sure that the speakers and microphone are enabled normally and not muted or at a low volume. 4. To disable the software, you can try disabling the audio adapter.
 Logitech headset microphone is silent, please fix it
Jan 18, 2024 am 08:03 AM
Logitech headset microphone is silent, please fix it
Jan 18, 2024 am 08:03 AM
Some users may encounter the problem of no sound from the headset microphone when using Logitech drivers. Check whether the headset microphone cable is plugged in properly or whether the headset is muted. This can be solved by turning it on in the settings. There is no sound from the Logitech-driven headset microphone: 1. Users need to first check whether the headset microphone is plugged into the wrong wire. 2. If it is wrong, just plug it in again. If not, then you need to check whether the headset microphone is broken. 3. Open "Settings" and search for "Control Panel" in "Settings". 4. Select "Hardware and Sound". 5. Click "Manage Audio Devices". 6. After entering the interface, click the "Recording" option and double-click "Microphone". 7. After entering, click "Level" to increase the microphone volume to the maximum. If it is not loud enough, you can strengthen the microphone settings. 8. Last look
 How to automatically recognize speech and generate subtitles in movie clipping. Introduction to the method of automatically generating subtitles
Mar 14, 2024 pm 08:10 PM
How to automatically recognize speech and generate subtitles in movie clipping. Introduction to the method of automatically generating subtitles
Mar 14, 2024 pm 08:10 PM
How do we implement the function of generating voice subtitles on this platform? When we are making some videos, in order to have more texture, or when narrating some stories, we need to add our subtitles, so that everyone can better understand the information of some of the videos above. It also plays a role in expression, but many users are not very familiar with automatic speech recognition and subtitle generation. No matter where it is, we can easily let you make better choices in various aspects. , if you also like it, you must not miss it. We need to slowly understand some functional skills, etc., hurry up and take a look with the editor, don't miss it.
 How to solve the microphone mute problem in Win10 Knives Out
Jan 11, 2024 am 10:24 AM
How to solve the microphone mute problem in Win10 Knives Out
Jan 11, 2024 am 10:24 AM
Knives Out is a very popular game on Windows 10 computers. Many friends like to play it with their friends, but many of them encounter the situation where the microphone has no sound, so what should I do? Let’s take a look at the solution below. What to do if there is no sound from the Knives Out microphone in Windows 10: 1. Enter the Knives Out game interface and turn on the microphone switch. 2. Enter the game settings and check "My Microphone" in the sound settings. 3. If it still doesn’t work, click Start in the lower left corner and open the “Control Panel”. 4. After opening, click "Hardware and Sound" and then "Manage Audio Devices". 5. Select the "Recording" tab and double-click "Microphone". 6. Click "Use this device". 7. Then turn up the volume.
 Why can't my computer detect the microphone?
Sep 12, 2023 pm 05:11 PM
Why can't my computer detect the microphone?
Sep 12, 2023 pm 05:11 PM
The reason why the microphone is not detected on the computer may be a microphone connection problem, a microphone driver problem, a system settings problem, a microphone failure, an operating system problem, a firewall or security software problem, etc. Detailed introduction: 1. Microphone connection problem, please make sure the microphone is correctly connected to the computer, check whether the microphone is plugged into the correct audio jack, and make sure the connection is firm. If you are using a USB microphone, make sure the USB plug is correctly plugged into the computer's USB interface. , the plug is not inserted to the bottom, which may cause the computer to be unable to detect the microphone, etc.
 How to implement an online speech recognition system using WebSocket and JavaScript
Dec 17, 2023 pm 02:54 PM
How to implement an online speech recognition system using WebSocket and JavaScript
Dec 17, 2023 pm 02:54 PM
How to use WebSocket and JavaScript to implement an online speech recognition system Introduction: With the continuous development of technology, speech recognition technology has become an important part of the field of artificial intelligence. The online speech recognition system based on WebSocket and JavaScript has the characteristics of low latency, real-time and cross-platform, and has become a widely used solution. This article will introduce how to use WebSocket and JavaScript to implement an online speech recognition system.
 Solve the problem that the microphone is connected but not recognized in win11
Jan 29, 2024 pm 06:57 PM
Solve the problem that the microphone is connected but not recognized in win11
Jan 29, 2024 pm 06:57 PM
Nowadays, when many users use win11 system, they may encounter the problem that the microphone is connected to the computer but shows that it is not plugged in, causing the device to not work properly. For this situation, I will share with you two solutions. If you need detailed operation steps, please visit this site. What to do if the win11 microphone is connected but it says not plugged in: Method 1: 1. Click the start menu or search button below. 3. Open Hardware and Sound in the Control Panel. 5. After opening, click Advanced Device Settings in the upper right corner. Method 2: 1. There are also cases where your microphone is not connected properly. 2. You can try to replug and unplug the microphone cable to see if it can solve the problem.
 Detailed method to turn off speech recognition in WIN10 system
Mar 27, 2024 pm 02:36 PM
Detailed method to turn off speech recognition in WIN10 system
Mar 27, 2024 pm 02:36 PM
1. Enter the control panel, find the [Speech Recognition] option, and turn it on. 2. When the speech recognition page pops up, select [Advanced Voice Options]. 3. Finally, uncheck [Run speech recognition at startup] in the User Settings column in the Voice Properties window.