

3 Ways to Fix Error 740 When Adding a Printer in Windows 11

Can't add a printer on Windows 11? If you're encountering error 740 when adding a printer to your Windows 11 PC, you're not alone. It often leaves you wondering, will your printer work with Windows 11?
This is a common error and the message reads – This doesn’t work. We cannot install this printer at this time. Please try again later or contact your network administrator for assistance. Bug: #740.
But, to your relief, this just means that you need to have the required admin rights to add the printer.
Additionally, you may see the message – The requested operation requires elevation: Error 740. This error prevents you from running applications or accessing files on the storage device.
You may encounter different errors while installing a printer, such as – We cannot install this printer right now Error 283 or The requested operation requires elevation: Error 740.
While installing the latest Windows updates may sometimes fix the problem, most of the time it probably won't. It’s really annoying when your printer doesn’t work on Windows 11 and you need to get some urgent work done.
Luckily, we have some quick solutions to help you fix error 740 when adding a printer on Windows 11.
How to fix error 740 when adding a printer?
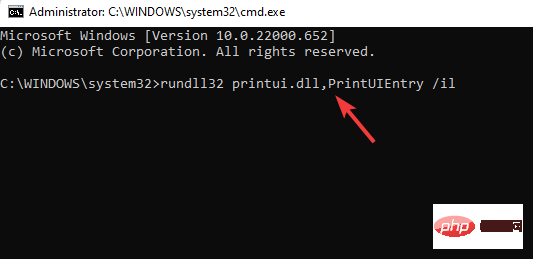
1. Use the command prompt to run the Printer Wizard
- Simultaneously press the Win R key to open Run Command window.
- In the search field, type cmd and press Ctrl Shift Enter shortcut to open an elevated command prompt .

- Now, copy and paste the following command into the command prompt window and press Enter:
<strong>rundll32 printui.dll,PrintUIEntry /il</strong>
- After executing the command, continue to install the printer.

So, if you can't install the printer and it doesn't work, this method should help you fix it.
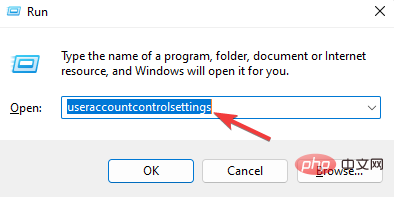
2. Disable User Account Control
- To open the Run console, press Win R at the same time key.
- Enter useraccountcontrolsettings in the search bar and click Enter.
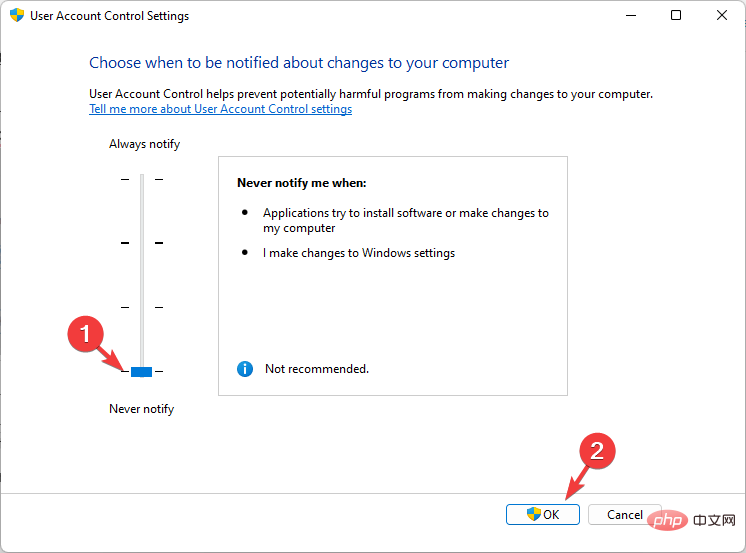
- When the User Account Control Settings window opens, set it to Never notify.
- Press OK to save changes and exit.
Now, try to install the printer again and check if it shows the message - Again not working Error #740 Printer.
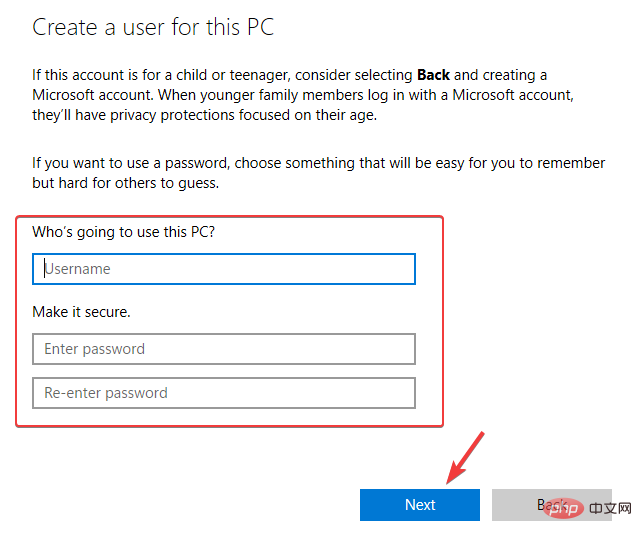
3. Create a new administrator account to fix error 740
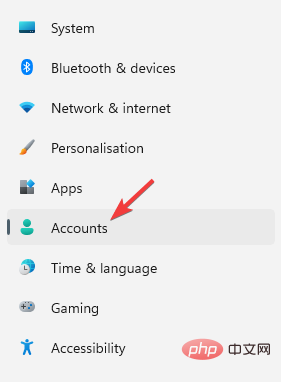
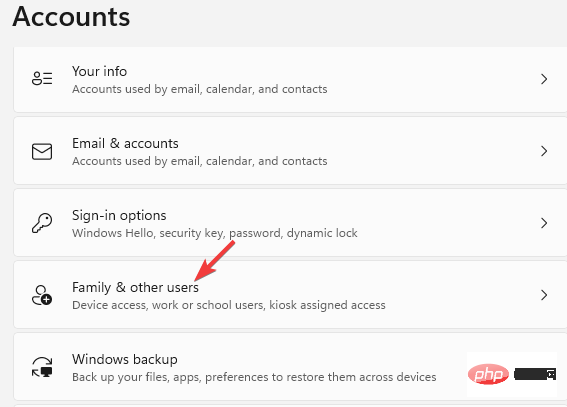
- Press the shortcut key combination - Win IStartSettingsapp.
- In Windows Settings, click Accounts on the left.
- Next, on the right side, click Family & other users.
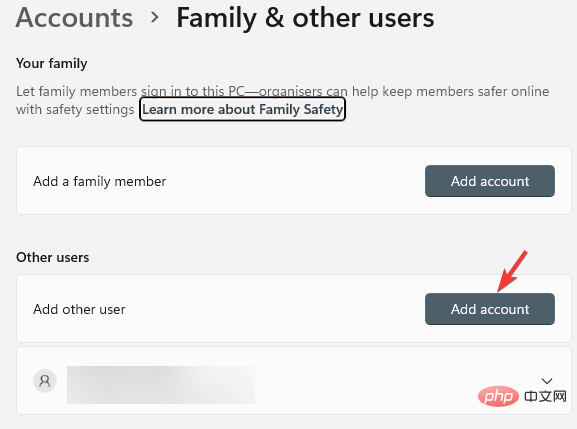
- Now, go to the Other Users section and next to Add another user, click Add Account.
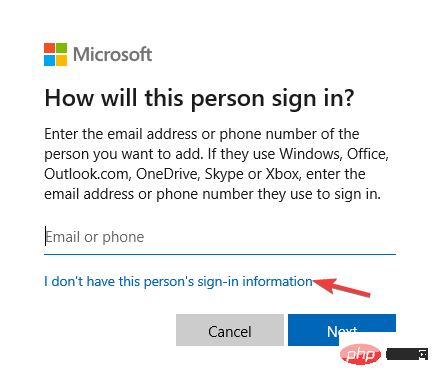
- A new window will open - How this person will log in.
- Here, click I don’t have login information for this person.
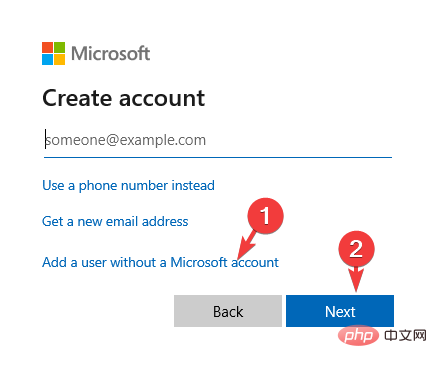
- In the Create Account window, click Add users without Microsoft accounts, and then click Next.
- Next, enter your new username and password and press Next.
After creating a new account, you need to change it to an administrator account. Follow our tutorial on how to change the administrator account in Windows 11.
When finished, close the Settings window and you should now be able to install the printer.
So, you can first create a new administrator account and then try to add a printer in Windows 11 but get error 740.
If the error occurs due to a conflict with Windows Defender, third-party antivirus software, or if a firewall blocks the printer, temporarily disabling the antivirus software and firewall may help resolve the issue.
Also, you need to install the driver for this printer before adding it. You should also look for some compatible printer drivers for Windows 11 from the manufacturer’s website and install them.
You can also refer to our tutorial on how to fix error 740 on Windows 10 when you encounter an error while running a specific application.
Although it's a tutorial for Windows 10 users, many of the solutions apply to new operating systems as well.
The above is the detailed content of 3 Ways to Fix Error 740 When Adding a Printer in Windows 11. For more information, please follow other related articles on the PHP Chinese website!

Hot AI Tools

Undresser.AI Undress
AI-powered app for creating realistic nude photos

AI Clothes Remover
Online AI tool for removing clothes from photos.

Undress AI Tool
Undress images for free

Clothoff.io
AI clothes remover

Video Face Swap
Swap faces in any video effortlessly with our completely free AI face swap tool!

Hot Article
Hot Tools

Notepad++7.3.1
Easy-to-use and free code editor

SublimeText3 Chinese version
Chinese version, very easy to use

Zend Studio 13.0.1
Powerful PHP integrated development environment

Dreamweaver CS6
Visual web development tools

SublimeText3 Mac version
God-level code editing software (SublimeText3)
Hot Topics


 What to do if win11 connects to shared printer error 0x00000bc4
Jan 30, 2024 pm 11:33 PM
What to do if win11 connects to shared printer error 0x00000bc4
Jan 30, 2024 pm 11:33 PM
The new system win11 brings many optimizations and new features to users, but when connecting to a shared printer, you may encounter an error code 0x00000bc4, which causes the printer to be unable to connect and print. So how to solve the problem of shared printer 0x00000bc4? ? Let’s take a look at the following processing methods. Method 1. Printer sharing (same operating system): 1. All clients are located in the same network segment, such as 192.168.1.* (if the router IP is 192.168.1.1); 2. All clients are located in the same network segment. In the same workgroup, such as WORKGROUP; turn off password-protected sharing in WIN7: Open the Network and Sharing Center, select Change advanced sharing settings, and scroll down
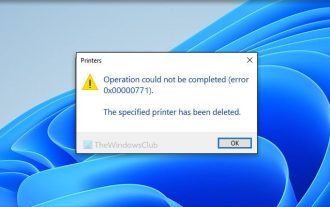 Unable to complete operation (Error 0x0000771) Printer error
Mar 16, 2024 pm 03:50 PM
Unable to complete operation (Error 0x0000771) Printer error
Mar 16, 2024 pm 03:50 PM
If you encounter an error message when using your printer, such as the operation could not be completed (error 0x00000771), it may be because the printer has been disconnected. In this case, you can solve the problem through the following methods. In this article, we will discuss how to fix this issue on Windows 11/10 PC. The entire error message says: The operation could not be completed (error 0x0000771). The specified printer has been deleted. Fix 0x00000771 Printer Error on Windows PC To fix Printer Error the operation could not be completed (Error 0x0000771), the specified printer has been deleted on Windows 11/10 PC, follow this solution: Restart Print Spool
 Printer has insufficient memory and cannot print the page Excel or PowerPoint error
Feb 19, 2024 pm 05:45 PM
Printer has insufficient memory and cannot print the page Excel or PowerPoint error
Feb 19, 2024 pm 05:45 PM
If you encounter the problem of insufficient printer memory when printing Excel worksheets or PowerPoint presentations, this article may be helpful to you. You may receive a similar error message stating that the printer does not have enough memory to print the page. However, there are some suggestions you can follow to resolve this issue. Why is printer memory unavailable when printing? Insufficient printer memory may cause a memory not available error. Sometimes it's because the printer driver settings are too low, but it can also be for other reasons. Large file size Printer driver Outdated or corrupt Interruption from installed add-ons Misconfiguration of printer settings This issue may also occur because of low memory settings on the Microsoft Windows printer driver. Repair printing
 Solution to the error code 0x00003e3 when connecting the computer to the printer
Jan 30, 2024 am 09:15 AM
Solution to the error code 0x00003e3 when connecting the computer to the printer
Jan 30, 2024 am 09:15 AM
The computer prompts error code 0x00003e3 when connecting to the printer. In daily work and life, we often need to use a printer to print files. However, sometimes we may encounter some problems, such as the error code 0x00003e3 when the computer is connected to the printer. This error code usually indicates that there is some malfunction with the printer or a connection problem. In this article, we will introduce some ways to solve this problem. First, we can try to restart the computer and printer. Sometimes, this error code is just a temporary issue that may be resolved by restarting the device. We can turn off the computer and printer first, then wait for a while before restarting them. If this method does not solve the problem, we can try the following
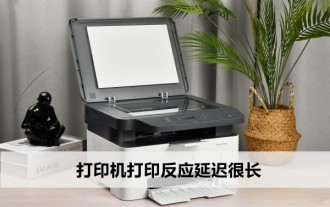 What is the reason for the long response delay of the printer in Win11 system? Detailed analysis
Jan 29, 2024 pm 07:09 PM
What is the reason for the long response delay of the printer in Win11 system? Detailed analysis
Jan 29, 2024 pm 07:09 PM
Printers are equipment that we often use in our daily offices and lives. Occasionally, we may encounter the problem of long printing response delays, which is a headache. There are many reasons for this. First, check whether the printer is connected properly and make sure all the cables are plugged in tightly. Secondly, there may be too many tasks to be processed in the print queue. You can try clearing the print queue or restarting the printer. There may also be a problem with the printer driver. You can try updating the driver or reinstalling it. In addition, hardware failure inside the printer may also cause delays. In this case, you need to contact after-sales service.
 Access Denied Issue—Win10 System Shared Printer
Jan 29, 2024 pm 06:12 PM
Access Denied Issue—Win10 System Shared Printer
Jan 29, 2024 pm 06:12 PM
Win10 system shared printer access denied (solution to the inability to connect to the shared printer) When using the Windows 10 operating system, sometimes we encounter the problem of shared printer access denied, that is, unable to connect to the shared printer. This problem may cause us to be unable to print files normally, causing inconvenience to our work and life. Here are some solutions to help you solve this problem. 1. Check the network connection: First, make sure your computer and the shared printer are connected to the same network. Check whether the network connection is normal and ensure that the network connection is stable. 2. Check sharing permissions: On the computer where the shared printer is located, open "Control Panel" and select "Devices and Printers". Right-click the shared printer and select "
 Can't print from snipping tool in Windows 11/10
Feb 19, 2024 am 11:39 AM
Can't print from snipping tool in Windows 11/10
Feb 19, 2024 am 11:39 AM
If you are unable to print using the Snipping Tool in Windows 11/10, it may be caused by corrupted system files or driver issues. This article will provide you with solutions to this problem. Can't print from Snipping Tool in Windows 11/10 If you can't print from Snipping Tool in Windows 11/10, use these fixes: Restart PC Printer Clear print queue Update printer and graphics driver Fix or reset Snipping Tool Run SFC and DISM Scan uses PowerShell commands to uninstall and reinstall Snipping Tool. let us start. 1] Restart your PC and printer Restarting your PC and printer helps eliminate temporary glitches
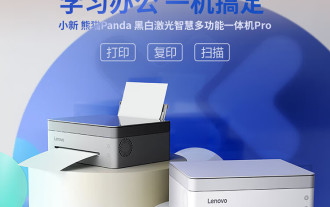 Lenovo Xiaoxin Panda Pro Panda Printer Pro goes on sale on May 6: black and white laser printing, built-in learning resources, 999 yuan
May 01, 2024 am 08:46 AM
Lenovo Xiaoxin Panda Pro Panda Printer Pro goes on sale on May 6: black and white laser printing, built-in learning resources, 999 yuan
May 01, 2024 am 08:46 AM
According to news from this site on April 30, Lenovo Xiaoxin PandaPro Panda Printer Pro is now available on JD.com. This printer will go on sale on May 6. It supports black and white laser printing, has an optional two-color body, and has built-in learning resources. The initial price is 999. Yuan. Lenovo Xiaoxin Panda Printer Pro measures 350x275x141mm and is available in two color options: Xiling White and Qingcheng Gray. This printer supports 2.4GHz/5GHz dual-band Wi-Fi, USB wired and other connection methods. It can print with one click after being configured with the network, and can also achieve NFC one-touch printing. Xiaoxin Panda Printer Pro supports black and white laser printing and can print 22 pages per minute. In addition to printing functions, this model also supports copying and scanning functions, with a color scanning resolution of 4800d.