

How to repeat top row header on every page when printing in Excel worksheet

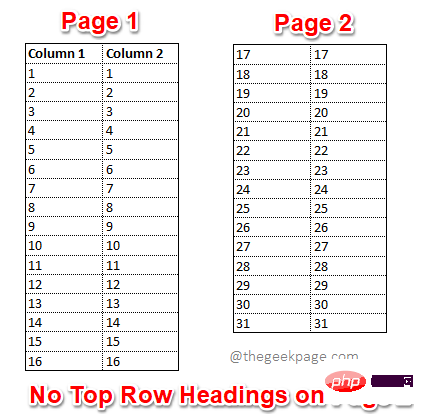
Open the Excel worksheet you want to print, and then press the CTRL P keys simultaneously to see a print preview. If you have multiple pages in your document, by default the top row headers are not visible on any page except the first, as shown in the print preview screenshot below.
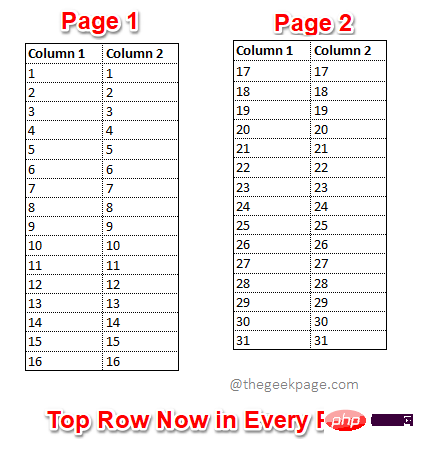
This is a huge inconvenience, but you can choose to print top row headers on every page of your Excel worksheet, like in the screenshot below.
Want to know how to do this? Well, you wouldn't believe it if I told you how easy it is to complete this task. So what are you waiting for? Let’s jump right into the article.
Solution
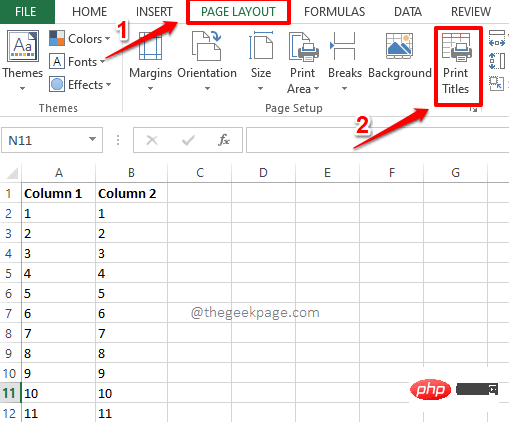
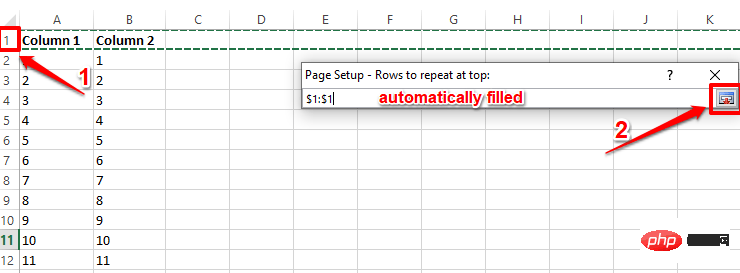
Step 1: First, click the PAGE LAYOUT tab at the top of the Excel window, and then click the button named Print Titles button.
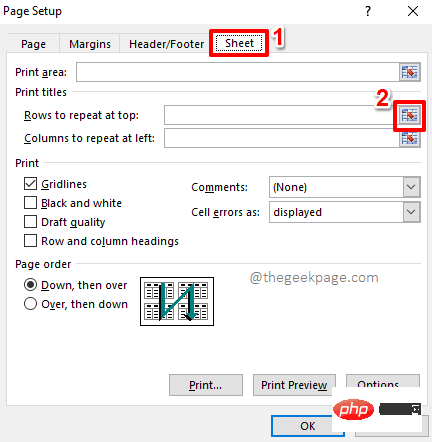
Step 2: When the Page Settings window opens, click on the named Sheet Tab.
Next, under the Print title section, click the Shrink button related to the Rows to repeat at top option.
Step 3: In the next step, you just select the rows you want to repeat on all pages when printing. You can also select multiple lines if you wish to have more than 1 line repeated on all pages to be printed.
If you look at thePage Setup - Duplicate Rows in the top window, you will see that it autofills with the rows you selected.
After selecting the row, click the smallExpand icon shown in the screenshot below to return to the "Page Setup" window.
Step 4: That’s it. You can now click the Print Preview button in the Page Setup window to verify your changes.
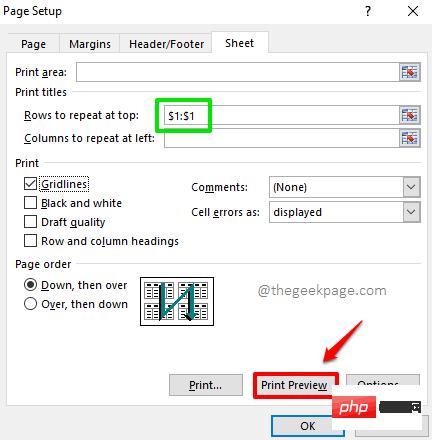
: There you go! The top row you selected will now appear on every page of the printout, instead of only appearing on the first page from now on. You can go ahead and click the "Print" button to print your document.

If you were wondering how we managed to get the grid lines to appear in the print preview as well, wonder no further. Click here to learn how to add gridlines to your prints.
The above is the detailed content of How to repeat top row header on every page when printing in Excel worksheet. For more information, please follow other related articles on the PHP Chinese website!

Hot AI Tools

Undresser.AI Undress
AI-powered app for creating realistic nude photos

AI Clothes Remover
Online AI tool for removing clothes from photos.

Undress AI Tool
Undress images for free

Clothoff.io
AI clothes remover

Video Face Swap
Swap faces in any video effortlessly with our completely free AI face swap tool!

Hot Article
Hot Tools

Notepad++7.3.1
Easy-to-use and free code editor

SublimeText3 Chinese version
Chinese version, very easy to use

Zend Studio 13.0.1
Powerful PHP integrated development environment

Dreamweaver CS6
Visual web development tools

SublimeText3 Mac version
God-level code editing software (SublimeText3)
Hot Topics


 Excel found a problem with one or more formula references: How to fix it
Apr 17, 2023 pm 06:58 PM
Excel found a problem with one or more formula references: How to fix it
Apr 17, 2023 pm 06:58 PM
Use an Error Checking Tool One of the quickest ways to find errors with your Excel spreadsheet is to use an error checking tool. If the tool finds any errors, you can correct them and try saving the file again. However, the tool may not find all types of errors. If the error checking tool doesn't find any errors or fixing them doesn't solve the problem, then you need to try one of the other fixes below. To use the error checking tool in Excel: select the Formulas tab. Click the Error Checking tool. When an error is found, information about the cause of the error will appear in the tool. If it's not needed, fix the error or delete the formula causing the problem. In the Error Checking Tool, click Next to view the next error and repeat the process. When not
 How to set the print area in Google Sheets?
May 08, 2023 pm 01:28 PM
How to set the print area in Google Sheets?
May 08, 2023 pm 01:28 PM
How to Set GoogleSheets Print Area in Print Preview Google Sheets allows you to print spreadsheets with three different print areas. You can choose to print the entire spreadsheet, including each individual worksheet you create. Alternatively, you can choose to print a single worksheet. Finally, you can only print a portion of the cells you select. This is the smallest print area you can create since you could theoretically select individual cells for printing. The easiest way to set it up is to use the built-in Google Sheets print preview menu. You can view this content using Google Sheets in a web browser on your PC, Mac, or Chromebook. To set up Google
 5 Tips to Fix Stdole32.tlb Excel Error in Windows 11
May 09, 2023 pm 01:37 PM
5 Tips to Fix Stdole32.tlb Excel Error in Windows 11
May 09, 2023 pm 01:37 PM
When you start Microsoft Word or Microsoft Excel, Windows very tediously tries to set up Office 365. At the end of the process, you may receive a Stdole32.tlbExcel error. Since there are many bugs in the Microsoft Office suite, launching any of its products can sometimes be a nightmare. Microsoft Office is a software that is used regularly. Microsoft Office has been available to consumers since 1990. Starting from Office 1.0 version and developing to Office 365, this
 How to solve out of memory problem in Microsoft Excel?
Apr 22, 2023 am 10:04 AM
How to solve out of memory problem in Microsoft Excel?
Apr 22, 2023 am 10:04 AM
Microsoft Excel is a popular program used for creating worksheets, data entry operations, creating graphs and charts, etc. It helps users organize their data and perform analysis on this data. As can be seen, all versions of the Excel application have memory issues. Many users have reported seeing the error message "Insufficient memory to run Microsoft Excel. Please close other applications and try again." when trying to open Excel on their Windows PC. Once this error is displayed, users will not be able to use MSExcel as the spreadsheet will not open. Some users reported problems opening Excel downloaded from any email client
 How to display the Developer tab in Microsoft Excel
Apr 14, 2023 pm 02:10 PM
How to display the Developer tab in Microsoft Excel
Apr 14, 2023 pm 02:10 PM
If you need to record or run macros, insert Visual Basic forms or ActiveX controls, or import/export XML files in MS Excel, you need the Developer tab in Excel for easy access. However, this developer tab does not appear by default, but you can add it to the ribbon by enabling it in Excel options. If you are working with macros and VBA and want to easily access them from the Ribbon, continue reading this article. Steps to enable Developer tab in Excel 1. Launch MS Excel application. Right-click anywhere on one of the top ribbon tabs and when
 How to take a scrolling screenshot on iPhone
Apr 15, 2023 pm 06:55 PM
How to take a scrolling screenshot on iPhone
Apr 15, 2023 pm 06:55 PM
How to take a scrolling screenshot on iPhone Using this native iOS option, scrolling screenshots or "full page" screenshots give you a PDF of everything in a document, web page, note, or email in an Apple app. Take a screenshot (press the side or top button and the volume up button at the same time) before it disappears Click on the preview in the lower left corner Select the full page option in the upper right corner The full page option will only appear if you have more content on the screen than the page is worth You can preview all pages before saving, use markup, and more. You can also click the crop icon (the square icon next to "Done") to edit the portion of the full page you want to save. Click Done in the upper left corner to save or click the Share button in the upper right corner for Scroll screenshots on iPhone
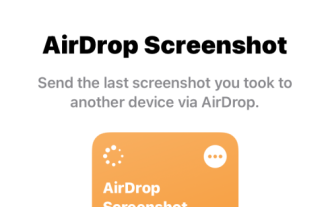 How to Share Last Screenshot on iPhone via AirDrop
Feb 23, 2024 am 08:16 AM
How to Share Last Screenshot on iPhone via AirDrop
Feb 23, 2024 am 08:16 AM
To simplify repetitive tasks, Apple has launched Shortcuts apps that can help you automate common daily operations, such as automatically turning off the Internet connection when you leave your phone, or automatically playing your favorite music list when you get in the car. One task you might want to make easier is sharing the last screenshot you just took without opening the Photos app. This article will introduce how to use the Airdrop function to quickly send iPhone’s latest screenshots to others or other Apple devices. How to quickly share your last screenshot on iPhone Before sharing content, make sure the target device (such as another iPhone, iPad, or Mac) has AirDrop enabled for this to happen
 How to add borders to Snipping Tool captures in Windows 11
May 13, 2023 pm 08:46 PM
How to add borders to Snipping Tool captures in Windows 11
May 13, 2023 pm 08:46 PM
If you want to grab all or part of your computer screen, the Snipping Tool in Windows 11 lets you capture it easily. Additionally, you can even add a colored border to the captured area, but you first need to enable the settings related to this feature. Let's see how it's done! Add Colored Borders to Snipping Tool Captures in Windows 11 There’s more than one way to capture screenshots in Windows 11. However, all of these images will not display a border around them unless they are configured to do so. Here's how to change settings in the Windows 11 Snipping Tool to add custom colors and change image border thickness. Click Start, then in the search box, type Snipping tool and select