

How to use Python ttkbootstrap

1. What is ttkbootstrap?
ttkbootstrap is an interface beautification library based on tkinter. Using this tool, you can develop a tkinter desktop program similar to the front-end bootstrap style
2. Installation steps
Installation command: pip install ttkbootstrap
3. Start using
First of all, some brief introduction to its instantiation and creation of application windows.
import ttkbootstrap as ttk
#实例化创建应用程序窗口,其实大部分命令与tkinter相似
root = ttk.Window(
        title="窗口名字",        #设置窗口的标题
        themename="litera",     #设置主题
        size=(1066,600),        #窗口的大小
        position=(100,100),     #窗口所在的位置
        minsize=(0,0),          #窗口的最小宽高
        maxsize=(1920,1080),    #窗口的最大宽高
        resizable=None,         #设置窗口是否可以更改大小
        alpha=1.0,              #设置窗口的透明度(0.0完全透明)
        )
# root.place_window_center()    #让显现出的窗口居中
# root.resizable(False,False)   #让窗口不可更改大小
# root.wm_attributes('-topmost', 1)#让窗口位置其它窗口之上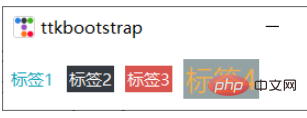
root.mainloop()Label style
import ttkbootstrap as ttk
from ttkbootstrap.constants import *
root = ttk.Window()
ttk.Label(root,text="标签1",bootstyle=INFO).pack(side=ttk.LEFT, padx=5, pady=10)
ttk.Label(root,text="标签2",boot).pack(side=ttk.LEFT, padx=5, pady=10)
ttk.Label(root,text="标签3",boot).pack(side=ttk.LEFT, padx=5, pady=10)
ttk.Label(root, text="标签4", bootstyle=WARNING, font=("微软雅黑", 15), background='#94a2a4').pack(side=LEFT, padx=5, pady=10)
root.mainloop()
'''
# bootstyle colors
PRIMARY = 'primary'
SECONDARY = 'secondary'
SUCCESS = 'success'
DANGER = 'danger'
WARNING = 'warning'
INFO = 'info'
LIGHT = 'light'
DARK = 'dark'

# bootstyle types
OUTLINE = 'outline'
LINK = 'link'
TOGGLE = 'toggle'
INVERSE = 'inverse'
STRIPED = 'striped'
TOOLBUTTON = 'toolbutton'
ROUND = 'round'
SQUARE = 'square'
'''Button style

import ttkbootstrap as ttk
from ttkbootstrap.constants import *
root = ttk.Window()
ttk.Button(root, text="Button 1", bootstyle=SUCCESS).pack(side=LEFT, padx=5, pady=10)
ttk.Button(root, text="Button 2", bootstyle=(INFO, OUTLINE)).pack(side=LEFT, padx=5, pady=10)
ttk.Button(root, text="Button 3", bootstyle=(PRIMARY, "outline-toolbutton")).pack(side=LEFT, padx=5, pady=10)
ttk.Button(root, text="Button 4", boot).pack(side=LEFT, padx=5, pady=10)
ttk.Button(root, text="Button 5", boot).pack(side=LEFT, padx=5, pady=10)
ttk.Button(root, text="Button 6", state="disabled").pack(side=LEFT, padx=5, pady=10) #在禁用状态下创建按钮
root.mainloop()
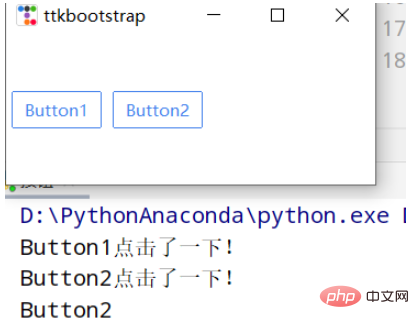
Button click
import ttkbootstrap as ttk
from ttkbootstrap.constants import *
root = ttk.Window()
#为按钮添加点击事件
#法一
def button1():
    print("Button1点击了一下!")
ttk.Button(root,text="Button1", bootstyle=(PRIMARY, "outline-toolbutton"),command=button1).pack(side=LEFT, padx=5, pady=10)
#法二
def button2(event): #这里要加一个参数,不然会报错
    print("Button2点击了一下!")
    button_text = event.widget["text"] #得到按钮上的文本
    print(button_text)
b = ttk.Button(root,text="Button2", bootstyle=(PRIMARY, "outline-toolbutton"))
b.pack(side=LEFT, padx=5, pady=10)
b.bind("<Button-1>", button2) #<Button-1>鼠标左键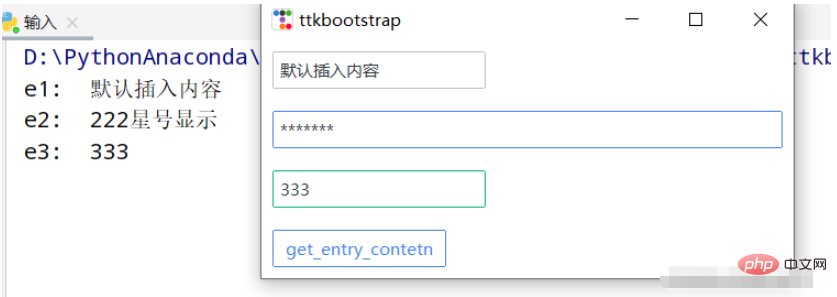
root.mainloop()Input box (Entry) style
import ttkbootstrap as ttk
from ttkbootstrap.constants import *
root = ttk.Window()
e1 = ttk.Entry(root,show=None)
e1.insert('0',"默认插入内容")
e1.grid(row=5, column=1, sticky=ttk.W, padx=10,pady=10)
e2 = ttk.Entry(root,show="*",width=50,bootstyle=PRIMARY)
e2.grid(row=10, column=1, sticky=ttk.W, padx=10, pady=10)
e3_content = ttk.StringVar()
e3 = ttk.Entry(root,bootstyle='success', textvariable=e3_content).grid(row=15, column=1, sticky=ttk.W, padx=10, pady=10)
def get_entry_contetn():
    print("e1: ",e1.get())
    print("e2: ",e2.get())
    print("e3: ",e3_content.get())
ttk.Button(root,text="get_entry_contetn", bootstyle=(PRIMARY, "outline-toolbutton"),command=get_entry_contetn).grid(row=20, column=1, sticky=ttk.W, padx=10, pady=10)
root.mainloop()Text box (Text) style
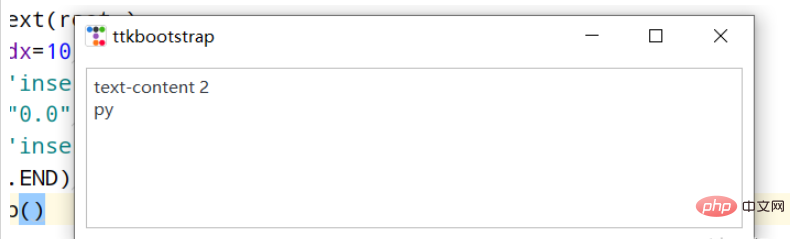
import ttkbootstrap as ttk
from ttkbootstrap.constants import *
root = ttk.Window()
text = ttk.Text(root,)
text.pack(padx=10,pady=10,fill=BOTH)
text.insert('insert','text-content 1') #插入内容
text.delete("0.0",'end') #删除内容
text.insert('insert','text-content 2\npy')
text.see(ttk.END) #光标跟随着插入的内容移动
root.mainloop()The rest are not commonly used in tkinter or are included in the tkinter.ttk official tutorial.
The above is the detailed content of How to use Python ttkbootstrap. For more information, please follow other related articles on the PHP Chinese website!

Hot AI Tools

Undresser.AI Undress
AI-powered app for creating realistic nude photos

AI Clothes Remover
Online AI tool for removing clothes from photos.

Undress AI Tool
Undress images for free

Clothoff.io
AI clothes remover

Video Face Swap
Swap faces in any video effortlessly with our completely free AI face swap tool!

Hot Article
Hot Tools

Notepad++7.3.1
Easy-to-use and free code editor

SublimeText3 Chinese version
Chinese version, very easy to use

Zend Studio 13.0.1
Powerful PHP integrated development environment

Dreamweaver CS6
Visual web development tools

SublimeText3 Mac version
God-level code editing software (SublimeText3)
Hot Topics
 1653
1653
 14
1413
52
1304
25
1251
29
1224
24
14
1413
52
1304
25
1251
29
1224
24

 PHP and Python: Different Paradigms Explained
Apr 18, 2025 am 12:26 AM
PHP and Python: Different Paradigms Explained
Apr 18, 2025 am 12:26 AM
PHP is mainly procedural programming, but also supports object-oriented programming (OOP); Python supports a variety of paradigms, including OOP, functional and procedural programming. PHP is suitable for web development, and Python is suitable for a variety of applications such as data analysis and machine learning.
 Choosing Between PHP and Python: A Guide
Apr 18, 2025 am 12:24 AM
Choosing Between PHP and Python: A Guide
Apr 18, 2025 am 12:24 AM
PHP is suitable for web development and rapid prototyping, and Python is suitable for data science and machine learning. 1.PHP is used for dynamic web development, with simple syntax and suitable for rapid development. 2. Python has concise syntax, is suitable for multiple fields, and has a strong library ecosystem.
 PHP and Python: A Deep Dive into Their History
Apr 18, 2025 am 12:25 AM
PHP and Python: A Deep Dive into Their History
Apr 18, 2025 am 12:25 AM
PHP originated in 1994 and was developed by RasmusLerdorf. It was originally used to track website visitors and gradually evolved into a server-side scripting language and was widely used in web development. Python was developed by Guidovan Rossum in the late 1980s and was first released in 1991. It emphasizes code readability and simplicity, and is suitable for scientific computing, data analysis and other fields.
 Python vs. JavaScript: The Learning Curve and Ease of Use
Apr 16, 2025 am 12:12 AM
Python vs. JavaScript: The Learning Curve and Ease of Use
Apr 16, 2025 am 12:12 AM
Python is more suitable for beginners, with a smooth learning curve and concise syntax; JavaScript is suitable for front-end development, with a steep learning curve and flexible syntax. 1. Python syntax is intuitive and suitable for data science and back-end development. 2. JavaScript is flexible and widely used in front-end and server-side programming.
 How to run sublime code python
Apr 16, 2025 am 08:48 AM
How to run sublime code python
Apr 16, 2025 am 08:48 AM
To run Python code in Sublime Text, you need to install the Python plug-in first, then create a .py file and write the code, and finally press Ctrl B to run the code, and the output will be displayed in the console.
 Can vs code run in Windows 8
Apr 15, 2025 pm 07:24 PM
Can vs code run in Windows 8
Apr 15, 2025 pm 07:24 PM
VS Code can run on Windows 8, but the experience may not be great. First make sure the system has been updated to the latest patch, then download the VS Code installation package that matches the system architecture and install it as prompted. After installation, be aware that some extensions may be incompatible with Windows 8 and need to look for alternative extensions or use newer Windows systems in a virtual machine. Install the necessary extensions to check whether they work properly. Although VS Code is feasible on Windows 8, it is recommended to upgrade to a newer Windows system for a better development experience and security.
 Where to write code in vscode
Apr 15, 2025 pm 09:54 PM
Where to write code in vscode
Apr 15, 2025 pm 09:54 PM
Writing code in Visual Studio Code (VSCode) is simple and easy to use. Just install VSCode, create a project, select a language, create a file, write code, save and run it. The advantages of VSCode include cross-platform, free and open source, powerful features, rich extensions, and lightweight and fast.
 How to run python with notepad
Apr 16, 2025 pm 07:33 PM
How to run python with notepad
Apr 16, 2025 pm 07:33 PM
Running Python code in Notepad requires the Python executable and NppExec plug-in to be installed. After installing Python and adding PATH to it, configure the command "python" and the parameter "{CURRENT_DIRECTORY}{FILE_NAME}" in the NppExec plug-in to run Python code in Notepad through the shortcut key "F6".
