

Fix: Windows security is not turned on in Windows 11 or 10

Windows Security is a set of tools that help protect your system and its data from virus and malware threats from the Internet or other third-party applications.
Many Windows users have recently reported that they are unable to launch Windows Security software on their PCs after upgrading to Windows 11. Windows users have been frustrated because there is nothing they can do about it.
There could be many reasons for this, we have mentioned some of them below.
- Corrupted data files
- Window not updated
- Third-party antivirus software
- Windows system settings may have changed
- Security Center Service is not running
- Change Registry Settings
After researching the above reasons, we have created a list of solutions in this article to help users resolve this issue question.
Fix 1 – Reset Windows Security Applications
These issues are visible even if the user makes minor changes in any application settings. Therefore, it is better to reset or repair the application to resolve this issue.
Let’s see how to reset Windows Security apps in this article.
Method 1 – Using a PowerShell Application
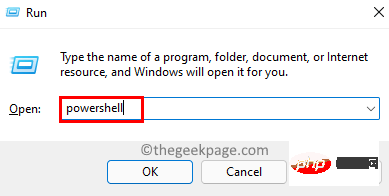
Step 1: Simultaneously press Windows R on the keyboard that opens the Run command box key.
Step 2: Next, type powershell in the run box and press the CTRL SHIFT ENTER keys simultaneously to open the PowerShell application as administrator .
Step 3: Accept the UAC prompt (if any) and click "Yes" to continue.
Step 4: Once the PowerShell application opens, copy and paste the following command and press Enter to execute it.
获取-AppxPackage Microsoft.SecHealthUI -AllUsers | 重置-AppxPackage
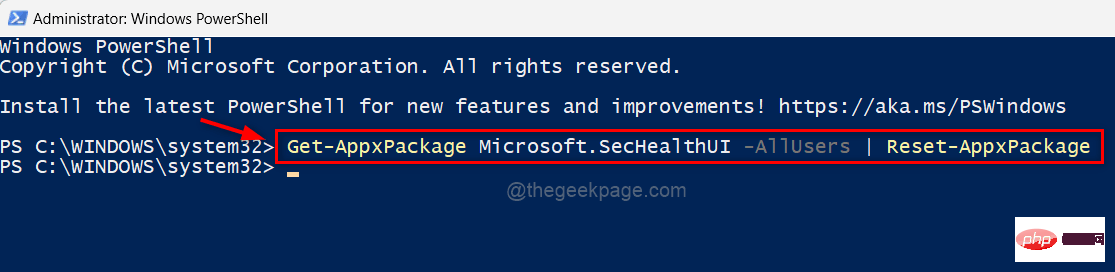
Step 5: After executing the command, close the PowerShell application window.
Now check if the Windows Security app is open on your system.
That's it.
Method 2 – From the Installed Applications page
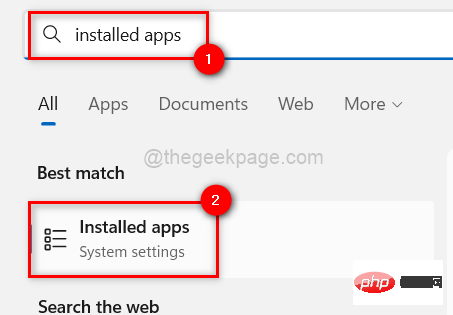
Step 1: Press the Windows key and type Installed Applications.
Step 2: Select Installed Applications System Settings from the search results as shown below.
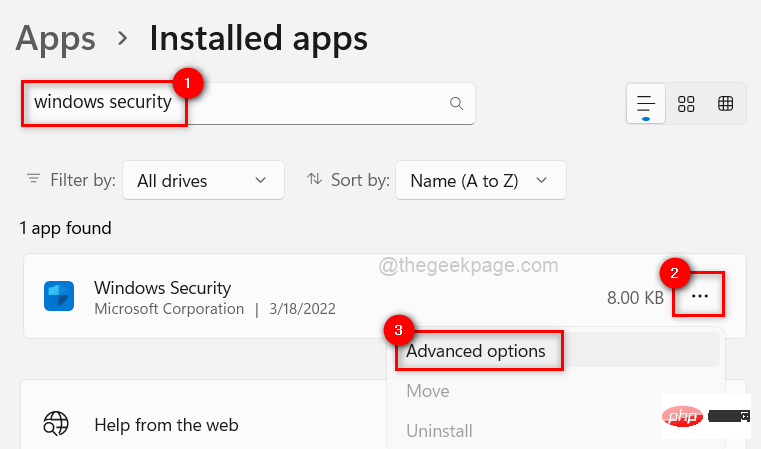
Step 3: After opening the installed applications page, type windows security in the search bar.
Step 4: Then, from the search results, click on the Three vertical dots icon in the upper right corner of the Windows Security app as shown in the image below.
Step 5: SelectAdvanced Options from the list.
#Step 6: This will take you to the Advanced Options page. Scroll it and go to the "Reset" section.
Step 7: Then, click the Reset button to reset the Windows Security application as shown below.
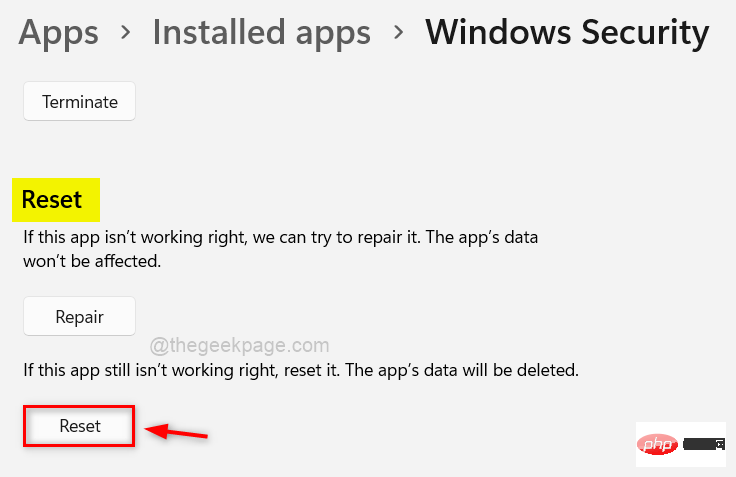
Step 8: After the reset, close the Installed Applications page and check if the Windows Security application opens normally.
Hope this solves your problem.
Fix 2 – Restart the Windows Security Center service
The Windows Security Center service keeps Windows security applications synchronized with the latest information to protect the system from threats. If there is a problem with this service, Windows Security applications may not start on your Windows system.
Therefore, we recommend that users restart the Windows Security Center service once on their system to see if this resolves the issue.
Let us see how it can be done by the steps given below.
Step 1: Press the CTRL SHIFT ESC key to open the Task Manager on the system.
Step 2: In Task Manager, go to the Services tab as shown below.
Step 3: Then, search for Security Center Services (wscsvc) and right-click on it.
Step 4: Select Restart from the context menu as shown in the screenshot below.
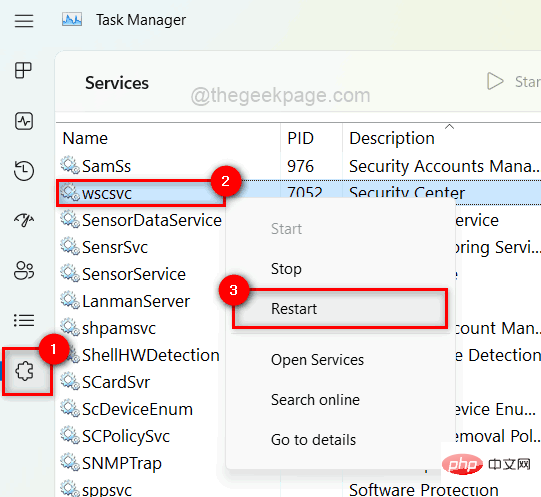
Step 5: Once completed, close the Services window.
Now try opening the Windows Security app on your system to see if this fix works for you.
Fix 3 – Use DISM to perform a System File Checker scan and restore system health
Corrupted data files on your system may be the main cause of this issue.
When users are unable to repair or delete these corrupted files, they cause compromised system and application performance.
When such issues occur, it is best to check if there are any corrupted data files.
View the steps to perform an SFC scan and restore DISM health.
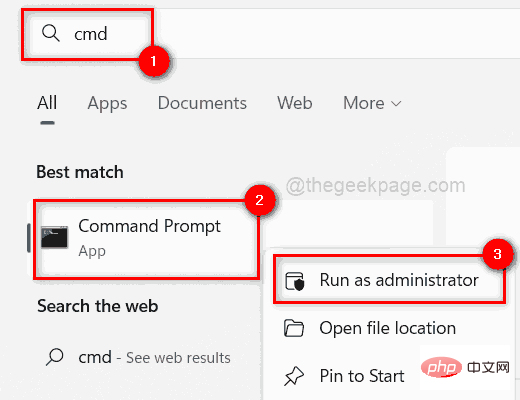
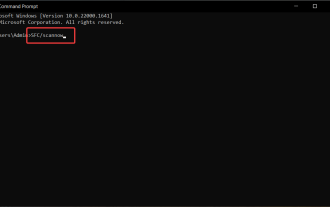
第 1 步:通过按Windows键并键入cmd打开系统上提升的命令提示符。
步骤2:然后在搜索结果中右键单击命令提示符,如下所示。
第 3 步:从上下文菜单中选择以管理员身份运行。
注意:在 UAC 提示上单击是以继续。
第 4 步:在命令提示符中,执行以下命令以扫描任何损坏的系统文件。
sfc /scannow
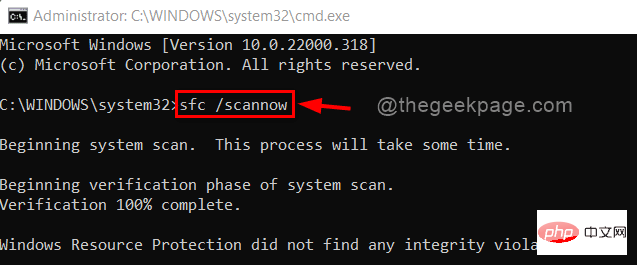
第 5 步:如果列出了任何可用的损坏文件,请立即替换它们。
第 6 步:完成后,复制并粘贴下面的命令,然后按 Enter键以使用 DISM 工具恢复系统运行状况。
Dism /在线 /Cleanup-Image /RestoreHealth
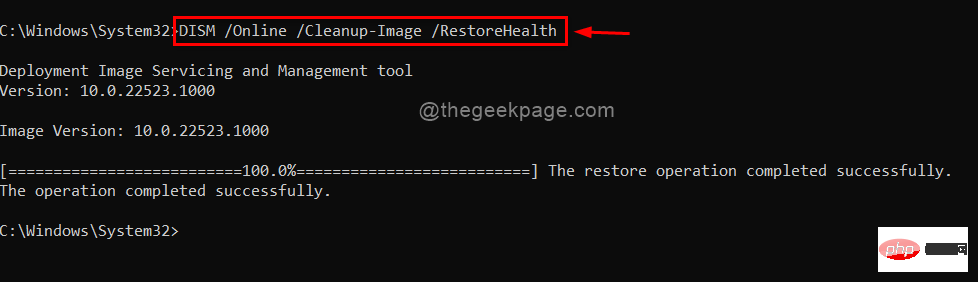
第 7 步:在此之后,关闭命令提示符并检查问题是否已解决。
修复 4 – 保持 Windows 系统更新
如果任何用户不更新 Windows,那么系统上往往会出现此类问题。微软不时发布许多更新,以确保用户获得最大的利益和体验,无论是驱动程序更新还是系统更新。
请按照以下步骤了解如何更新 Windows 系统。
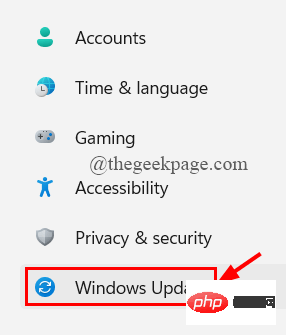
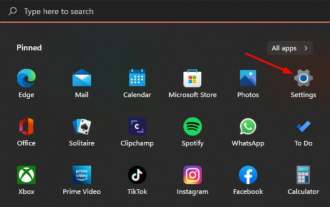
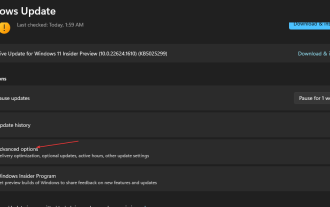
第 1 步:同时按键盘上的Windows + I键以打开“设置”应用。
第 2 步:然后,转到“设置”窗口左侧面板上的Windows 更新。
第三步:在Windows更新页面,点击右上角的检查更新,如下图。

第 4 步:完成后,检查是否有可用的更新。
第 5 步:请下载并安装系统上可用的所有更新,以保持更新。
第6步:在此之后,关闭“设置”窗口。
现在检查问题是否得到解决。
修复 5 – 使用注册表编辑器修改注册表文件
对注册表文件的更改,往往会对系统造成严重破坏。这些更改可能是用户或系统上的第三方软件无意中做出的。
可以修改注册表文件以修复 Windows 安全性 (Defender)。
注意:在开始之前,请备份注册表文件,因为它是最重要的文件,如果出现问题,可能会导致系统崩溃。
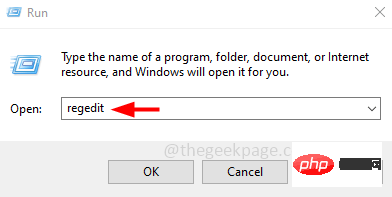
第 1 步:同时按Windows + R键打开“运行”命令框。
第 2 步:在运行框中键入regedit ,然后按Enter键打开注册表编辑器。
注意:通过单击是继续接受 UAC 提示。

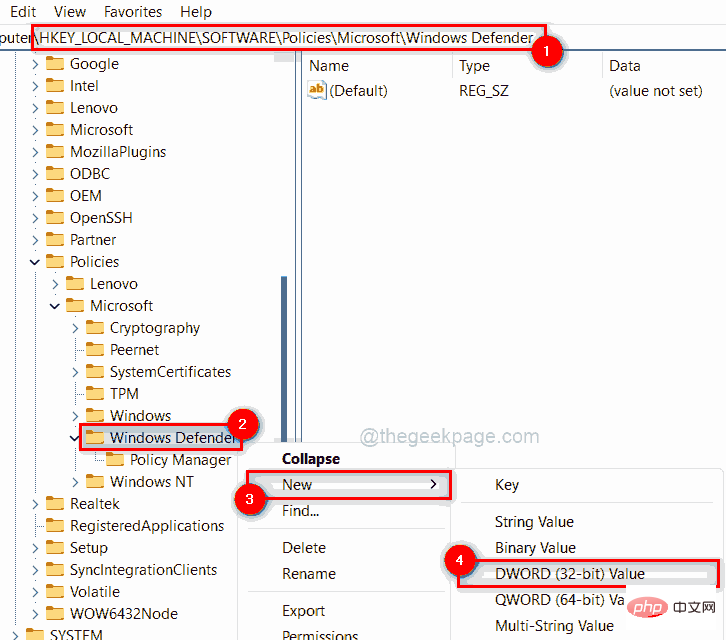
第 3 步:在注册表编辑器中,将以下路径复制并粘贴到空地址栏中,然后按 Enter键以到达Windows Defender 注册表项,如下所示。
HKEY_LOCAL_MACHINE\SOFTWARE\Policies\Microsoft\Windows Defender
第 4 步:选择左侧的Windows Defender注册表项,并检查窗口右侧是否有名为DisableAntiSpyware 的任何 DWORD(32 位)值。
第 5 步:如果没有,则右键单击Windows Defender注册表项,然后从上下文菜单中选择新建 > DWORD(32 位)值,如下所示。
第 6 步:将新创建的 DWORD 值重命名为DisableAntiSpyware 并双击打开它。
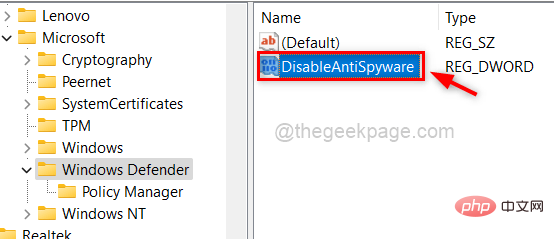
第 7 步:接下来,在数值数据字段中输入0 ,然后单击确定以应用更改。
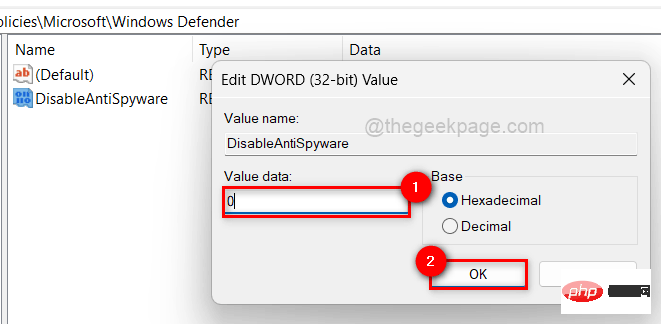
第 8 步:完成后,关闭注册表编辑器。
现在查看 Windows 安全应用程序是否正常打开。
The above is the detailed content of Fix: Windows security is not turned on in Windows 11 or 10. For more information, please follow other related articles on the PHP Chinese website!

Hot AI Tools

Undresser.AI Undress
AI-powered app for creating realistic nude photos

AI Clothes Remover
Online AI tool for removing clothes from photos.

Undress AI Tool
Undress images for free

Clothoff.io
AI clothes remover

Video Face Swap
Swap faces in any video effortlessly with our completely free AI face swap tool!

Hot Article
Hot Tools

Notepad++7.3.1
Easy-to-use and free code editor

SublimeText3 Chinese version
Chinese version, very easy to use

Zend Studio 13.0.1
Powerful PHP integrated development environment

Dreamweaver CS6
Visual web development tools

SublimeText3 Mac version
God-level code editing software (SublimeText3)
Hot Topics


 How to disable driver signature enforcement in Windows 11
May 20, 2023 pm 02:17 PM
How to disable driver signature enforcement in Windows 11
May 20, 2023 pm 02:17 PM
Microsoft has built several security features into Windows to ensure your PC remains secure. One of them is driver signature enforcement in Windows 11. When this feature is enabled, it ensures that only drivers digitally signed by Microsoft can be installed on the system. This helps most of the users to a great extent as it protects them. But there is a downside to enabling driver signature enforcement. Suppose you find a driver that works for your device, but it is not signed by Microsoft, although it is completely safe. But you won't be able to install it. Therefore, you must know how to disable driver signing in Windows 11
 How to fix Windows 11 activation error 0xc004c060
May 17, 2023 pm 08:47 PM
How to fix Windows 11 activation error 0xc004c060
May 17, 2023 pm 08:47 PM
Why am I encountering Windows 11 activation error 0xc004c060? First make sure you are using genuine Windows and that the license key is valid. Also, check if it was obtained from an official source and if the key is suitable for the installed OS version. If there is an issue with any of these, you may encounter Windows 11 activation error 0xc004c060. So be sure to verify these and if you find everything is in order, move on to the next section. If you obtained the key through unreliable means or believe that the installed copy is a pirated version, you will need to purchase a valid key from Microsoft. In addition to this, misconfigured settings, missing
 0x80010105: How to fix this Windows update error
May 17, 2023 pm 05:44 PM
0x80010105: How to fix this Windows update error
May 17, 2023 pm 05:44 PM
Microsoft regularly releases Windows updates to improve functionality or increase the security of the operating system. You can ignore some of these updates, but it's important to always install security updates. While installing these updates, you may encounter error code; 0x80010105. An unstable connection usually causes most update errors, and once the connection is reestablished you're good to go. However, some require more technical troubleshooting, such as the 0x80010105 error, which is what we will see in this article. What causes WindowsUpdate error 0x80010105? This error may occur if your computer has not been updated in a while. Some users may have permanently disabled W for their reasons
 How to disable display scaling for high DPI settings in Windows 11 or 10
May 22, 2023 pm 10:11 PM
How to disable display scaling for high DPI settings in Windows 11 or 10
May 22, 2023 pm 10:11 PM
The default display scaling feature on Windows 10 or later is a core component of the Windows operating system. But sometimes, this feature of certain apps can cause compatibility issues, unreadable text, blurry logos, and ultimately, app crashes. This can be a huge headache if you're dealing with 2160p or higher resolutions. There are many ways to disable the default display scaling feature on high DPI settings. We've selected the best ones and detailed step-by-step instructions for each process. How to Disable Display Scaling on High DPI Settings There is a way, all you have to do is disable high DPI scaling for a single application, and there is a way to do it for the entire Window
 How to disable core parking on Windows 10
May 16, 2023 pm 01:07 PM
How to disable core parking on Windows 10
May 16, 2023 pm 01:07 PM
If you are a Windows user and want to disable the core parking functionality in your system, this article will guide you through the process. What is core parking? The core parking function is a power saving mechanism. It puts some of your processors into a sleep mode that doesn't perform any tasks and consumes very little or no power. This helps reduce energy consumption and therefore heat in the system. These cores are unparked when needed. Few users need to disable this feature, especially gamers. Disabling this feature will improve your system performance. Disable Windows Core Parking using Windows Registry Editor Step 1: Use Windows + R keys simultaneously to open the run prompt. Step 2: At the run prompt
 Fix: WD My Cloud doesn't show up on the network in Windows 11
Oct 02, 2023 pm 11:21 PM
Fix: WD My Cloud doesn't show up on the network in Windows 11
Oct 02, 2023 pm 11:21 PM
If WDMyCloud is not showing up on the network in Windows 11, this can be a big problem, especially if you store backups or other important files in it. This can be a big problem for users who frequently need to access network storage, so in today's guide, we'll show you how to fix this problem permanently. Why doesn't WDMyCloud show up on Windows 11 network? Your MyCloud device, network adapter, or internet connection is not configured correctly. The SMB function is not installed on the computer. A temporary glitch in Winsock can sometimes cause this problem. What should I do if my cloud doesn't show up on the network? Before we start fixing the problem, you can perform some preliminary checks:
 5 Ways to Disable Delivery Optimization Service in Windows
May 17, 2023 am 09:31 AM
5 Ways to Disable Delivery Optimization Service in Windows
May 17, 2023 am 09:31 AM
There are many reasons why you might want to disable the Delivery Optimization service on your Windows computer. However, our readers complained about not knowing the correct steps to follow. This guide discusses how to disable the Delivery Optimization service in a few steps. To learn more about services, you may want to check out our How to open services.msc guide for more information. What does Delivery Optimization Service do? Delivery Optimization Service is an HTTP downloader with cloud hosting solution. It allows Windows devices to download Windows updates, upgrades, applications and other large package files from alternative sources. Additionally, it helps reduce bandwidth consumption by allowing multiple devices in a deployment to download these packages. In addition, Windo
 NET HELPMSG 3774: How to fix this error in 5 steps
May 17, 2023 pm 09:27 PM
NET HELPMSG 3774: How to fix this error in 5 steps
May 17, 2023 pm 09:27 PM
Many of our readers have encountered error code NETHELPMSG3774 when trying to create a new user account through the command prompt. The error states that the user was successfully created but could not be added to the USERS local group. Why do I receive the NETHELPMSG3774 error code? If you receive error code NETHELPMSG3774 when trying to create a user account on your Windows PC, it may be due to one or more of the following reasons. Incomplete Windows Installation – If Windows was not installed correctly, or the installation process was interrupted, the NETHELPMSG3774 error may occur during user account creation. Corrupted user profile – if