

Windows 11 drag and drop not working

How to Restart Applications to Fix Windows 11 Drag and Drop Not Working
If you encounter drag and drop not working with a specific application, you can restart it to fix it.
The fix is easy. Save any work you need and X outside of the app. Then, restart it after a few seconds and see if drag and drop works properly.
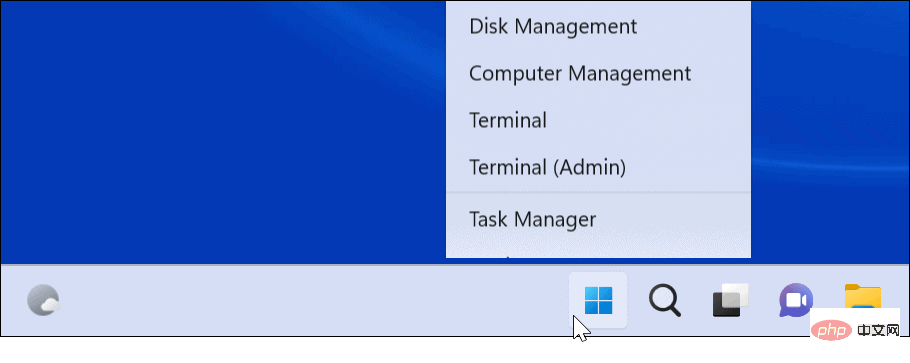
You may also want to close the application in Task Manager using the following steps:
- By right-clicking the Start button and Select Task Manager from the menu to open the Task Manager.

- Right-click the offending application under the Processes tab and select End Task from the menu.
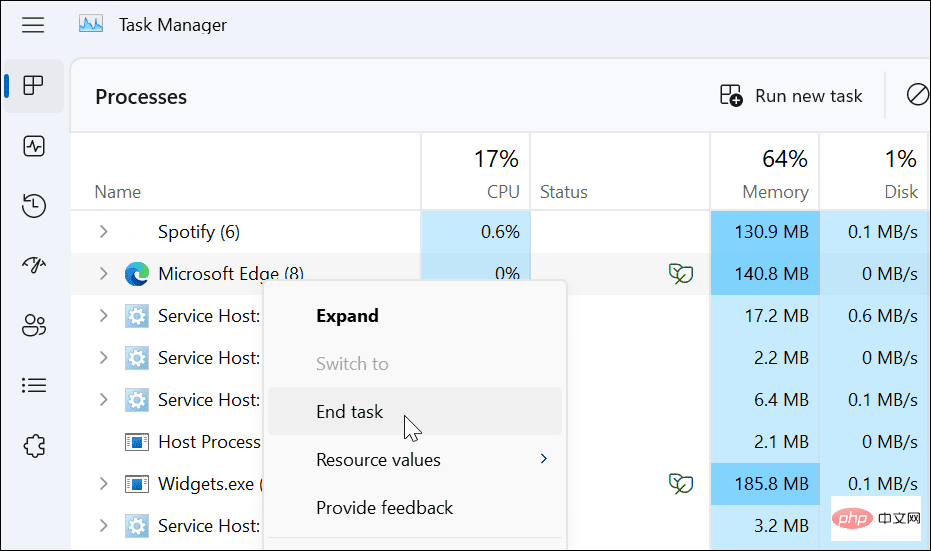
After ending the application in Task Manager, go back to the application, restart it, and see if the drag-and-drop functionality works properly.
How to Forget Your Last Drag and Drop
Sometimes Windows hangs up on the last drag and drop operation you performed. Fortunately, it's easy to forget about it.
Open File Explorer, click on any file or folder, hold down the left mouse button, and then press the Esc key. Try dragging and dropping files to see if it works.

How to Update Windows 11
When Microsoft deploys updates, they include patches for security, bugs, and system fixes. Your system should be updating in the background, but it doesn't always work. Fortunately, you can update Windows 11 manually.
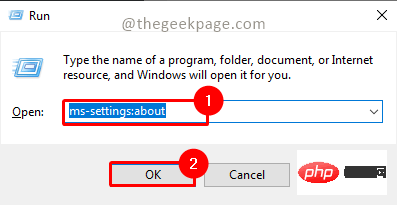
To check for Windows updates:
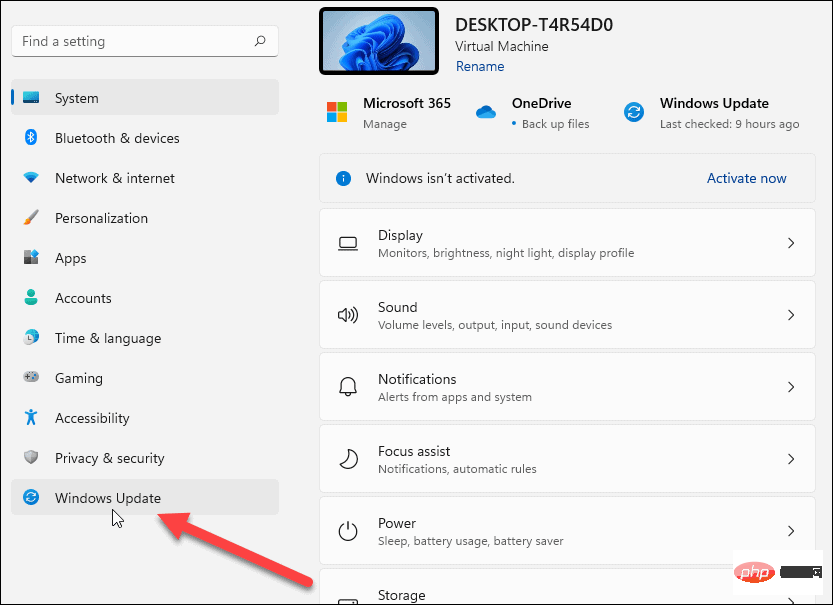
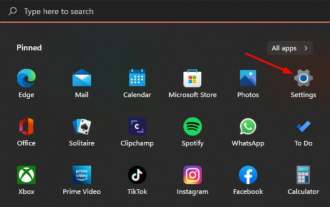
- Click the Start button or press the Windows keyAnd open Settings.
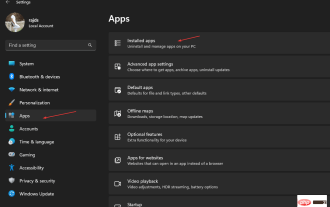
- When Settings open, click Windows Update at the bottom of the list on the left.
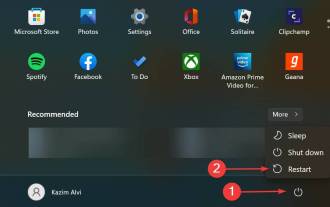
- Click the Check for Updates button and download any available updates - you may need to restart Windows 11 to complete the update process.


After installing the latest update for Windows, check to see if the drag-and-drop feature is working properly.
How to Restart File Explorer to Fix Drag and Drop Not Working
Another reason why Windows 11 drag and drop is not working is because File Explorer freezes.
To restart File Explorer on Windows, use the following steps:
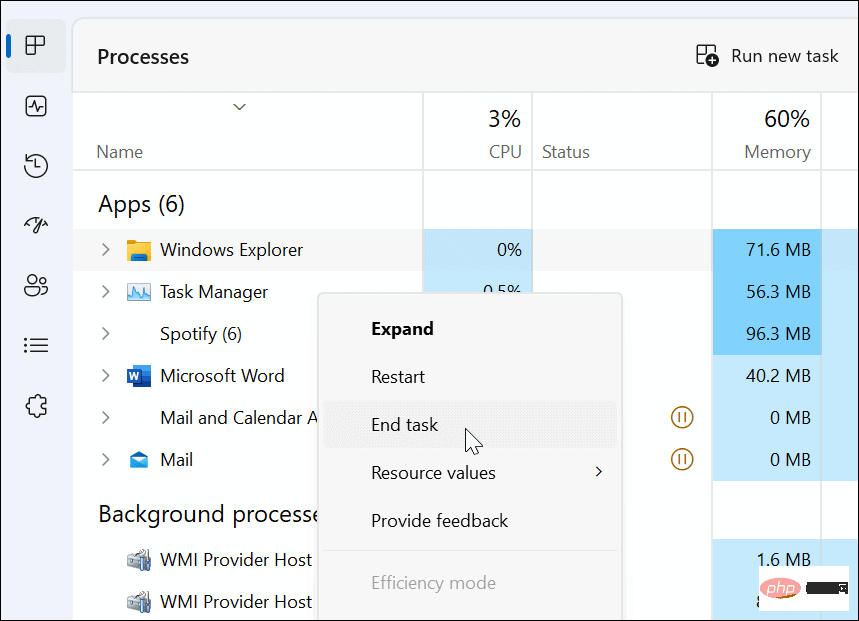
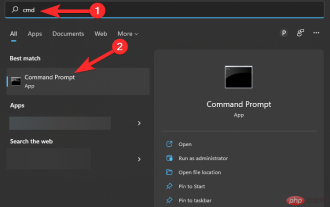
- Right-click the Start button, and then Select Task Manager from the menu.
- Select the Processes tab, sort by name, and right-click Windows Explorer.
- Click from the menu to end the mission. Your desktop will disappear for a second, but you will get it back in the next steps.
- Click Run new task, type explorer.exe, and click OK.
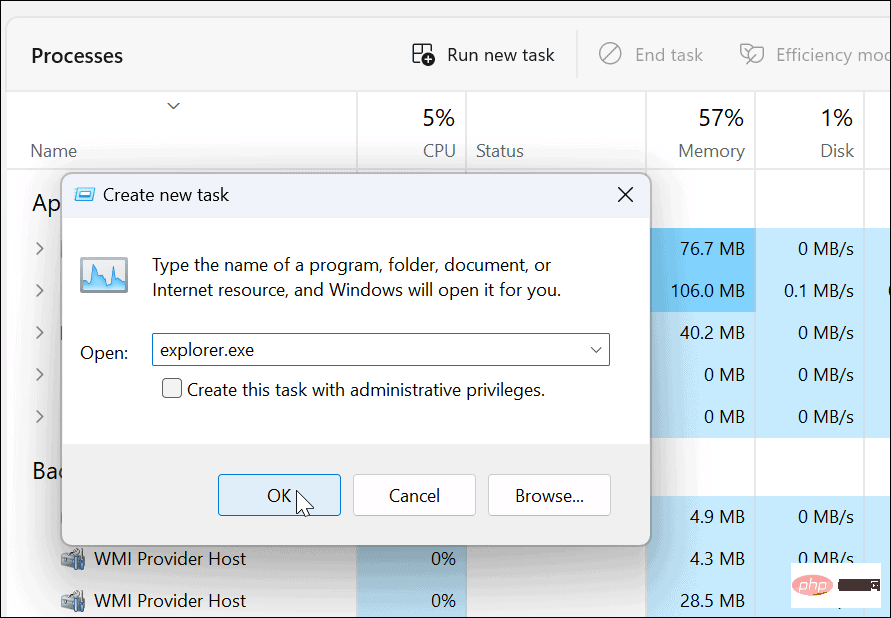
File Explorer will restart and you can see if the drag and drop functionality works.
How to check if there is a problem with your mouse
If drag and drop doesn't work, the problem may be with your mouse. When your mouse needs to be plugged in, unplug it and plug it back into the USB port to make sure it's recognized. If not, you may need to try plugging it into a different known working port on your PC or plugging it into another PC.
Do you have a wireless mouse? Make sure it's connected via Bluetooth or other wireless technology. For example, many Logitech mice use a proprietary receiver that plugs into a USB port.

#If your mouse uses batteries, make sure to replace the old batteries with new ones. If it's a self-charging mouse, leave it plugged in overnight to fully charge. Also, check the mouse and power cord (if applicable) for damage. If the mouse has physical damage, this is most likely why drag and drop isn't working.
If the mouse doesn't work after plugging it into another PC, you need to replace the mouse. So if drag and drop does work, it could be a system issue.
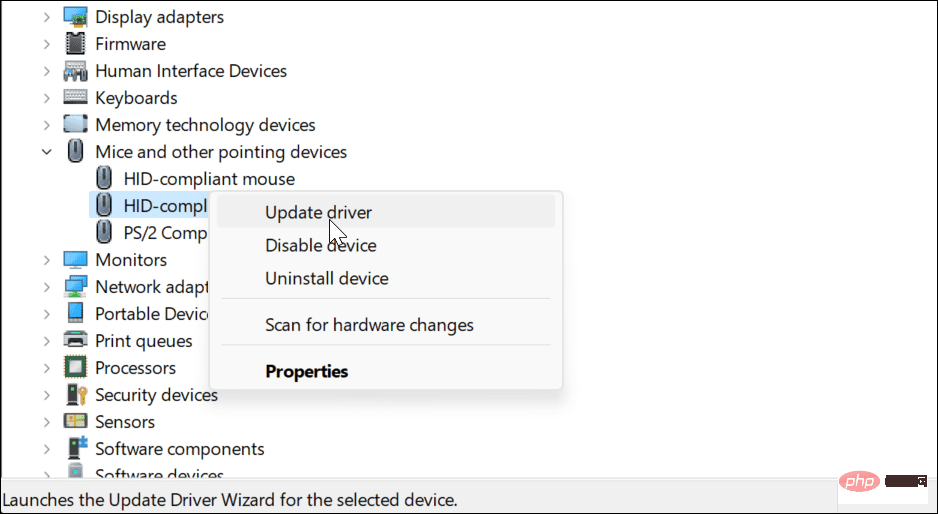
How to Verify Mouse Driver
Other thing to check is whether the mouse driver is up to date. Using Device ManagerMaking sure your mouse driver is up to date is easy.
To check your mouse driver, use the following steps:
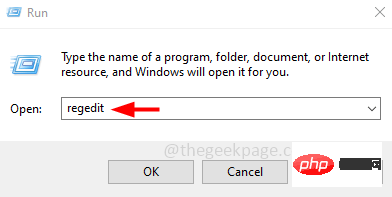
- Press the Windows key R to bring up "Run" Dialog box.
- Type devmgmt.msc and click OK.
- Expand Mouse and other pointing devices
- Right-click the mouse and select Update Driver, Then follow the on-screen instructions operate.

If your mouse has proprietary software, launch it on your PC and check if you can use it to update your mouse.

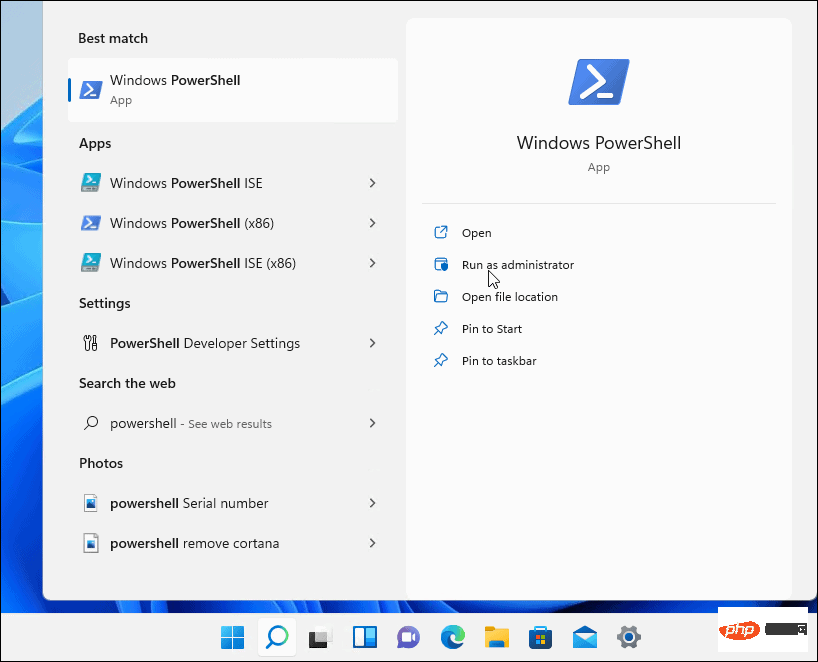
How to run SFC and DISM scans
Drag and drop functionality may not work properly due to corrupted system files. To check, you need to run System File Checker (SFC) and Deployment Image Servicing and Management (DISM) scans to check your PC for corrupt installation files.
SFC scans discover corrupted system files and replace them with known working files. However, it doesn't capture everything, so run a DISM scan to get replacement files directly from Microsoft.
To run SFC and DISM scans, do the following
- Click the Start button or press the Windows key.
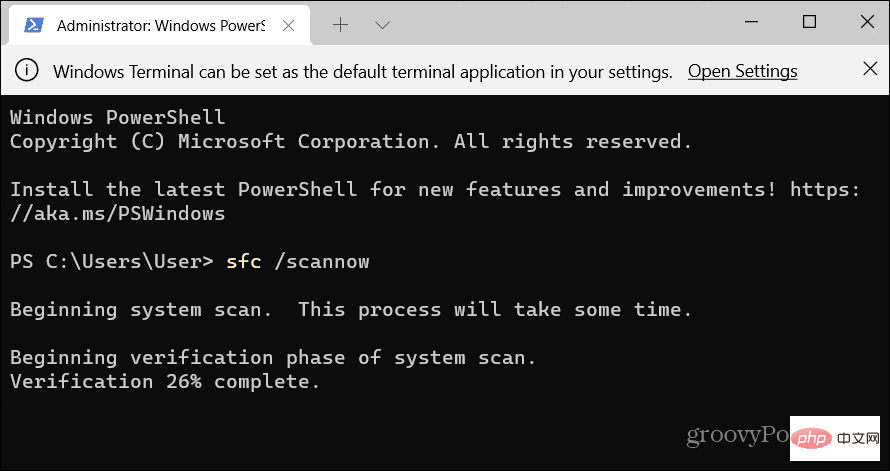
- Search PowerShell and select "Run as administrator" from the Start menu right side.
- Type the following command and press Enter.
sfc/scannow
Copy after login - SFCAfter the scan is complete, run a DISM scan, which replaces corrupted system files with known working files from Microsoft servers .
- While still in the terminal, run the following command:
DISM /在线 /Cleanup-Image /RestoreHealth
Copy after login

Please note that each scan may take a while to complete. Once done, restart your PC and see if drag and drop works properly.
Fix Windows 11 drag and drop not working
If you are encountering an issue where drag and drop is not working, you can fix it using one of the troubleshooting steps above.
If you are left-handed, you can make your mouse left-handed on Windows 11 and 10. If your mouse isn't as responsive as you'd like, you can change mouse sensitivity on Windows. Also, if you're new to Windows 11 and have a touchpad, check out Customizing Touchpad Gestures.
The above is the detailed content of Windows 11 drag and drop not working. For more information, please follow other related articles on the PHP Chinese website!

Hot AI Tools

Undresser.AI Undress
AI-powered app for creating realistic nude photos

AI Clothes Remover
Online AI tool for removing clothes from photos.

Undress AI Tool
Undress images for free

Clothoff.io
AI clothes remover

Video Face Swap
Swap faces in any video effortlessly with our completely free AI face swap tool!

Hot Article
Hot Tools

Notepad++7.3.1
Easy-to-use and free code editor

SublimeText3 Chinese version
Chinese version, very easy to use

Zend Studio 13.0.1
Powerful PHP integrated development environment

Dreamweaver CS6
Visual web development tools

SublimeText3 Mac version
God-level code editing software (SublimeText3)
Hot Topics


 How to run a JAR file on Windows 11 or 10
May 12, 2023 pm 06:34 PM
How to run a JAR file on Windows 11 or 10
May 12, 2023 pm 06:34 PM
Windows 11 is capable of running a large number of file types with or without external third-party applications. Not only does it allow you to perform numerous tasks from the comfort of your PC, but it also ensures that you can take advantage of your PC's raw capabilities. Today, we'll take a look at a complex file type—jar—and tell you how to open it on your Windows 11 or Windows 10 PC. What is a jar file? jar is an archive package format that may or may not contain an executable Java program. These archives can contain Java applications or source code, which can then be used to compile and run applications without having to write separate code for each application. You can use various methods
 How to disable driver signature enforcement in Windows 11
May 20, 2023 pm 02:17 PM
How to disable driver signature enforcement in Windows 11
May 20, 2023 pm 02:17 PM
Microsoft has built several security features into Windows to ensure your PC remains secure. One of them is driver signature enforcement in Windows 11. When this feature is enabled, it ensures that only drivers digitally signed by Microsoft can be installed on the system. This helps most of the users to a great extent as it protects them. But there is a downside to enabling driver signature enforcement. Suppose you find a driver that works for your device, but it is not signed by Microsoft, although it is completely safe. But you won't be able to install it. Therefore, you must know how to disable driver signing in Windows 11
 4 Ways to Enable or Disable Microsoft Store on Windows 11 or 10
May 14, 2023 am 10:46 AM
4 Ways to Enable or Disable Microsoft Store on Windows 11 or 10
May 14, 2023 am 10:46 AM
Here are some possible reasons why you need to disable Microsoft Store: Stop unwanted notifications. Preserves data by limiting the background processes of the Microsoft Store to improve security or privacy Addresses some issues related to the Store or the apps it installs. Restrict children, family members, or other users from downloading applications without permission. Steps to Disable or Enable Windows Store Before following this tutorial, disabling the Microsoft Store will also stop the installation of any apps that require its services. To use the store, users need to enable its service in the same way as blocking it. 1. Block WindowsStore background service Let us from restricting Microsoft Store as
 How to fix Windows 11 activation error 0xc004c060
May 17, 2023 pm 08:47 PM
How to fix Windows 11 activation error 0xc004c060
May 17, 2023 pm 08:47 PM
Why am I encountering Windows 11 activation error 0xc004c060? First make sure you are using genuine Windows and that the license key is valid. Also, check if it was obtained from an official source and if the key is suitable for the installed OS version. If there is an issue with any of these, you may encounter Windows 11 activation error 0xc004c060. So be sure to verify these and if you find everything is in order, move on to the next section. If you obtained the key through unreliable means or believe that the installed copy is a pirated version, you will need to purchase a valid key from Microsoft. In addition to this, misconfigured settings, missing
 0x80010105: How to fix this Windows update error
May 17, 2023 pm 05:44 PM
0x80010105: How to fix this Windows update error
May 17, 2023 pm 05:44 PM
Microsoft regularly releases Windows updates to improve functionality or increase the security of the operating system. You can ignore some of these updates, but it's important to always install security updates. While installing these updates, you may encounter error code; 0x80010105. An unstable connection usually causes most update errors, and once the connection is reestablished you're good to go. However, some require more technical troubleshooting, such as the 0x80010105 error, which is what we will see in this article. What causes WindowsUpdate error 0x80010105? This error may occur if your computer has not been updated in a while. Some users may have permanently disabled W for their reasons
 How to fix runtime error 339 on Windows 11/10
May 13, 2023 pm 11:22 PM
How to fix runtime error 339 on Windows 11/10
May 13, 2023 pm 11:22 PM
There can be several reasons why runtime error 339 occurs when running a program. Some of them may be that some ocx or dll files are missing, damaged or the dll or ocx is not registered. This would be an annoying experience for the smooth execution of the application. Here are some of the possible error messages you may see for Runtime Error 339 Error – Runtime Error 339: Component DUZOCX32.OCX is not registered correctly or the file is missing. Error – Runtime Error 339. Component MSMASK32.ocx or one of its dependencies is not registered correctly; the file is missing or invalid. Error – Runtime Error '339': Component 'FM20.DLL' or one of its dependencies was not correctly noted
 How to disable display scaling for high DPI settings in Windows 11 or 10
May 22, 2023 pm 10:11 PM
How to disable display scaling for high DPI settings in Windows 11 or 10
May 22, 2023 pm 10:11 PM
The default display scaling feature on Windows 10 or later is a core component of the Windows operating system. But sometimes, this feature of certain apps can cause compatibility issues, unreadable text, blurry logos, and ultimately, app crashes. This can be a huge headache if you're dealing with 2160p or higher resolutions. There are many ways to disable the default display scaling feature on high DPI settings. We've selected the best ones and detailed step-by-step instructions for each process. How to Disable Display Scaling on High DPI Settings There is a way, all you have to do is disable high DPI scaling for a single application, and there is a way to do it for the entire Window
 How to disable core parking on Windows 10
May 16, 2023 pm 01:07 PM
How to disable core parking on Windows 10
May 16, 2023 pm 01:07 PM
If you are a Windows user and want to disable the core parking functionality in your system, this article will guide you through the process. What is core parking? The core parking function is a power saving mechanism. It puts some of your processors into a sleep mode that doesn't perform any tasks and consumes very little or no power. This helps reduce energy consumption and therefore heat in the system. These cores are unparked when needed. Few users need to disable this feature, especially gamers. Disabling this feature will improve your system performance. Disable Windows Core Parking using Windows Registry Editor Step 1: Use Windows + R keys simultaneously to open the run prompt. Step 2: At the run prompt