

Fix: Wifi option not showing up in Settings on Windows 11

Sometimes, you will suddenly find that the Wifi option is not showing up in the Windows 11 Settings app. For example, when you go to Settings > Network & Internet, you'll notice that there is no Wifi option listed on the right. This can be annoying as you may want to enable or disable Wifi connection on your PC or make any changes to WiFi properties etc.
Most of the time, the problem occurs due to outdated WiFi drivers or related services that stop functioning. While we mostly opted to use a Wifi card instead of a wired connection, there wasn't a huge difference in internet speed. However, the issue of missing Wifi option may be due to operating system issues. Windows may not be able to find the Wifi card.
Also, with the large number of changes in Windows 11, users are confused and they may find it difficult to deal with this issue. Therefore, we have created a tutorial on how to fix missing Wifi option on Windows 11 PC. Let’s see how:
Method 1: Restart the WLAN Autoconfig service
Sometimes the problem may simply be that the WLAN AutoConfig service has stopped running. Therefore, it is recommended to start the required service and check if it helps solve the problem. That's it:
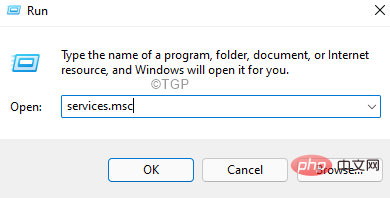
Step 1: Press the Win R keys simultaneously on your keyboard to launch the Run Command window.
Step 2: In the Run Command window, type services.msc in the search bar and press EnterTo open Service Manager.
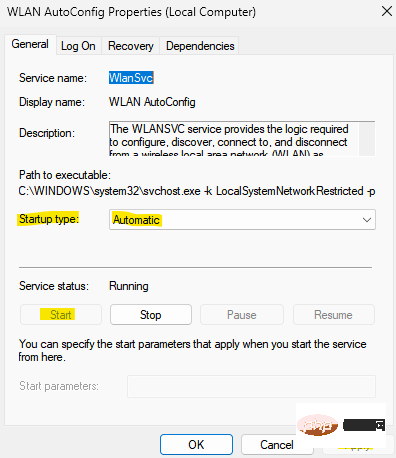
Step 3: In the "Service" window, go to the right and click on "Name" column, look for the WLAN AutoConfig service.
Double-click it to open its Properties window.
Step 4: In the WLAN Auto-Configuration Properties window, under the General tab, go to Service Status section and check if it is already running.
If not, please click the "Start" button to start the service.
Step 5: Now, go to the "StartupType" field and select "Automatic" from the drop-down list.
Press Apply and then OKSave changes and exit.
Now, check if the Wifi option shows up in the Settings app.
Method 2: By updating the network driver
Outdated network drivers can often be the cause of Wifi not showing up in setup issues. Follow these instructions to update your network drivers and possibly fix the glitch:
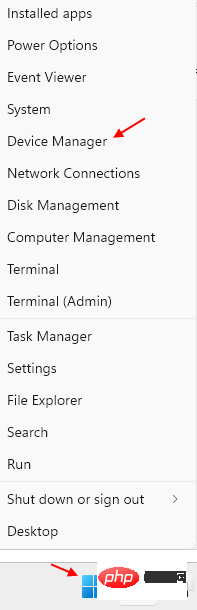
Step 1: Right-click Start and select Device Manager# from the menu ##.
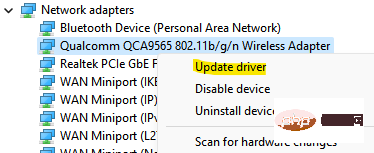
Step 2: In the Device Manager window that opens, navigate to Network Adapters section and click to expand it.
Now, right-click on your PC’s network driver and selectUpdate Driver.
Step 3:Next, in the "Update Driver" window, click "Browse My Computer to find the driver".

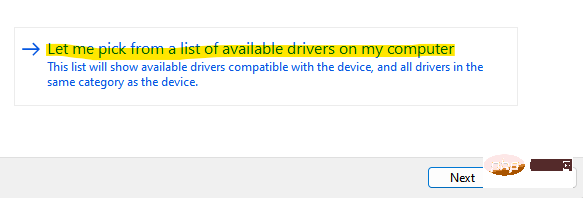
Step 4: In the next window, select the Let me select from a list of drivers available on my computer option .
Step 5: Now, in the next screen, check the box next to Show compatible hardware.
Select themodel from the list and click Next.
Note,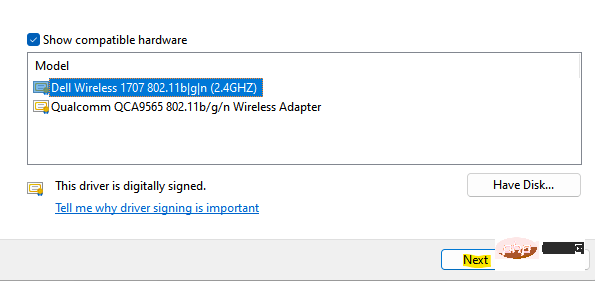
Win I keys simultaneously on your keyboard to open the Settings app.
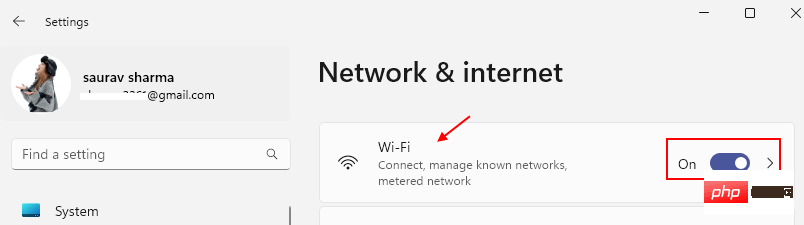
Step 2: In the Settings app, clickNetwork & Internet on the left side of the pane.
Step 3; Now, go to the right side and check if WiFi option is enabled
Now, click on it.
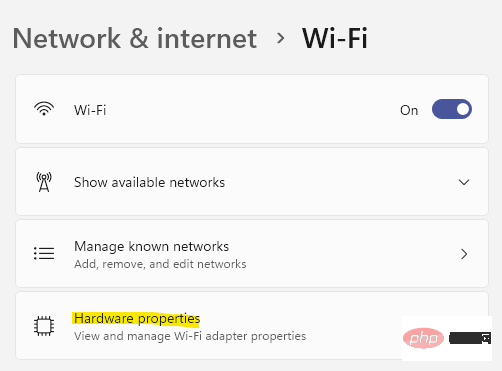
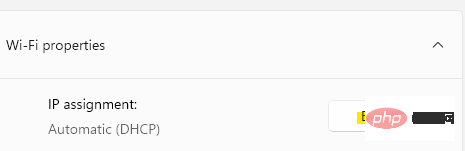
Step 4: Next, in the WiFi screen, click on the Hardware Properties option at the bottom.
Step 5: Now, under WiFi Properties on the right, go to IP Assignment and click on Edit next to it.
Step 6: In the Edit IP settings pop-up window, click the drop-down menu to select Automatic (DHCP).
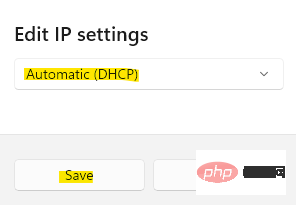
Press Save to save changes and return to the WiFi window.
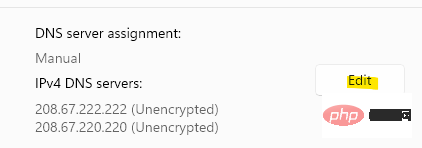
Step 7: Now, go to the DNS Server Assignment option and click on the Edit button next to it.
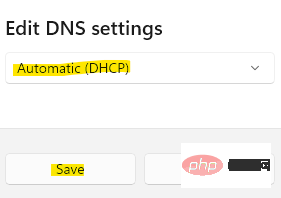
Step 8: Same as step 6, in the pop-up Edit DNS settings, select Automatic (DHCP) from the drop-down list, and then click Save to apply changes.
Now you should be able to see the WiFi option in the Settings window.
In addition to the above methods, if your PC motherboard comes with a wireless network card, or you purchased a separate Wifi card, you can also check the wireless network card first. Make sure the WiFi card is properly seated in the motherboard, because if not, Windows won't recognize it and you'll have issues with missing WiFi options.
The next most common fix is to simply restart your device and check if this helps restore the WiFi options, as in most cases restarting helps resolve the issue. If not, completely turn off your WiFi router by unplugging the power cord from the power switch. Next, wait about 10 minutes before reconnecting the cables and turning on the router. Now, check if you can see the WiFi option.
Method 4: By uninstalling/reinstalling the network driver
If the driver is corrupted or damaged, just updating the driver will not solve the problem, therefore, you can try to uninstall and install the driver again program to check if it redisplays the Wifi icon in the Settings app. Let’s see how:
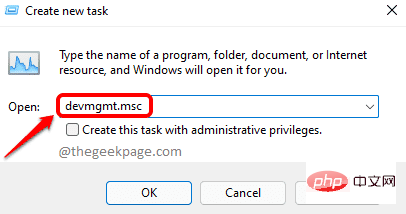
Step 1: Press the Win R shortcut key on your keyboard to open the Run Command window.
Step 2: In the search field, enter devmgmt.msc and press Enter to open Device Manager window.
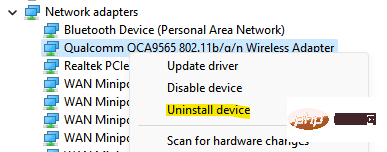
Step 3: In the Device Manager window, expand the Network Adapters section.
Now, find your wireless device, right-click on it and select Uninstall Device.
Step 4: You will now see the Uninstall Device prompt.
Check the box next to Try to remove the driver for this device and press the Uninstall button to confirm the action.
After the uninstallation is complete, exit the Device Manager window and restart your PC.
When restarting, the device will automatically reinstall.
Now, check the Wifi icon in the Settings app and it should be back.
Method 5: By changing power management
Most likely, the missing Wifi option in the Settings app could also be due to a change in the driver's power settings. Here's how you can change it to see if it helps solve the problem:
Step 1:Press the Win X keys simultaneously on your keyboard to Open the context menu and select Device Manager from the list.
Step 2: It opens the Device Manager window.
Here, click Network Adapters to expand the section.
Now, right-click on your network driver and select Properties.
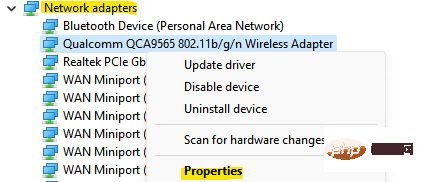
Step 3: In the "Properties" dialog box, select "Power Management" Tab.
Now, uncheck the checkbox next to Allow the computer to turn off this device to save power.
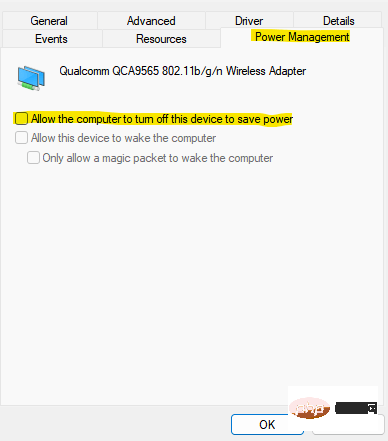
Press OK to save changes and return to Device Manager. Now, close the Device Manager window and restart your device.
You should now be able to find the Wifi option in the Settings app on your Windows 11 PC.
Method 6: By enabling all services in the system configuration
You can also try enabling all Windows services to check if it helps resolve the missing Wifi option issue. That's it:
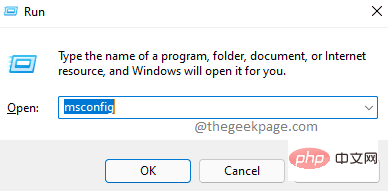
Step 1: Press the Win R hotkey to open the "Run" command box.
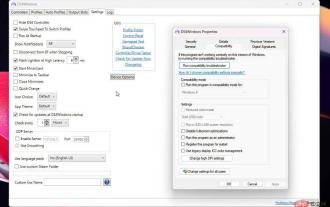
Step 2: In the Run Command search field, type msconfig and press OK to open System Configuration window.
Step 3: In the "System Configuration" window, go to "Services" Tab.
Now, navigate to the lower right corner of the window and press the Enable all button.
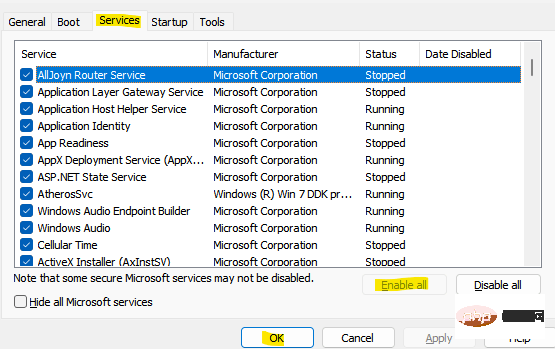
Press to apply and then press OK to save changes and exit.
Now, go to your Settings app and check if the WiFi option is shown.
Method 7: Reset the Network Adapter via Command Prompt
If none of the above methods work, you can try resetting the network adapter using the Command Prompt with administrator privileges . That's it:
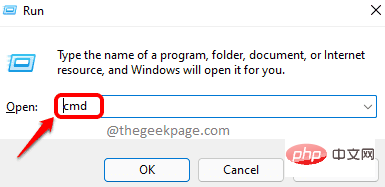
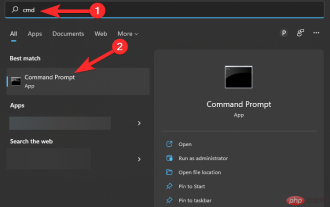
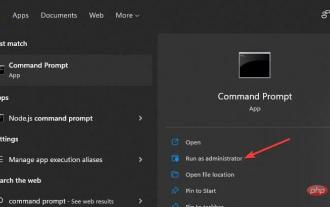
Step 1: Right-click the Start menu and select Run.
Step 2: In the open Run Command window, type cmd in the search bar, and then press Ctrl at the same time Shift Enter key to open an elevated Command Prompt window.
Step 3: In the Command Prompt( admin) window, run the following command and press Enter key Reset your network adapter:
Netsh winsock 重置
Step 4: Now, enter the following command and press Enter key to complete Action:
Netsh int ip reset resetlog.txt
Once completed, close the command prompt window and you should now be able to see the WiFi network option in the settings window.
Also, make sure the WiFi router is as close as possible to your PC for better network connection and the WiFi option should be displayed.
Also, make sure your PC is always updated to avoid any glitches due to pending updates.
The above is the detailed content of Fix: Wifi option not showing up in Settings on Windows 11. For more information, please follow other related articles on the PHP Chinese website!

Hot AI Tools

Undresser.AI Undress
AI-powered app for creating realistic nude photos

AI Clothes Remover
Online AI tool for removing clothes from photos.

Undress AI Tool
Undress images for free

Clothoff.io
AI clothes remover

Video Face Swap
Swap faces in any video effortlessly with our completely free AI face swap tool!

Hot Article
Hot Tools

Notepad++7.3.1
Easy-to-use and free code editor

SublimeText3 Chinese version
Chinese version, very easy to use

Zend Studio 13.0.1
Powerful PHP integrated development environment

Dreamweaver CS6
Visual web development tools

SublimeText3 Mac version
God-level code editing software (SublimeText3)
Hot Topics


 How to run a JAR file on Windows 11 or 10
May 12, 2023 pm 06:34 PM
How to run a JAR file on Windows 11 or 10
May 12, 2023 pm 06:34 PM
Windows 11 is capable of running a large number of file types with or without external third-party applications. Not only does it allow you to perform numerous tasks from the comfort of your PC, but it also ensures that you can take advantage of your PC's raw capabilities. Today, we'll take a look at a complex file type—jar—and tell you how to open it on your Windows 11 or Windows 10 PC. What is a jar file? jar is an archive package format that may or may not contain an executable Java program. These archives can contain Java applications or source code, which can then be used to compile and run applications without having to write separate code for each application. You can use various methods
 How to install CAB files on Windows 11
Apr 30, 2023 pm 10:10 PM
How to install CAB files on Windows 11
Apr 30, 2023 pm 10:10 PM
What is a CAB file? The extension of CAB file is .cab, which is the abbreviation of WindowsCabinet file. This is a compressed file typically used to compress software installation packages such as device drivers or update files. CAB files support lossless compression, which makes the format ideal for compressing files where it is critical that the files can be extracted accurately, such as drivers and other updates. How to Install a CAB File on Windows 11 Using Command Prompt There are multiple ways to install a CAB file on Windows 11. One of the methods is to use command prompt to extract and install the files. You can also use the newer Windows PowerShell
 How to safely set high priority for apps in Windows 11?
May 06, 2023 pm 06:28 PM
How to safely set high priority for apps in Windows 11?
May 06, 2023 pm 06:28 PM
Windows does a great job of allocating system resources to the processes and programs that need it most by assigning priorities to them. Most applications you install will run perfectly fine at the default "normal" priority level. Sometimes, however, you may need to run a program, such as a game, at a higher level than the default normal level to improve its performance. But this comes at a cost, and it's a deal worth pondering. What happens when you set an app to high priority? Windows has a total of six priority levels for running different processes and programs - low, below normal, normal, above normal, high and real-time. Windows will rank and queue applications based on their priority. The higher the priority, the application
 How to fix Windows 11 not detecting your PS4 controller issue
May 09, 2023 pm 04:19 PM
How to fix Windows 11 not detecting your PS4 controller issue
May 09, 2023 pm 04:19 PM
There are many different ways you can play video games on your Windows 11 computer. A classic mouse and keyboard, Xbox controller or PlayStation 4 controller; all run on Microsoft's latest operating system. But there are reports that the PS4 controller may not be recognized on your Windows 11 PC. This may be due to outdated Bluetooth drivers not working properly or DS4Windows not working properly. What are the fixes for PS4 controller not recognized? Your PS4 can connect to your PC via Bluetooth, but many games don't support the controller and prefer Xbox devices. This is how you download and install DS4Windo
 3 Ways to Open System 32 Folder on Windows 11 or 10
May 04, 2023 pm 10:01 PM
3 Ways to Open System 32 Folder on Windows 11 or 10
May 04, 2023 pm 10:01 PM
What is the System32 folder? System32 is one of the main folders used by Windows. During Windows installation, all necessary files and folders that are critical for the proper functioning of Windows are copied to this folder. These include important system files, related executable files used by Windows utilities, dynamic link libraries (DLLs), and even some software files are copied to this folder. However, don't be fooled by the name System32. This is true for both 32-bit and 64-bit computers. In a 64-bit machine, the System32 folder hosts the 64-bit files, while the 32-bit files are located in
 How to fix DISM 87 error in Windows 11?
May 09, 2023 am 09:31 AM
How to fix DISM 87 error in Windows 11?
May 09, 2023 am 09:31 AM
Windows 11 users are facing issues dealing with many error codes caused by different issues. DISM error 87 is a command line error. DISM means DeploymentImageServicingManagement, and its main job is to help organize virtual disks. It manages split Windows Image Format (WIM) files, all-flash utility files, virtual hard disks (VHD) and more. You can access the tool on Command Prompt or Windows PowerShell. We use this tool to repair Windows image issues. This article will introduce how to fix the problem in Windows 11
 7 Ways to Fix Unable to Enumerate Objects in Containers
May 12, 2023 pm 01:43 PM
7 Ways to Fix Unable to Enumerate Objects in Containers
May 12, 2023 pm 01:43 PM
While trying to change the permissions of a file or folder, you may often encounter the error - Unable to enumerate objects in container Access is denied. Although as an administrator you can change the access rights, sometimes even an administrator may encounter the same error message. This is a common mistake that is usually made by users on different forums. In this case, even the administrator cannot change the permissions of a specific user or other user groups when access is denied on Windows 10/11. Additionally, many users also face an issue of not being able to enumerate objects during Azure file sharing, which can apparently be solved by assigning the appropriate RBAC role (the elevated participant role for SMB shares that store file data). In this article we
 How do I know if PHP is installed on Windows?
May 01, 2023 pm 09:31 PM
How do I know if PHP is installed on Windows?
May 01, 2023 pm 09:31 PM
How to Check PHP Version on Windows 10 or 11 Before following this tutorial, make sure that PHP is configured correctly on your Windows system. In addition to this, you will need a command prompt or terminal access. Check PHP Version Using Command Prompt or Powershell The best and easiest way to identify the installed PHP version is to use its command line tool. However, to use, the user must have access to a Windows command line application such as CMD. Go to the Windows 10 or 11 search box and type CMD or Powershell. You can use any of them. When the icon appears on these