

How to install macOS on a new SSD

How to use macOS Recovery to install macOS on a new SSD
On any Mac built after 2009, there is a built-in recovery system. This allows you to boot your Mac into recovery mode. In this mode, you can repair the internal disk, restore files from a Time Machine backup, get online help, or reinstall macOS.
You must be able to connect to the Internet to use these tools. You can use the macOS installation tool to install macOS on a new SSD installed in your computer.
To use Internet Recovery to install macOS on an SSD:
- Follow the manufacturer's instructions for your specific model of Mac to install the new SSD into your in the computer.
- If you have an Intel Mac, press the power button to start your computer, then immediately hold Cmd Option R.
- For M1 Macs, press and hold the power button until you see a message informing you that if you hold down the button, you will access startup options. Press and hold until the options appear, then select Options > Restore.
- Once you see the message that recovery is starting, you can release the keys.

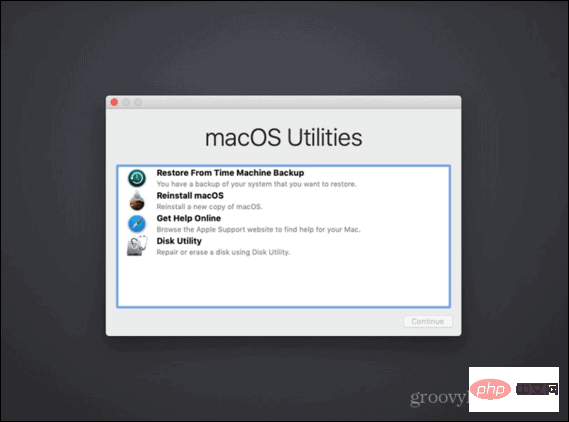
- Once the recovery has finished loading, you will see the macOS Utilities available.
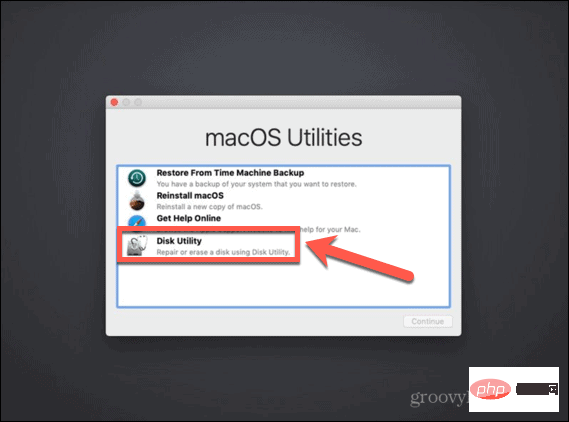
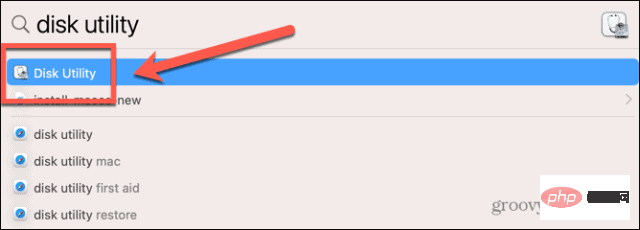
- Before installing macOS, you need to format your new SSD. Select Disk Utility.
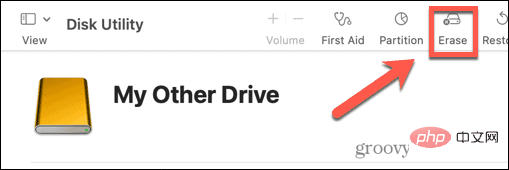
- Select your new SSD in the left menu and click Erase.
- Fill in the required details for the new drive, such as name and format. For SSDs, APFS is the best choice for format, but if you have an older Mac, you may want to select Mac OS Extended as APFS is not available on macOS Sierra or older old version.
- If there is an option to select the scheme, please select GUID Partition Map.
- Wait for the drive to finish formatting, then press Cmd Q to return to the main menu.
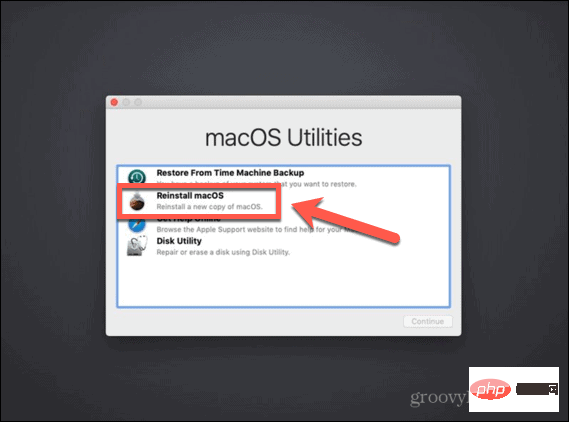
- Click to reinstall macOS.
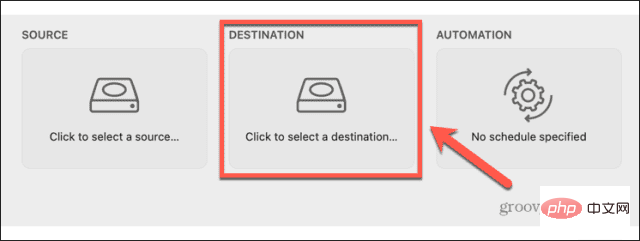
- Follow the on-screen instructions, making sure to select the new SSD drive as the destination.
- After macOS completes installation, give your Mac a try.

How to install macOS on a new SSD using a bootable installer
Another option for installing macOS to a new SSD is to create a bootable installer. This is especially useful if you want to install macOS on multiple computers, as it saves you from downloading the installer each time. You will need a flash drive or external disk drive with at least 15 GB of free space. It should be in Mac OS Extended format.
How to create a bootable macOS installer
The first step in using the installer to install macOS on a new SSD is to create the installer itself. You'll need a suitable flash drive or external hard drive and a copy of the macOS installer for the version of macOS you want.
To create a bootable macOS installer:
- Download the macOS installer for the version of macOS you want to install on your SSD and save it in your Applications folder.
- Plug the external drive into your computer.
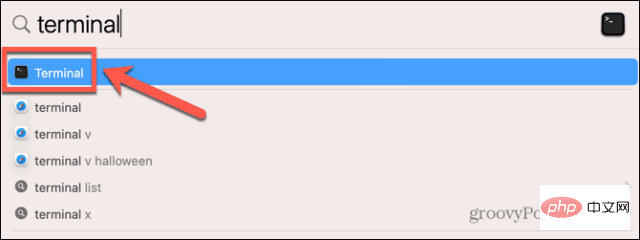
- Press Cmd Space and type Terminal to open Spotlight Search.
- Double-click the Terminal application in the results.
- Enter one of the following commands, depending on the operating system you are creating the bootable installer for. Replace MyDrive with the name of your flash drive or external hard drive.
- Ventura: sudo /Applications/Install\ macOS\ Ventura.app/Contents/Resources/createinstallmedia –volume /Volumes/MyDrive
- Monterey: sudo /Applications/Install\ macOS\ Monterey.app/Contents/Resources/createinstallmedia –volume /Volumes/MyDrive
- Big Sur: sudo /Applications/Install\ macOS\ Big\ Sur.app/Contents/Resources/createinstallmedia –volume /Volumes/MyDrive
- Catalina: sudo /Applications/Install\ macOS\ Catalina.app/ Contents/Resources/createinstallmedia –volume /Volumes/MyDrive
- Mojave: sudo /Applications/Install\ macOS\ Mojave.app/Contents/Resources/createinstallmedia –volume /Volumes/MyDrive
- High Sierra: sudo /Applications/Install\ macOS\ High\ Sierra.app/Contents/Resources/createinstallmedia –volume /Volumes/MyDrive
- Sierra: sudo /Applications/Install\ macOS\ Sierra.app/Contents/Resources/createinstallmedia –volume /Volumes/MyDrive –applicationpath /Applications/Install\ macOS\ Sierra.app
- El Capitan: sudo /Applications/Install\ OS\
- Enter
- . Enter your administrator password when prompted and press Enter key
- . Type Y
- to confirm erasing the target volume. Click OK
- to allow the terminal to access files on the bootable disk. After the process is complete, exit Terminal
- and eject the bootable disk. It's ready to use now. How to install macOS using the bootable installer
The way you use the installer will be slightly different depending on whether you have an Intel Mac or a newer one with Apple Silicon Mac.
To install macOS on an Intel Mac using the bootable installer:Follow the manufacturer's instructions for your computer model to install the SSD into your in the computer.
- Insert the bootable installer you created into your Mac.
- Turn on your Mac and immediately hold down the Option
- key. When you see the screen showing the bootable volume, you can release the Option
- key. Select the drive that contains the bootable installer and press Enter key
- . You may be asked to select a language.
- Select Install macOS
- and click Continue. Follow the instructions to complete the installation of macOS.
Follow the manufacturer's instructions for your computer model Install it into your computer.
- Insert the bootable installer you created into your Mac.
- Hold the power button on your Mac.
- When you see the startup option, you can release the power button.
- Select the drive containing the bootable installer and click Continue
- . Follow the instructions to complete the installation of macOS.
- How to use Carbon Copy Cloner to install macOS on a new SSD
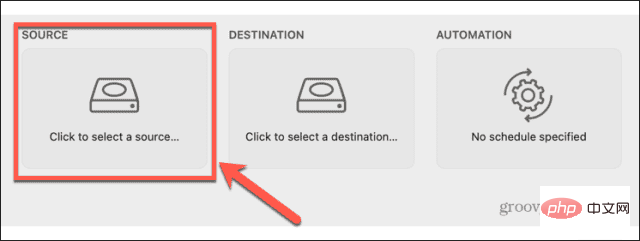
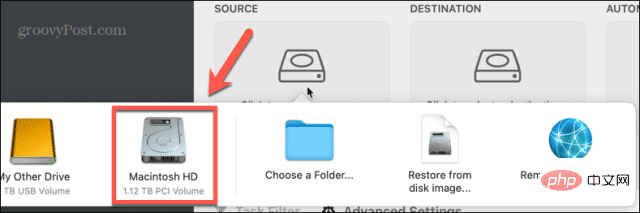
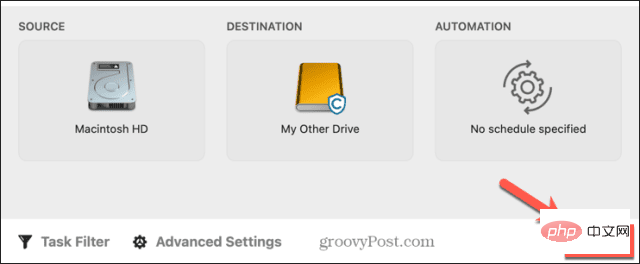
Installing any operating system on a computer can go wrong, so always back it up before making any changes to your Mac is a good idea. If you want to make sure macOS is installed correctly on your SSD before installing it, you can install it in an external hard drive enclosure. You can then use Carbon Copy Cloner to install macOS on the SSD as if it were an external disk.
This allows you to test the installation of macOS before installing the SSD in your computer. This means you can rest assured that the installation is going as planned before you even start turning on your Mac.
What is Carbon Copy Cloner?
Carbon Copy Cloner is an application that allows you to clone a copy of your hard drive to an external drive or flash drive. Although this is a paid app, there is a 30-day free trial that allows you to use the full features of the app.
To install macOS on an SSD using Carbon Copy Cloner:Learning how to install macOS on a new SSD can help you breathe new life into your old Mac, or allow you to upgrade your current one SSD. There are many ways you can get the most out of your Mac.

Get more from your Mac
The above is the detailed content of How to install macOS on a new SSD. For more information, please follow other related articles on the PHP Chinese website!

Hot AI Tools

Undresser.AI Undress
AI-powered app for creating realistic nude photos

AI Clothes Remover
Online AI tool for removing clothes from photos.

Undress AI Tool
Undress images for free

Clothoff.io
AI clothes remover

Video Face Swap
Swap faces in any video effortlessly with our completely free AI face swap tool!

Hot Article
Hot Tools

Notepad++7.3.1
Easy-to-use and free code editor

SublimeText3 Chinese version
Chinese version, very easy to use

Zend Studio 13.0.1
Powerful PHP integrated development environment

Dreamweaver CS6
Visual web development tools

SublimeText3 Mac version
God-level code editing software (SublimeText3)
Hot Topics


 Samsung to launch PM1753 data center-grade SSD: 14.8 GB/s sequential read, 3.4 million IOPS random read
Aug 08, 2024 pm 04:40 PM
Samsung to launch PM1753 data center-grade SSD: 14.8 GB/s sequential read, 3.4 million IOPS random read
Aug 08, 2024 pm 04:40 PM
According to news from this site on August 8, Samsung demonstrated a variety of new SSD products at the 2024 Flash Memory Summit (FMS) - PM1753, BM1743, PM9D3a, PM9E1, and also tested the ninth generation QLCV-NAND, TLCV-NAND and CMM-D –DRAM, CMM-HTM, CMM-HPM, and CMM-BCXL technologies were introduced. BM1743 uses QLC flash memory with a capacity of up to 128TB, a continuous read speed of 7.5GB/s, a write speed of 3.5GB/s, a random read of 1.6 million IOPS, and a write of 45,000 IOPS. It adopts a 2.5-inch form factor and a U.2 interface, and is idle Power consumption is reduced to 4W, and after subsequent OTA updates, only
 How to set up WeChat Mac to automatically convert voice messages into text - How to set up voice to text conversion
Mar 19, 2024 am 08:28 AM
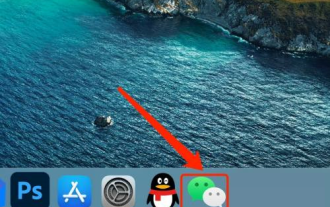
How to set up WeChat Mac to automatically convert voice messages into text - How to set up voice to text conversion
Mar 19, 2024 am 08:28 AM
Recently, some friends have consulted the editor about how to set up WeChat Mac to automatically convert voice messages into text. The following is a method for setting up WeChat Mac to automatically convert voice messages into text. Friends in need can come and learn more. Step 1: First, open the Mac version of WeChat. As shown in the picture: Step 2: Next, click "Settings". As shown in the picture: Step 3: Then, click "General". As shown in the picture: Step 4: Then check the option "Automatically convert voice messages in chat to text". As shown in the picture: Step 5: Finally, close the window. As shown in the picture:
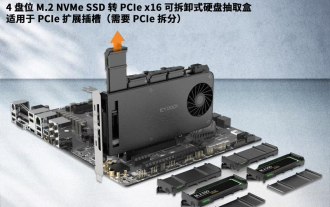 Esidak launches MB204MP-B four-bay M.2 solid-state drive box: supports PCIe 5.0, 2399 yuan
Jul 22, 2024 am 11:55 AM
Esidak launches MB204MP-B four-bay M.2 solid-state drive box: supports PCIe 5.0, 2399 yuan
Jul 22, 2024 am 11:55 AM
This website reported on July 22 that ICEDOCK launched the ExpressSlotMB204MP-B four-bay M.2 solid-state drive extraction box on the 19th of this month. The extraction box adopts the shape of a PCIeAIC add-on card, requires PCIe6Pin auxiliary power supply, has a three-dimensional dimension of 204.5×21.59×126.9 (mm), supports the PCIe5.0 protocol, and can provide 16GB/s PCIe5.0×4 full-speed bandwidth for each solid-state drive. . Esidak ExpressSlotMB204MP-B SSD extraction box is compatible with M.22230/2242/2260/2280 SSDs. However, the thickness of each side of these SSDs must not exceed 1.5mm.
 Phison comprehensively showcases Pascari enterprise-class SSD products, including 100DWPD ultra-high endurance model
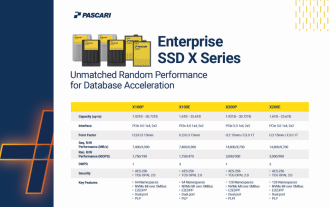
Aug 07, 2024 pm 06:58 PM
Phison comprehensively showcases Pascari enterprise-class SSD products, including 100DWPD ultra-high endurance model
Aug 07, 2024 pm 06:58 PM
According to news from this site on August 7, Phison fully demonstrated its Pascari enterprise-class solid-state drive product line at the FMS2024 Summit. This product line covers 5 major categories and is targeted at various enterprise-level and data center applications. Here is a brief introduction on this site: X Series - Best Performance Phison's X Series enterprise-class SSDs are "designed for extreme writing requirements." In addition to the first X200 family, Phison also launched two PCIe 4.0 products, X100P and X100E, respectively 1DWPD and 3DWPD, with maximum capacities of 32TB Note 1. Both X100P and
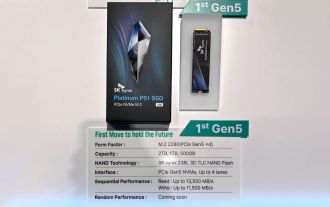 SK Hynix demonstrates Platinum P51 SSD: sequential read peak 13500 MB/s
Mar 20, 2024 pm 02:36 PM
SK Hynix demonstrates Platinum P51 SSD: sequential read peak 13500 MB/s
Mar 20, 2024 pm 02:36 PM
According to news from this website on March 20, SK Hynix recently attended the NVIDIA GTC2024 conference and demonstrated the first Gen5NVMe solid-state drive series for the consumer market-Platinum P51M.22280NVMeSSD. PlatinumP51 is similar to GoldP31 and PlatinumP41. It uses a self-designed SSD master control, but the main highlight is the use of PCIeGen5 and 238-layer TLCNAND flash memory. Note from this site: Hynix acquired SSD master control manufacturer LAMD in 2012, giving it the ability to design its own master control. SK Hynix said at the booth that Platinum P51 will be launched in 500GB, 1TB and 2
 Samsung introduces BM1743 data center-grade SSD: equipped with v7 QLC V-NAND and supports PCIe 5.0
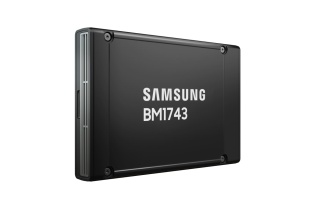
Jun 18, 2024 pm 04:15 PM
Samsung introduces BM1743 data center-grade SSD: equipped with v7 QLC V-NAND and supports PCIe 5.0
Jun 18, 2024 pm 04:15 PM
According to news from this website on June 18, Samsung Semiconductor recently introduced its next-generation data center-grade solid-state drive BM1743 equipped with its latest QLC flash memory (v7) on its technology blog. ▲Samsung QLC data center-grade solid-state drive BM1743 According to TrendForce in April, in the field of QLC data center-grade solid-state drives, only Samsung and Solidigm, a subsidiary of SK Hynix, had passed the enterprise customer verification at that time. Compared with the previous generation v5QLCV-NAND (note on this site: Samsung v6V-NAND does not have QLC products), Samsung v7QLCV-NAND flash memory has almost doubled the number of stacking layers, and the storage density has also been greatly improved. At the same time, the smoothness of v7QLCV-NAND
 How to format a drive using GUID on Mac
Apr 12, 2024 am 09:13 AM
How to format a drive using GUID on Mac
Apr 12, 2024 am 09:13 AM
Formatting the drive of your Mac system is crucial for proper functioning. It helps prevent various system problems and makes your Mac more stable overall. While naturally Mac supports various partitioning schemes, GUID offers more modern and versatile features compared to other options. Also essential for newer Macs and supports larger drives, giving you the best compatibility and stability. This guide will take an in-depth look at how to format a drive using a GUID on macOS. That said, let's get started. Why GUID is important for macOS installation A GUID (full form of Globally Unique Identifier) is a partitioning scheme that helps install and run the macOS operating system. It is better than traditional MBR (main lead
 MacBook Pro, iMac to get the M4 upgrade later this year followed by MacBook Air in spring of 2025, claims reliable tipster
Jun 25, 2024 am 06:35 AM
MacBook Pro, iMac to get the M4 upgrade later this year followed by MacBook Air in spring of 2025, claims reliable tipster
Jun 25, 2024 am 06:35 AM
Ever since the Apple M4-powered OLED iPad Prolineuparrived, Apple Silicon aficionados have been eagerly awaiting the arrival of the M4 SoC on the Mac lineup. The M4 was undeniably a major leap forward in both compute and graphics performance - leapfr