

How to use Redis in Node.js? It turns out it's that simple!

How to use Redis in
Node? The following article will introduce to you how to use Redis in Node.js. You will find that it is so simple. I hope it will be helpful to you!

In the previous article, we actually left two places that can be optimized with redis:
- One is us When logging in, the server has implemented
tokengeneration and verification of thetokeninformation sent by the client throughJWT. [Related tutorial recommendations: nodejs video tutorial, Programming video] - implements the function of liking articles by writing the like data directly into the database
JWT token The implementation method is to put the basic information directly in token to facilitate the use of distributed systems, but we do not set a limited period (this is possible implemented), and the server cannot actively invalidate token. Redis naturally supports expiration time, and can also allow the server to actively expire token.
Of course, this does not mean that JWT token is not as good as redis token implementation. It depends on the usage scenario. Here we do not discuss which one is better, but only provide an implementation solution to let everyone know how to implement it.
1. Get to know redis
For front-end friends, Redis may be relatively unfamiliar. First, let’s get to know
What is Redis? What
Redis is an open source (BSD licensed), memory-based data structure storage system. It can be used as a database, cache and message middleware. It is one of the most popular NoSQL databases now. .
It has the following characteristics:
- Fast speed
- A single node can read 110,000 times/s and write 81,000 times/s
- Run based on memory , high performance
- Implemented in C language, closer to the operating system
- Persistence
- Data updates will be asynchronously saved to the hard disk (RDB And AOF
##Multiple data structures - Not only supports simple key-value type data
- It also supports: string, hash, list, Sets, ordered sets
Support multiple programming languages, etc.
Redis typical usage scenarios
Caching
Caching can be said to be one of the most commonly used functions of Redis. Reasonable caching can not only speed up access, but also reduce the pressure on the back-end database.Ranking system
Using the characteristics of Redis lists and ordered collections, a ranking system can be created. The ranking system is currently used in shopping malls, news, blogs, etc. It is indispensable.Counter application
The application of counter is basically the same as the ranking system, which is a common requirement of most websites, such as the play count of video websites, The number of views on e-commerce websites, etc., but these numbers are generally relatively large. If stored in a relational database, it will still pose a great challenge to MySQL or other relational databases, and Redis can basically be said to naturally support counter applications.(Live video) message barrage
The online user list, gift rankings, barrage messages and other information in the live broadcast room are all suitable for storage using the SortedSet structure in Redis .For example, barrage messages can be sorted and returned usingZREVRANGEBYSCORE. In Redis5.0, new zpopmax and zpopmin commands are added. More convenient for message processing.
Talking on paper is ultimately shallow, you must practice it~I will not introduce the installation and simple use of Redis one by one here. Here are two articles I wrote before: You can quickly install, understand Redis data types and Commonly used commands.
Visual client
UseRedisClient under Windows, and Redis Desktop Manager## under mac #RedisClient download link: https://github.com/caoxinyu/RedisClient
After downloading, double-click the
redisclient-win32.x86.2.0.exe file to run After
 is started, click
After connecting, you can see the overall situation:
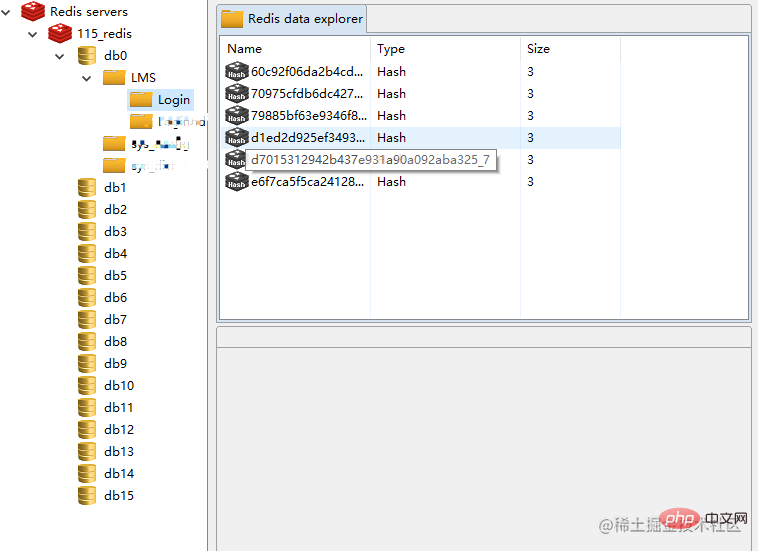
Different from SQL-type data, redis does not provide the operation of creating a new database because it comes with 16 (0 -15) databases (0 database is used by default). In the same library, key is the only one that exists and is not allowed to be repeated. It is like a "key" and can only open one "lock". The essence of key-value storage is to use key to identify value. When you want to retrieve value, you must use the key corresponding to value to search.
Redis recognition is a prerequisite for the article. This is the end of the article. Let’s get to the point~
This article mainly uses Redis to implement the cache function.
2. Using
in Nest.js Version:
| Library | Version |
|---|---|
| Nest.js | V8.1.2 |
project is based on the Nest.js 8.x version, which is different from the Nest.js 9.x version. The following article specifically sorts out the differences between the two versions. Instructions and how to upgrade from V8 to V9 will not be discussed here.
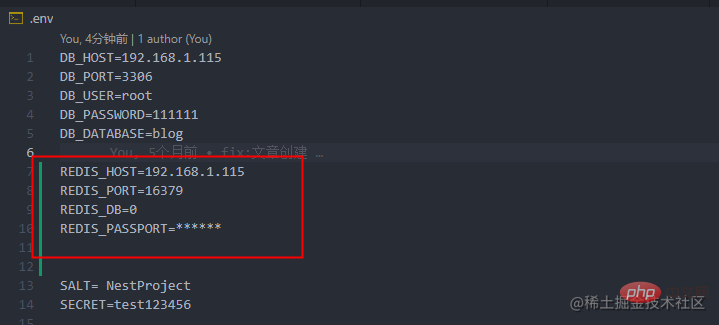
First, we connect Redis in the Nest.js project. The parameters required to connect Redis:
REDIS_HOST:Redis 域名
REDIS_PORT:Redis 端口号
REDIS_DB: Redis 数据库
REDIS_PASSPORT:Redis 设置的密码
Write the parameters into .env and .env. prodIn the configuration file:
Use the method officially recommended by Nest, which only requires 3 simple steps:
1. Introduce dependency files
npm install cache-manager --save
npm install cache-manager-redis-store --save
npm install @types/cache-manager -D
Nest Provides a unified API for various cache storage. The built-in data storage is in-memory, but you can also use cache-manager to use other solutions. For example, use Redis for caching.
To enable caching, import ConfigModule, and call register() or registerAsync() to pass in the response configuration parameters.
2. Create module file src/db/redis-cache.module.ts, implemented as follows:
import { ConfigModule, ConfigService } from '@nestjs/config';
import { RedisCacheService } from './redis-cache.service';
import { CacheModule, Module, Global } from '@nestjs/common';
import * as redisStore from 'cache-manager-redis-store';

@Module({
  imports: [
    CacheModule.registerAsync({
      isGlobal: true,
      imports: [ConfigModule],
      inject: [ConfigService],
      useFactory: async (configService: ConfigService) => {
        return {
          store: redisStore,
          host: configService.get('REDIS_HOST'),
          port: configService.get('REDIS_PORT'),
          db: 0, //目标库,
          auth_pass:  configService.get('REDIS_PASSPORT') // 密码,没有可以不写
        };
      },
    }),
  ],
  providers: [RedisCacheService],
  exports: [RedisCacheService],
})
export class RedisCacheModule {}CacheModuleregisterAsyncMethod uses Redis Store configuration to communicatestoreAttribute valueredisStore, indicating 'cache-manager-redis-store' libraryisGlobalproperty is set totrueto declare it as a global module, when we importRedisCacheModuleinAppModule, other modules can be used directly without importing again.- Since the Redis information is written in the configuration file, the
registerAsync()method is used to process asynchronous data. If it is static data, you can Useregister
3, create a new redis-cache.service.ts file, and implement cache read and write
import { Injectable, Inject, CACHE_MANAGER } from '@nestjs/common';
import { Cache } from 'cache-manager';

@Injectable()
export class RedisCacheService {
  constructor(
    @Inject(CACHE_MANAGER)
    private cacheManager: Cache,
  ) {}

  cacheSet(key: string, value: string, ttl: number) {
    this.cacheManager.set(key, value, { ttl }, (err) => {
      if (err) throw err;
    });
  }

  async cacheGet(key: string): Promise<any> {
    return this.cacheManager.get(key);
  }
} connections in the service Come down and import RedisCacheModule in app.module.ts.
Adjust token issuance and verification process
We use redis to implement token expiration processing, automatic token renewal, and unique user login.
- Expiration processing: put user information and token into redis, and set the expiration time
- Token automatic renewal: the token expiration time is 30 minutes, if within these 30 minutes If there is no operation, log in again. If there is an operation within 30 minutes, the token will be automatically renewed for a new time to prevent disconnection during use.
- Unique login for each user: same account, different computer login, the user who logs in first will be pushed offline by the user who logs in later
Token expiration processing
After logging in At this time, store the token generated by jwt into redis and set the validity period to 30 minutes. The key stored in redis consists of user information, and value is the token value.
// auth.service.ts
 async login(user: Partial<User>) {
    const token = this.createToken({
      id: user.id,
      username: user.username,
      role: user.role,
    });

+   await this.redisCacheService.cacheSet(
+     `${user.id}&${user.username}&${user.role}`,
+     token,
+     1800,
+   );
    return { token };
}When verifying the token, get the token from redis. If you cannot get the token, the token may have expired.
// jwt.strategy.ts
+ import { RedisCacheService } from './../core/db/redis-cache.service';
export class JwtStrategy extends PassportStrategy(Strategy) {
constructor(
@InjectRepository(User)
private readonly userRepository: Repository<User>,
private readonly authService: AuthService,
private readonly configService: ConfigService,
+ private readonly redisCacheService: RedisCacheService,
) {
super({
jwtFromRequest: ExtractJwt.fromAuthHeaderAsBearerToken(),
secretOrKey: configService.get('SECRET'),
+ passReqToCallback: true,
} as StrategyOptions);
}
async validate(req, user: User) {
+ const token = ExtractJwt.fromAuthHeaderAsBearerToken()(req);
+ const cacheToken = await this.redisCacheService.cacheGet(
+ `${user.id}&${user.username}&${user.role}`,
+ );
+ if (!cacheToken) {
+ throw new UnauthorizedException('token 已过期');
+ }
const existUser = await this.authService.getUser(user);
if (!existUser) {
throw new UnauthorizedException('token不正确');
}
return existUser;
}
}User's only login
When a user logs in, each new token issued will overwrite the previous token and determine the token in redis and the request incoming Are the tokens the same? If not, it may be that the user has logged in elsewhere and a token error is displayed.
// jwt.strategy.ts
  async validate(req, user: User) {
    const token = ExtractJwt.fromAuthHeaderAsBearerToken()(req);
    const cacheToken = await this.redisCacheService.cacheGet(
      `${user.id}&${user.username}&${user.role}`,
    );
    if (!cacheToken) {
      throw new UnauthorizedException('token 已过期');
    }
+   if (token != cacheToken) {
+     throw new UnauthorizedException('token不正确');
+   }
    const existUser = await this.authService.getUser(user);
    if (!existUser) {
      throw new UnauthorizedException('token不正确');
    }
    return existUser;
}Token automatic renewal
There are many implementation solutions, you can generate access_token (jwt valid for 30 minutes) and through background jwt refresh_token, refresh_token has a longer validity period than access_token. The client caches these two tokens. When access_token expires, the client carries again. refresh_tokenGet the new access_token. This solution requires the cooperation of the developer of the interface call.
I will mainly introduce here, the automatic renewal of token implemented by pure backend
Implementation process:
- ①: When jwt generates a token, the validity period is set to No expiration
- ②: Set the validity period to 30 minutes when redis caches the token
- ③: When the user carries the token request, if the key exists and the value is the same, the validity period is reset to 30 minutes
Set the token generated by jwt so that it does not expire. This part of the code is in the auth.module.ts file. If you don’t understand, you can read the article Nest.js Practical Series. Part 2 - Implement registration, scan code login, jwt authentication
// auth.module.ts
const jwtModule = JwtModule.registerAsync({
  inject: [ConfigService],
  useFactory: async (configService: ConfigService) => {
    return {
      secret: configService.get('SECRET', 'test123456'),
-     signOptions: { expiresIn: '4h' },  // 取消有效期设置
    };
  },
}); and then reset the expiration time after the token authentication is passed, because the cache-manager used has not been updated directly The validity period method is implemented by resetting:
// jwt.strategy.ts
 async validate(req, user: User) {
    const token = ExtractJwt.fromAuthHeaderAsBearerToken()(req);
    const cacheToken = await this.redisCacheService.cacheGet(
      `${user.id}&${user.username}&${user.role}`,
    );
    if (!cacheToken) {
      throw new UnauthorizedException('token 已过期');
    }
    if (token != cacheToken) {
      throw new UnauthorizedException('token不正确');
    }
    const existUser = await this.authService.getUser(user);
    if (!existUser) {
      throw new UnauthorizedException('token不正确');
    }
+   this.redisCacheService.cacheSet(
+     `${user.id}&${user.username}&${user.role}`,
+     token,
+     1800,
+   );
    return existUser;
}At this point, the token expiration processing, token automatic renewal, and user only login are completed in Nest. It is easier to remove the token when logging out. Here are the codes one by one.
In addition to using the officially recommended method in Nest, you can also use nestjs-redis to implement it. If you want to save the token, you want to save the hash structure. , when using cache-manager-redis-store, you will find that there is no hash value storage and retrieval method (it takes some effort to find out).
Note: If you use
nest-redisto implement redis caching, an error will be reported under Nest.js 8 version. Friends can use@chenjm/nestjs-redisinstead, or refer to the solution on the issue: Nest 8 redis bug.
Summary
Source code address: https://github.com/koala-coding/nest-blog
More programming related For knowledge, please visit: programming teaching! !
The above is the detailed content of How to use Redis in Node.js? It turns out it's that simple!. For more information, please follow other related articles on the PHP Chinese website!

Hot AI Tools

Undresser.AI Undress
AI-powered app for creating realistic nude photos

AI Clothes Remover
Online AI tool for removing clothes from photos.

Undress AI Tool
Undress images for free

Clothoff.io
AI clothes remover

Video Face Swap
Swap faces in any video effortlessly with our completely free AI face swap tool!

Hot Article
Hot Tools

Notepad++7.3.1
Easy-to-use and free code editor

SublimeText3 Chinese version
Chinese version, very easy to use

Zend Studio 13.0.1
Powerful PHP integrated development environment

Dreamweaver CS6
Visual web development tools

SublimeText3 Mac version
God-level code editing software (SublimeText3)
Hot Topics


 PHP and Vue: a perfect pairing of front-end development tools
Mar 16, 2024 pm 12:09 PM
PHP and Vue: a perfect pairing of front-end development tools
Mar 16, 2024 pm 12:09 PM
PHP and Vue: a perfect pairing of front-end development tools. In today's era of rapid development of the Internet, front-end development has become increasingly important. As users have higher and higher requirements for the experience of websites and applications, front-end developers need to use more efficient and flexible tools to create responsive and interactive interfaces. As two important technologies in the field of front-end development, PHP and Vue.js can be regarded as perfect tools when paired together. This article will explore the combination of PHP and Vue, as well as detailed code examples to help readers better understand and apply these two
 Simple JavaScript Tutorial: How to Get HTTP Status Code
Jan 05, 2024 pm 06:08 PM
Simple JavaScript Tutorial: How to Get HTTP Status Code
Jan 05, 2024 pm 06:08 PM
JavaScript tutorial: How to get HTTP status code, specific code examples are required. Preface: In web development, data interaction with the server is often involved. When communicating with the server, we often need to obtain the returned HTTP status code to determine whether the operation is successful, and perform corresponding processing based on different status codes. This article will teach you how to use JavaScript to obtain HTTP status codes and provide some practical code examples. Using XMLHttpRequest
 Is Django front-end or back-end? check it out!
Jan 19, 2024 am 08:37 AM
Is Django front-end or back-end? check it out!
Jan 19, 2024 am 08:37 AM
Django is a web application framework written in Python that emphasizes rapid development and clean methods. Although Django is a web framework, to answer the question whether Django is a front-end or a back-end, you need to have a deep understanding of the concepts of front-end and back-end. The front end refers to the interface that users directly interact with, and the back end refers to server-side programs. They interact with data through the HTTP protocol. When the front-end and back-end are separated, the front-end and back-end programs can be developed independently to implement business logic and interactive effects respectively, and data exchange.
 Questions frequently asked by front-end interviewers
Mar 19, 2024 pm 02:24 PM
Questions frequently asked by front-end interviewers
Mar 19, 2024 pm 02:24 PM
In front-end development interviews, common questions cover a wide range of topics, including HTML/CSS basics, JavaScript basics, frameworks and libraries, project experience, algorithms and data structures, performance optimization, cross-domain requests, front-end engineering, design patterns, and new technologies and trends. . Interviewer questions are designed to assess the candidate's technical skills, project experience, and understanding of industry trends. Therefore, candidates should be fully prepared in these areas to demonstrate their abilities and expertise.
 Exploring Go language front-end technology: a new vision for front-end development
Mar 28, 2024 pm 01:06 PM
Exploring Go language front-end technology: a new vision for front-end development
Mar 28, 2024 pm 01:06 PM
As a fast and efficient programming language, Go language is widely popular in the field of back-end development. However, few people associate Go language with front-end development. In fact, using Go language for front-end development can not only improve efficiency, but also bring new horizons to developers. This article will explore the possibility of using the Go language for front-end development and provide specific code examples to help readers better understand this area. In traditional front-end development, JavaScript, HTML, and CSS are often used to build user interfaces
 Django: A magical framework that can handle both front-end and back-end development!
Jan 19, 2024 am 08:52 AM
Django: A magical framework that can handle both front-end and back-end development!
Jan 19, 2024 am 08:52 AM
Django: A magical framework that can handle both front-end and back-end development! Django is an efficient and scalable web application framework. It is able to support multiple web development models, including MVC and MTV, and can easily develop high-quality web applications. Django not only supports back-end development, but can also quickly build front-end interfaces and achieve flexible view display through template language. Django combines front-end development and back-end development into a seamless integration, so developers don’t have to specialize in learning
 How to get HTTP status code in JavaScript the easy way
Jan 05, 2024 pm 01:37 PM
How to get HTTP status code in JavaScript the easy way
Jan 05, 2024 pm 01:37 PM
Introduction to the method of obtaining HTTP status code in JavaScript: In front-end development, we often need to deal with the interaction with the back-end interface, and HTTP status code is a very important part of it. Understanding and obtaining HTTP status codes helps us better handle the data returned by the interface. This article will introduce how to use JavaScript to obtain HTTP status codes and provide specific code examples. 1. What is HTTP status code? HTTP status code means that when the browser initiates a request to the server, the service
 Combination of Golang and front-end technology: explore how Golang plays a role in the front-end field
Mar 19, 2024 pm 06:15 PM
Combination of Golang and front-end technology: explore how Golang plays a role in the front-end field
Mar 19, 2024 pm 06:15 PM
Combination of Golang and front-end technology: To explore how Golang plays a role in the front-end field, specific code examples are needed. With the rapid development of the Internet and mobile applications, front-end technology has become increasingly important. In this field, Golang, as a powerful back-end programming language, can also play an important role. This article will explore how Golang is combined with front-end technology and demonstrate its potential in the front-end field through specific code examples. The role of Golang in the front-end field is as an efficient, concise and easy-to-learn
