
 Backend Development
Python Tutorial
Guide you step by step to implement cutout and change the background color through the Python calling interface
Backend Development
Python Tutorial
Guide you step by step to implement cutout and change the background color through the Python calling interface
Guide you step by step to implement cutout and change the background color through the Python calling interface

Sometimes we need to change the background color of our ID photos, and we don’t have time to go to the photo studio to take pictures. It’s not easy to cut out pictures with PS, so today I will share with you how to use Python to cut out pictures. , and change the background color
1. Register a Baidu AI account and create a portrait segmentation application
Baidu portrait segmentation homepage: follow the steps to register and log in , real-name authentication is enough.
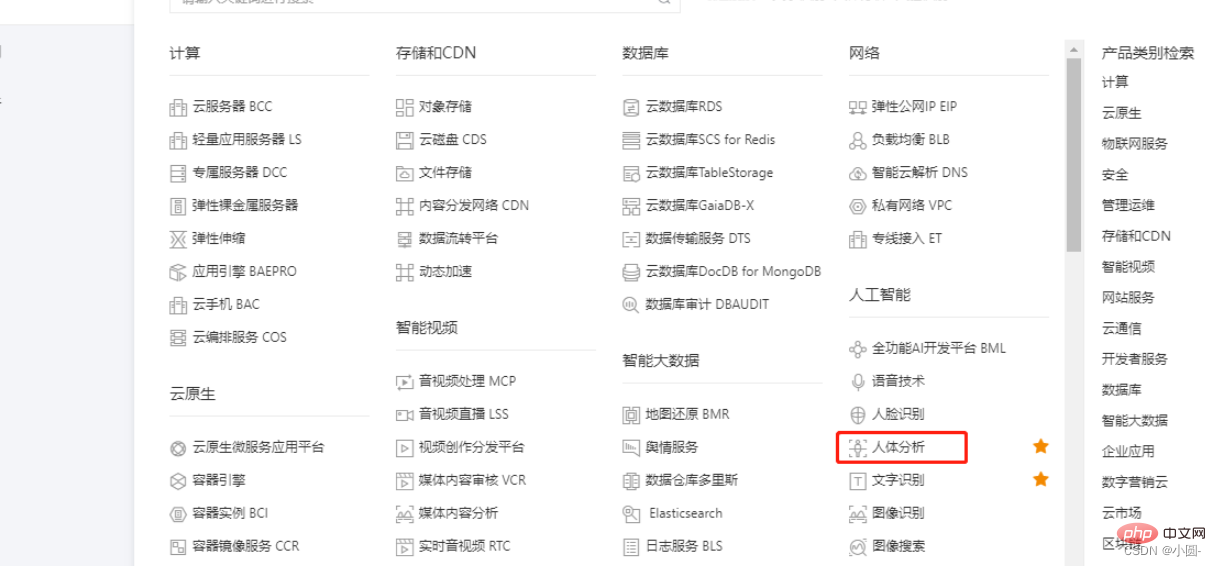
Find Human Analysis on the console home page
Create application
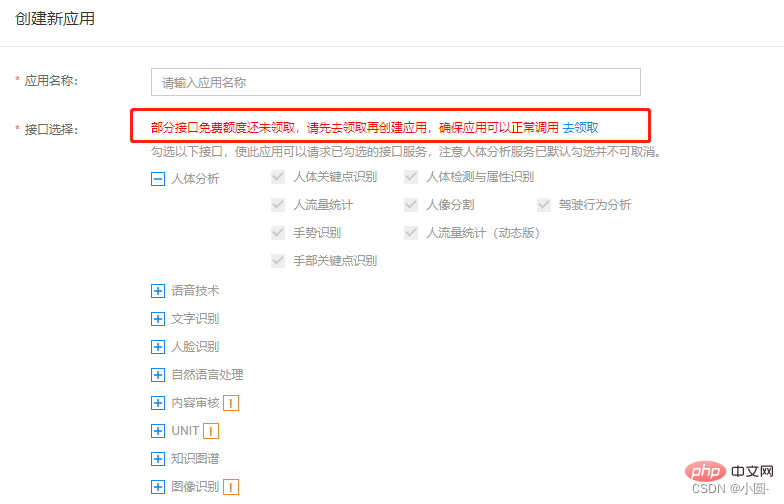
## You can write whatever you want in 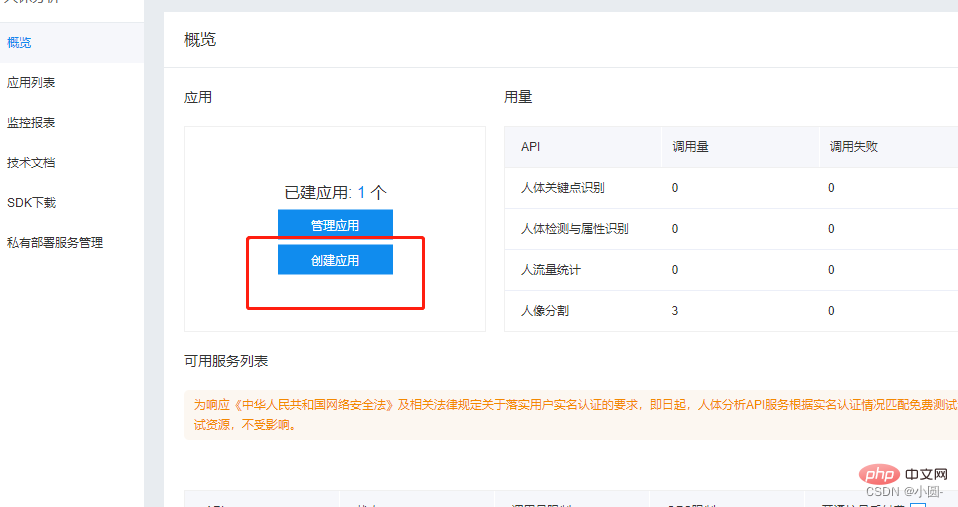


2. Code implementation
1.Introduce the libraryimport os
import requests
import base64
import cv2
import numpy as np
from PIL import Image
from pathlib import Path
path = os.getcwd()
paths = list(Path(path).glob('*'))Copy after login
import os
import requests
import base64
import cv2
import numpy as np
from PIL import Image
from pathlib import Path

path = os.getcwd()
paths = list(Path(path).glob('*'))2. Get Access Tokendef get_access_token():
url = 'https://aip.baidubce.com/oauth/2.0/token'
data = {
'grant_type': 'client_credentials', # 固定值
'client_id': '替换成你的API Key', # 在开放平台注册后所建应用的API Key
'client_secret': '替换成你的Secret Key' # 所建应用的Secret Key
}
res = requests.post(url, data=data)
res = res.json()
access_token = res['access_token']
return access_tokenCopy after login
def get_access_token():
    url = 'https://aip.baidubce.com/oauth/2.0/token'
    data = {
        'grant_type': 'client_credentials',  # 固定值
        'client_id': '替换成你的API Key',  # 在开放平台注册后所建应用的API Key
        'client_secret': '替换成你的Secret Key'  # 所建应用的Secret Key
    }
    res = requests.post(url, data=data)
    res = res.json()
    access_token = res['access_token']
return access_tokenCore Code
If you have any questions about the article, you can send me a private message or come here https://jq. qq.com/?_wv=1027&k=s5bZE0K3def removebg(): try: request_url = "https://aip.baidubce.com/rest/2.0/image-classify/v1/body_seg" # 二进制方式打开图片文件 f = open(name, 'rb') img = base64.b64encode(f.read()) params = {"image":img} access_token = get_access_token() request_url = request_url + "?access_token=" + access_token headers = {'content-type': 'application/x-www-form-urlencoded'} response = requests.post(request_url, data=params, headers=headers) if response: res = response.json()["foreground"] png_name=name.split('.')[0]+".png" with open(png_name,"wb") as f: data = base64.b64decode(res) f.write(data) fullwhite(png_name) #png图片底色填充,视情况舍去 png_jpg(png_name) #png格式转jpg,视情况舍去 os.remove(png_name) #删除原png图片,视情况舍去 print(name+"\t处理成功!") except Exception as e: passCopy after login
4. Image background color fillingdef fullwhite(png_name):
im = Image.open(png_name)
x,y = im.size
try:
p = Image.new('RGBA', im.size, (255,255,255)) # 使用白色来填充背景,视情况更改
p.paste(im, (0, 0, x, y), im)
p.save(png_name)
except:
passCopy after login
def fullwhite(png_name):
    im = Image.open(png_name)
    x,y = im.size
    try:
        p = Image.new('RGBA', im.size, (255,255,255))        # 使用白色来填充背景,视情况更改
        p.paste(im, (0, 0, x, y), im)
        p.save(png_name)
    except:
pass5. Image compression#compress_rate:数值越小照片越模糊
def resize(compress_rate = 0.5):
im = Image.open(name)
w, h = im.size
im_resize = im.resize((int(w*compress_rate), int(h*compress_rate)))
resize_w, resieze_h = im_resize.size
#quality 代表图片质量,值越低越模糊
im_resize.save(name)
im.close()
Copy after login
#compress_rate:数值越小照片越模糊
def resize(compress_rate = 0.5):
    im = Image.open(name)
    w, h = im.size
    im_resize = im.resize((int(w*compress_rate), int(h*compress_rate)))
    resize_w, resieze_h = im_resize.size
    #quality 代表图片质量,值越低越模糊
    im_resize.save(name)
    im.close()
6. Get the image sizedef get_size():
size = os.path.getsize(name)
return size / 1024
Copy after login
def get_size():
    size = os.path.getsize(name)
    return size / 1024
7.png format to jpgdef png_jpg(png_name):
im = Image.open(png_name)
bg=Image.new('RGB',im.size,(255,255,255))
bg.paste(im)
jpg_name = png_name.split('.')[0]+".jpg"
#quality 代表图片质量,值越低越模糊
bg.save(jpg_name,quality=70)
im.close()Copy after login
def png_jpg(png_name):
    im = Image.open(png_name)
    bg=Image.new('RGB',im.size,(255,255,255))
    bg.paste(im)
    jpg_name = png_name.split('.')[0]+".jpg"
    #quality 代表图片质量,值越低越模糊
    bg.save(jpg_name,quality=70)
im.close()8.Main Functionif __name__ == '__main__':
for i in paths:
name = os.path.basename(i.name)
if(name==os.path.basename(__file__)):
continue
size = get_size()
##照片压缩
while size >=900:
size = get_size()
resize()
removebg()
print(" ")Copy after login
if __name__ == '__main__':
    for i in paths:
        name = os.path.basename(i.name)
        if(name==os.path.basename(__file__)):
            continue
        size = get_size()
        ##照片压缩
        while size >=900:
            size = get_size()
            resize()
        removebg()
print(" ")9. Complete code
If you have any questions about the article, you can send me a private message or come here https://jq.qq.com /?_wv=1027&k=s5bZE0K3#人像分割 import os import requests import base64 import cv2 import numpy as np from PIL import Image from pathlib import Path path = os.getcwd() paths = list(Path(path).glob('*')) def get_access_token(): url = 'https://aip.baidubce.com/oauth/2.0/token' data = { 'grant_type': 'client_credentials', # 固定值 'client_id': '替换成你的API Key', # 在开放平台注册后所建应用的API Key 'client_secret': '替换成你的Secret Key' # 所建应用的Secret Key } res = requests.post(url, data=data) res = res.json() access_token = res['access_token'] return access_token def png_jpg(png_name): im = Image.open(png_name) bg=Image.new('RGB',im.size,(255,255,255)) bg.paste(im) jpg_name = png_name.split('.')[0]+".jpg" #quality 代表图片质量,值越低越模糊 bg.save(jpg_name,quality=70) im.close() #compress_rate:数值越小照片越模糊 def resize(compress_rate = 0.5): im = Image.open(name) w, h = im.size im_resize = im.resize((int(w*compress_rate), int(h*compress_rate))) resize_w, resieze_h = im_resize.size #quality 代表图片质量,值越低越模糊 im_resize.save(name) im.close() def get_size(): size = os.path.getsize(name) return size / 1024 def fullwhite(png_name): im = Image.open(png_name) x,y = im.size try: # 使用白色来填充背景 # (alpha band as paste mask). p = Image.new('RGBA', im.size, (255,255,255)) p.paste(im, (0, 0, x, y), im) p.save(png_name) except: pass def removebg(): try: request_url = "https://aip.baidubce.com/rest/2.0/image-classify/v1/body_seg" # 二进制方式打开图片文件 f = open(name, 'rb') img = base64.b64encode(f.read()) params = {"image":img} access_token = get_access_token() request_url = request_url + "?access_token=" + access_token headers = {'content-type': 'application/x-www-form-urlencoded'} response = requests.post(request_url, data=params, headers=headers) if response: res = response.json()["foreground"] png_name=name.split('.')[0]+".png" with open(png_name,"wb") as f: data = base64.b64decode(res) f.write(data) fullwhite(png_name) png_jpg(png_name) os.remove(png_name) print(name+"\t处理成功!") except Exception as e: pass if __name__ == '__main__': for i in paths: name = os.path.basename(i.name) if(name==os.path.basename(__file__)): continue size = get_size() ##照片压缩 while size >=900: size = get_size() resize() removebg() print(" ")Copy after login
[Important] Precautions before use
1. This program will overwrite the original file. Before use Please back up the files to avoid data loss 2. Copy the program to the same directory as the photos to be processed, double-click the program to run
Final rendering
Original image: Rendering

The code is not difficult, but there are many small problems along the way. For example, the image size cannot exceed 4MB, and you have to compress the photo, path and other issues. In short, this function has been achieved. Very happy!
Okay, today’s sharing ends here ~
[Related recommendations:
The above is the detailed content of Guide you step by step to implement cutout and change the background color through the Python calling interface. For more information, please follow other related articles on the PHP Chinese website!

Hot AI Tools

Undresser.AI Undress
AI-powered app for creating realistic nude photos

AI Clothes Remover
Online AI tool for removing clothes from photos.

Undress AI Tool
Undress images for free

Clothoff.io
AI clothes remover

Video Face Swap
Swap faces in any video effortlessly with our completely free AI face swap tool!

Hot Article
Hot Tools

Notepad++7.3.1
Easy-to-use and free code editor

SublimeText3 Chinese version
Chinese version, very easy to use

Zend Studio 13.0.1
Powerful PHP integrated development environment

Dreamweaver CS6
Visual web development tools

SublimeText3 Mac version
God-level code editing software (SublimeText3)
Hot Topics


 PHP and Python: Different Paradigms Explained
Apr 18, 2025 am 12:26 AM
PHP and Python: Different Paradigms Explained
Apr 18, 2025 am 12:26 AM
PHP is mainly procedural programming, but also supports object-oriented programming (OOP); Python supports a variety of paradigms, including OOP, functional and procedural programming. PHP is suitable for web development, and Python is suitable for a variety of applications such as data analysis and machine learning.
 Choosing Between PHP and Python: A Guide
Apr 18, 2025 am 12:24 AM
Choosing Between PHP and Python: A Guide
Apr 18, 2025 am 12:24 AM
PHP is suitable for web development and rapid prototyping, and Python is suitable for data science and machine learning. 1.PHP is used for dynamic web development, with simple syntax and suitable for rapid development. 2. Python has concise syntax, is suitable for multiple fields, and has a strong library ecosystem.
 Python vs. JavaScript: The Learning Curve and Ease of Use
Apr 16, 2025 am 12:12 AM
Python vs. JavaScript: The Learning Curve and Ease of Use
Apr 16, 2025 am 12:12 AM
Python is more suitable for beginners, with a smooth learning curve and concise syntax; JavaScript is suitable for front-end development, with a steep learning curve and flexible syntax. 1. Python syntax is intuitive and suitable for data science and back-end development. 2. JavaScript is flexible and widely used in front-end and server-side programming.
 PHP and Python: A Deep Dive into Their History
Apr 18, 2025 am 12:25 AM
PHP and Python: A Deep Dive into Their History
Apr 18, 2025 am 12:25 AM
PHP originated in 1994 and was developed by RasmusLerdorf. It was originally used to track website visitors and gradually evolved into a server-side scripting language and was widely used in web development. Python was developed by Guidovan Rossum in the late 1980s and was first released in 1991. It emphasizes code readability and simplicity, and is suitable for scientific computing, data analysis and other fields.
 Can vs code run in Windows 8
Apr 15, 2025 pm 07:24 PM
Can vs code run in Windows 8
Apr 15, 2025 pm 07:24 PM
VS Code can run on Windows 8, but the experience may not be great. First make sure the system has been updated to the latest patch, then download the VS Code installation package that matches the system architecture and install it as prompted. After installation, be aware that some extensions may be incompatible with Windows 8 and need to look for alternative extensions or use newer Windows systems in a virtual machine. Install the necessary extensions to check whether they work properly. Although VS Code is feasible on Windows 8, it is recommended to upgrade to a newer Windows system for a better development experience and security.
 Can visual studio code be used in python
Apr 15, 2025 pm 08:18 PM
Can visual studio code be used in python
Apr 15, 2025 pm 08:18 PM
VS Code can be used to write Python and provides many features that make it an ideal tool for developing Python applications. It allows users to: install Python extensions to get functions such as code completion, syntax highlighting, and debugging. Use the debugger to track code step by step, find and fix errors. Integrate Git for version control. Use code formatting tools to maintain code consistency. Use the Linting tool to spot potential problems ahead of time.
 How to run python with notepad
Apr 16, 2025 pm 07:33 PM
How to run python with notepad
Apr 16, 2025 pm 07:33 PM
Running Python code in Notepad requires the Python executable and NppExec plug-in to be installed. After installing Python and adding PATH to it, configure the command "python" and the parameter "{CURRENT_DIRECTORY}{FILE_NAME}" in the NppExec plug-in to run Python code in Notepad through the shortcut key "F6".
 How to run sublime code python
Apr 16, 2025 am 08:48 AM
How to run sublime code python
Apr 16, 2025 am 08:48 AM
To run Python code in Sublime Text, you need to install the Python plug-in first, then create a .py file and write the code, and finally press Ctrl B to run the code, and the output will be displayed in the console.
