 Web Front-end
 Vue.js
 What is state management? Let's talk about how to use Vuex for state management
What is state management? Let's talk about how to use Vuex for state management
What is state management? The following article will take you through Vuex state management and talk about how to use Vuex for state management. I hope it will be helpful to you!

? 1. What is state management
In development, our applications need to process a variety of data, and these data need to be saved At a certain location in our application, the management of these data is called State Management. (Learning video sharing: vue video tutorial)
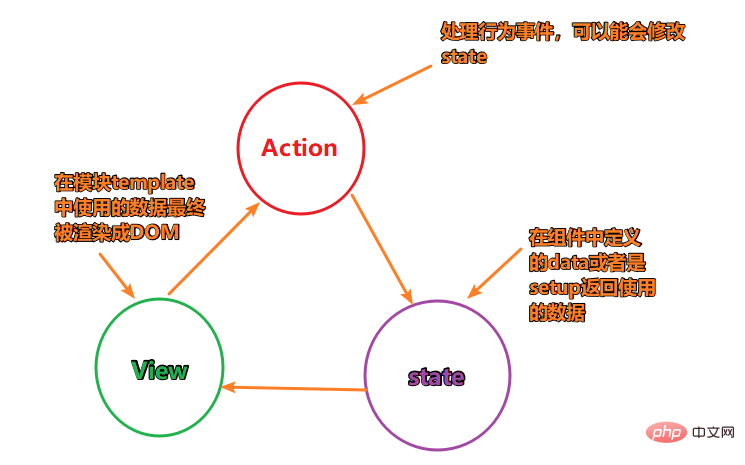
Basic implementation of Vuex’s state management (official illustrations are used here)
⏰ How to use Vuex
1. Install vuex
npm install vuex
2. Basic usage:
Store is essentially a container--> stores the state of most applications.
Vuex's state storage is responsive. When the state in the store changes, the responding components will also be updated.
// main.js
import { createApp } from "vue"
import App from "./App.vue"
import store from "./store"

const app = createApp(App)

app.user(store)
app.mount("#app")// src/store/index.js
import { createStore } from "vuex"
const store = createStore({
state: () => ({
counter: 100
}),
mutations: {
increment(state) {
state.counter++
}
}
})
export default store//App.vue
<template>
<div>
<!-- store 中的counter -->
<h2 id="方式一-模板-App当前计数-store-state-counter">方式一:模板:App当前计数: {{$store.state.counter}}</h2>
<h2 id="方式二-optionsAPI中的computed使用-storeCounter">方式二:optionsAPI中的computed使用: {{storeCounter}}</h2>
<h2 id="方式三-在compositionAPI中setup函数使用-counter">方式三:在compositionAPI中setup函数使用:{{counter}}</h2>
<button>+1</button>
</div>
</template>
<script>
export default {
computed: {
storeCounter () {
return this.store.state.counter
}
}
}
</script>
<script>
import { toRefs } from 'vue'
import { useStore } from 'vuex'
const store = useStore()
const { counter } = toRefs(store.state)
function increment () {
store.commit("increment")
}
</script>
<style></style>? Single state tree and mapState auxiliary function
1. Single state tree
This means that each application contains only one store instance
Advantages: If the status information contains multiple store instance objects, then it will be more troublesome to maintain and manage later. Single state tree is the most direct way for us to find the fragment of a certain state, so it is more convenient to maintain
2. mapState auxiliary function
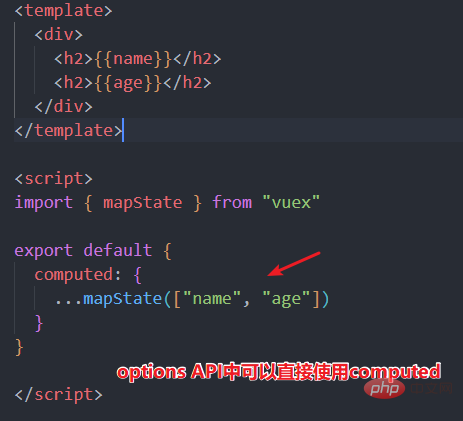
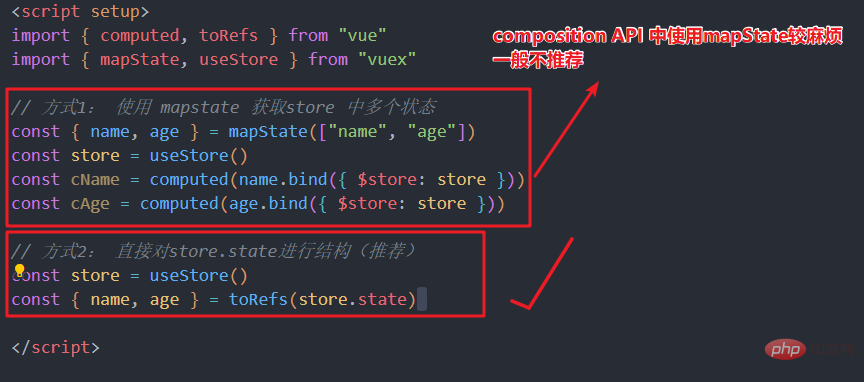
If you need to obtain multiple states, you can use the mapSate auxiliary function
There are two ways, namely using mapState in optionsAPI and composition API
? Basic use of getters
1. Use of getters
Scenario: When we need to use some attributes in the store after a series of changes, we can choose to use getters
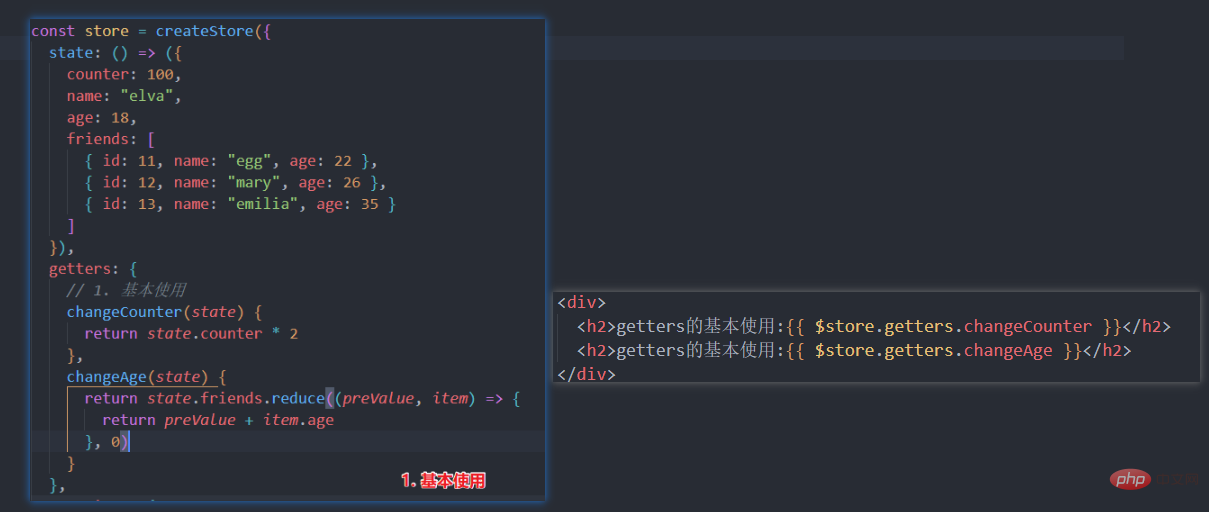
2. getters Two parameters
In the above scenario, the first parameter accepted by getters is state, and getters can also receive the second parameter
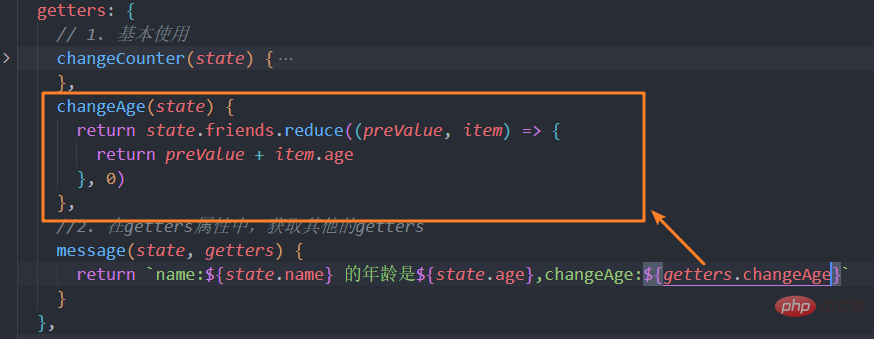
3. The return function of getters (understanding)
The function itself in getters can return a function, then it is equivalent to calling this function where it is used
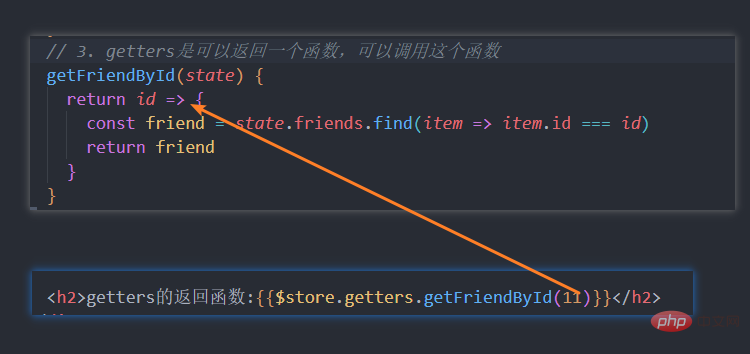
4. Auxiliary function of mapGetters
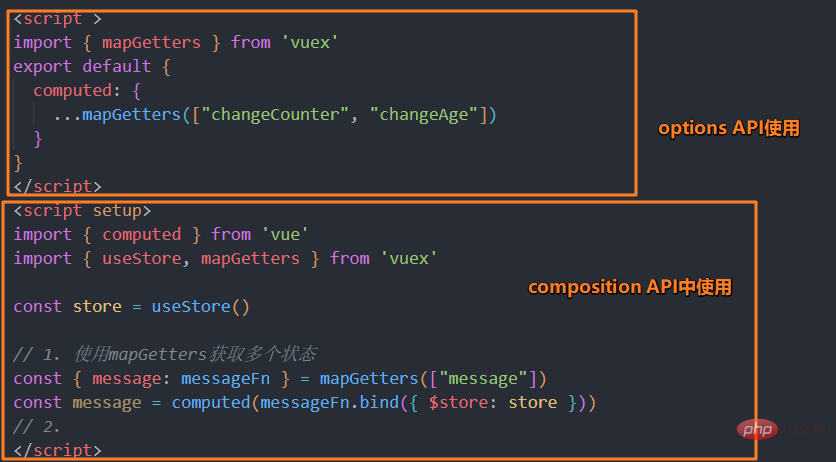
? Basic use of mutation
The only way to change the state of the store in vuex is to submit a mutation
Note: Mutation is canceled in pinia, which will be discussed later. The composition API with vue3 will be better than vuex, so here is the options API demonstration
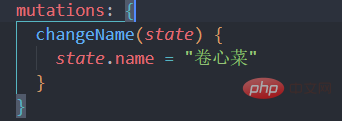
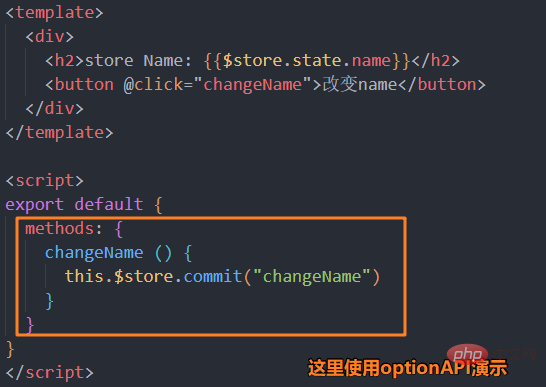
##1. mutation Carrying data
Many times we will carry some data when submitting a mutation. At this time, we can use it like this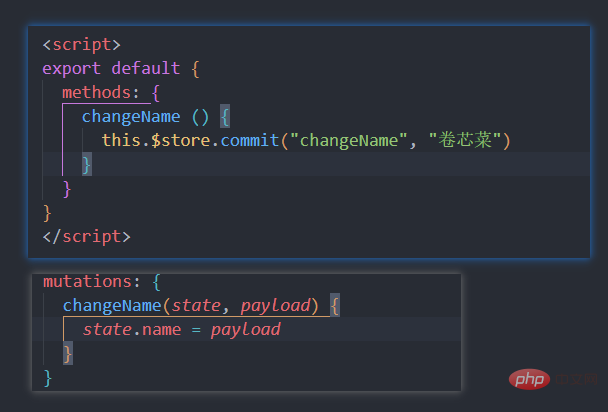
2. mutation Important principles
mutation must be a synchronous function, that is, asynchronous functions (such as sending network requests) are not allowed
? Basic use of actions
Action is similar to mutation, the difference is:- Action submits a mutation instead of directly changing the state;
- Action can contain
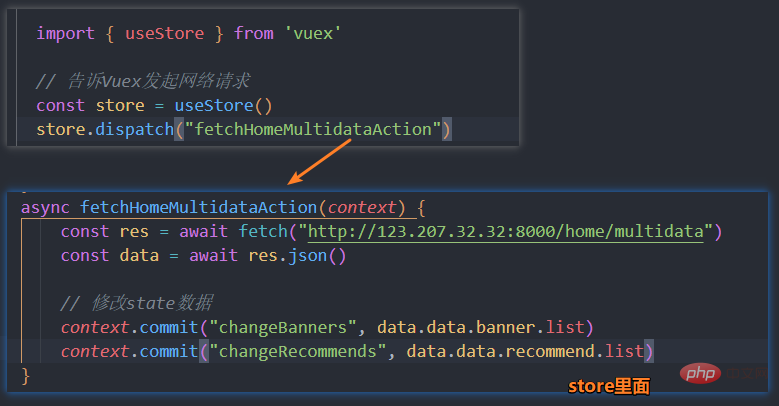
- any Asynchronous operation;
context:
- Context is a context object that has the same methods and properties as the store instance;
- You can get the commit method from it to submit a mutation, or through context.state and context.getters Get state and getters;
1. Distribution operation of actions
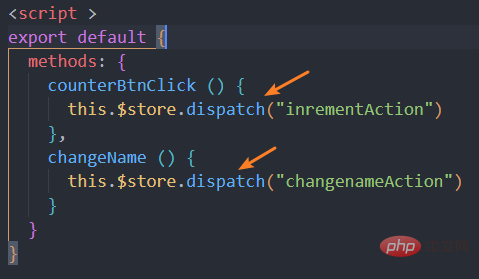
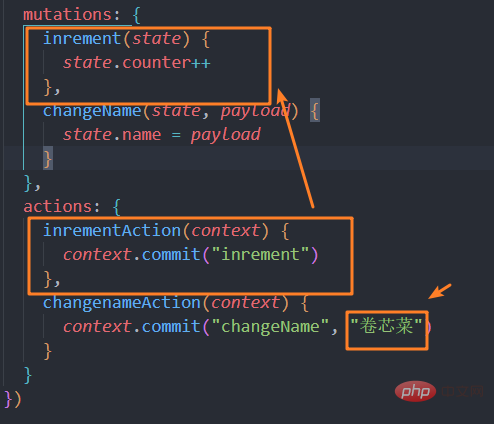
2. Auxiliary functions of actions
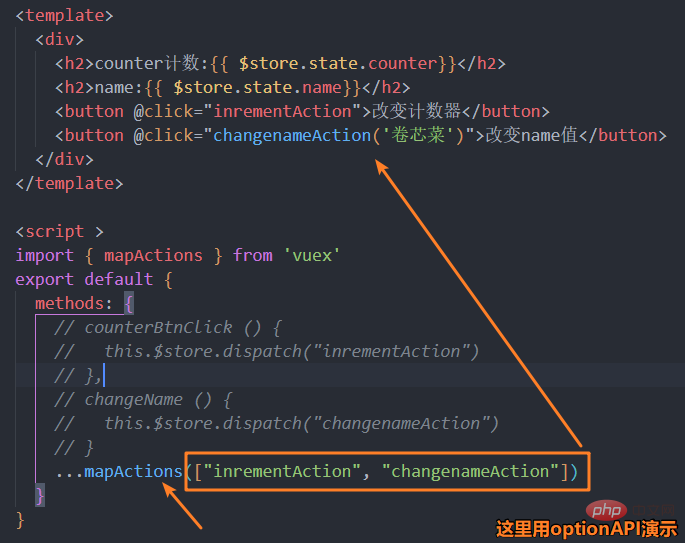
3. Asynchronous operations of actions
?Basic use of module
Due to the use of a single state tree, all the states of the application will be concentrated into a relatively large object. When the application becomes very complex, the store object It can become quite bloated. So Vuex allows us to split the store into modules.
Each module has its own state, mutation, action, getter, and even nested submodules
1. The local state of the module
For mutations and getters inside a module, the first parameter received is the module’s local state object.
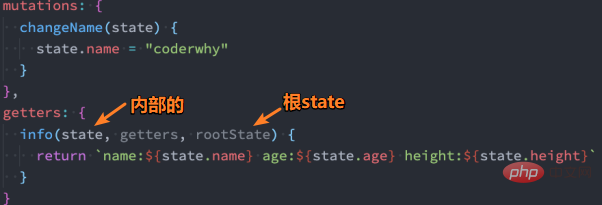
2. module namespace
By default, actions and mutations inside the module are still registered in in the global namespace. So naming cannot be repeated
If we want the module to have a higher degree of encapsulation and reusability, we can add namespaced: true to make it a module with a namespace: When the module After being registered, all its getters, actions and mutations will automatically be named according to the path registered by the module.
3. module modifies or dispatches the root component
Modify the state in the root in the action, then there are the following methods:

(Learning video sharing: web front-end development, Basic programming video)
The above is the detailed content of What is state management? Let's talk about how to use Vuex for state management. For more information, please follow other related articles on the PHP Chinese website!

Hot AI Tools

Undresser.AI Undress
AI-powered app for creating realistic nude photos

AI Clothes Remover
Online AI tool for removing clothes from photos.

Undress AI Tool
Undress images for free

Clothoff.io
AI clothes remover

Video Face Swap
Swap faces in any video effortlessly with our completely free AI face swap tool!

Hot Article

Hot Tools

Notepad++7.3.1
Easy-to-use and free code editor

SublimeText3 Chinese version
Chinese version, very easy to use

Zend Studio 13.0.1
Powerful PHP integrated development environment

Dreamweaver CS6
Visual web development tools

SublimeText3 Mac version
God-level code editing software (SublimeText3)

Hot Topics
 How to use bootstrap in vue
Apr 07, 2025 pm 11:33 PM
Using Bootstrap in Vue.js is divided into five steps: Install Bootstrap. Import Bootstrap in main.js. Use the Bootstrap component directly in the template. Optional: Custom style. Optional: Use plug-ins.
 How to add functions to buttons for vue
Apr 08, 2025 am 08:51 AM
You can add a function to the Vue button by binding the button in the HTML template to a method. Define the method and write function logic in the Vue instance.
 How to use watch in vue
Apr 07, 2025 pm 11:36 PM
The watch option in Vue.js allows developers to listen for changes in specific data. When the data changes, watch triggers a callback function to perform update views or other tasks. Its configuration options include immediate, which specifies whether to execute a callback immediately, and deep, which specifies whether to recursively listen to changes to objects or arrays.
 What does vue multi-page development mean?
Apr 07, 2025 pm 11:57 PM
Vue multi-page development is a way to build applications using the Vue.js framework, where the application is divided into separate pages: Code Maintenance: Splitting the application into multiple pages can make the code easier to manage and maintain. Modularity: Each page can be used as a separate module for easy reuse and replacement. Simple routing: Navigation between pages can be managed through simple routing configuration. SEO Optimization: Each page has its own URL, which helps SEO.
 How to reference js file with vue.js
Apr 07, 2025 pm 11:27 PM
There are three ways to refer to JS files in Vue.js: directly specify the path using the <script> tag;; dynamic import using the mounted() lifecycle hook; and importing through the Vuex state management library.
 How to return to previous page by vue
Apr 07, 2025 pm 11:30 PM
Vue.js has four methods to return to the previous page: $router.go(-1)$router.back() uses <router-link to="/" component window.history.back(), and the method selection depends on the scene.
 How to use vue traversal
Apr 07, 2025 pm 11:48 PM
There are three common methods for Vue.js to traverse arrays and objects: the v-for directive is used to traverse each element and render templates; the v-bind directive can be used with v-for to dynamically set attribute values for each element; and the .map method can convert array elements into new arrays.
 How to jump to the div of vue
Apr 08, 2025 am 09:18 AM
There are two ways to jump div elements in Vue: use Vue Router and add router-link component. Add the @click event listener and call this.$router.push() method to jump.


