

Take you to understand the HTTP module in depth

This article will help you learn about the http module and lay the foundation for writing interfaces. I hope it will be helpful to you!

1. Web server
What is a web server?
When the application (client) needs a certain resource, it can obtain the resource through an HTTP request to a server; the server that provides the resource is a Web server;
1.1 First experience with the server
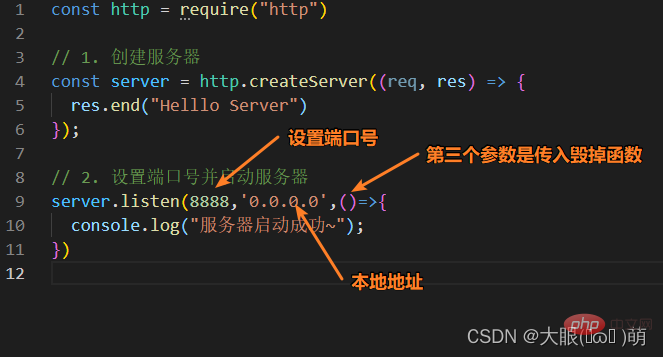
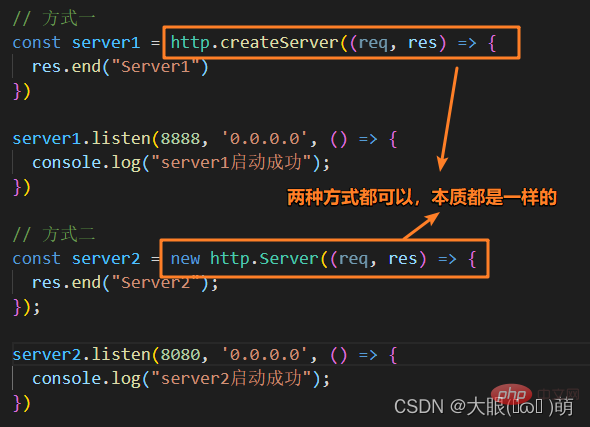
##1.2 Two ways to create a server
- http.createServer will return the server object
- The bottom layer actually uses the direct new Server object
1.3 request object
#The request object encapsulates all the information passed by the client to our server
- The URL of this request, the server needs to process it differently according to different URLs;
- The request method of this request, such as the parameters passed in GET and POST requests The processing method is different;
- The headers of this request will also carry some information, such as client information, format for receiving data, supported encoding formats, etc...

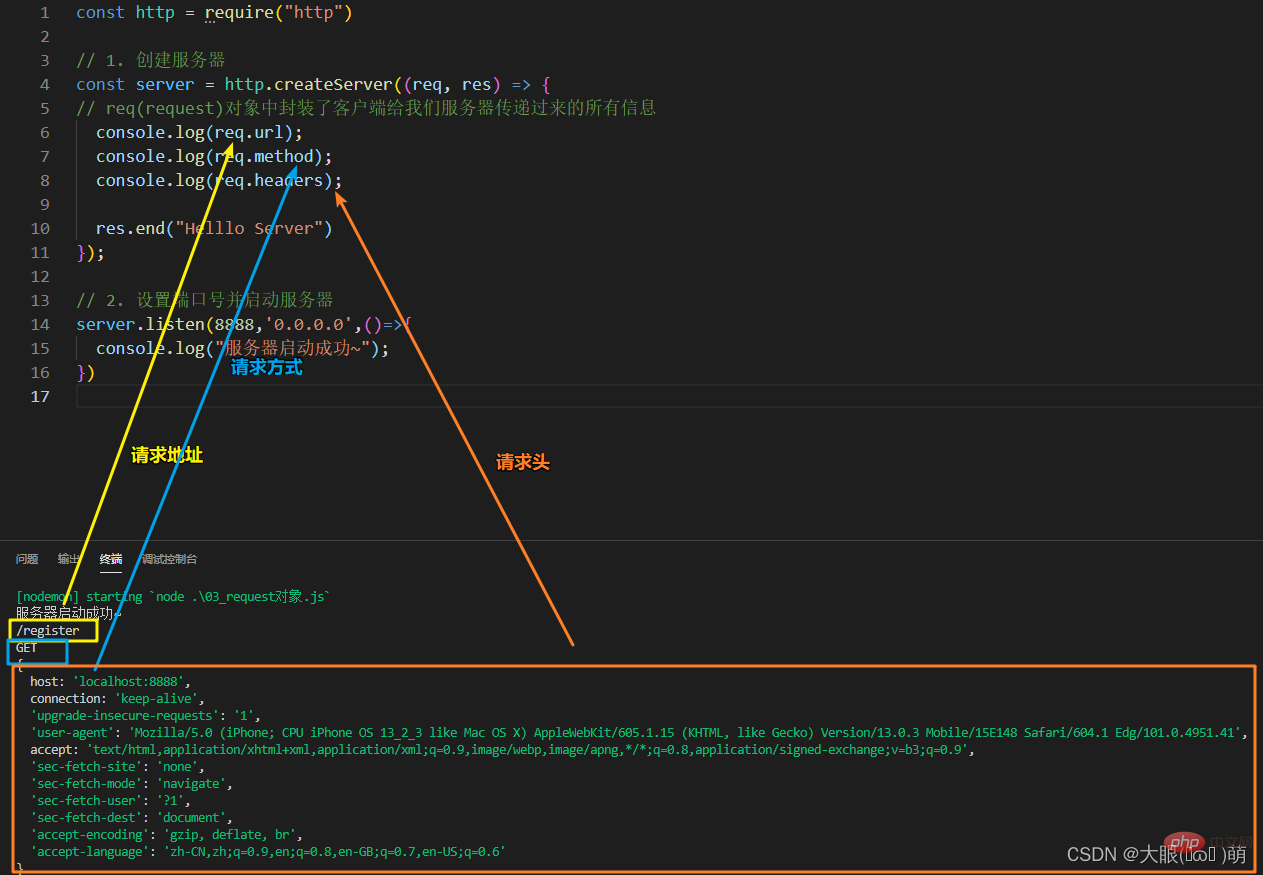
When the client sends a request, it will request different data, and then different request addresses will be passed in. The server needs to make different responses based on different request addresses.
If the user's request address also carries some additional parameters, how should we parse it?
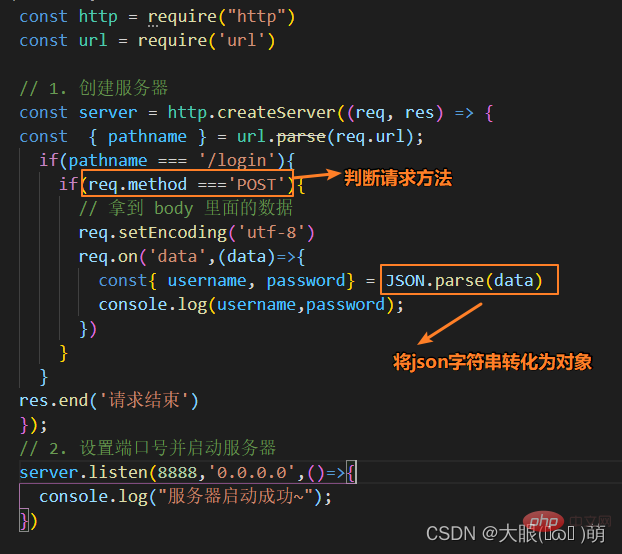
We can use the url module.
Among them, the url module provides practical tools for URL processing and parsing
Import url const url = require('url')
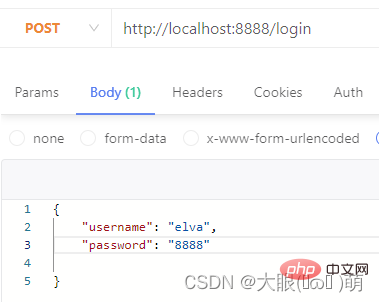
Assume that our request data is:
 The result of the console parsing the url is:
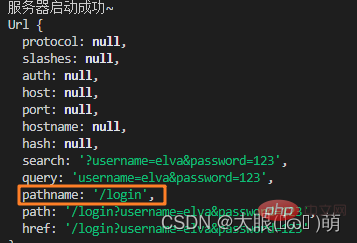 The pathname is the final path we need to obtain. Our purpose is to obtain username and password separately in the query.
Import querystring module
const qs = require('querystring');<div class="code" style="position:relative; padding:0px; margin:0px;"><pre class="brush:php;toolbar:false">const http = require("http")const url = require('url')const qs = require('querystring')// 1. 创建服务器const server = http.createServer((req, res) => {
// 使用内置模块
const{ pathname,query } = url.parse(req.url)
if(pathname === '/login'){
console.log(query);
console.log(qs.parse(query));
const { username, password } = qs.parse(query)
console.log(username,password);
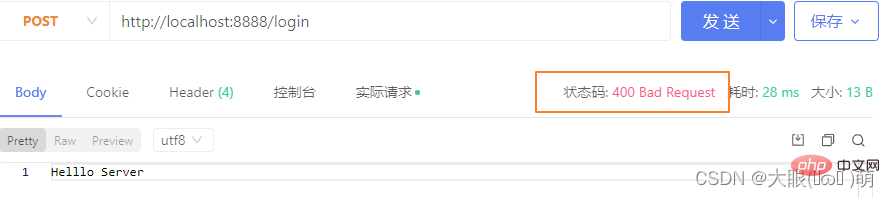
res.end('请求结束')
}});// 2. 设置端口号并启动服务器server.listen(8888,'0.0.0.0',()=>{
console.log("服务器启动成功~");})</pre><div class="contentsignin">Copy after login</div></div>

In the Restful specification (design style), we should use different request methods for adding, deleting, modifying and checking data:
GET: Query data;- POST: Create new data;
- PATCH: Update data;
- DELETE: Delete data
- We can perform different processing by judging different request methods.
 ##✅Console output
-
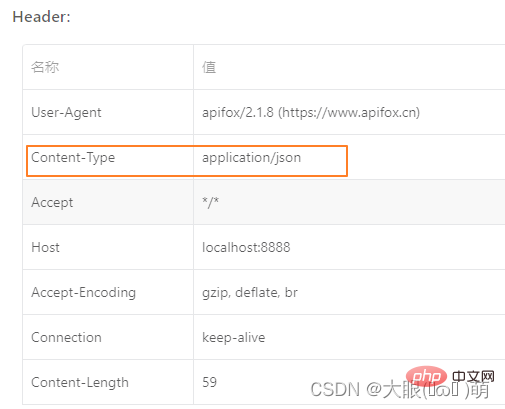
 1.3.2 request-headers

##content-type is the type of data carried in this request: 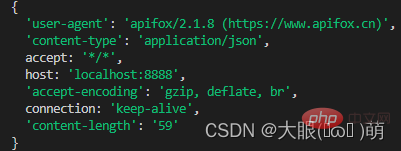
application/json means a json type;
text/plain means a text type;- application/xml means an xml type;
- multipart/form-data Indicates uploading a file;
- **content-length: **The size and length of the file
- http is based on the TCP protocol, but it is usually interrupted immediately after a request and response;
- In http1.0, if you want to continue to maintain the connection: ①The browser requires Add connection: keep-alive in the request header; ② The server needs to add connection: keey-alive in the response header; ③ When the client makes a request again, the same connection will be used, and the direct party will interrupt the connection;
- In http1.1, all connections default to connection: keep-alive: ① Different Web servers will have different keep-alive times; ② The default in Node is 5s
**accept-encoding: **Inform the server that the file compression format supported by the client. For example, js files can be encoded using gzip, corresponding to .gz files
**accept: **Inform the server that the client is acceptable File format type;
**user-agent: **Client-related information;
1.4 response object
1.4.1 response-response object
If we want to respond to the client with result data, we can do so in two ways:
- Write method: This method writes the data directly, but does not close the stream;
- end method: This method writes the last data, and the stream will be closed after writing;
Note: If we do not call end and close, the client will wait for the result.
1.4.2 response-response code
Http Status Code (Http Status Code) is a numeric code used to represent the Http response status:
- Http status codes are very many, and different status codes can be returned to the client according to different situations;
- The common status codes are the following (the status codes will also be used in subsequent projects )
- http status code collection
| ##Category | Reason Phrase | |
|---|---|---|
| Informational (Informational Status Code) | Accepted Request Processing | |
| Success (success status code) | The request has been processed normally | |
| Redirection | Additional action required to complete the request | |
| Client error | Client request error, the server cannot process the request | |
| Server Error | The server has an error processing the request |
| Description status | Description | |
|---|---|---|
| The request was successful. Generally used for GET and POST requests | 400 | |
| The client request has a syntax error and the server cannot understand | 401 | |
| The request requires user authentication | 403 | |
| The server understands the request from the client, but refuses to execute the request | 404 | |
| The server cannot find the resource based on the client's request ( Web page). Through this code, website designers can set up a personalized page for "The resource you requested cannot be found" | 500 | |
| Server Internal error, unable to complete the request | 503 | |
| The server is temporarily unable to process the client's request due to overload or system maintenance. The length of the delay can be included in the server's Retry-After header information |
 1.4.3 response-response header
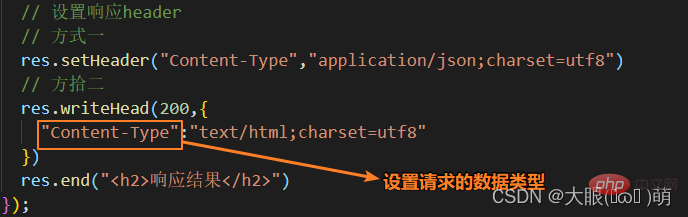
There are two main ways to return header information:
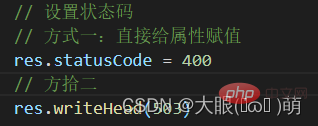
res.setHeader: Write one header information at a time;
- res.writeHead: Write header and status at the same time
-
More For more node-related knowledge, please visit: nodejs tutorial
 More For more node-related knowledge, please visit:
 The above is the detailed content of Take you to understand the HTTP module in depth. For more information, please follow other related articles on the PHP Chinese website!

Hot AI Tools

Undresser.AI Undress
AI-powered app for creating realistic nude photos

AI Clothes Remover
Online AI tool for removing clothes from photos.

Undress AI Tool
Undress images for free

Clothoff.io
AI clothes remover

Video Face Swap
Swap faces in any video effortlessly with our completely free AI face swap tool!

Hot Article
Hot Tools

Notepad++7.3.1
Easy-to-use and free code editor

SublimeText3 Chinese version
Chinese version, very easy to use

Zend Studio 13.0.1
Powerful PHP integrated development environment

Dreamweaver CS6
Visual web development tools

SublimeText3 Mac version
God-level code editing software (SublimeText3)
Hot Topics


 Detailed graphic explanation of the memory and GC of the Node V8 engine
Mar 29, 2023 pm 06:02 PM
Detailed graphic explanation of the memory and GC of the Node V8 engine
Mar 29, 2023 pm 06:02 PM
This article will give you an in-depth understanding of the memory and garbage collector (GC) of the NodeJS V8 engine. I hope it will be helpful to you!
 An article about memory control in Node
Apr 26, 2023 pm 05:37 PM
An article about memory control in Node
Apr 26, 2023 pm 05:37 PM
The Node service built based on non-blocking and event-driven has the advantage of low memory consumption and is very suitable for handling massive network requests. Under the premise of massive requests, issues related to "memory control" need to be considered. 1. V8’s garbage collection mechanism and memory limitations Js is controlled by the garbage collection machine
 How to use express to handle file upload in node project
Mar 28, 2023 pm 07:28 PM
How to use express to handle file upload in node project
Mar 28, 2023 pm 07:28 PM
How to handle file upload? The following article will introduce to you how to use express to handle file uploads in the node project. I hope it will be helpful to you!
 Let's talk in depth about the File module in Node
Apr 24, 2023 pm 05:49 PM
Let's talk in depth about the File module in Node
Apr 24, 2023 pm 05:49 PM
The file module is an encapsulation of underlying file operations, such as file reading/writing/opening/closing/delete adding, etc. The biggest feature of the file module is that all methods provide two versions of **synchronous** and **asynchronous**, with Methods with the sync suffix are all synchronization methods, and those without are all heterogeneous methods.
 An in-depth analysis of Node's process management tool 'pm2”
Apr 03, 2023 pm 06:02 PM
An in-depth analysis of Node's process management tool 'pm2”
Apr 03, 2023 pm 06:02 PM
This article will share with you Node's process management tool "pm2", and talk about why pm2 is needed, how to install and use pm2, I hope it will be helpful to everyone!
 Let's talk about the event loop in Node
Apr 11, 2023 pm 07:08 PM
Let's talk about the event loop in Node
Apr 11, 2023 pm 07:08 PM
The event loop is a fundamental part of Node.js and enables asynchronous programming by ensuring that the main thread is not blocked. Understanding the event loop is crucial to building efficient applications. The following article will give you an in-depth understanding of the event loop in Node. I hope it will be helpful to you!
 Pi Node Teaching: What is a Pi Node? How to install and set up Pi Node?
Mar 05, 2025 pm 05:57 PM
Pi Node Teaching: What is a Pi Node? How to install and set up Pi Node?
Mar 05, 2025 pm 05:57 PM
Detailed explanation and installation guide for PiNetwork nodes This article will introduce the PiNetwork ecosystem in detail - Pi nodes, a key role in the PiNetwork ecosystem, and provide complete steps for installation and configuration. After the launch of the PiNetwork blockchain test network, Pi nodes have become an important part of many pioneers actively participating in the testing, preparing for the upcoming main network release. If you don’t know PiNetwork yet, please refer to what is Picoin? What is the price for listing? Pi usage, mining and security analysis. What is PiNetwork? The PiNetwork project started in 2019 and owns its exclusive cryptocurrency Pi Coin. The project aims to create a one that everyone can participate
 Learn more about Buffers in Node
Apr 25, 2023 pm 07:49 PM
Learn more about Buffers in Node
Apr 25, 2023 pm 07:49 PM
At the beginning, JS only ran on the browser side. It was easy to process Unicode-encoded strings, but it was difficult to process binary and non-Unicode-encoded strings. And binary is the lowest level data format of the computer, video/audio/program/network package
