

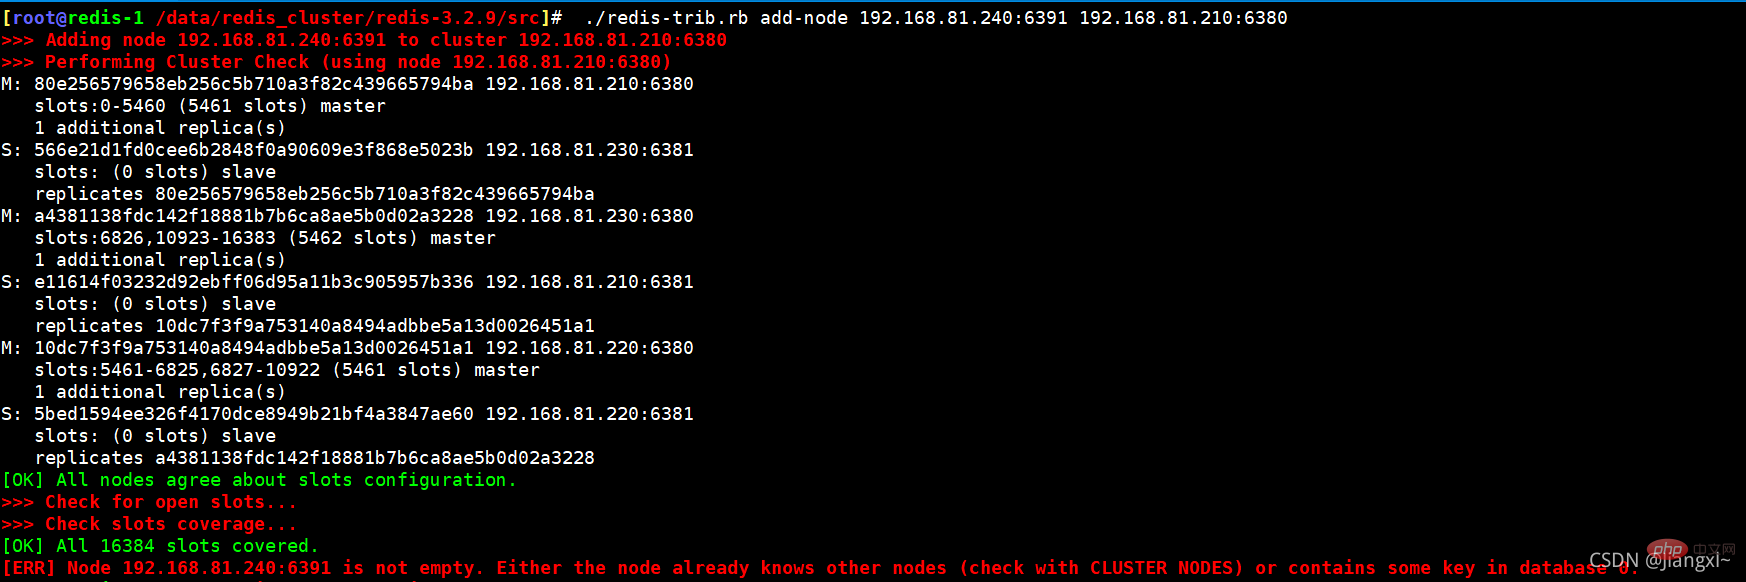
Detailed example of Redis Cluster cluster shrinking master and slave nodes

This article brings you relevant knowledge about Redis, which mainly introduces the issues related to the Redis Cluster cluster shrinking the master and slave nodes, including the concept of Cluster cluster shrinkage, moving 6390 master nodes from I hope it will be helpful to shrink the cluster and verify whether the data migration process causes data anomalies.

Recommended learning: Redis video tutorial
1.Cluster cluster shrink concept
When the project pressure carrying capacity is too high, you need to add nodes to increase the load. When the project pressure is not very high, you also hope to shrink the cluster and use it for other projects. This requires cluster shrinkage
The cluster shrink operation is the same as the cluster expansion operation, just reverse the direction.
When expanding the capacity, you can execute the command once to achieve successful slot migration. When shrinking, you need to execute the command as many times as there are several master nodes. For example, excluding the node to be offline, there are still 3 master nodes. Then it needs to be executed three times, and the number of migration slots needs to be divided by 3, and each node needs to be evenly distributed.
When shrinking, you must first fill in the number of slots to be allocated, then fill in who to allocate to, and finally fill in from where the slots will be allocated. Generally, the number of slots to be allocated depends on the host to be offline. How many slots are there on the host, and then divide it by the number of cluster master nodes, so that the slots assigned to each host are the same? When filling in who to assign to, fill in the ID of the first master node for the first time. Fill in the ID of the second master node for the second time, and finally fill in the ID of the node that provides the slot, which is the ID number of the offline node.
When the cluster shrinks and expands the slots, it will not affect the use of data.
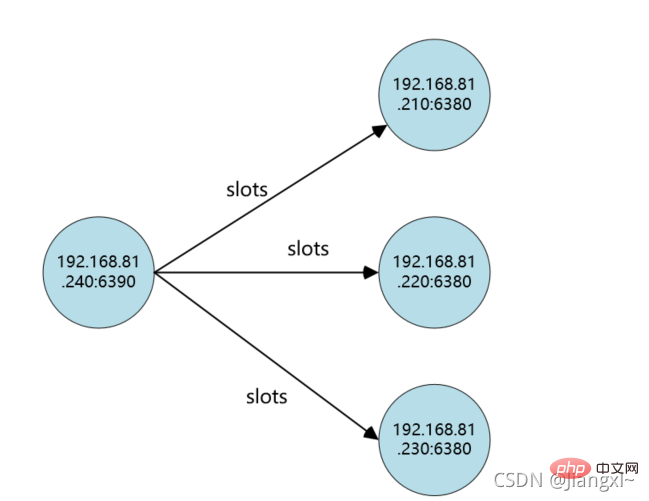
The source end of the cluster shrinkage is the master node that is going offline, and the target end is the online master node (the node assigned to it).
We need to be clear that only the master node has slots, so the slots of the master node need to be allocated to other master nodes. When the slots are cleared, the host node can go offline.
Comparison before and after shrinking the cluster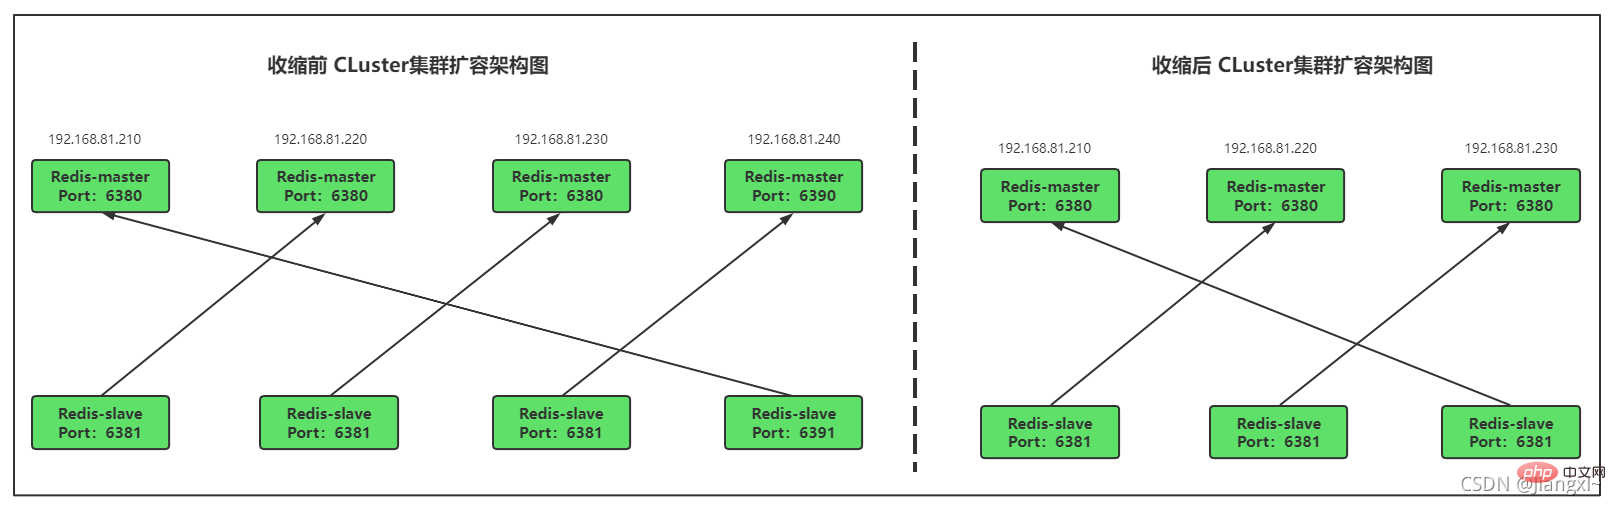
Cluster shrinking operation steps:
1. Execute the reshard command to disperse the slots of the master node that needs to go offline.
2. If you have several master nodes, you need to execute the reshard command several times. First fill in the number of slots to be divided, then fill in who to divide them from, and finally fill in where to divide them.
3. When the slot dispersion is completed and the master node to be offline does not have any data, delete the node from the cluster.
Cluster information
The current cluster has four masters and four slaves, a total of 8 nodes. We need to change the cluster to three masters and three slaves, shrinking two nodes for other nodes. program use. 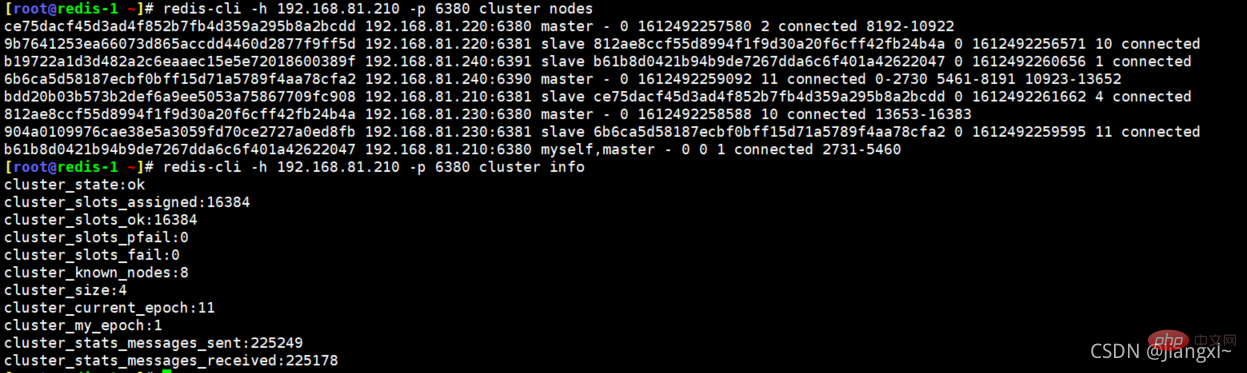
2. Shrink the 6390 master node from the cluster
2.1. Calculate the number of slots that need to be allocated to each node
You can see that there are 4096 slots on the 6390 node. After deleting the 6390 node to be offline, we still have 3 master nodes. Divide 4096 by 3 to get 1365. When allocating slots, 1365 are allocated to each node. The slots can be evenly spaced. 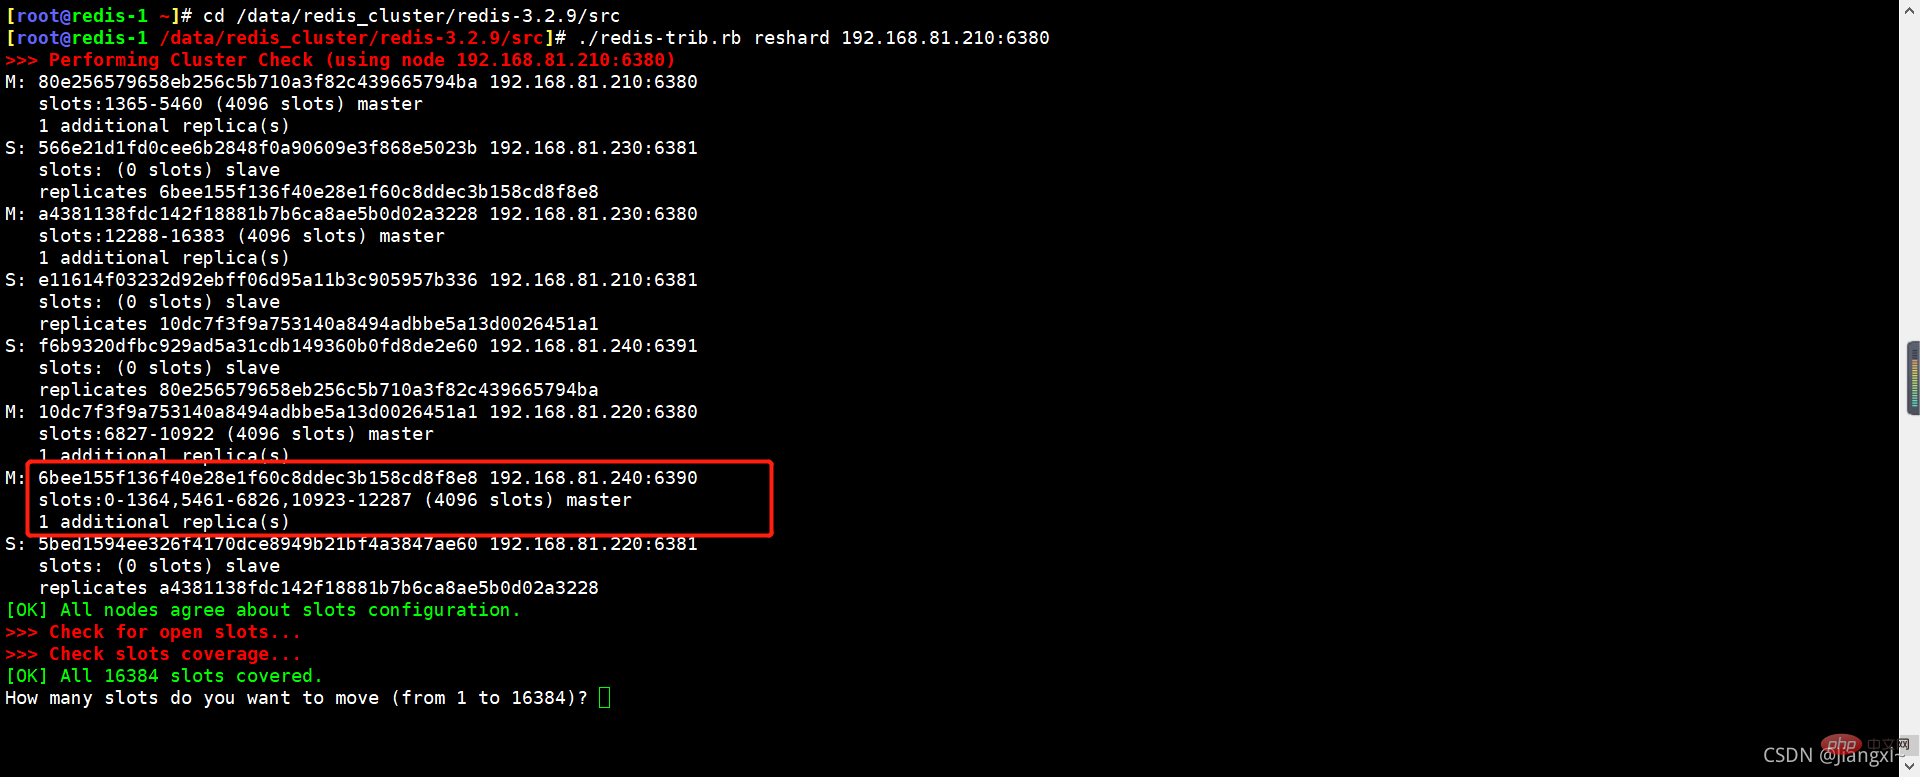
2.2. Allocate 1365 slots to the 6380 node at 192.168.81.210
We need to split the 6390 node at 192.168.81.240 into 1365 Slots are given to the 6380 nodes at 192.168.81.210.
You only need to fill in What is the receiving node ID as the 6380 node ID of 192.168.81.210, which refers to who the allocated slot will be given to.
Then the source node fills in the ID of the 6390 node of 192.168.81.240. This refers to the node from which the 1365 slots are allocated. After filling in the ID, press Enter and you will be prompted from which node to allocate. Slots, because only 6390 need to be allocated slots, so fill in done here, indicating that only this node has allocated 1365 slots to other nodes.
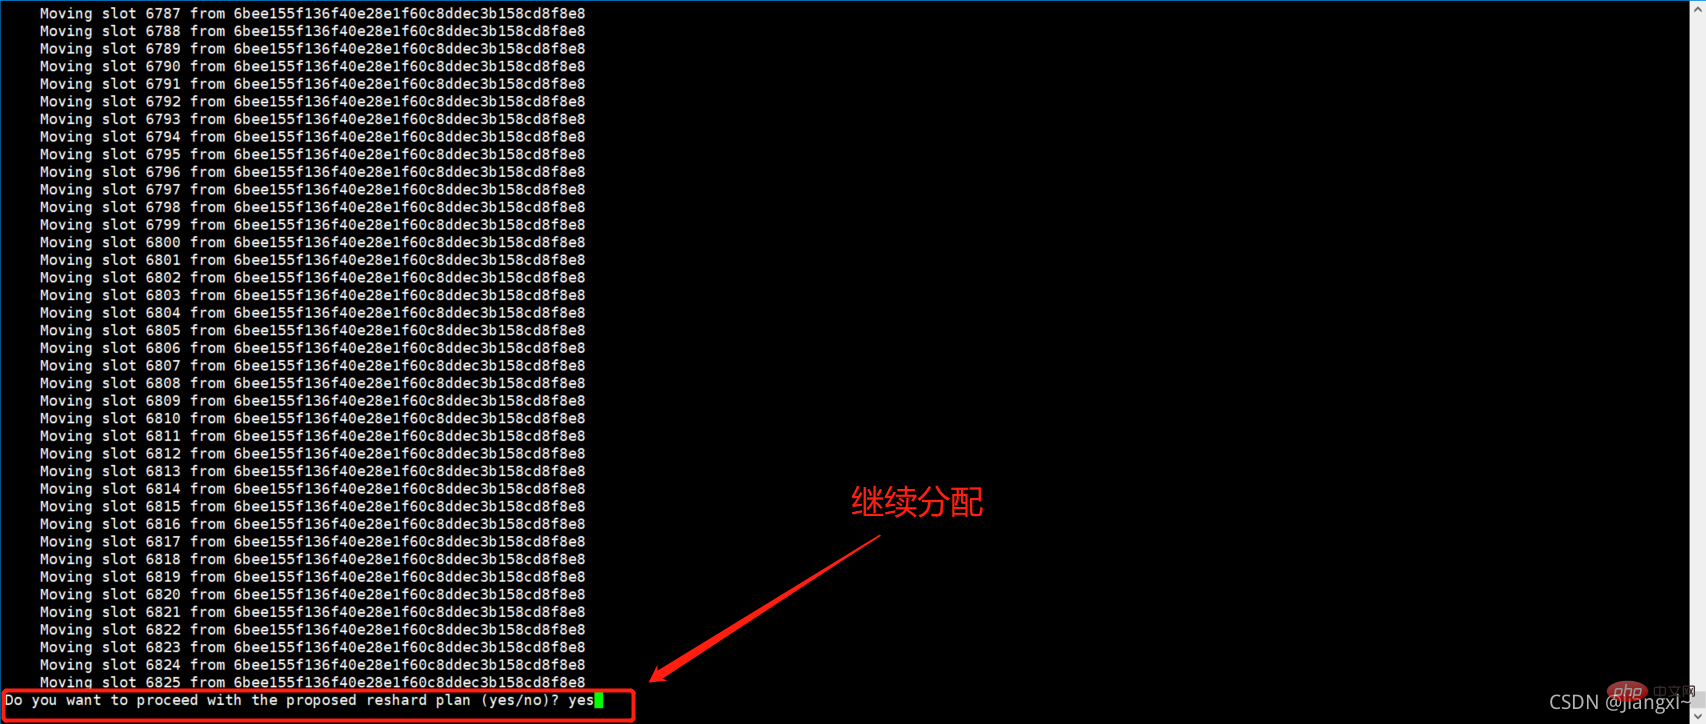
[root@redis-1 /data/redis_cluster/redis-3.2.9/src]# ./redis-trib.rb reshard 192.168.81.210:6380
How many slots do you want to move (from 1 to 16384)? 1365				#分配出多少个槽位

What is the receiving node ID? 80e256579658eb256c5b710a3f82c439665794ba				#将槽位分给那个节点

Please enter all the source node IDs.
  Type 'all' to use all the nodes as source nodes for the hash slots.
  Type 'done' once you entered all the source nodes IDs.
Source node #1:6bee155f136f40e28e1f60c8ddec3b158cd8f8e8					#从哪个节点分出槽位
Source node #2:done

Do you want to proceed with the proposed reshard plan (yes/no)? yes			#输入yes继续
The following is a screenshot of the process of shrinking nodes. 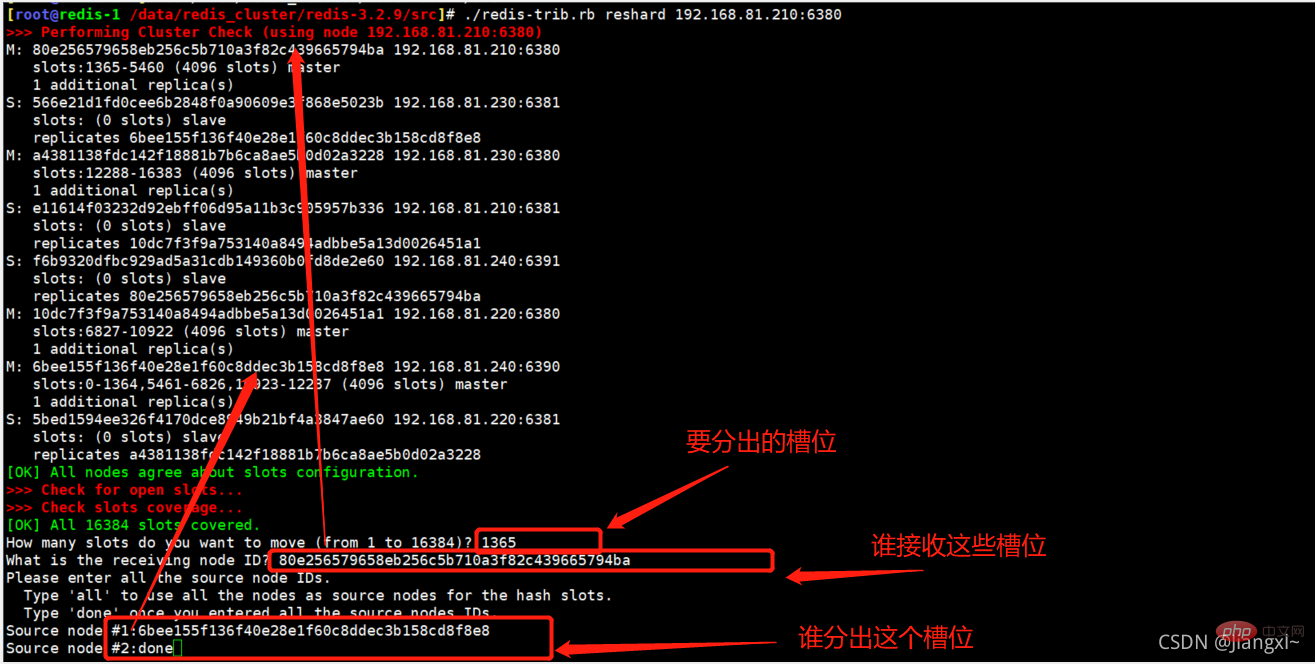
Data migration process. 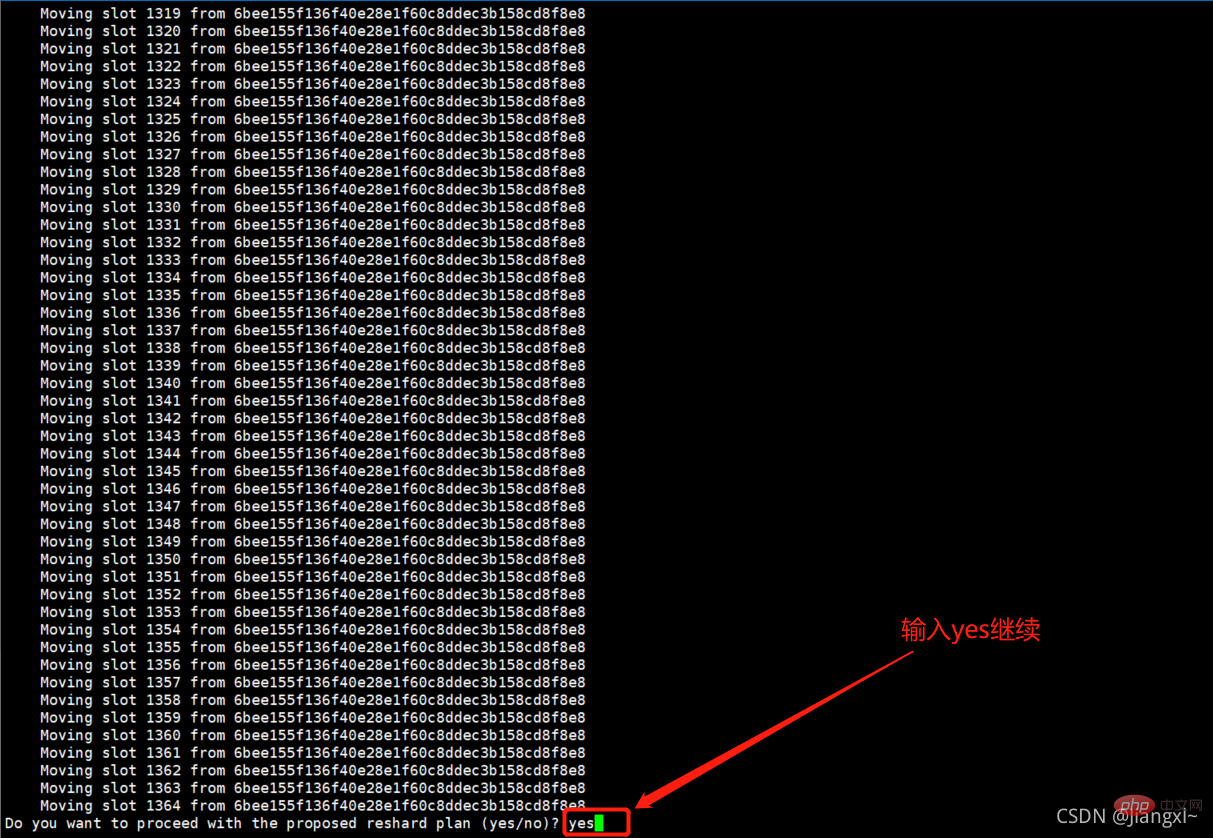
The slot migration was successful. 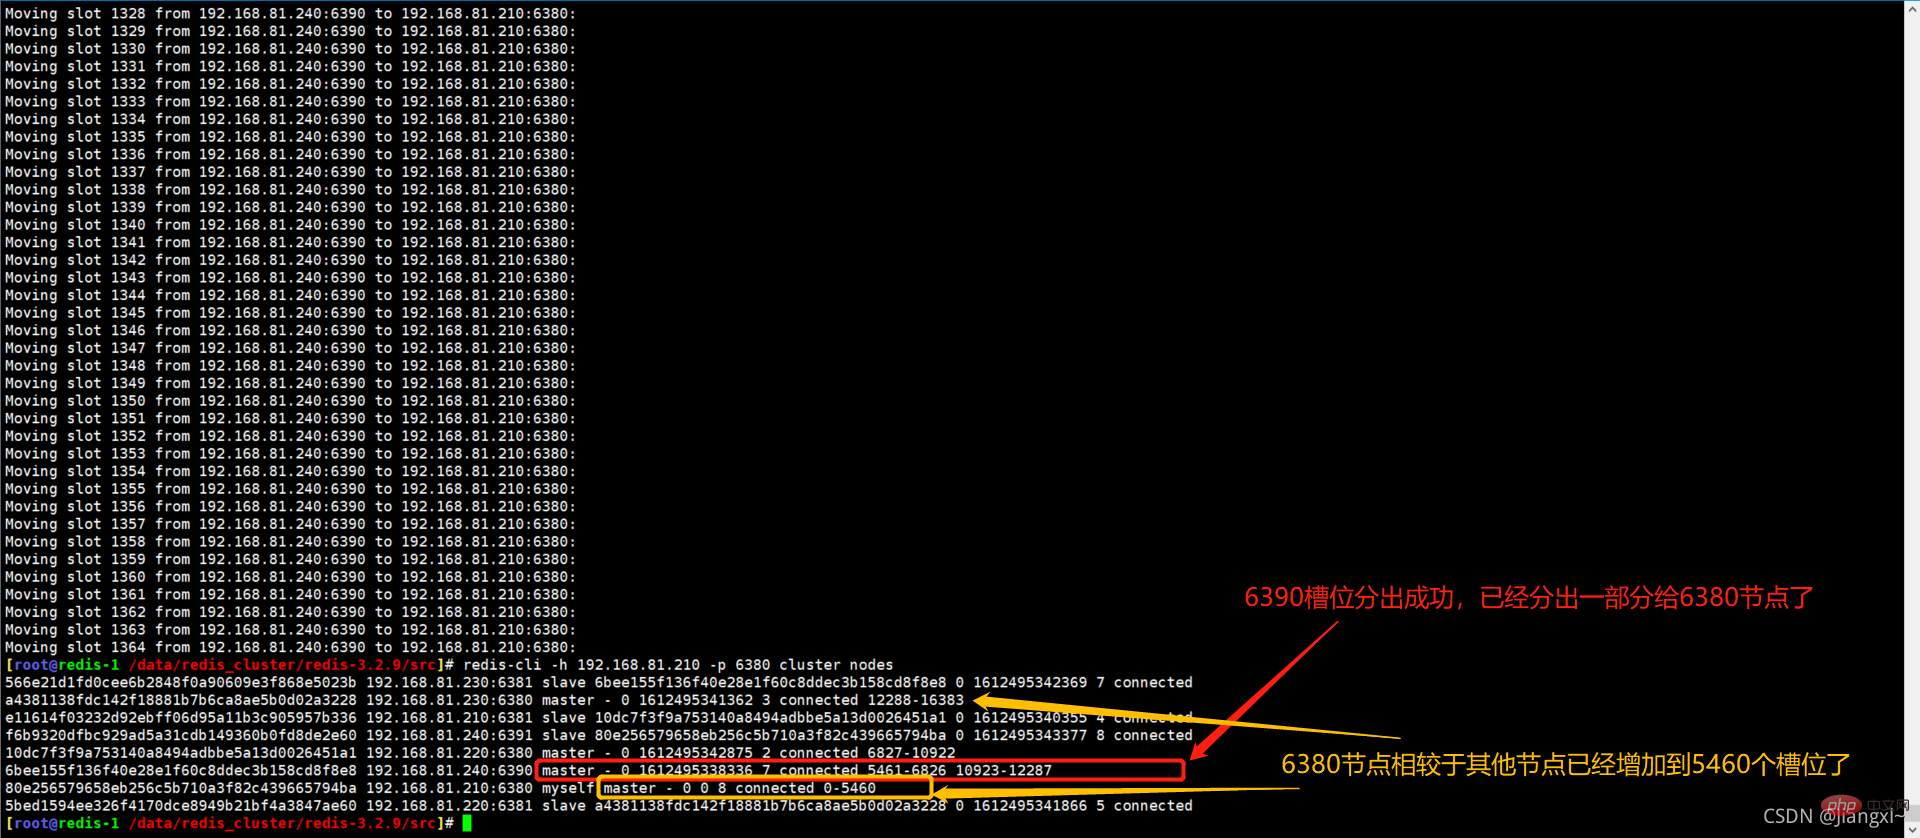
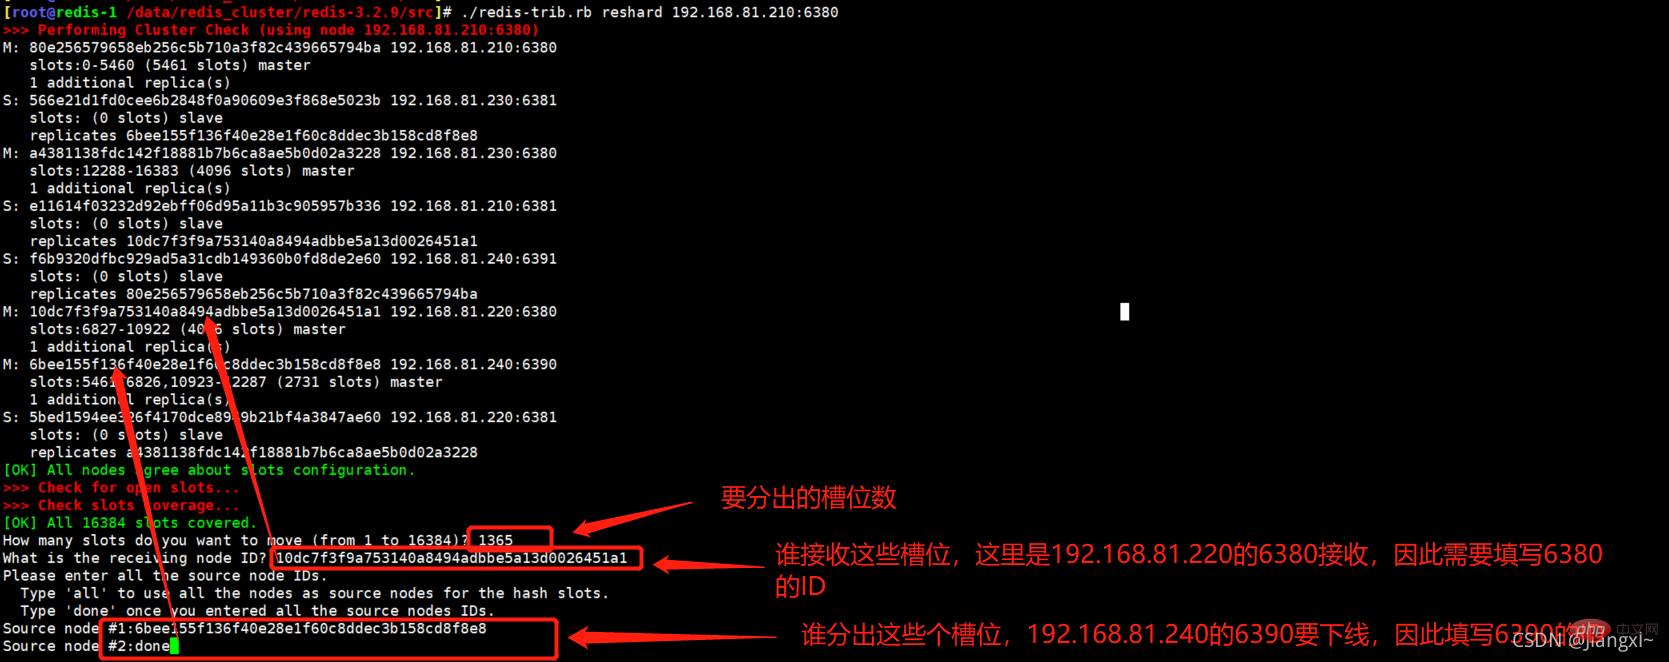
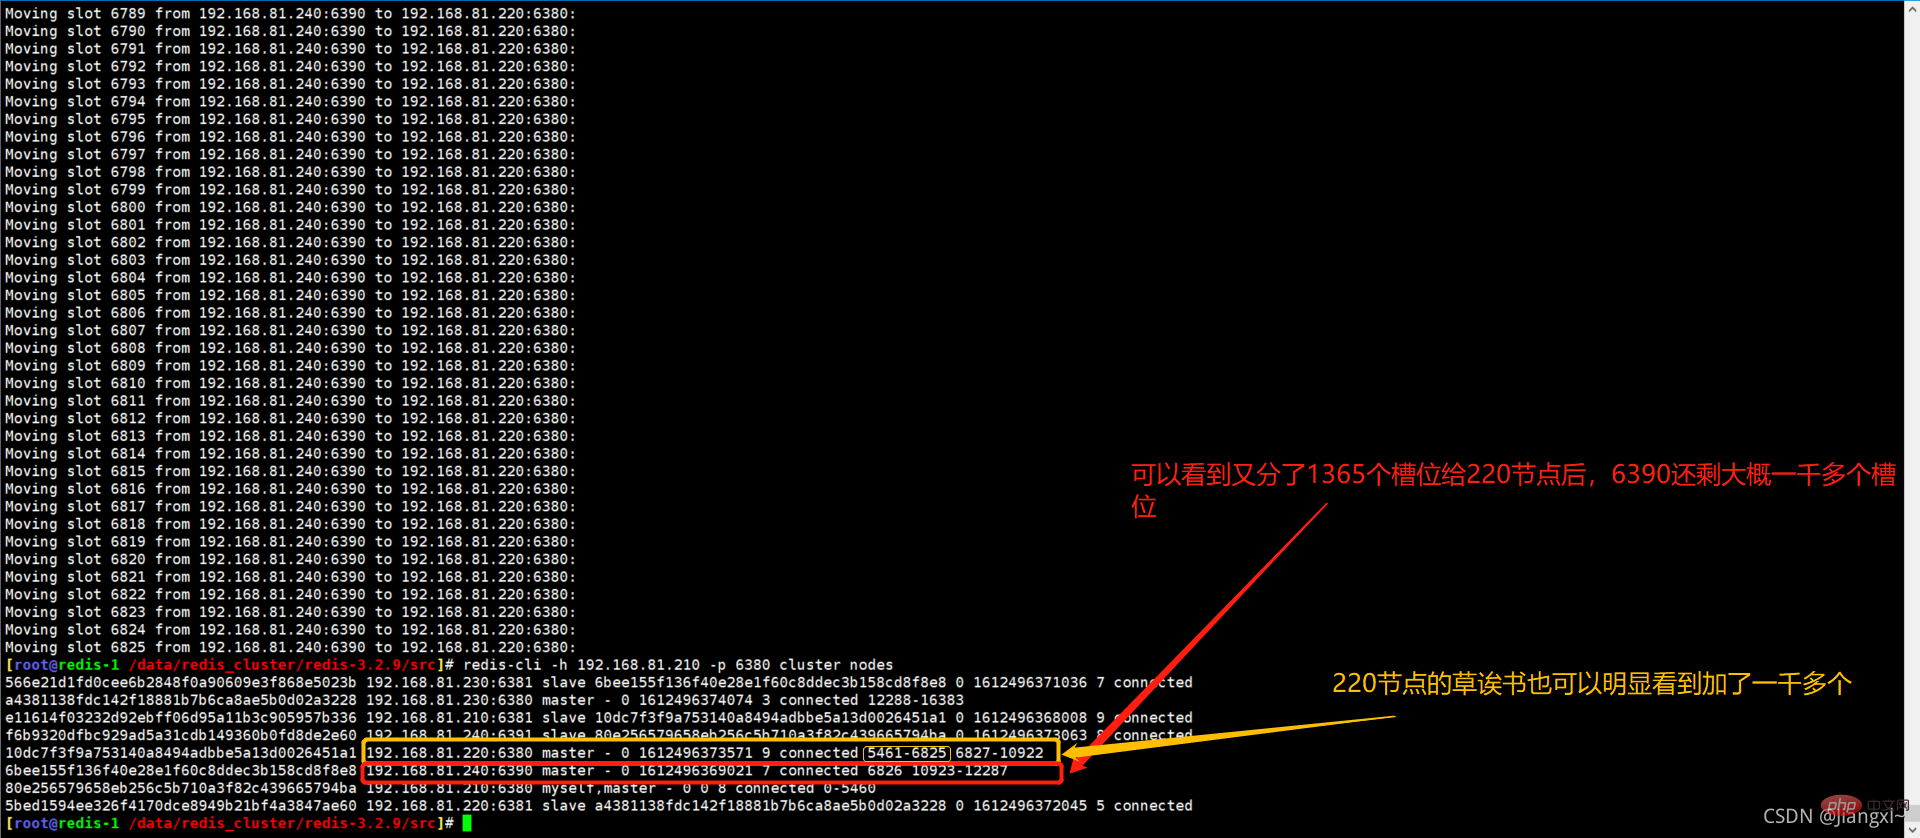
2.3. Allocate 1365 slots to 6380 nodes at 192.168.81.220
[root@redis-1 /data/redis_cluster/redis-3.2.9/src]# ./redis-trib.rb reshard 192.168.81.210:6380
How many slots do you want to move (from 1 to 16384)? 1365				#分配出多少个槽位

What is the receiving node ID? 10dc7f3f9a753140a8494adbbe5a13d0026451a1				#将槽位分给那个节点

Please enter all the source node IDs.
  Type 'all' to use all the nodes as source nodes for the hash slots.
  Type 'done' once you entered all the source nodes IDs.
Source node #1:6bee155f136f40e28e1f60c8ddec3b158cd8f8e8					#从哪个节点分出槽位
Source node #2:done

Do you want to proceed with the proposed reshard plan (yes/no)? yes			#输入yes继续
Screenshot showing the shrinking process.
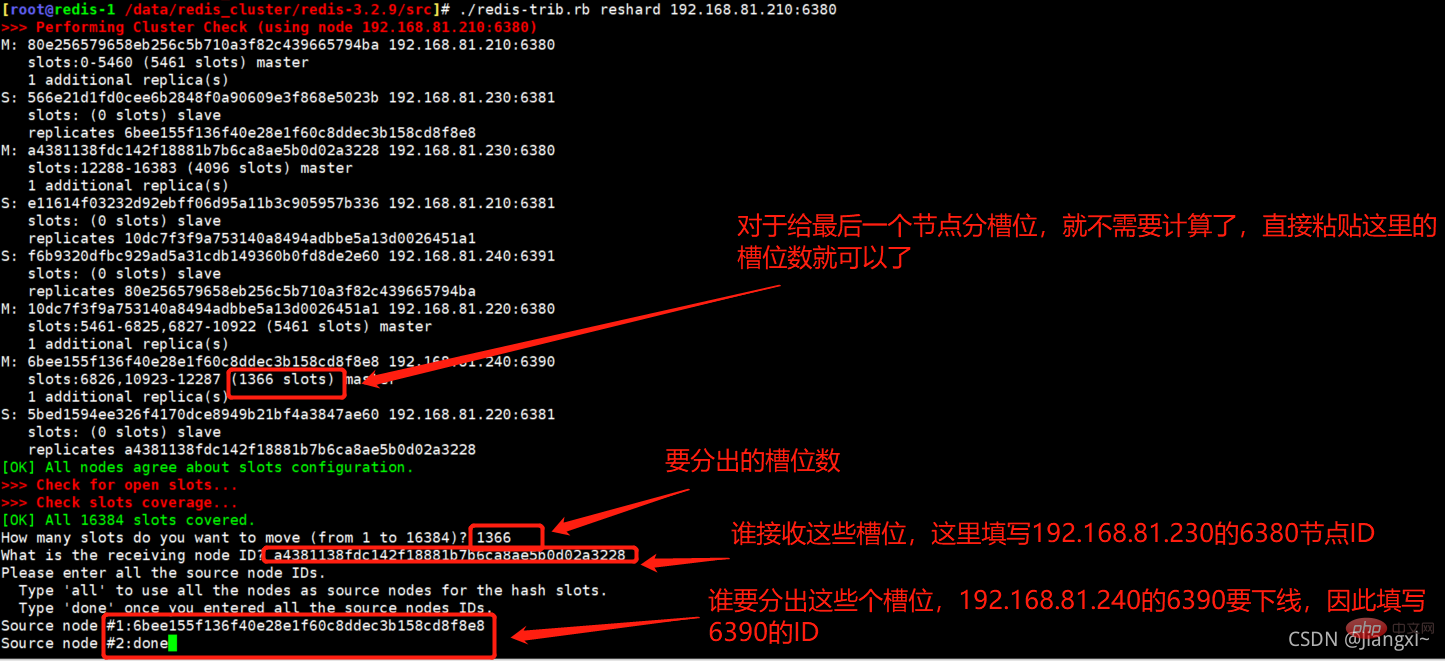
2.4.分配1365个槽位给192.168.81.230的6380节点
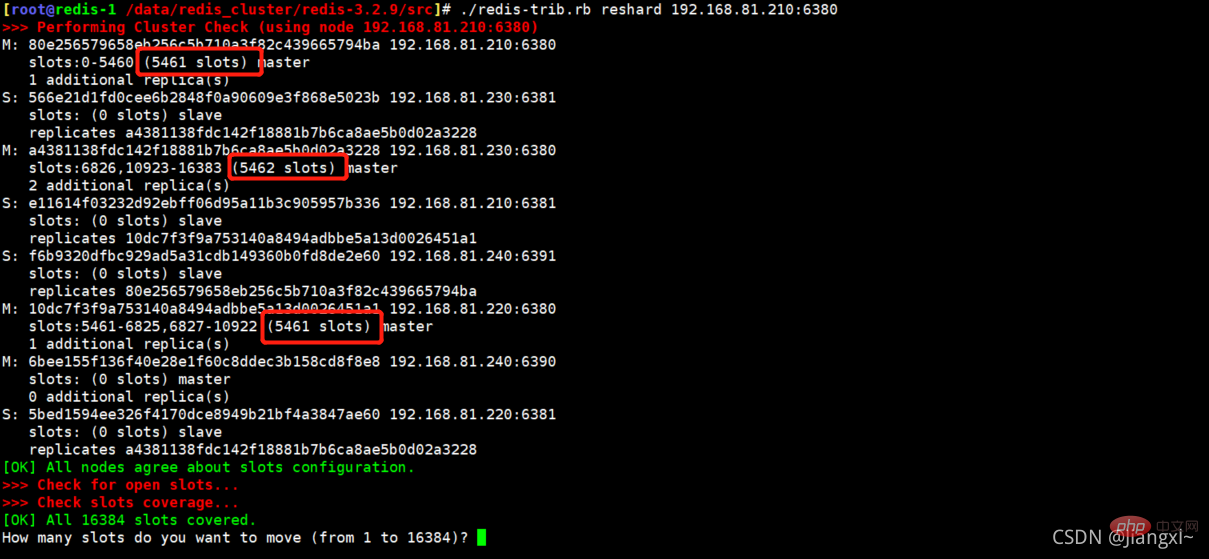
[root@redis-1 /data/redis_cluster/redis-3.2.9/src]# ./redis-trib.rb reshard 192.168.81.210:6380
How many slots do you want to move (from 1 to 16384)? 1366				#分配出多少个槽位

What is the receiving node ID? a4381138fdc142f18881b7b6ca8ae5b0d02a3228				#将槽位分给那个节点

Please enter all the source node IDs.
  Type 'all' to use all the nodes as source nodes for the hash slots.
  Type 'done' once you entered all the source nodes IDs.
Source node #1:6bee155f136f40e28e1f60c8ddec3b158cd8f8e8					#从哪个节点分出槽位
Source node #2:done

Do you want to proceed with the proposed reshard plan (yes/no)? yes			#输入yes继续
收缩过程截图展示。
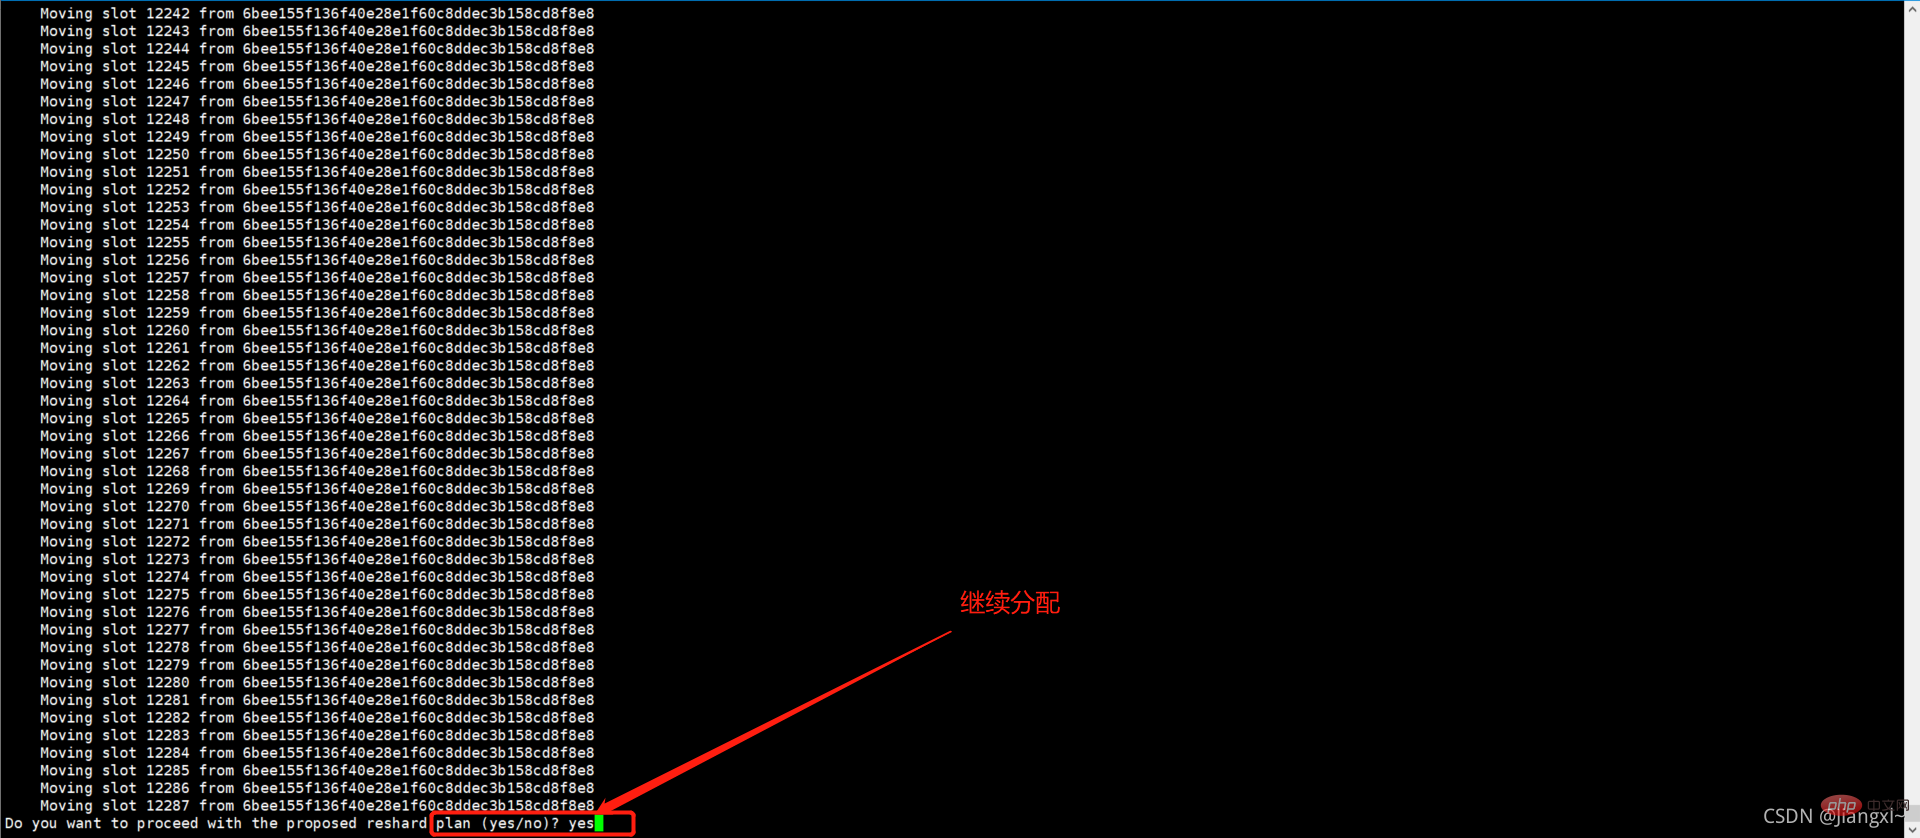
当最后一个节点迁移完数据后,6390主节点槽位数变为0。
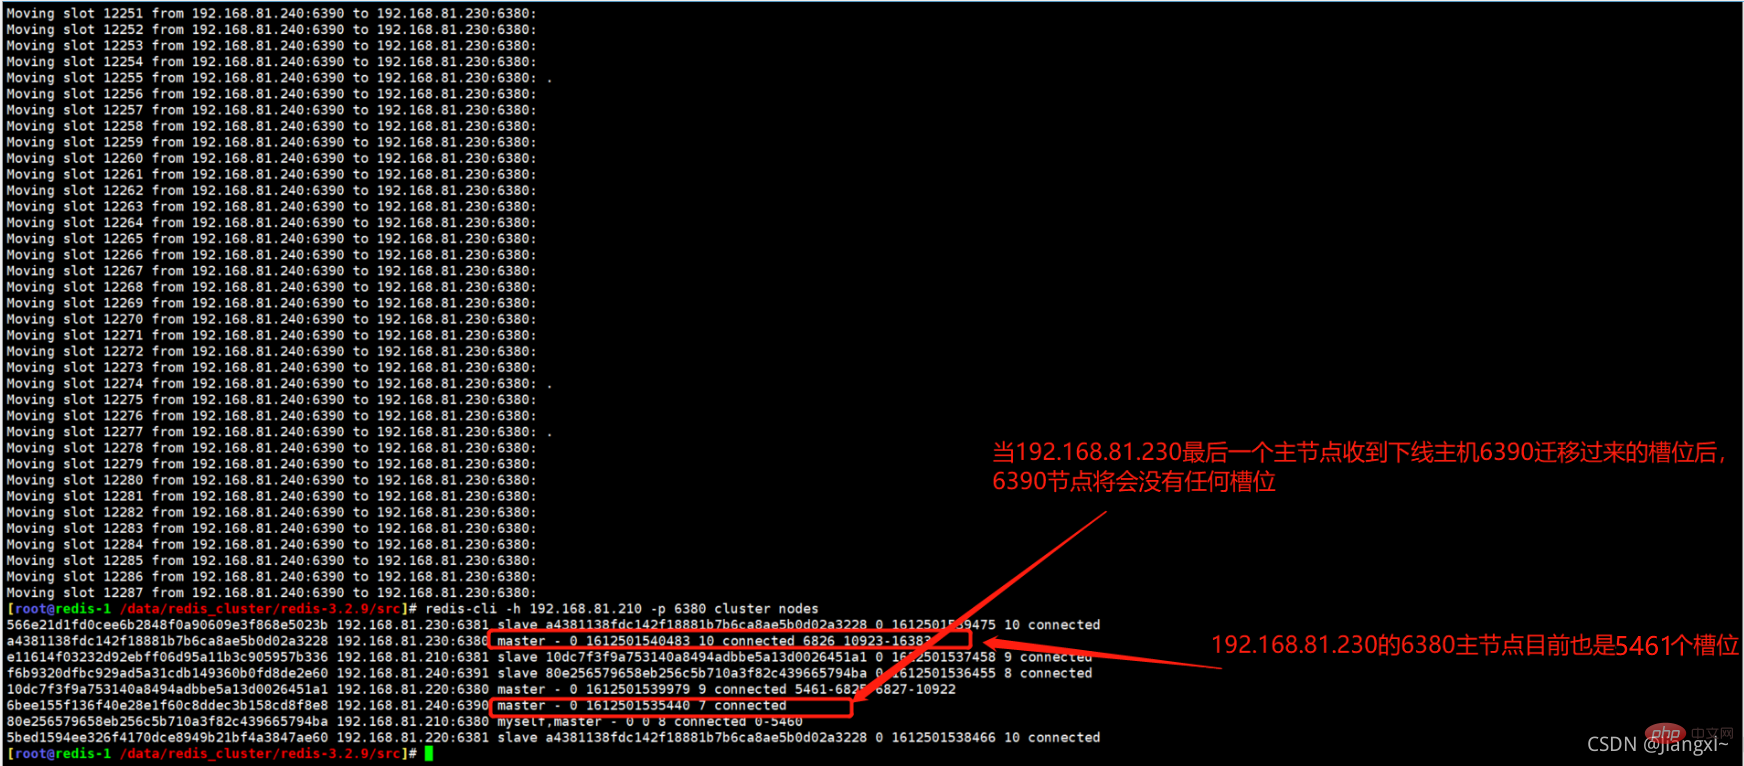
2.5.查看当前集群槽位分配
槽位及数据已经从6390即将下线的主机迁移完毕,可以看下当前集群三个主节点的槽位数。
可以非常清楚的看到,现在每个主节点的槽位数为5461。
如果觉得槽位重新分配后顺序不太满意,那么在执行一下reshard,把其它节点的槽位都分给192.168.81.210的6380上,这样一来,210的6380拥有的槽位就是0-16383,然后在将210的槽位一个节点分给5461个,分完之后,各节点的顺序就一致了。
3.验证数据迁移过程是否导致数据异常
多开几个窗口,一个执行数据槽位迁移,一个不断创建key,一个查看key的创建进度,一个查看key的数据。
持续测试,发现没有任何数据异常,全部显示ok。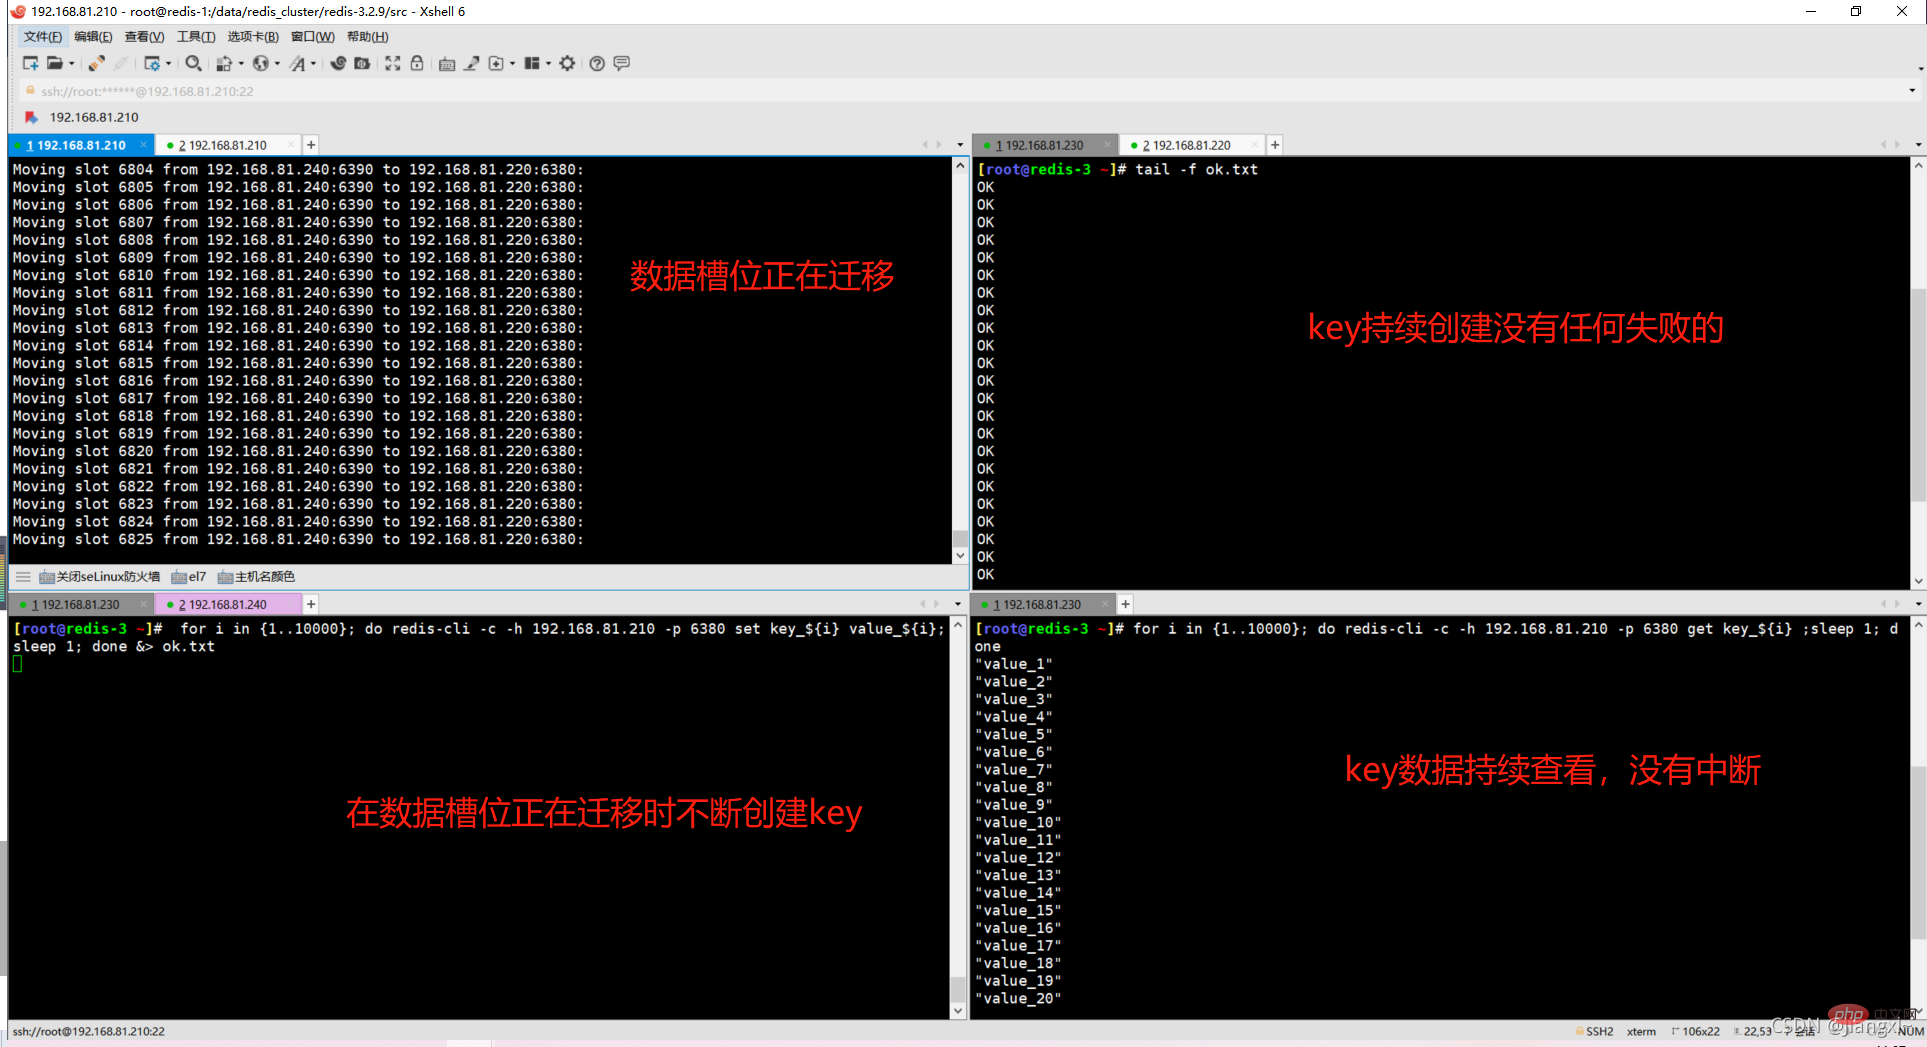
4.将下线的主节点从集群中删除
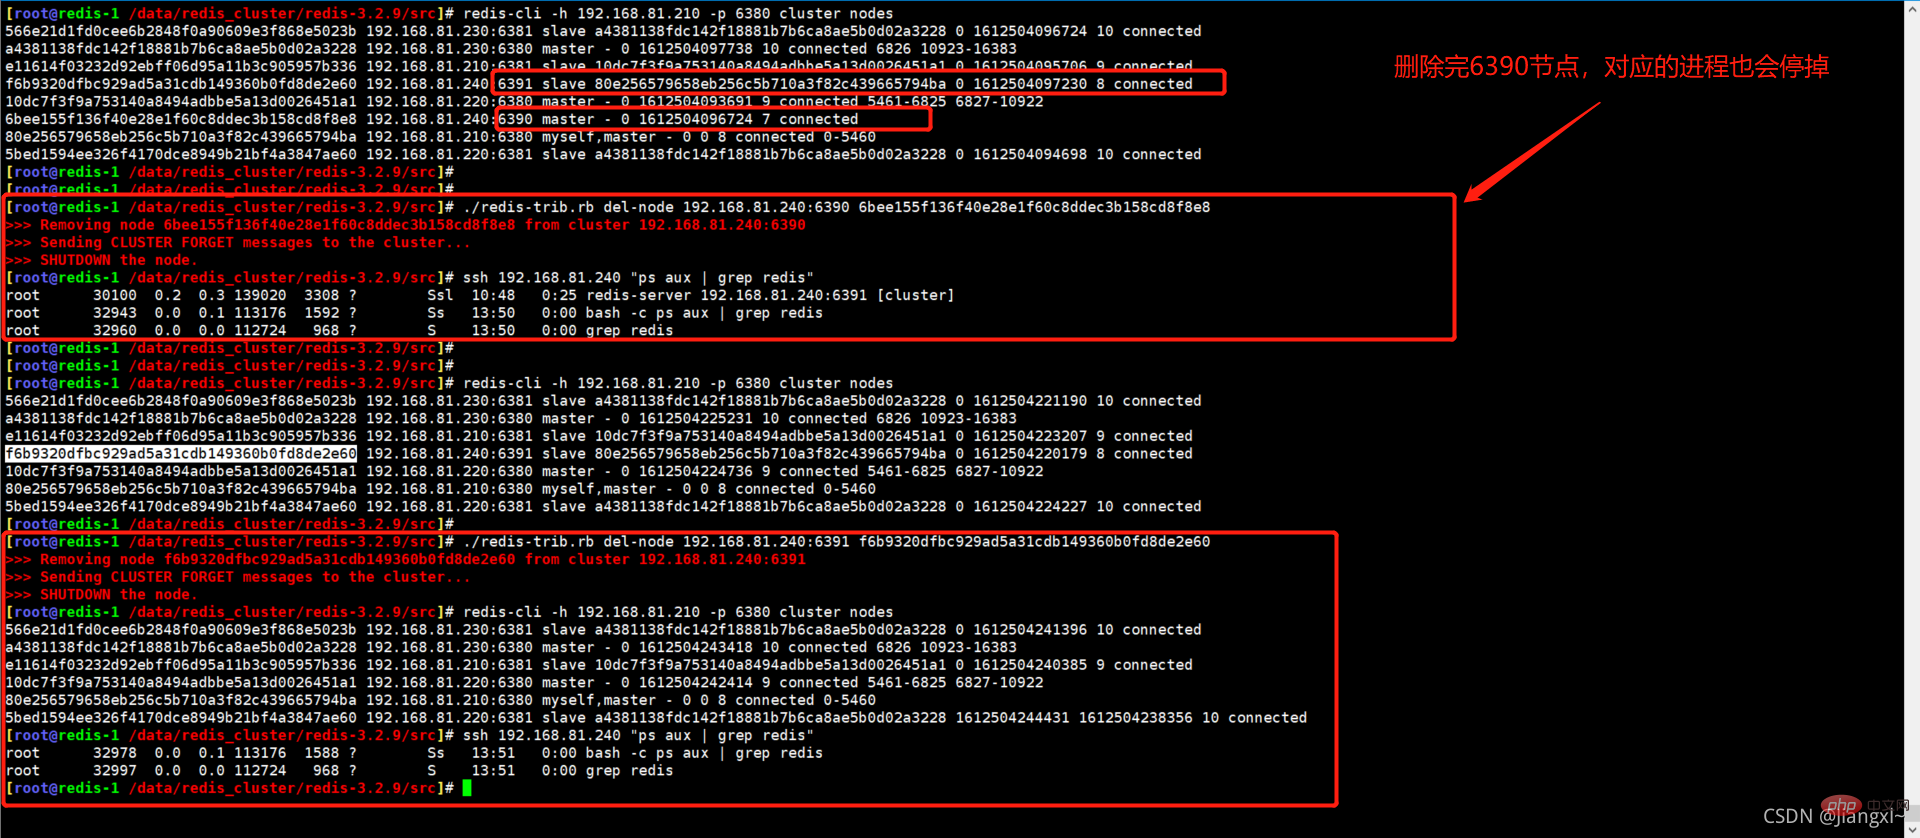
4.1.删除节点
使用redis-trib删除一个节点,如果这个节点存在复制关系,有节点在复制当前节点或者当前节点复制别的节点的数据,redis-trib会自动处理复制关系,然后将节点删除,节点删除后会把对应的进程也停止运行。
删除节点之前必须确保该节点没有任何槽位和数据,否则会删除失败。
命令:./redis-trib.rb del-node 节点IP:端口 ID
[root@redis-1 /data/redis_cluster/redis-3.2.9/src]# ./redis-trib.rb del-node 192.168.81.240:6390 6bee155f136f40e28e1f60c8ddec3b158cd8f8e8
>>> Removing node 6bee155f136f40e28e1f60c8ddec3b158cd8f8e8 from cluster 192.168.81.240:6390
>>> Sending CLUSTER FORGET messages to the cluster...
>>> SHUTDOWN the node.

[root@redis-1 /data/redis_cluster/redis-3.2.9/src]# ./redis-trib.rb del-node 192.168.81.240:6391 f6b9320dfbc929ad5a31cdb149360b0fd8de2e60
>>> Removing node f6b9320dfbc929ad5a31cdb149360b0fd8de2e60 from cluster 192.168.81.240:6391
>>> Sending CLUSTER FORGET messages to the cluster...
>>> SHUTDOWN the node.
4.2.调整主从交叉复制
删掉192.168.81.240服务器上的两个redis节点后,192.168.81.210服务器上的6380就没有了复制关系,我们需要把192.168.81.230的6381节点复制192.168.81.210的6380节点。
[root@redis-1 ~]# redis-cli -h 192.168.81.230 -p 6381
192.168.81.230:6381> CLUSTER REPLICATE 80e256579658eb256c5b710a3f82c439665794ba
OK

4.3.当节点存在数据无法删除
[root@redis-1 /data/redis_cluster/redis-3.2.9/src]# ./redis-trib.rb del-node 192.168.81.220:6380 10dc7f3f9a753140a8494adbbe5a13d0026451a1
>>> Removing node 10dc7f3f9a753140a8494adbbe5a13d0026451a1 from cluster 192.168.81.220:6380
[ERR] Node 192.168.81.220:6380 is not empty! Reshard data away and try again.

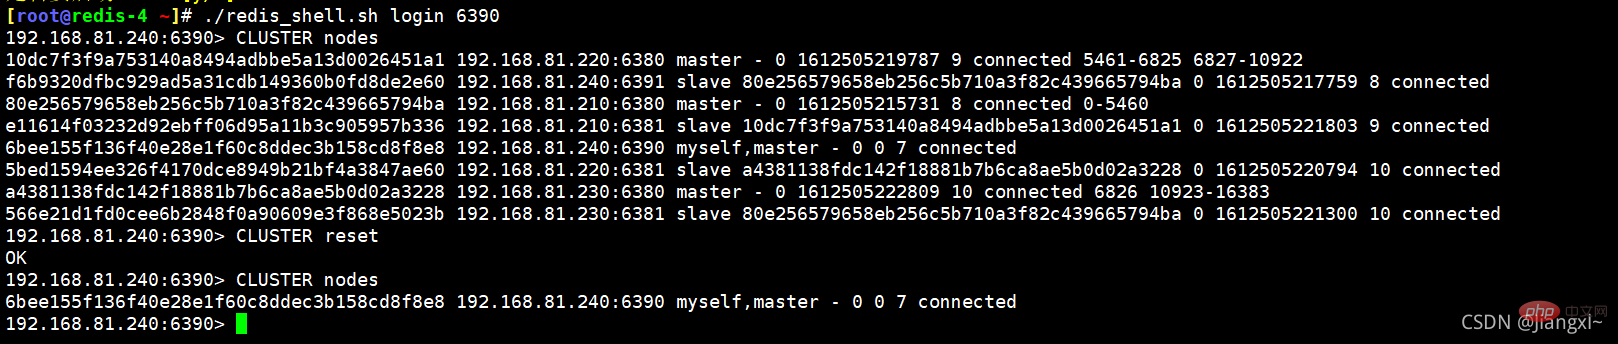
5.将下线主机清空集群信息
redis-trib虽然能够将节点在集群中删除,但是无法将其的集群信息清空,如果集群信息还有保留,那么该接地那就无法加入其它集群。
在下线的redis节点上使用cluster reset删除集群信息即可。
192.168.81.240:6390> CLUSTER reset
OK
推荐学习:Redis视频教程
The above is the detailed content of Detailed example of Redis Cluster cluster shrinking master and slave nodes. For more information, please follow other related articles on the PHP Chinese website!

Hot AI Tools

Undresser.AI Undress
AI-powered app for creating realistic nude photos

AI Clothes Remover
Online AI tool for removing clothes from photos.

Undress AI Tool
Undress images for free

Clothoff.io
AI clothes remover

Video Face Swap
Swap faces in any video effortlessly with our completely free AI face swap tool!

Hot Article
Hot Tools

Notepad++7.3.1
Easy-to-use and free code editor

SublimeText3 Chinese version
Chinese version, very easy to use

Zend Studio 13.0.1
Powerful PHP integrated development environment

Dreamweaver CS6
Visual web development tools

SublimeText3 Mac version
God-level code editing software (SublimeText3)
Hot Topics


 How to build the redis cluster mode
Apr 10, 2025 pm 10:15 PM
How to build the redis cluster mode
Apr 10, 2025 pm 10:15 PM
Redis cluster mode deploys Redis instances to multiple servers through sharding, improving scalability and availability. The construction steps are as follows: Create odd Redis instances with different ports; Create 3 sentinel instances, monitor Redis instances and failover; configure sentinel configuration files, add monitoring Redis instance information and failover settings; configure Redis instance configuration files, enable cluster mode and specify the cluster information file path; create nodes.conf file, containing information of each Redis instance; start the cluster, execute the create command to create a cluster and specify the number of replicas; log in to the cluster to execute the CLUSTER INFO command to verify the cluster status; make
 How to clear redis data
Apr 10, 2025 pm 10:06 PM
How to clear redis data
Apr 10, 2025 pm 10:06 PM
How to clear Redis data: Use the FLUSHALL command to clear all key values. Use the FLUSHDB command to clear the key value of the currently selected database. Use SELECT to switch databases, and then use FLUSHDB to clear multiple databases. Use the DEL command to delete a specific key. Use the redis-cli tool to clear the data.
 How to read redis queue
Apr 10, 2025 pm 10:12 PM
How to read redis queue
Apr 10, 2025 pm 10:12 PM
To read a queue from Redis, you need to get the queue name, read the elements using the LPOP command, and process the empty queue. The specific steps are as follows: Get the queue name: name it with the prefix of "queue:" such as "queue:my-queue". Use the LPOP command: Eject the element from the head of the queue and return its value, such as LPOP queue:my-queue. Processing empty queues: If the queue is empty, LPOP returns nil, and you can check whether the queue exists before reading the element.
 How to use the redis command
Apr 10, 2025 pm 08:45 PM
How to use the redis command
Apr 10, 2025 pm 08:45 PM
Using the Redis directive requires the following steps: Open the Redis client. Enter the command (verb key value). Provides the required parameters (varies from instruction to instruction). Press Enter to execute the command. Redis returns a response indicating the result of the operation (usually OK or -ERR).
 How to use redis lock
Apr 10, 2025 pm 08:39 PM
How to use redis lock
Apr 10, 2025 pm 08:39 PM
Using Redis to lock operations requires obtaining the lock through the SETNX command, and then using the EXPIRE command to set the expiration time. The specific steps are: (1) Use the SETNX command to try to set a key-value pair; (2) Use the EXPIRE command to set the expiration time for the lock; (3) Use the DEL command to delete the lock when the lock is no longer needed.
 How to configure Lua script execution time in centos redis
Apr 14, 2025 pm 02:12 PM
How to configure Lua script execution time in centos redis
Apr 14, 2025 pm 02:12 PM
On CentOS systems, you can limit the execution time of Lua scripts by modifying Redis configuration files or using Redis commands to prevent malicious scripts from consuming too much resources. Method 1: Modify the Redis configuration file and locate the Redis configuration file: The Redis configuration file is usually located in /etc/redis/redis.conf. Edit configuration file: Open the configuration file using a text editor (such as vi or nano): sudovi/etc/redis/redis.conf Set the Lua script execution time limit: Add or modify the following lines in the configuration file to set the maximum execution time of the Lua script (unit: milliseconds)
 How to use the redis command line
Apr 10, 2025 pm 10:18 PM
How to use the redis command line
Apr 10, 2025 pm 10:18 PM
Use the Redis command line tool (redis-cli) to manage and operate Redis through the following steps: Connect to the server, specify the address and port. Send commands to the server using the command name and parameters. Use the HELP command to view help information for a specific command. Use the QUIT command to exit the command line tool.
 How to optimize the performance of debian readdir
Apr 13, 2025 am 08:48 AM
How to optimize the performance of debian readdir
Apr 13, 2025 am 08:48 AM
In Debian systems, readdir system calls are used to read directory contents. If its performance is not good, try the following optimization strategy: Simplify the number of directory files: Split large directories into multiple small directories as much as possible, reducing the number of items processed per readdir call. Enable directory content caching: build a cache mechanism, update the cache regularly or when directory content changes, and reduce frequent calls to readdir. Memory caches (such as Memcached or Redis) or local caches (such as files or databases) can be considered. Adopt efficient data structure: If you implement directory traversal by yourself, select more efficient data structures (such as hash tables instead of linear search) to store and access directory information
