 Development Tools
 VSCode
 Scaffolding also comes in plug-in form! vscode implements scaffolding plug-in
Scaffolding also comes in plug-in form! vscode implements scaffolding plug-in
Scaffolding also comes in plug-in form! The following article will introduce to you the vscode plug-in visual production and management scaffolding and principle analysis. I hope it will be helpful to everyone!
When it comes to scaffolding, you may think of various xxx-cli. This article introduces another way: implemented in the form of vscode plug-in to provide web visual operations , as shown below:
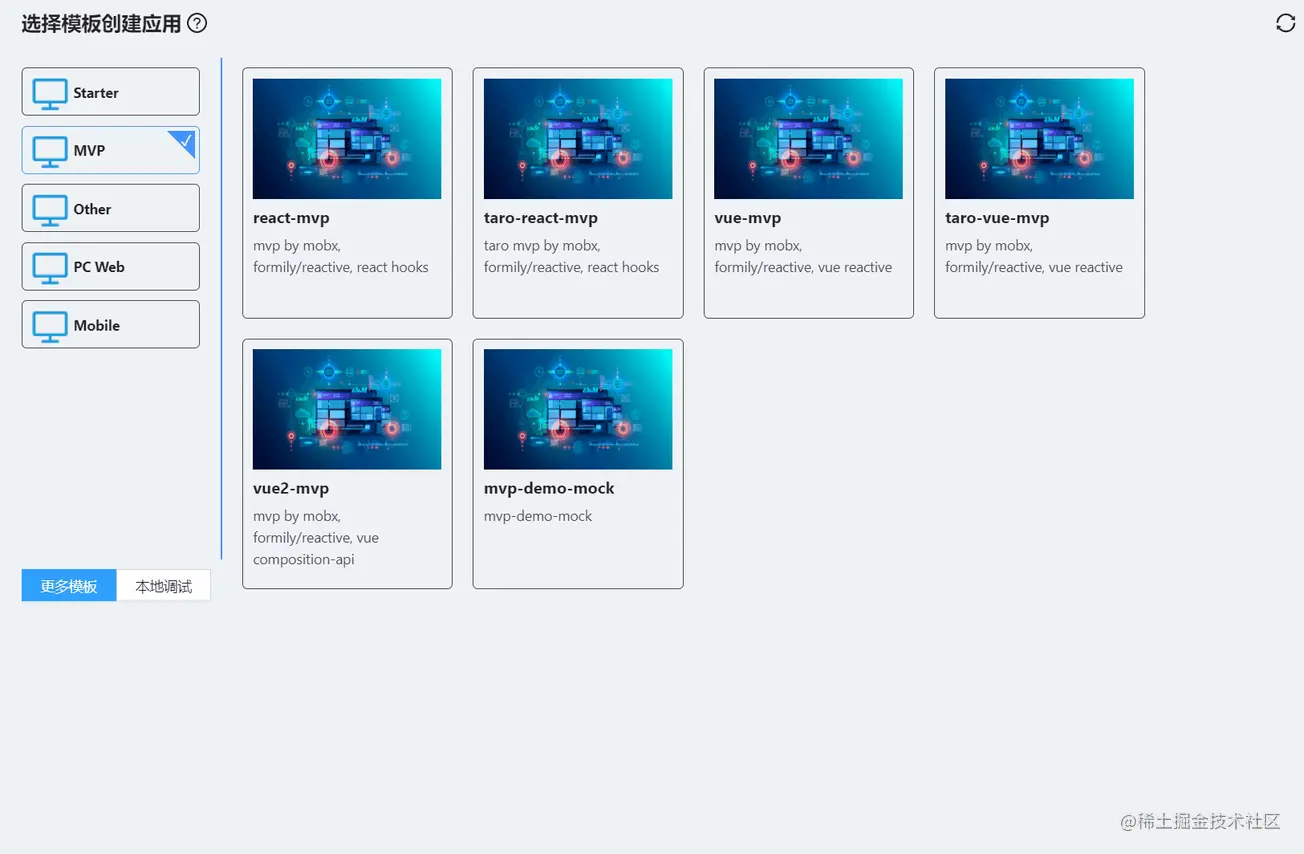
#The following describes how to install and use it, as well as the implementation principle.
Install and use
vscode to install the lowcode plug-in. This plug-in is an efficiency tool. Scaffolding is only one of its functions. You can view more functionsDocumentation, this episode only talks about scaffolding. [Recommended learning: "vscode introductory tutorial"]
After the plug-in is installed, open the scaffolding interface. The steps are as follows:
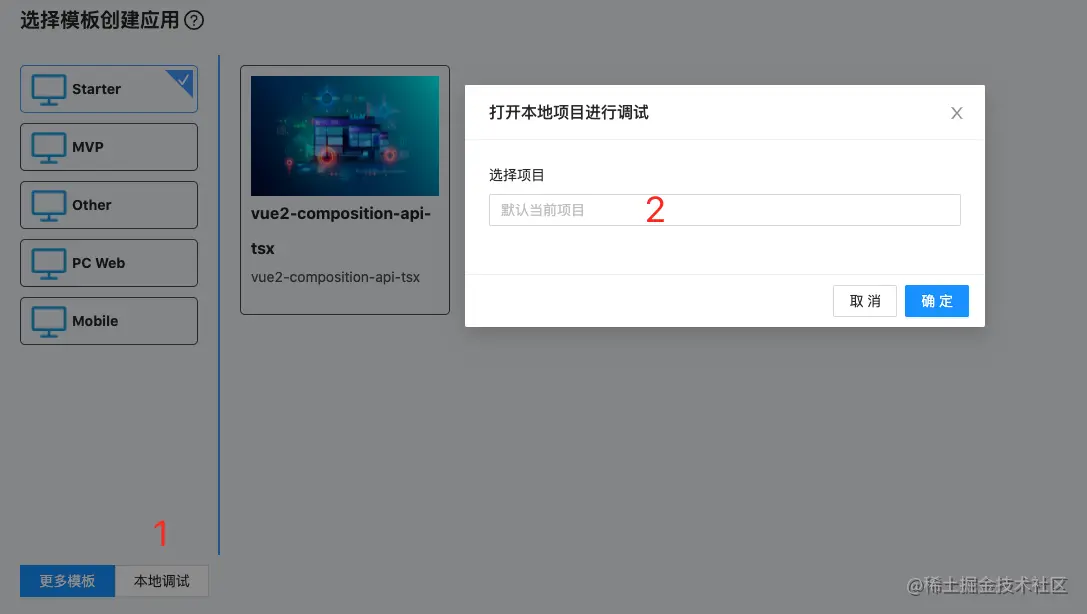

Create the scaffolding
In the root directory of the template project Create thelowcode.scaffold.config.json file, and add the .ejs suffix to the file that needs to be dynamically replaced.
ejs syntax: https://ejs.bootcss.com/

Configuration##A complete
lowcode.scaffold.config.json Configuration: <div class="code" style="position:relative; padding:0px; margin:0px;"><pre class='brush:php;toolbar:false;'>{
"formSchema": {
"schema": {
"type": "object",
"ui:displayType": "row",
"ui:showDescIcon": true,
"properties": {
"port": {
"title": "监听端口",
"type": "string",
"props": {},
"default": "3000"
},
"https": {
"title": "https",
"type": "boolean",
"ui:widget": "switch"
},
"lint": {
"title": "eslint + prettier",
"type": "boolean",
"ui:widget": "switch",
"default": true
},
"noREADME": {
"title": "移除README文件",
"type": "boolean",
"ui:widget": "switch",
"ui:width": "100%",
"ui:labelWidth": 0,
"ui:hidden": "{{rootValue.emptyREADME === true}}",
"default": false
},
"emptyREADME": {
"title": "空README文件",
"type": "boolean",
"ui:widget": "switch",
"ui:hidden": "{{rootValue.noREADME === true}}"
}
},
"labelWidth": 120,
"displayType": "row"
},
"formData": {
"port": 3000,
"https": false,
"lint": true,
"noREADME": false,
"emptyREADME": false
}
},
"excludeCompile": ["codeTemplate/", "materials/"],
"conditionFiles": {
"noREADME": {
"value": true,
"exclude": ["README.md.ejs"]
},
"lint": {
"value": false,
"exclude": [".eslintrc.js", ".prettierrc.js"]
}
}
}</pre><div class="contentsignin">Copy after login</div></div>
:
is the schema exported by x-render form designer. The form interface will be built based on the schema. formSchema.formData is the default for the form. Data
 #When creating a project, the form data will be passed into the ejs template for compilation.
: Configure folders or files that do not need to be compiled by ejs.
: Based on the value of the form item, delete certain folders or files when creating the project, such as: <div class="code" style="position:relative; padding:0px; margin:0px;"><pre class='brush:php;toolbar:false;'>"conditionFiles": {
"noREADME": {
"value": true,
"exclude": ["README.md.ejs"]
},
"lint": {
"value": false,
"exclude": [".eslintrc.js", ".prettierrc.js"]
}
}</pre><div class="contentsignin">Copy after login</div></div>when
When the value of this form item is false, the configured folders or files ".eslintrc.js" and ".prettierrc.js" will be excluded from the created project.
Local debugging scaffolding

https://github.com/lowcode-scaffold/lowcode-mock
Submit the scaffolding to the git repository, please note that it is open Public access to the project. Use scaffoldingUse the git warehouse address directlyPublish the scaffolding
##Note Use clone address to support specified branches, such as 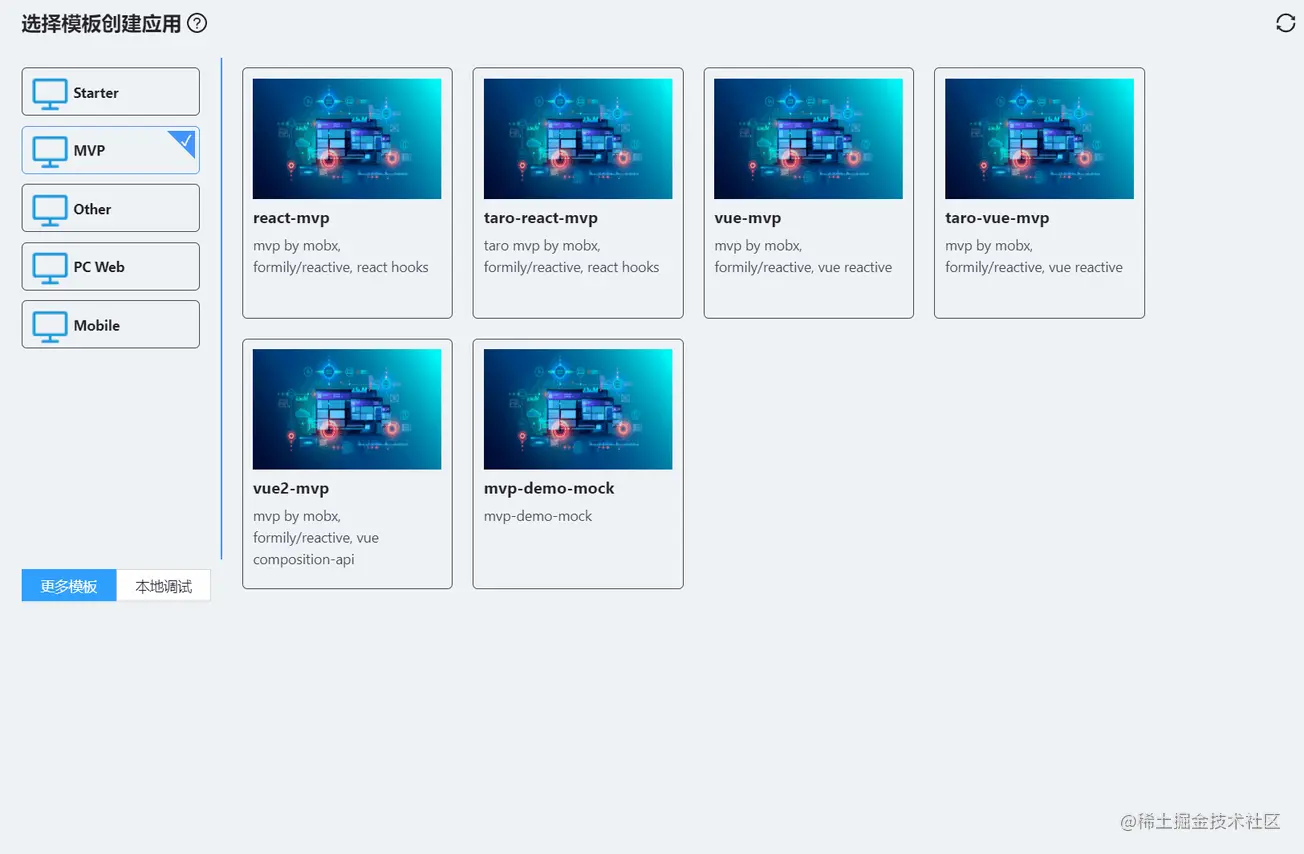 -b master https://github.com/lowcode-scaffold/lowcode-mock.git
 Share to template list to quickly create
Modify
warehouse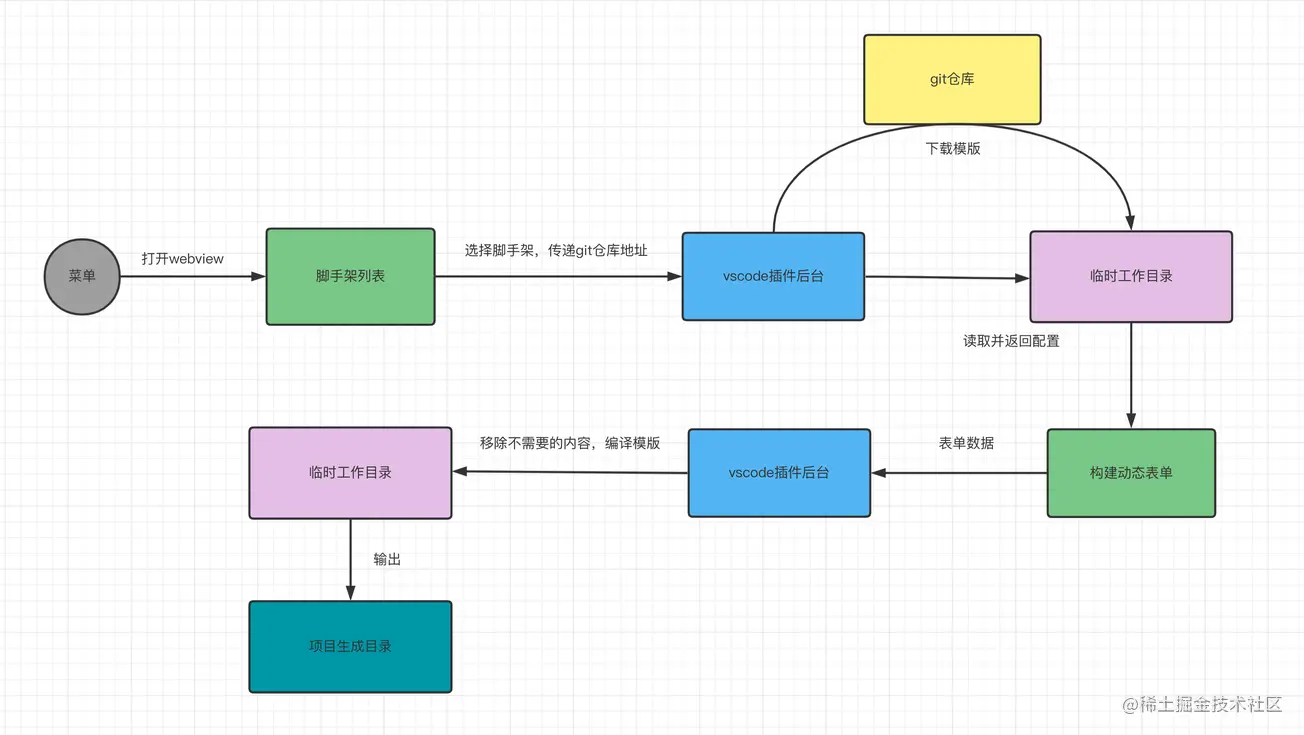 Contents in
, submit PR. 打开 webview 的时候从 cdn 拉取记录了脚手架列表的 json 文件,渲染列表视图。 点击某个脚手架,将脚手架的 git 仓库地址传到插件后台,插件后台根据 git 地址下载模版到临时工作目录,并且读取 webview 拿到 插件后台拿到表单数据后,到临时目录中根据 本地调试时,就是在步骤 2 中将选择的文件夹内容或者当前 vscode 打开的项目内容拷贝到临时工作目录。 下集再说插件其他功能,插件源码:https://github.com/lowcoding/lowcode-vscode 原文地址:https://juejin.cn/post/7080787567192309797 作者:若邪 更多关于VSCode的相关知识,请访问:vscode教程!!实现原理
lowcode.scaffold.config.json 文件中的 formSchema 返回给 webview。export const downloadScaffoldFromGit = (remote: string) => {
fs.removeSync(tempDir.scaffold);
execa.sync('git', ['clone', ...remote.split(' '), tempDir.scaffold]);
fs.removeSync(path.join(tempDir.scaffold, '.git'));
if (
fs.existsSync(path.join(tempDir.scaffold, 'lowcode.scaffold.config.json'))
) {
return fs.readJSONSync(
path.join(tempDir.scaffold, 'lowcode.scaffold.config.json'),
);
}
return {};
};formSchema 后弹框渲染动态表单,点提交后将动态表单数据以及生成目录等信息传给插件后台。conditionFiles 配置删除掉不需要的文件。然后根据表单数据编译所有 ejs 文件,最后将所有文件拷贝到生成目录。export const compileScaffold = async (model: any, createDir: string) => {
if (
fs.existsSync(path.join(tempDir.scaffold, 'lowcode.scaffold.config.json'))
) {
const config = fs.readJSONSync(
path.join(tempDir.scaffold, 'lowcode.scaffold.config.json'),
);
const excludeCompile: string[] = config.excludeCompile || [];
if (config.conditionFiles) {
Object.keys(model).map((key) => {
if (
config.conditionFiles[key] &&
config.conditionFiles[key].value === model[key] &&
Array.isArray(config.conditionFiles[key].exclude)
) {
config.conditionFiles[key].exclude.map((exclude: string) => {
fs.removeSync(path.join(tempDir.scaffold, exclude));
});
}
});
}
await renderEjsTemplates(model, tempDir.scaffold, excludeCompile);
fs.removeSync(path.join(tempDir.scaffold, 'lowcode.scaffold.config.json'));
}
fs.copySync(tempDir.scaffold, createDir);
};
The above is the detailed content of Scaffolding also comes in plug-in form! vscode implements scaffolding plug-in. For more information, please follow other related articles on the PHP Chinese website!

Hot AI Tools

Undresser.AI Undress
AI-powered app for creating realistic nude photos

AI Clothes Remover
Online AI tool for removing clothes from photos.

Undress AI Tool
Undress images for free

Clothoff.io
AI clothes remover

Video Face Swap
Swap faces in any video effortlessly with our completely free AI face swap tool!

Hot Article

Hot Tools

Notepad++7.3.1
Easy-to-use and free code editor

SublimeText3 Chinese version
Chinese version, very easy to use

Zend Studio 13.0.1
Powerful PHP integrated development environment

Dreamweaver CS6
Visual web development tools

SublimeText3 Mac version
God-level code editing software (SublimeText3)

Hot Topics
 How to define header files for vscode
Apr 15, 2025 pm 09:09 PM
How to define header files using Visual Studio Code? Create a header file and declare symbols in the header file using the .h or .hpp suffix name (such as classes, functions, variables) Compile the program using the #include directive to include the header file in the source file. The header file will be included and the declared symbols are available.
 What computer configuration is required for vscode
Apr 15, 2025 pm 09:48 PM
VS Code system requirements: Operating system: Windows 10 and above, macOS 10.12 and above, Linux distribution processor: minimum 1.6 GHz, recommended 2.0 GHz and above memory: minimum 512 MB, recommended 4 GB and above storage space: minimum 250 MB, recommended 1 GB and above other requirements: stable network connection, Xorg/Wayland (Linux)
 vscode terminal usage tutorial
Apr 15, 2025 pm 10:09 PM
vscode built-in terminal is a development tool that allows running commands and scripts within the editor to simplify the development process. How to use vscode terminal: Open the terminal with the shortcut key (Ctrl/Cmd). Enter a command or run the script. Use hotkeys (such as Ctrl L to clear the terminal). Change the working directory (such as the cd command). Advanced features include debug mode, automatic code snippet completion, and interactive command history.
 How to solve the problem of vscode Chinese annotations becoming question marks
Apr 15, 2025 pm 11:36 PM
How to solve the problem that Chinese comments in Visual Studio Code become question marks: Check the file encoding and make sure it is "UTF-8 without BOM". Change the font to a font that supports Chinese characters, such as "Song Style" or "Microsoft Yahei". Reinstall the font. Enable Unicode support. Upgrade VSCode, restart the computer, and recreate the source file.
 Where to write code in vscode
Apr 15, 2025 pm 09:54 PM
Writing code in Visual Studio Code (VSCode) is simple and easy to use. Just install VSCode, create a project, select a language, create a file, write code, save and run it. The advantages of VSCode include cross-platform, free and open source, powerful features, rich extensions, and lightweight and fast.
 Common commands for vscode terminal
Apr 15, 2025 pm 10:06 PM
Common commands for VS Code terminals include: Clear the terminal screen (clear), list the current directory file (ls), change the current working directory (cd), print the current working directory path (pwd), create a new directory (mkdir), delete empty directory (rmdir), create a new file (touch) delete a file or directory (rm), copy a file or directory (cp), move or rename a file or directory (mv) display file content (cat) view file content and scroll (less) view file content only scroll down (more) display the first few lines of the file (head)
 How to use VSCode
Apr 15, 2025 pm 11:21 PM
Visual Studio Code (VSCode) is a cross-platform, open source and free code editor developed by Microsoft. It is known for its lightweight, scalability and support for a wide range of programming languages. To install VSCode, please visit the official website to download and run the installer. When using VSCode, you can create new projects, edit code, debug code, navigate projects, expand VSCode, and manage settings. VSCode is available for Windows, macOS, and Linux, supports multiple programming languages and provides various extensions through Marketplace. Its advantages include lightweight, scalability, extensive language support, rich features and version
 vscode terminal command cannot be used
Apr 15, 2025 pm 10:03 PM
Causes and solutions for the VS Code terminal commands not available: The necessary tools are not installed (Windows: WSL; macOS: Xcode command line tools) Path configuration is wrong (add executable files to PATH environment variables) Permission issues (run VS Code as administrator) Firewall or proxy restrictions (check settings, unrestrictions) Terminal settings are incorrect (enable use of external terminals) VS Code installation is corrupt (reinstall or update) Terminal configuration is incompatible (try different terminal types or commands) Specific environment variables are missing (set necessary environment variables)


