 Development Tools
 VSCode
 How to configure synchronization in VSCode? Official synchronization plan sharing (strongly recommended)
How to configure synchronization in VSCode? Official synchronization plan sharing (strongly recommended)
How to configure synchronization in VSCode? This article will share with you the VSCode official configuration synchronization solution. Simply synchronize all your VSCode configurations. I hope it will be helpful to everyone!

I have been migrating my computer working environment these days. For VSCode, I really don’t want to download plug-ins and configure code rules from scratch, so I asked Baidu for help, and the search results were high. The solution is basically to use the Setings Sync plug-in, so I followed that.
After a lot of tossing, and even stepping into the trap where it is difficult to find a solution online, I sincerely wrote a synchronous article. Then a friend left a comment and told me that there is an official solution.


So in order to let more friends know about this solution, I checked the official documentation of VSCode and decided to write another article about VSCode Configure synchronization article.
What is the relationship between VSCode Settings Sync and the Settings Sync plug-in?
You still have to confirm the function of the Settings Sync plug-in. Although I have stepped on a lot of pitfalls, it is indeed Meets my needs. The names are both Settings Sync. Is there any relationship between the two?
The official explanation is: It doesn’t matter a dime!
I have experienced both methods, and my experience is: it is still the official one, and it is not a little bit more convenient. I strongly recommend the official synchronization solution directly introduced in this article! [Recommended learning: "vscode introductory tutorial"]

Next, we will introduce the official configuration synchronization scheme of VSCode, and the text begins. .
Turn on the Settings Sync function
Settings SyncThe function is turned off by default. Click the gear at the bottom left of VSCode to turn on the Settings Syncfunction

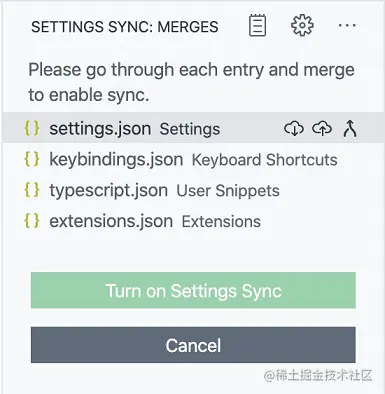
The following interface will appear, allowing you to select the content you want to synchronize, including the following 5 types (just select all if you find it troublesome):
- Settings(Configuration)
- Keyboard Shortcuts(Shortcut keys)
- Extensions(Plugin)
- User Snippets(User code snippets)
- UI State(Interface state)

Click the Sign in & Turn on button and choose the login method. It doesn’t matter which one you choose, as long as you use the same account to log in in the future.

Here I chooseSign in with your GitHub.
After selecting the login method and logging in successfully, Settings Sync is turned on, and VSCode will automatically synchronize the content you just selected in the background.
Merge or Replace?
Yes, it has been configured so far. Isn’t it super simple? Now VSCode has silently synchronized the configuration for you in the background. When you synchronize the configuration uploaded by other devices, the following dialog box may pop up. Just process it according to your own needs.

- ##Merge: This item will merge the remote configuration with the local configuration
- Replace Local: Remote configuration will replace local configuration
- Merge Manually...: Manually merge

- Accept Local: Use local configuration to overwrite remote configuration
- Accept Remote : Use remote configuration to overwrite local configuration
- Show Conflicts: Handle conflicts manually
Settings Sync at any time, and then use another account to turn on Settings Sync.
Can I roll back if the configuration is wrong?
VSCode will save your local and remote data backups while synchronizing data. When you encounter configuration errors, you can roll back.
Use the Settings Sync: Show Synced Data command in the command panel, you can see 3 views of synchronized records
- SYNC ACTIVITY ( REMOTE) : Remote synchronization record
- SYNC ACTIVITY (LOCAL) : Local synchronization record
- SYNCED MACHINES: Synchronized Device
It should be noted that the **SYNC ACTIVITY (LOCAL)** view is closed by default and can be displayed as shown in the figure below.
Version rollback
in **SYNC ACTIVITY (REMOTE) or SYNC ACTIVITY (LOCAL) **Select the version you want to roll back in the view and click the icon on the right to roll back.
View historical devices
SYNCED MACHINESThe view shows all the configurations you have ever synchronized The device is automatically named according to the version of VSCode (internal beta version/stable version) and the device operating system. You can click the "Pencil" button to change the name. You can also right-click on the corresponding device and select the Turn off Settings Sync menu to disable the synchronization function of the device.
What should I do if I want to delete all configurations?
Click the gear button, then select the Settings Sync is On menu, remember to check Check the box in the picture to delete all saved configurations. Open Settings Sync configuration next time and start all over again.
The VSCode official synchronization plan is briefly introduced here, which is enough for most friends. If you have more synchronization issues, you can refer toVSCode official document.
This article is reproduced from: https://juejin.cn/post/7066622158184644621
Author: Chan Mufeng
More about For VSCode related knowledge, please visit: vscode tutorial! !
The above is the detailed content of How to configure synchronization in VSCode? Official synchronization plan sharing (strongly recommended). For more information, please follow other related articles on the PHP Chinese website!

Hot AI Tools

Undresser.AI Undress
AI-powered app for creating realistic nude photos

AI Clothes Remover
Online AI tool for removing clothes from photos.

Undress AI Tool
Undress images for free

Clothoff.io
AI clothes remover

Video Face Swap
Swap faces in any video effortlessly with our completely free AI face swap tool!

Hot Article

Hot Tools

Notepad++7.3.1
Easy-to-use and free code editor

SublimeText3 Chinese version
Chinese version, very easy to use

Zend Studio 13.0.1
Powerful PHP integrated development environment

Dreamweaver CS6
Visual web development tools

SublimeText3 Mac version
God-level code editing software (SublimeText3)

Hot Topics
 How to define header files for vscode
Apr 15, 2025 pm 09:09 PM
How to define header files using Visual Studio Code? Create a header file and declare symbols in the header file using the .h or .hpp suffix name (such as classes, functions, variables) Compile the program using the #include directive to include the header file in the source file. The header file will be included and the declared symbols are available.
 What computer configuration is required for vscode
Apr 15, 2025 pm 09:48 PM
VS Code system requirements: Operating system: Windows 10 and above, macOS 10.12 and above, Linux distribution processor: minimum 1.6 GHz, recommended 2.0 GHz and above memory: minimum 512 MB, recommended 4 GB and above storage space: minimum 250 MB, recommended 1 GB and above other requirements: stable network connection, Xorg/Wayland (Linux)
 How to solve the problem of vscode Chinese annotations becoming question marks
Apr 15, 2025 pm 11:36 PM
How to solve the problem that Chinese comments in Visual Studio Code become question marks: Check the file encoding and make sure it is "UTF-8 without BOM". Change the font to a font that supports Chinese characters, such as "Song Style" or "Microsoft Yahei". Reinstall the font. Enable Unicode support. Upgrade VSCode, restart the computer, and recreate the source file.
 How to use VSCode
Apr 15, 2025 pm 11:21 PM
Visual Studio Code (VSCode) is a cross-platform, open source and free code editor developed by Microsoft. It is known for its lightweight, scalability and support for a wide range of programming languages. To install VSCode, please visit the official website to download and run the installer. When using VSCode, you can create new projects, edit code, debug code, navigate projects, expand VSCode, and manage settings. VSCode is available for Windows, macOS, and Linux, supports multiple programming languages and provides various extensions through Marketplace. Its advantages include lightweight, scalability, extensive language support, rich features and version
 Common commands for vscode terminal
Apr 15, 2025 pm 10:06 PM
Common commands for VS Code terminals include: Clear the terminal screen (clear), list the current directory file (ls), change the current working directory (cd), print the current working directory path (pwd), create a new directory (mkdir), delete empty directory (rmdir), create a new file (touch) delete a file or directory (rm), copy a file or directory (cp), move or rename a file or directory (mv) display file content (cat) view file content and scroll (less) view file content only scroll down (more) display the first few lines of the file (head)
 vscode terminal usage tutorial
Apr 15, 2025 pm 10:09 PM
vscode built-in terminal is a development tool that allows running commands and scripts within the editor to simplify the development process. How to use vscode terminal: Open the terminal with the shortcut key (Ctrl/Cmd). Enter a command or run the script. Use hotkeys (such as Ctrl L to clear the terminal). Change the working directory (such as the cd command). Advanced features include debug mode, automatic code snippet completion, and interactive command history.
 Where to write code in vscode
Apr 15, 2025 pm 09:54 PM
Writing code in Visual Studio Code (VSCode) is simple and easy to use. Just install VSCode, create a project, select a language, create a file, write code, save and run it. The advantages of VSCode include cross-platform, free and open source, powerful features, rich extensions, and lightweight and fast.
 How to switch Chinese mode with vscode
Apr 15, 2025 pm 11:39 PM
VS Code To switch Chinese mode: Open the settings interface (Windows/Linux: Ctrl, macOS: Cmd,) Search for "Editor: Language" settings Select "Chinese" in the drop-down menu Save settings and restart VS Code


)
)
)
)


