 Web Front-end
 Vue.js
 How to pre-render web pages in Vue? A brief analysis of the usage of prerender-spa-plugin
How to pre-render web pages in Vue? A brief analysis of the usage of prerender-spa-plugin
How to pre-render web pages in Vue? This article will introduce to you how Vue uses prerender-spa-plugin to pre-render web pages. I hope it will be helpful to you!

Pre-rendering
Normally, the Vue project is a single-page project, that is, the rendered project has only one index.html. [Related recommendations: vue.js video tutorial]
The shortcomings of this are obvious:
- To deploy to Nginx, you need to do
try_files $uri $ uri/ /index.htmlInternal redirection, the page can be accessed through routing. - SEO is not friendly and the search engine indexing effect is not good.
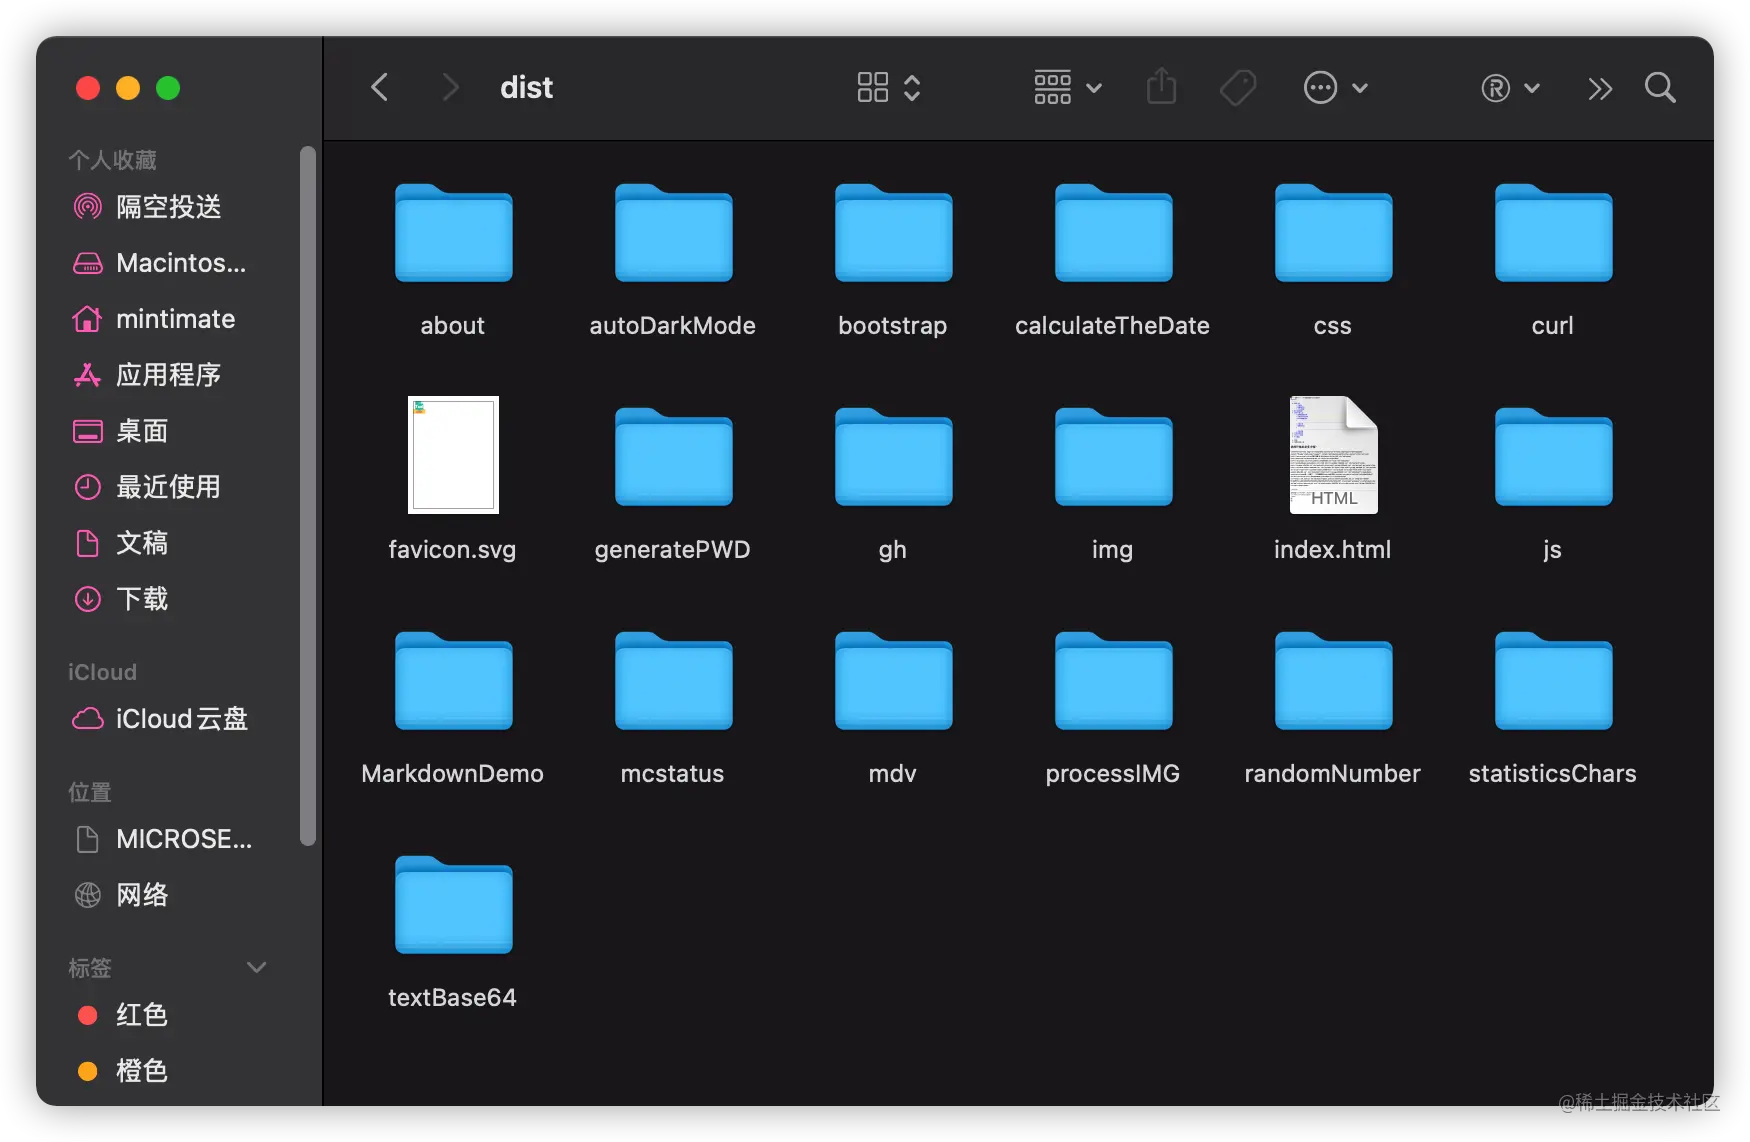
And pre-rendering is to render the original single index.html into multiple directories, and each directory has another index.html. This eliminates the need for internal redirection access routes and is more conducive to search engine inclusion.

prerender-spa-plugin
This pre-rendering uses prerender-spa-plugin for pre-rendering.
Its main principle is to start the browser, grab the HTML after rendering is completed, and then create a directory and save it as index.html.
Note:
- The official website currently only has Vue2.x Demo, which actually supports Vue3 (this demonstration also uses Vue3)
- Although the most recent one The released version is in 2018 (a new version should be released recently), but it has been maintained and can be used.
##Installation
First, we use npm to install:npm i prerender-spa-plugin
Need to pay attention, becauseprerender-spa-plugin
will install a Chromium, so the installation will take a long time.

npm i prerender-spa-plugin -D
- App.vuevue.config.js
App.vue
First , we add a trigger event inApp.vue:
mounted() {
  document.dispatchEvent(new Event('render-event'))
}vue.config.js
According toprerender-spa-plugin project documentation:
const path = require('path')
const PrerenderSPAPlugin = require('prerender-spa-plugin')

module.exports = {
  plugins: [
    ...
    new PrerenderSPAPlugin({
      // Required - The path to the webpack-outputted app to prerender.
      staticDir: path.join(__dirname, 'dist'),
      // Required - Routes to render.
      routes: [ '/', '/about', '/some/deep/nested/route' ],
    })
  ]
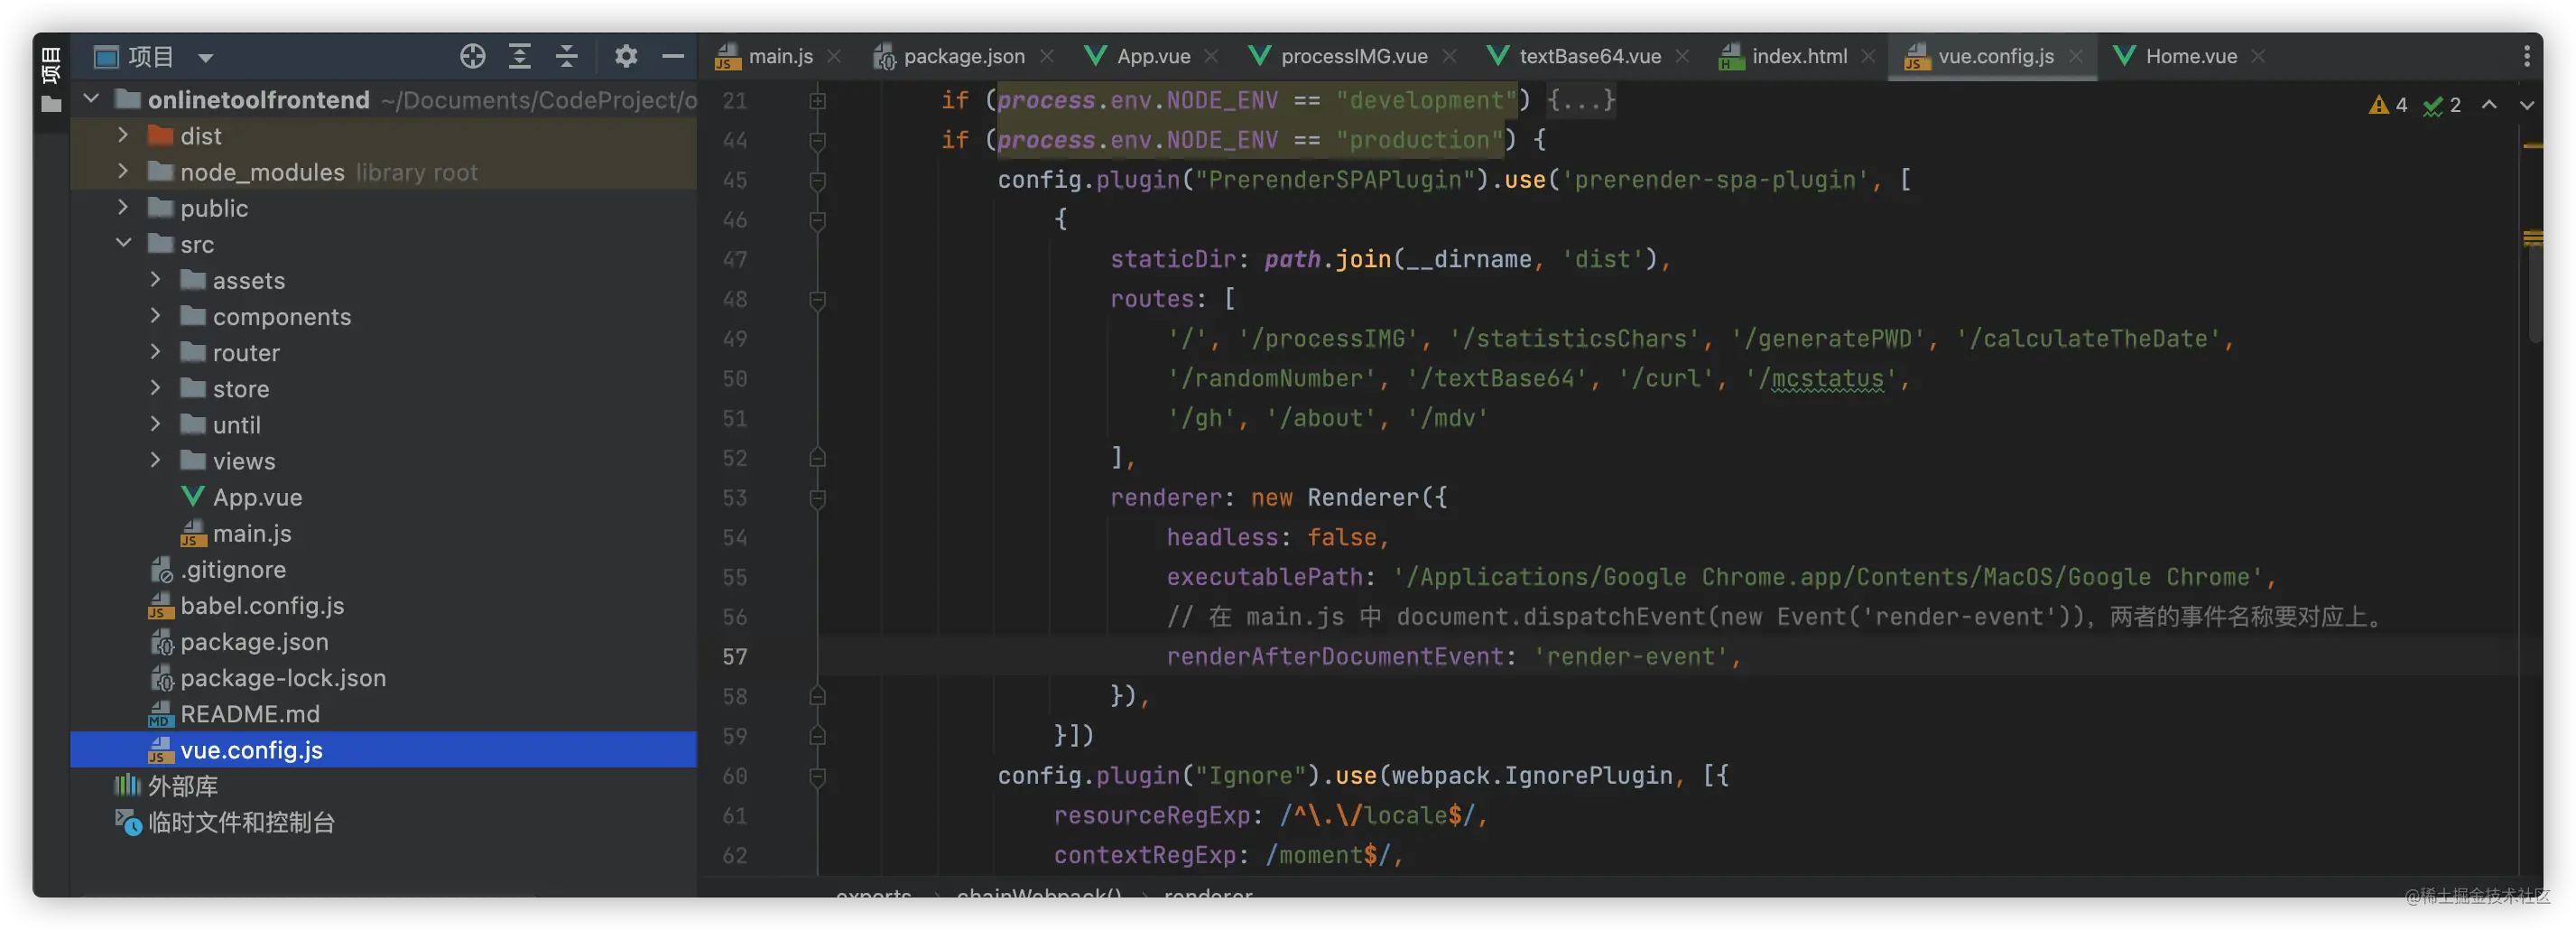
}PuppeteerRenderer for customization. So, my own vue.config.js configuration:
module.exports = {
    ……
    chainWebpack: config => {
        if (process.env.NODE_ENV == "development") {
        ……
        }
        if (process.env.NODE_ENV == "production") {
            config.plugin("PrerenderSPAPlugin").use('prerender-spa-plugin', [
                {
                    staticDir: path.join(__dirname, 'dist'),
                    routes: [
                        '/', '/processIMG', '/statisticsChars', '/generatePWD', '/calculateTheDate',
                        '/randomNumber', '/textBase64', '/curl', '/mcstatus',
                        '/gh', '/about', '/mdv'
                    ],
                    renderer: new PuppeteerRenderer({
                        headless: false,
                        executablePath: '/Applications/Google Chrome.app/Contents/MacOS/Google Chrome',
                        // 对应App.vue
                        renderAfterDocumentEvent: 'render-event',
                    }),
                }])
            ])
        }
}if-else.
Among them, the renderer attribute:
- headless
: This is Chrome’sheadlessattribute, which is commonly used for Debug. For more information, please refer to:Google Chrome - executablePath
: Redirect browser address; I use the Chrome browser that comes with my computer for redirection here. (Optional, you can not add it directly, Chromium will be called by default) - renderAfterDocumentEvent
: Needs to be the same event name as document.dispatchEvent(new Event('render-event')) in App.vue To correspond.
routes array contains the routing addresses that need to be pre-rendered.


staticDir needs to point to the compiled output folder.
npm run build

如果你也想用Vue-meta组件配合
prerender-spa-plugin,可以参考文章:https://juejin.cn/post/7056972997894094861
需要注意,如果出现什么错误,可以尝试:
# 删除项目node_modules
rm -rf node_modules
# 重新安装
npm install
这样的文件,就可以进行部署了。
部署效果
我们使用Nginx进行部署,上次到Nginx Web文件夹内,修改config文件,就不需要:
location / {
  try_files $uri $uri/ /index.html;
}来实现内部重定向了。因为有真实的目录,可以去掉。
但是,数据代理,最好使用Nginx来实现。比如,开发环境,数据代理:
config.devServer.proxy({
        '/dataApiJava': {
            target: JavaBaseURL,
            pathRewrite: {'^/dataApiJava': ""},
            ws: true,
            changeOrigin: true
        },
        '/dataApiPython': {
            target: PythonBaseURL,
            pathRewrite: {'^/dataApiPython': ""},
            ws: true,
            changeOrigin: true
        },
        '/ghs': {
            target: GithubSpeedURL,
            pathRewrite: {'^/ghs': ""},
            ws: true,
            changeOrigin: true
        }
    }
)对应的Nginx配置,可以这样写:
location /dataApiPython/{
      proxy_pass http://127.0.0.1:8099/;
      proxy_set_header Host $host;
      proxy_set_header X-Real-IP $remote_addr;
      proxy_set_header X-Forwarded-For $proxy_add_x_forwarded_for;
      proxy_set_header REMOTE-HOST $remote_addr;
      add_header X-Cache $upstream_cache_status;
}
location /dataApiJava/ {
      proxy_ssl_server_name on;
      proxy_pass https://…….cn/;
}
location /ghs/ {
      proxy_ssl_server_name on;
      proxy_pass https://……/gh/;
}给大家展示三种配置,按需设置哦。
END
到此,我们的前端预渲染就完成了。这样SEO好。但是对比SSR,还是优点欠缺。好处就是部署和配置方便,坏处就是构建麻烦,如果你页面有几十个路由需要预渲染,那么prerender-spa-plugin渲染起来就没SSR方便了。
改天有机会和大家分享分享SSR吧,真不错,又挖一个坑。
另外,是不是有小伙伴好奇,我截图里出现的CompressionPlugin属性?其实是gz压缩啦。有机会和大家分享,使用compression-webpack-plugin来优化项目。
更多编程相关知识,请访问:编程入门!!
The above is the detailed content of How to pre-render web pages in Vue? A brief analysis of the usage of prerender-spa-plugin. For more information, please follow other related articles on the PHP Chinese website!

Hot AI Tools

Undresser.AI Undress
AI-powered app for creating realistic nude photos

AI Clothes Remover
Online AI tool for removing clothes from photos.

Undress AI Tool
Undress images for free

Clothoff.io
AI clothes remover

Video Face Swap
Swap faces in any video effortlessly with our completely free AI face swap tool!

Hot Article

Hot Tools

Notepad++7.3.1
Easy-to-use and free code editor

SublimeText3 Chinese version
Chinese version, very easy to use

Zend Studio 13.0.1
Powerful PHP integrated development environment

Dreamweaver CS6
Visual web development tools

SublimeText3 Mac version
God-level code editing software (SublimeText3)

Hot Topics
 How to use bootstrap in vue
Apr 07, 2025 pm 11:33 PM
Using Bootstrap in Vue.js is divided into five steps: Install Bootstrap. Import Bootstrap in main.js. Use the Bootstrap component directly in the template. Optional: Custom style. Optional: Use plug-ins.
 How to add functions to buttons for vue
Apr 08, 2025 am 08:51 AM
You can add a function to the Vue button by binding the button in the HTML template to a method. Define the method and write function logic in the Vue instance.
 How to use watch in vue
Apr 07, 2025 pm 11:36 PM
The watch option in Vue.js allows developers to listen for changes in specific data. When the data changes, watch triggers a callback function to perform update views or other tasks. Its configuration options include immediate, which specifies whether to execute a callback immediately, and deep, which specifies whether to recursively listen to changes to objects or arrays.
 What does vue multi-page development mean?
Apr 07, 2025 pm 11:57 PM
Vue multi-page development is a way to build applications using the Vue.js framework, where the application is divided into separate pages: Code Maintenance: Splitting the application into multiple pages can make the code easier to manage and maintain. Modularity: Each page can be used as a separate module for easy reuse and replacement. Simple routing: Navigation between pages can be managed through simple routing configuration. SEO Optimization: Each page has its own URL, which helps SEO.
 How to reference js file with vue.js
Apr 07, 2025 pm 11:27 PM
There are three ways to refer to JS files in Vue.js: directly specify the path using the <script> tag;; dynamic import using the mounted() lifecycle hook; and importing through the Vuex state management library.
 How to return to previous page by vue
Apr 07, 2025 pm 11:30 PM
Vue.js has four methods to return to the previous page: $router.go(-1)$router.back() uses <router-link to="/" component window.history.back(), and the method selection depends on the scene.
 How to use vue traversal
Apr 07, 2025 pm 11:48 PM
There are three common methods for Vue.js to traverse arrays and objects: the v-for directive is used to traverse each element and render templates; the v-bind directive can be used with v-for to dynamically set attribute values for each element; and the .map method can convert array elements into new arrays.
 How to jump to the div of vue
Apr 08, 2025 am 09:18 AM
There are two ways to jump div elements in Vue: use Vue Router and add router-link component. Add the @click event listener and call this.$router.push() method to jump.


