

How to use linux find command

In Linux, the find command is used to find files in a specified directory. The basic syntax is "find path -option..". Any string before the parameter will be regarded as the directory name to be found; if you use this command without setting any parameters, the find command will search for subdirectories and files in the current directory.

#The operating environment of this tutorial: Red Hat Enterprise Linux 6.1 system, Dell G3 computer.
Linux find command is used to find files in the specified directory.
find command format:
find path -option 【 -print 】 【 -exec -ok |xargs |grep 】 【 command {} \; 】find command parameters:
1)path: The directory path to be searched.
- ~ represents the $HOME directory
- . represents the current directory
- / represents the root directory
2 ) print: Indicates outputting the results to standard output.
3) exec: Execute the shell command given by this parameter on the matching file.
The form is command {} \;, Note that there is a space between {} and \;
4) ok: has the same effect as exec ,
The difference is that before executing the command, a prompt will be given to let the user confirm whether to execute it
5)|xargs It has the same function as exec and serves as a successor
The difference is that |xargs is mainly used to undertake deletion operations, while -exec can be used for copying, moving, renaming, etc.
6)options : Indicates the search method
options Commonly used options include the following options:
-name   filename               #查找名为filename的文件
 -perm                                #按执行权限来查找
 -user    username             #按文件属主来查找
 -group groupname            #按组来查找
 -mtime   -n +n                   #按文件
更改时间
来查找文件,-n指n天以内,+n指n天以前
 -atime    -n +n                   #按文件
访问时间
来查找文件,-n指n天以内,+n指n天以前
 -ctime    -n +n                  #按文件
创建时间
来查找文件,-n指n天以内,+n指n天以前
 -nogroup                          #查无有效属组的文件,即文件的属组在/etc/groups中不存在
 -nouser                            #查无有效属主的文件,即文件的属主在/etc/passwd中不存
 -type    b/d/c/p/l/f             #查是块设备、目录、字符设备、管道、符号链接、普通文件
 -size      n[c]                    #查长度为n块[或n字节]的文件
 -mount                            #查文件时不跨越文件系统mount点
 -follow                            #如果遇到符号链接文件,就跟踪链接所指的文件
 -prune                            #忽略某个目录
Any string before the parameter will be regarded as the directory name to be searched. If you use this command without setting any parameters, the find command will search for subdirectories and files in the current directory. And all found subdirectories and files will be displayed.
Here are some simple examples to introduce the common usage of find:
1. Search by name
In the current directory and subdirectories, search for uppercase letters txt files starting with letters
##
$ find . -name '[A-Z]*.txt' -print
$ find /etc -name 'host*' -print
$ find ~ -name '*' -print
$ find . -name "out*" -prune -o -name "*.txt" -print
$ find . -path "./aa" -prune -o -name "*.txt" -print
$ find . \( -path './dir0' -o -path './dir1' \) -a -prune -o -name '*.txt' -print

Note: Required in both 1 and 2 Add spaces, otherwise an error will appear as shown in the picture
You can add -a in the 3 places without adding -a In the current directory, no longer in the subdirectory, Find txt files
$ find . ! -name "." -type d -prune -o -type f -name "*.txt" -print
or
find . -name *.txt -type f -print
$find . -perm 755 -print
find ./ -perm /220
find ./ -perm /u+w,g+w
find ./ -perm /u=w,g=w
$ find . -type l -print
Search for files whose owner is www
$ find / -user www -type f -print
$ find / -nouser -type f -print
$ find / -group mysql -type f -print
$ find / -nogroup -type f -print
6. Search by time
Find files that have been changed within 2 days
$ find . -mtime -2 -type f -print
$ find . -mtime +2 -type f -print
$ find . -atime -1 -type f -print
$ find . -atime +1 -type f -print
$ find . -ctime -1 -type f -print
$ find . -ctime +1 -type f -print
查找10分钟以前状态被改变的文件
$ find . -cmin +10 -type f -print
7、按文件新旧
查找比 aa.txt 新的文件
$ find . -newer "aa.txt" -type f -print
查找比 aa.txt 旧的文件
$ find . ! -newer "aa.txt" -type f -print
查找比aa.txt新,比bb.txt旧的文件
$ find . -newer 'aa.txt' ! -newer 'bb.txt' -type f -print
8、按大小查找
查找超过1M的文件
$ find / -size +1M -type f -print
查找等于6字节的文件
$ find . -size 6c -print
查找小于32k的文件
$ find . -size -32k -print
9、执行命令
1)查找 del.txt 并删除,删除前提示确认
$ find . -name 'del.txt' -ok rm {} \; 2) 查找 aa.txt 并备份为aa.txt.bak
$ find . -name 'aa.txt' -exec cp {} {}.bak \;3)查当前目录下的所有普通文件
    # find . -type f -exec ls -l {} \;
    -rw-r–r–    1 root      root         34928 2003-02-25   ./conf/httpd.conf
    -rw-r–r–    1 root      root         12959 2003-02-25   ./conf/magic
-rw-r–r– 1 root root 180 2003-02-25 ./conf.d/README查当前目录下的所有普通文件,并在 - exec 选项中使用 ls -l 命令将它们列出
4)在 /logs 目录中查找更改时间在5日以前的文件并删除它们
$ find logs -type f -mtime +5 -exec -ok rm {} \;5)查询当天修改过的文件
# find ./ -mtime -1 -type f -exec ls -l {} \;6)查询文件并询问是否要显示
# find   ./   -mtime   -1   -type f   -ok   ls -l   {} \;
    < ls … ./classDB.inc.php > ? y
    -rw-r–r–    1 cnscn    cnscn       13709   1月 12 12:22 ./classDB.inc.php
    # find   ./   -mtime   -1   -type f   -ok   ls -l   {} \;
< ls … ./classDB.inc.php > ? n关于 有没有 -print 的区别
加 -print
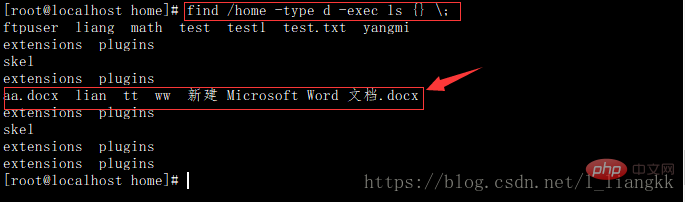
查找目录并列出目录下的文件(为找到的每一个目录单独执行ls命令,没有选项-print时文件列表前一行不会显示目录名称)
find /home -type d -print -exec ls {} \;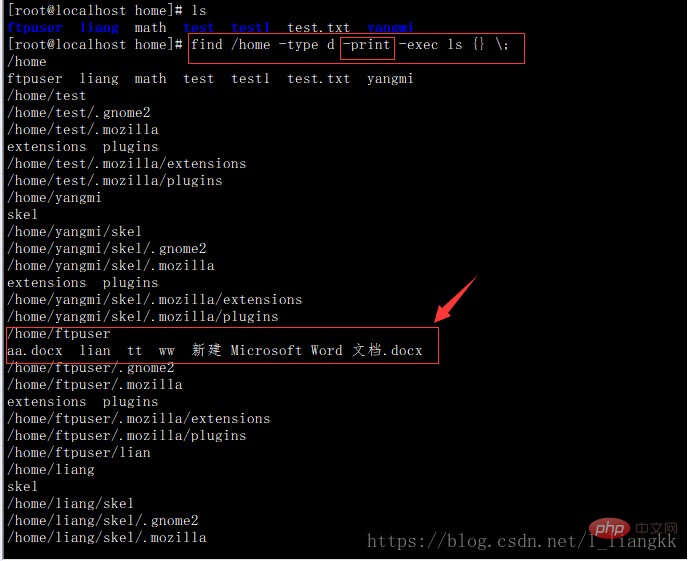
不加 -print
相关推荐:《Linux视频教程》
The above is the detailed content of How to use linux find command. For more information, please follow other related articles on the PHP Chinese website!

Hot AI Tools

Undresser.AI Undress
AI-powered app for creating realistic nude photos

AI Clothes Remover
Online AI tool for removing clothes from photos.

Undress AI Tool
Undress images for free

Clothoff.io
AI clothes remover

Video Face Swap
Swap faces in any video effortlessly with our completely free AI face swap tool!

Hot Article
Hot Tools

Notepad++7.3.1
Easy-to-use and free code editor

SublimeText3 Chinese version
Chinese version, very easy to use

Zend Studio 13.0.1
Powerful PHP integrated development environment

Dreamweaver CS6
Visual web development tools

SublimeText3 Mac version
God-level code editing software (SublimeText3)
Hot Topics


 What computer configuration is required for vscode
Apr 15, 2025 pm 09:48 PM
What computer configuration is required for vscode
Apr 15, 2025 pm 09:48 PM
VS Code system requirements: Operating system: Windows 10 and above, macOS 10.12 and above, Linux distribution processor: minimum 1.6 GHz, recommended 2.0 GHz and above memory: minimum 512 MB, recommended 4 GB and above storage space: minimum 250 MB, recommended 1 GB and above other requirements: stable network connection, Xorg/Wayland (Linux)
 Linux Architecture: Unveiling the 5 Basic Components
Apr 20, 2025 am 12:04 AM
Linux Architecture: Unveiling the 5 Basic Components
Apr 20, 2025 am 12:04 AM
The five basic components of the Linux system are: 1. Kernel, 2. System library, 3. System utilities, 4. Graphical user interface, 5. Applications. The kernel manages hardware resources, the system library provides precompiled functions, system utilities are used for system management, the GUI provides visual interaction, and applications use these components to implement functions.
 How to run java code in notepad
Apr 16, 2025 pm 07:39 PM
How to run java code in notepad
Apr 16, 2025 pm 07:39 PM
Although Notepad cannot run Java code directly, it can be achieved by using other tools: using the command line compiler (javac) to generate a bytecode file (filename.class). Use the Java interpreter (java) to interpret bytecode, execute the code, and output the result.
 vscode cannot install extension
Apr 15, 2025 pm 07:18 PM
vscode cannot install extension
Apr 15, 2025 pm 07:18 PM
The reasons for the installation of VS Code extensions may be: network instability, insufficient permissions, system compatibility issues, VS Code version is too old, antivirus software or firewall interference. By checking network connections, permissions, log files, updating VS Code, disabling security software, and restarting VS Code or computers, you can gradually troubleshoot and resolve issues.
 How to check the warehouse address of git
Apr 17, 2025 pm 01:54 PM
How to check the warehouse address of git
Apr 17, 2025 pm 01:54 PM
To view the Git repository address, perform the following steps: 1. Open the command line and navigate to the repository directory; 2. Run the "git remote -v" command; 3. View the repository name in the output and its corresponding address.
 Can vscode be used for mac
Apr 15, 2025 pm 07:36 PM
Can vscode be used for mac
Apr 15, 2025 pm 07:36 PM
VS Code is available on Mac. It has powerful extensions, Git integration, terminal and debugger, and also offers a wealth of setup options. However, for particularly large projects or highly professional development, VS Code may have performance or functional limitations.
 How to use VSCode
Apr 15, 2025 pm 11:21 PM
How to use VSCode
Apr 15, 2025 pm 11:21 PM
Visual Studio Code (VSCode) is a cross-platform, open source and free code editor developed by Microsoft. It is known for its lightweight, scalability and support for a wide range of programming languages. To install VSCode, please visit the official website to download and run the installer. When using VSCode, you can create new projects, edit code, debug code, navigate projects, expand VSCode, and manage settings. VSCode is available for Windows, macOS, and Linux, supports multiple programming languages and provides various extensions through Marketplace. Its advantages include lightweight, scalability, extensive language support, rich features and version
 vscode terminal usage tutorial
Apr 15, 2025 pm 10:09 PM
vscode terminal usage tutorial
Apr 15, 2025 pm 10:09 PM
vscode built-in terminal is a development tool that allows running commands and scripts within the editor to simplify the development process. How to use vscode terminal: Open the terminal with the shortcut key (Ctrl/Cmd). Enter a command or run the script. Use hotkeys (such as Ctrl L to clear the terminal). Change the working directory (such as the cd command). Advanced features include debug mode, automatic code snippet completion, and interactive command history.
