A brief discussion on how to configure the LaTeX editor in VSCode
This article will introduce to you VSCodeHow to configure LaTeX and use VSCode to write LaTeX. It has certain reference value. Friends in need can refer to it. I hope it will be helpful to everyone.
Related recommendations: "vscode tutorial"
Many people use texstudio or winedt with texlive to write  documents. For a long time, texstudio was my only editor. However, as a face-conscious person, I couldn't stand the original interface, so I fell in love with VSCode. Beautiful, free, and open source are the main reasons why I choose VSCode.
There are many articles introducing VSCode  on the Internet, but there are a little less introductions on configuring external readers. I searched online for a long time before I found the method on the github homepage of the author of LaTeX Workshop, and at the same time I also had the idea. Got the idea to write a tutorial.
This article mainly introduces how to use VSCode to write simple documents and set up an external PDF reader.
If you have installed texlive, VSCode and SumatraPDF, and don’t want to read the entire article and just want to get started quickly, please turn to the appendix at the end of the article and copy all the code to the settings of VSCode , and then replace the "..." with the path of the software on your computer, and then you can use it.
1. Install texlive
You can download the image file of texlive from the following URL:
https://mirrors.huaweicloud.com/CTAN/systems/texlive/Images/
##https://mirrors.aliyun.com/CTAN/systems/texlive/Images/
Open source mirror sites from other universities such as Tsinghua University and University of Science and Technology of China are also available. But in terms of speed, I feel that Huawei Cloud and Alibaba Cloud are faster. Load the iso file of texlive 2020,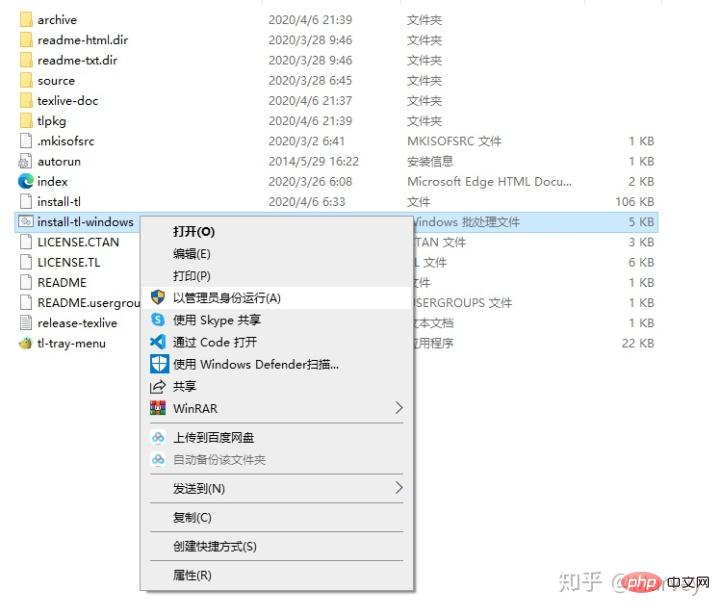
Right-click install-tl-windows, click Run as administrator to enter the installation interface, Click "Advanced" in the lower left corner to enter advanced installation to cancel the macro packages you do not need to install. 
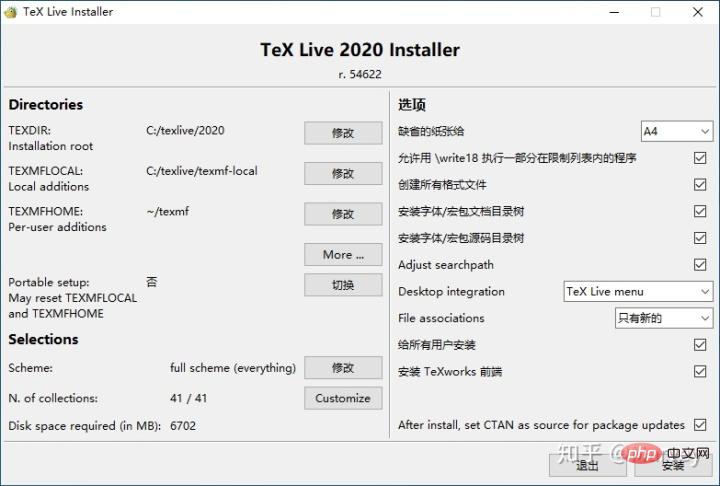
Click "Customize" to uncheck unnecessary macro packages. 

# You can save 1G of space by simply unchecking the non-Chinese and English language packs. If you find it too troublesome, you can also install them all. 
2. Install the  plug-in on VSCode
At the same time, download VSCode and install it. The installation of VSCode is very simple, here Stop nagging.
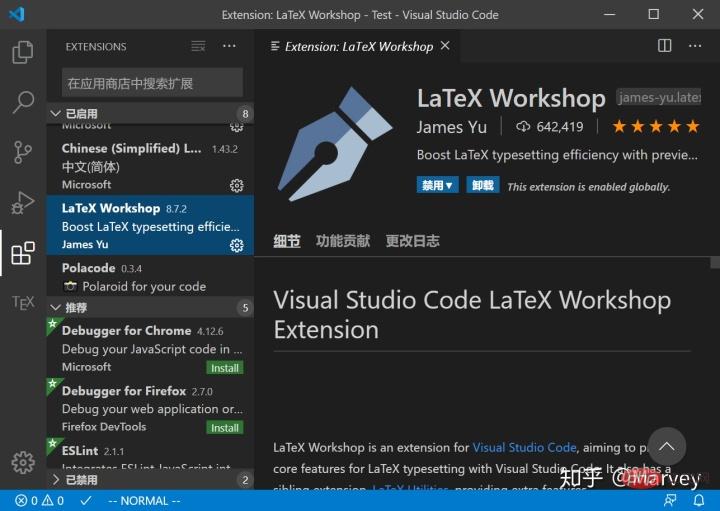
After VSCode is installed, install the LaTeX Workshop plug-in in the extension store. 
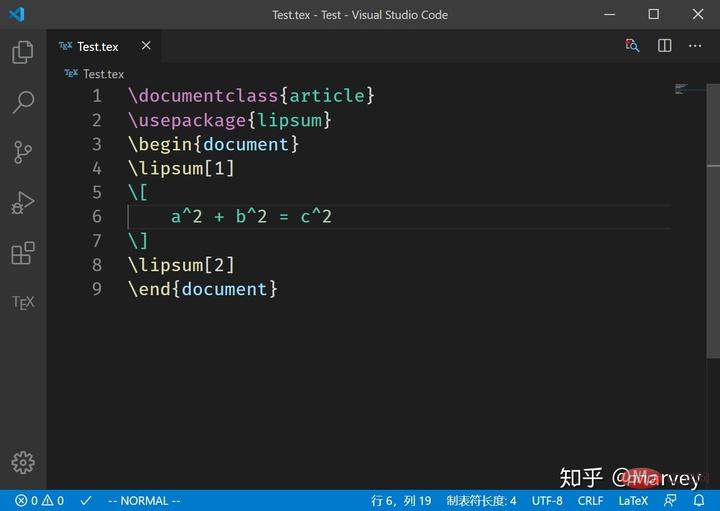
 You can see that the code has been highlighted.
3. Configure VSCode’s  plug-in
Press F1 in the VSCode interface, then type “setjson” and click “Home” Option: Open Settings (JSON)",
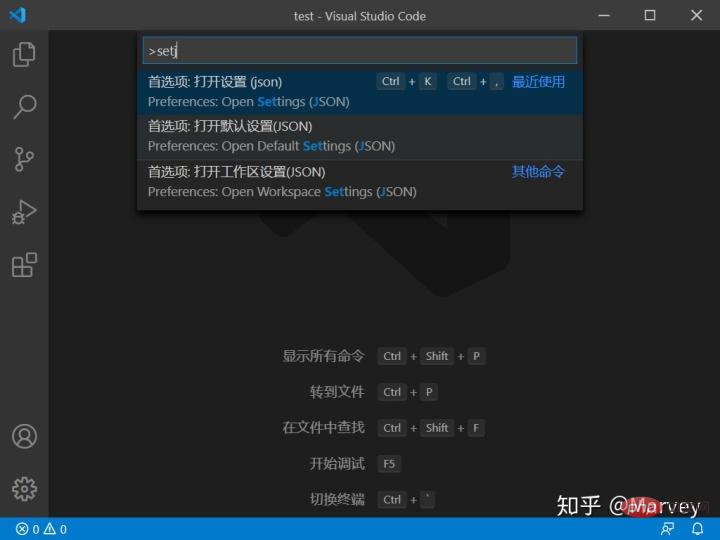
Put the following code into the settings area:
"latex-workshop.latex.tools": [
    {
        // 编译工具和命令
        "name": "xelatex",
        "command": "xelatex",
        "args": [
            "-synctex=1",
            "-interaction=nonstopmode",
            "-file-line-error",
            "-pdf",
            "%DOCFILE%"
        ]
    },
    {
        "name": "pdflatex",
        "command": "pdflatex",
        "args": [
            "-synctex=1",
            "-interaction=nonstopmode",
            "-file-line-error",
            "%DOCFILE%"
        ]
    },
    {
        "name": "bibtex",
        "command": "bibtex",
        "args": [
            "%DOCFILE%"
        ]
    }
], The default compilation tool of LaTeX Workshop is latexmk , everyone can modify the required tools and commands according to their needs. I don’t need to use latexmk, so I modified it to xelatex, which is commonly used in the Chinese environment, and everyone can modify it according to their needs. (Thanks to @huan Yu, replacing
 %DOC% in tools with %DOCFILE% will support compiling files under Chinese paths)
"latex-workshop.latex.recipes": [
    {
        "name": "xelatex",
        "tools": [
            "xelatex"
        ],
    },
    {
        "name": "pdflatex",
        "tools": [
            "pdflatex"
        ]
    },
    {
        "name": "xe->bib->xe->xe",
        "tools": [
            "xelatex",
            "bibtex",
            "xelatex",
            "xelatex"
        ]
    },
    {
        "name": "pdf->bib->pdf->pdf",
        "tools": [
            "pdflatex",
            "bibtex",
            "pdflatex",
            "pdflatex"
        ]
}], is used to configure the compilation chain and is also placed in the settings area. The first recipe is the default compilation tool. If you need to use bibtex, you can use the following method:
When compiling, click the small check mark in the lower left corner of the VSCode interface and click "Build LaTeX project ”, select the recipe with bib, or use shortcut keys to quickly select;
Put the recipe with bib first, and it can be compiled as the default recipe, or you can Because there are more compilations, the speed will be slower;
Add %!BIB program = bibtex
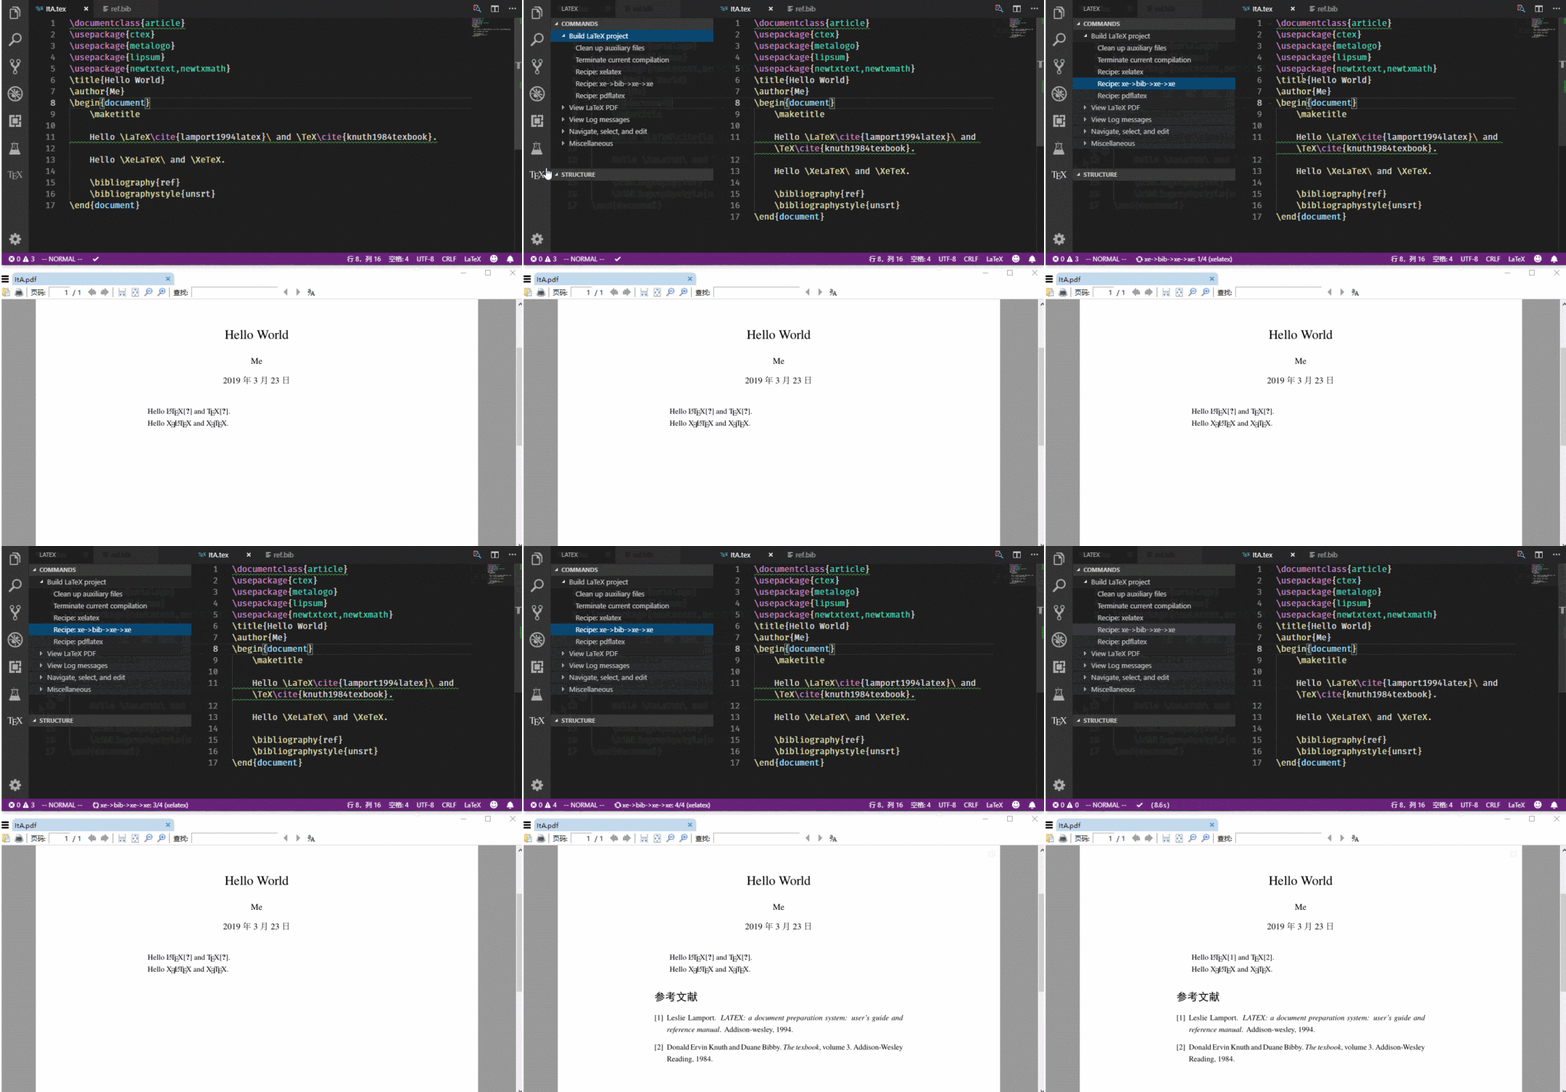 # at the beginning of the document
%!TEX program = pdflatex
"latex-workshop.view.pdf.viewer": "external","latex-workshop.view.pdf.external.viewer.command": "C:/.../SumatraPDF.exe","latex-workshop.view.pdf.external.viewer.args": [
    "-forward-search",
    "%TEX%",
    "%LINE%",
    "-reuse-instance",
    "-inverse-search",
    "\"C:/.../Microsoft VS Code/Code.exe\" \"C:/.../Microsoft VS Code/resources/app/out/cli.js\" -gr \"%f\":\"%l\"",
    "%PDF%"],
"viewer" chooses to use an external reader. Where there is "..." in "viewer.command" and "viewer.args", you need to install SumatraPDF and VSCode on your computer. To modify the location, remember to change the drive letter as well. 
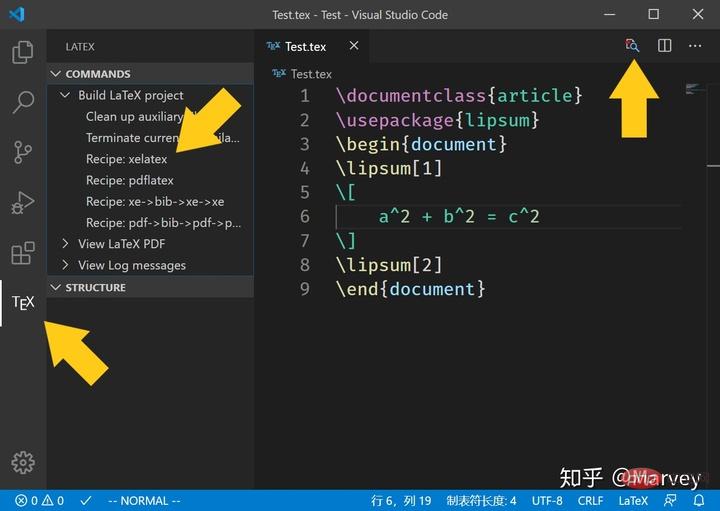
After several updates of the plug-in, the right-click menu option has been removed, and the options have been moved to the left column. Click the  icon in the left column, and then click the Recipe you want to use to compile. If you use the shortcut key, the first Recipe will be used by default to compile. Click the magnifying glass button in the upper right corner or press Ctrl Alt v to open SumatraPDF for preview.
4. Configure forward and reverse search"latex-workshop.view.pdf.external.synctex.command": "C:/.../SumatraPDF.exe","latex-workshop.view.pdf.external.synctex.args": [
"-forward-search",
"%TEX%",
"%LINE%",
"-reuse-instance",
"-inverse-search",
"\"C:/.../Microsoft VS Code/Code.exe\" \"C:/.../Microsoft VS Code/resources/app/out/cli.js\" -gr \"%f\":\"%l\"",
"%PDF%",],
Copy after login
"latex-workshop.view.pdf.external.synctex.command": "C:/.../SumatraPDF.exe","latex-workshop.view.pdf.external.synctex.args": [
    "-forward-search",
    "%TEX%",
    "%LINE%",
    "-reuse-instance",
    "-inverse-search",
    "\"C:/.../Microsoft VS Code/Code.exe\" \"C:/.../Microsoft VS Code/resources/app/out/cli.js\" -gr \"%f\":\"%l\"",
    "%PDF%",],
Add code into the settings area to configure forward search, the same as above, inside ".. ." part is modified based on your own situation (thanks to @Macrofuns for pointing out that without double quotes, reverse search will not be possible if the file path contains spaces). 

# Click "SyncTeX from cursor" to search forward. 
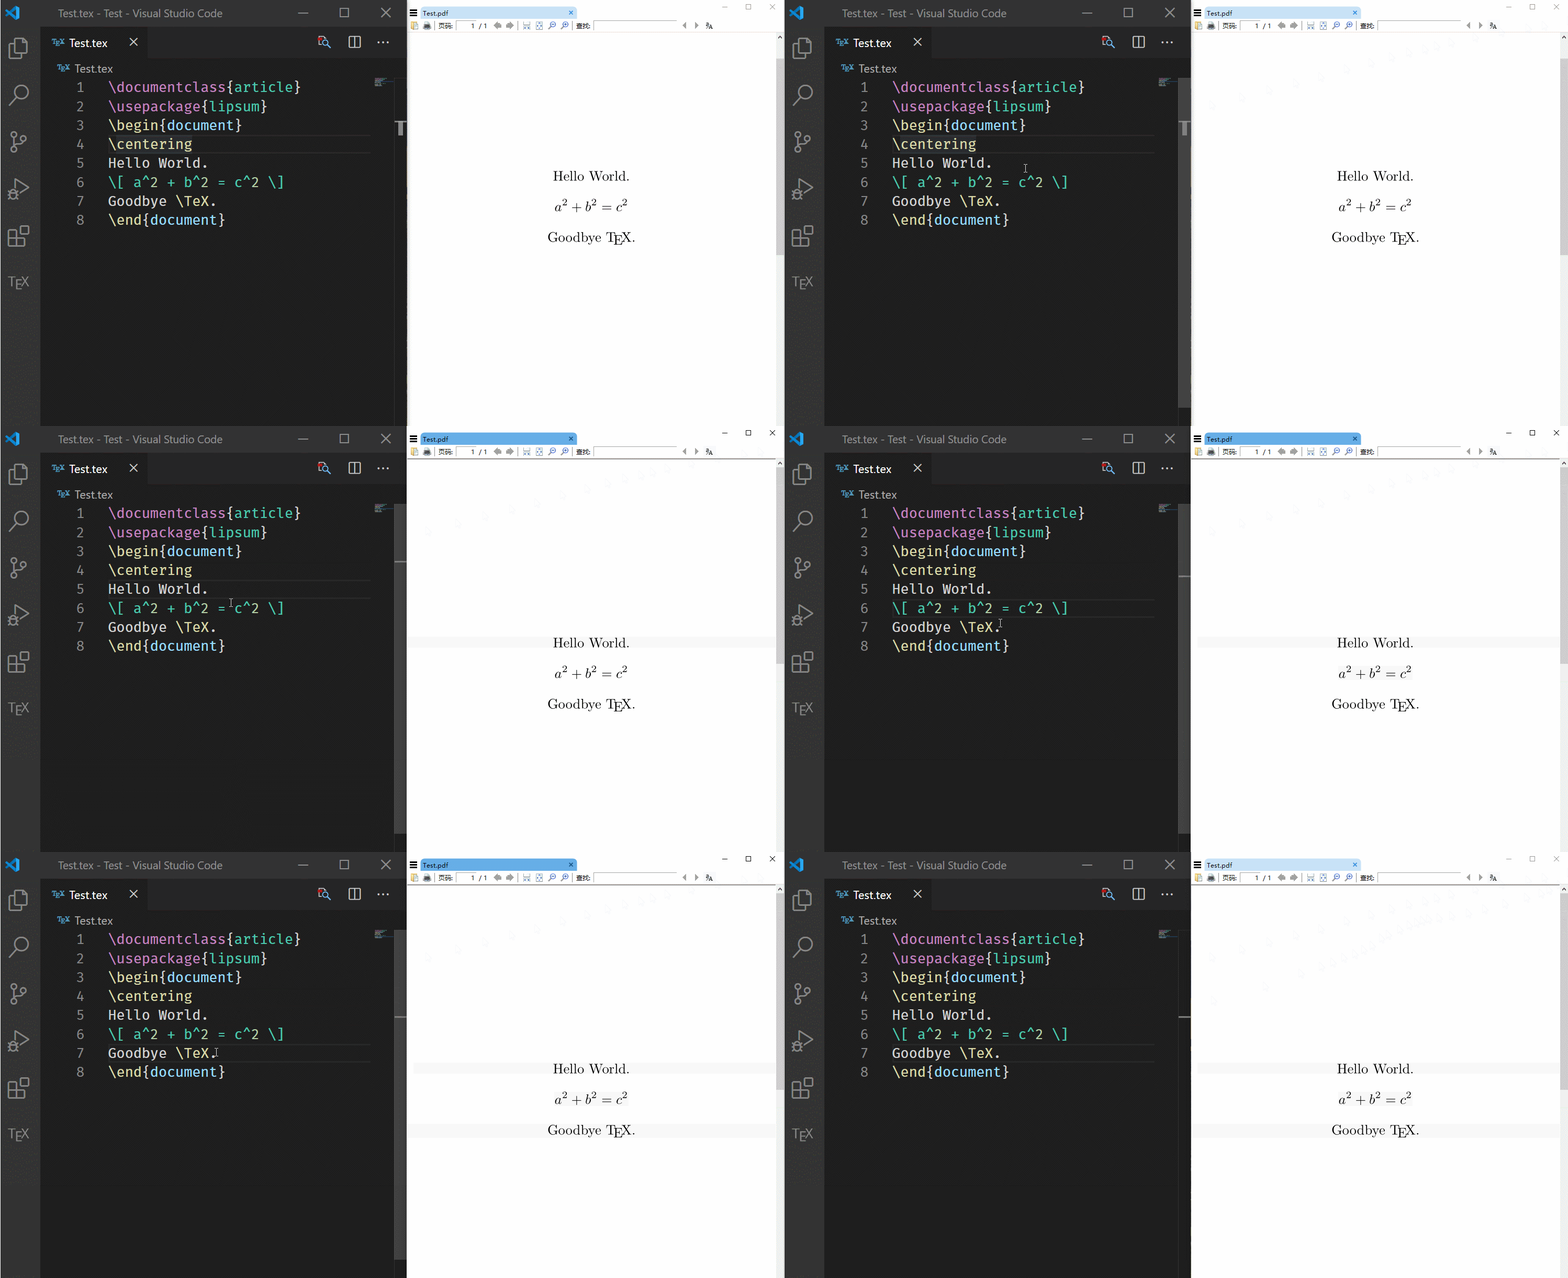
 可以看到,光标所在的行的内容在 PDF 中高亮显示(可以自己配置快捷键,我设置的是 Alt + S)。
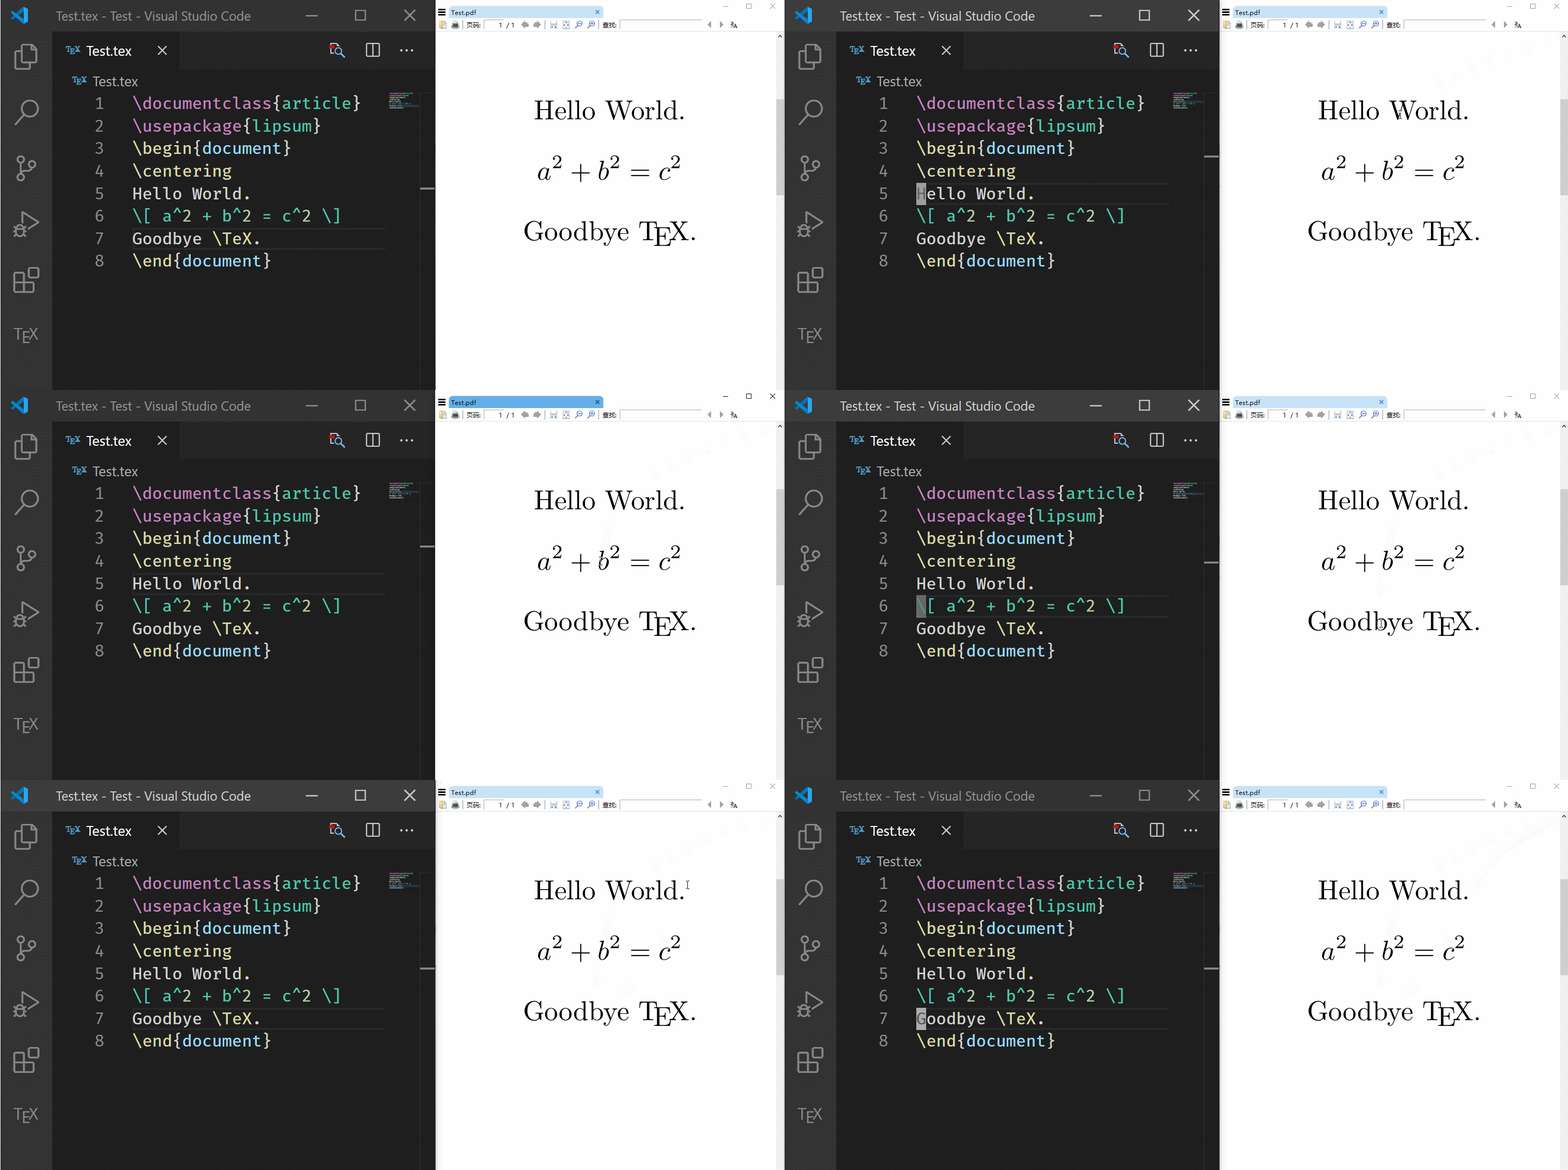
 在PDF中双击即可反向搜索
不要清理生成的名字中带 synctex 的文件,否则就不能进行正向和反向搜索;
之前的文章中,我提到了从 VSCode 预览按钮启动 SumatraPDF 会无法反向搜索的问题,现在已经解决,解决方法是在反向搜索命令中添加
"resources\app\out\cli.js"
解决方案来源:
https://github.com/James-Yu/LaTeX-Workshop/issues/637#issuecomment-473145503
这个方法目前有个 bug,SumatraPDF 要从 VSCode 中打开才能进行反向搜索,单独打开的 SumatraPDF 在进行反向搜索时会跳转到 VSCode 的配置文件 cli.js。
6. 快捷键设置
在 VSCode 界面下按下 F1,键入“keyjson”,选择“打开键盘快捷方式(JSON)”,然后把以下代码放入:
{
    "key": "alt+s",
    "command": "latex-workshop.synctex",
    "when": "editorTextFocus && !isMac"},{
    "key": "alt+b",
    "command": "latex-workshop.build",
    "when": "editorTextFocus && !isMac"},{
    "key": "alt+t",
    "command": "latex-workshop.kill",
    "when": "editorTextFocus && !isMac"},{
    "key": "alt+e",
"command": "latex-workshop.recipes"},这段代码的意义是将 Alt+s 绑定到正向搜索,将 Alt+b 绑定到使用默认 recipe 编译,将 Alt+t 绑定到终止编译,将 Alt+e 绑定到选择其他 recipe 编译,可以自行更换为适合自己的快捷键,只需修改“key”那一项即可。
7. 其他设置
- LaTeX Workshop 默认保存的时候自动编译,如果不喜欢这个设置,可以添加以下代码进入设置区:
"latex-workshop.latex.autoBuild.run": "never",
- 如果编译出错,插件会弹出两个很烦人的气泡,不喜欢的话可以在设置中添加以下代码:
"latex-workshop.message.error.show": false,"latex-workshop.message.warning.show": false,
附录
注意:只需把以下代码放入设置区的方括号里,不要删去方括号,不要忘记替换软件的路径。
// LaTeX
"latex-workshop.latex.autoBuild.run": "never",
"latex-workshop.message.error.show": false,
"latex-workshop.message.warning.show": false,

"latex-workshop.latex.tools": [
    {
        "name": "xelatex",
        "command": "xelatex",
        "args": [
            "-synctex=1",
            "-interaction=nonstopmode",
            "-file-line-error",
            "%DOCFILE%"
        ]
    },
    {
        "name": "pdflatex",
        "command": "pdflatex",
        "args": [
            "-synctex=1",
            "-interaction=nonstopmode",
            "-file-line-error",
            "%DOCFILE%"
        ]
    },
    {
        "name": "bibtex",
        "command": "bibtex",
        "args": [
            "%DOCFILE%"
        ]
    }
],

"latex-workshop.latex.recipes": [
    {
        "name": "xelatex",
        "tools": [
            "xelatex"
        ],
    },
    {
        "name": "pdflatex",
        "tools": [
            "pdflatex"
        ]
    },
    {
        "name": "xe->bib->xe->xe",
        "tools": [
            "xelatex",
            "bibtex",
            "xelatex",
            "xelatex"
        ]
    },
    {
        "name": "pdf->bib->pdf->pdf",
        "tools": [
            "pdflatex",
            "bibtex",
            "pdflatex",
            "pdflatex"
        ]
    }
],
"latex-workshop.view.pdf.viewer": "external",

"latex-workshop.view.pdf.external.viewer.command": "C:/.../SumatraPDF.exe",
"latex-workshop.view.pdf.external.viewer.args": [
    "-forward-search",
    "%TEX%",
    "%LINE%",
    "-reuse-instance",
    "-inverse-search",
    "\"C:/.../Microsoft VS Code/Code.exe\" \"C:/.../Microsoft VS Code/resources/app/out/cli.js\" -gr \"%f\":\"%l\"",
    "%PDF%"
],

"latex-workshop.view.pdf.external.synctex.command": "C:/.../SumatraPDF.exe",
"latex-workshop.view.pdf.external.synctex.args": [
    "-forward-search",
    "%TEX%",
    "%LINE%",
    "-reuse-instance",
    "-inverse-search",
    "\"C:/.../Microsoft VS Code/Code.exe\" \"C:/.../Microsoft VS Code/resources/app/out/cli.js\" -gr \"%f\":\"%l\"",
    "%PDF%",
],更多编程相关知识,请访问:编程视频!!
The above is the detailed content of A brief discussion on how to configure the LaTeX editor in VSCode. For more information, please follow other related articles on the PHP Chinese website!

Hot AI Tools

Undresser.AI Undress
AI-powered app for creating realistic nude photos

AI Clothes Remover
Online AI tool for removing clothes from photos.

Undress AI Tool
Undress images for free

Clothoff.io
AI clothes remover

Video Face Swap
Swap faces in any video effortlessly with our completely free AI face swap tool!

Hot Article

Hot Tools

Notepad++7.3.1
Easy-to-use and free code editor

SublimeText3 Chinese version
Chinese version, very easy to use

Zend Studio 13.0.1
Powerful PHP integrated development environment

Dreamweaver CS6
Visual web development tools

SublimeText3 Mac version
God-level code editing software (SublimeText3)

Hot Topics
 How to define header files for vscode
Apr 15, 2025 pm 09:09 PM
How to define header files using Visual Studio Code? Create a header file and declare symbols in the header file using the .h or .hpp suffix name (such as classes, functions, variables) Compile the program using the #include directive to include the header file in the source file. The header file will be included and the declared symbols are available.
 What computer configuration is required for vscode
Apr 15, 2025 pm 09:48 PM
VS Code system requirements: Operating system: Windows 10 and above, macOS 10.12 and above, Linux distribution processor: minimum 1.6 GHz, recommended 2.0 GHz and above memory: minimum 512 MB, recommended 4 GB and above storage space: minimum 250 MB, recommended 1 GB and above other requirements: stable network connection, Xorg/Wayland (Linux)
 How to solve the problem of vscode Chinese annotations becoming question marks
Apr 15, 2025 pm 11:36 PM
How to solve the problem that Chinese comments in Visual Studio Code become question marks: Check the file encoding and make sure it is "UTF-8 without BOM". Change the font to a font that supports Chinese characters, such as "Song Style" or "Microsoft Yahei". Reinstall the font. Enable Unicode support. Upgrade VSCode, restart the computer, and recreate the source file.
 How to use VSCode
Apr 15, 2025 pm 11:21 PM
Visual Studio Code (VSCode) is a cross-platform, open source and free code editor developed by Microsoft. It is known for its lightweight, scalability and support for a wide range of programming languages. To install VSCode, please visit the official website to download and run the installer. When using VSCode, you can create new projects, edit code, debug code, navigate projects, expand VSCode, and manage settings. VSCode is available for Windows, macOS, and Linux, supports multiple programming languages and provides various extensions through Marketplace. Its advantages include lightweight, scalability, extensive language support, rich features and version
 Common commands for vscode terminal
Apr 15, 2025 pm 10:06 PM
Common commands for VS Code terminals include: Clear the terminal screen (clear), list the current directory file (ls), change the current working directory (cd), print the current working directory path (pwd), create a new directory (mkdir), delete empty directory (rmdir), create a new file (touch) delete a file or directory (rm), copy a file or directory (cp), move or rename a file or directory (mv) display file content (cat) view file content and scroll (less) view file content only scroll down (more) display the first few lines of the file (head)
 vscode terminal usage tutorial
Apr 15, 2025 pm 10:09 PM
vscode built-in terminal is a development tool that allows running commands and scripts within the editor to simplify the development process. How to use vscode terminal: Open the terminal with the shortcut key (Ctrl/Cmd). Enter a command or run the script. Use hotkeys (such as Ctrl L to clear the terminal). Change the working directory (such as the cd command). Advanced features include debug mode, automatic code snippet completion, and interactive command history.
 Where to write code in vscode
Apr 15, 2025 pm 09:54 PM
Writing code in Visual Studio Code (VSCode) is simple and easy to use. Just install VSCode, create a project, select a language, create a file, write code, save and run it. The advantages of VSCode include cross-platform, free and open source, powerful features, rich extensions, and lightweight and fast.
 vscode terminal command cannot be used
Apr 15, 2025 pm 10:03 PM
Causes and solutions for the VS Code terminal commands not available: The necessary tools are not installed (Windows: WSL; macOS: Xcode command line tools) Path configuration is wrong (add executable files to PATH environment variables) Permission issues (run VS Code as administrator) Firewall or proxy restrictions (check settings, unrestrictions) Terminal settings are incorrect (enable use of external terminals) VS Code installation is corrupt (reinstall or update) Terminal configuration is incompatible (try different terminal types or commands) Specific environment variables are missing (set necessary environment variables)


