Preparation for PHP7 message board development
PHP7The tutorial column introduces the prepared message board development

Recommended (free): PHP7
Course Points:
This tutorial was made at the request of an old friend, hoping to help him! I also hope to provide some "motivation" to friends who need to get into the trap (it's actually not that difficult).
This tutorial is suitable for students who are starting to learn PHP;
Here we use process-oriented development, which is easy to understand; process-oriented is a basic imperative programming, which is easier for beginners to master. Other conceptual things will not be elaborated here. ;
The following are the technical points involved in this lesson that need to be mastered:
p CSS, PHP MYSQL
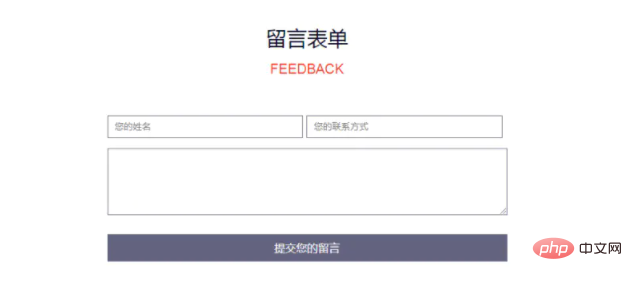
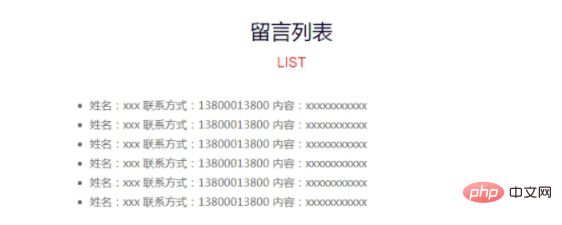
Page effect:

Message board home page

Message board list page
Development tools:
- XAMPP3.2.2 (php7. 1.8/MariaDB10.1.26)
Official website https://www.apachefriends.org/zh_cn/download.html - visual studio code (referred to as vs code)
Official website https://visualstudio.microsoft .com/zh-hans/downloads/
Tutorial arrangement:
The explanation is divided into three steps, from easy to deep.
- Step 1: Page design p CSS
- Step 2: Function implementation PHP MYSQL
- Step 3: Code optimization
Today I will mainly explain step one.
I believe that when I first get the design draft, if it is something I have made, I will quickly get into the state and type the code directly. However, if I encounter an unfamiliar layout or a more complex design draft When I do something, I will be in a hurry and don’t know where to start. Well, that’s right, because that’s how I came here in the beginning.
Let me talk about my method next:
-
1. Start building scaffolding
a. As the name suggests, it is similar to the scaffolding we saw. The house starts with a basic frame, poured with concrete, and then slowly laid with bricks. The same goes for writing p CSS. First, design the basic framework according to the design draft, clearly distinguish its top, bottom, left, and right structures, and then subdivide the sections in the framework. Of course, when building, define a class for each p tag, so that you can code the CSS style code. Quickly locate the designated location and improve efficiency.
b. For example, in the message board we are writing now, we first create a.container_boxcontainer (enclosure), and then divide it into.up and .downupper and lower structures (Okay, let’s just say Two floors), and finally design the detailed content on each layer. Of course, you can also repeat this operation (subdivided structure) on each layer; -
2. Create a new css style file And write the css code according to the renderings
a. Just look at the css code.
Note that the css file needs to be referenced in the HTML page<link rel="stylesheet" href="feedback.css"> - ##3. Final details adjustmenta. Add mouse events to the button
:hover
b. Add line spacing between processing content modules to make the entire page look clear and distinct
line-heightc. Of course, you can also add some CSS3 animation effects, which is not the focus here. No more writing. Students who want to go deeper can learn on their own. As a PHP developer, it is enough if you can complete the above two points.
If your thinking becomes much clearer, you can use your intelligence and wisdom to your heart's content. The page design is better and more beautiful than the design draft. This sense of accomplishment cannot be felt without experiencing it personally.I feel like I have said too much, so let’s start masturbating directly!This set of design ideas is actually applicable to the design of other front-end projects, such as designing pages, developing jquery plug-ins, etc.
Code area: p CSS page design
Key points: Form form (the tags to be used include input textarea)
The following is the completed HTML code:
CSS (feedback.css):
*{margin:0;padding:0;}

body{font-family: "微软雅黑", "Microsoft Yahei"; font-size: 12px;}
.container_box{width: 100%;max-width: 1170px;margin: 0 auto;text-align: center;}

a{color: #333;}
a:hover{color: #999;}

.fr{float: right}
.fl{float: left}

.container_box .up{padding: 20px 0;}
.container_box .up .title{font-size: 20px;}
.container_box .up .subtitle{color:#f00;margin-bottom: 10px;}
.container_box .down{margin: 0 auto;text-align: center;width: 50%;}
.container_box .down .input{margin-bottom: 10px;overflow: hidden;}
.container_box .down .input input{width: 46%;line-height: 30px;padding:4px;}
.container_box .down .content{width: 98%;display: block;margin-bottom: 10px;padding:4px;}
.container_box .down .sub{width: 100%;display: block;height: 35px;background-color: #63637f;color:#fff;border: 0;cursor: pointer;}
/* 鼠标移到按钮上去更换背景色 */
.container_box .down .sub:hover{background-color: #75849c;}

/* 列表 */
.list ul{padding: 20px 0;width: 100%;margin: 0 auto;text-align: left;}
.list ul li{line-height: 30px;color: #666;}nbsp;html> <meta> <title>留言板_科科分享</title> <!-- 2.新建css样式文件并根据效果图编写css代码 --> <link> <!-- 工作区,呈现给用户看的 --> <!-- 1.开始搭建脚手架 --> <p> </p><p> </p><h3 id="留言板">留言板</h3> <h5 id="FEEDBACK">FEEDBACK</h5> <p> </p>
nbsp;html>


        <meta>
        <title>列表_留言板_科科分享</title>
        <!-- 2.新建css样式文件并根据效果图编写css代码 -->
        <link>


        <!-- 工作区,呈现给用户看的 -->
        <!-- 1.开始搭建脚手架 -->
        <p>
            </p><p>
                </p><h3 id="留言板">留言板</h3>
                <h5 id="LIST">LIST</h5>

            <p>
                </p>
- 姓名:xxx 联系方式:13800013800 内容:xxxxxxxxxxx
- 姓名:xxx 联系方式:13800013800 内容:xxxxxxxxxxx
- 姓名:xxx 联系方式:13800013800 内容:xxxxxxxxxxx
- 姓名:xxx 联系方式:13800013800 内容:xxxxxxxxxxx
- 姓名:xxx 联系方式:13800013800 内容:xxxxxxxxxxx
- 姓名:xxx 联系方式:13800013800 内容:xxxxxxxxxxx
The above is the detailed content of Preparation for PHP7 message board development. For more information, please follow other related articles on the PHP Chinese website!

Hot AI Tools

Undresser.AI Undress
AI-powered app for creating realistic nude photos

AI Clothes Remover
Online AI tool for removing clothes from photos.

Undress AI Tool
Undress images for free

Clothoff.io
AI clothes remover

Video Face Swap
Swap faces in any video effortlessly with our completely free AI face swap tool!

Hot Article

Hot Tools

Notepad++7.3.1
Easy-to-use and free code editor

SublimeText3 Chinese version
Chinese version, very easy to use

Zend Studio 13.0.1
Powerful PHP integrated development environment

Dreamweaver CS6
Visual web development tools

SublimeText3 Mac version
God-level code editing software (SublimeText3)

Hot Topics
 How to install mongo extension in php7.0
Nov 21, 2022 am 10:25 AM
How to install the mongo extension in php7.0: 1. Create the mongodb user group and user; 2. Download the mongodb source code package and place the source code package in the "/usr/local/src/" directory; 3. Enter "src/" directory; 4. Unzip the source code package; 5. Create the mongodb file directory; 6. Copy the files to the "mongodb/" directory; 7. Create the mongodb configuration file and modify the configuration.
 What should I do if the plug-in is installed in php7.0 but it still shows that it is not installed?
Apr 02, 2024 pm 07:39 PM
To resolve the plugin not showing installed issue in PHP 7.0: Check the plugin configuration and enable the plugin. Restart PHP to apply configuration changes. Check the plugin file permissions to make sure they are correct. Install missing dependencies to ensure the plugin functions properly. If all other steps fail, rebuild PHP. Other possible causes include incompatible plugin versions, loading the wrong version, or PHP configuration issues.
 How to solve the problem when php7 detects that the tcp port is not working
Mar 22, 2023 am 09:30 AM
In php5, we can use the fsockopen() function to detect the TCP port. This function can be used to open a network connection and perform some network communication. But in php7, the fsockopen() function may encounter some problems, such as being unable to open the port, unable to connect to the server, etc. In order to solve this problem, we can use the socket_create() function and socket_connect() function to detect the TCP port.
 PHP Server Environment FAQ Guide: Quickly Solve Common Problems
Apr 09, 2024 pm 01:33 PM
Common solutions for PHP server environments include ensuring that the correct PHP version is installed and that relevant files have been copied to the module directory. Disable SELinux temporarily or permanently. Check and configure PHP.ini to ensure that necessary extensions have been added and set up correctly. Start or restart the PHP-FPM service. Check the DNS settings for resolution issues.
 How to install and deploy php7.0
Nov 30, 2022 am 09:56 AM
How to install and deploy php7.0: 1. Go to the PHP official website to download the installation version corresponding to the local system; 2. Extract the downloaded zip file to the specified directory; 3. Open the command line window and go to the "E:\php7" directory Just run the "php -v" command.
 How to automatically set permissions of unixsocket after system restart?
Mar 31, 2025 pm 11:54 PM
How to automatically set the permissions of unixsocket after the system restarts. Every time the system restarts, we need to execute the following command to modify the permissions of unixsocket: sudo...
 Why does an error occur when installing an extension using PECL in a Docker environment? How to solve it?
Apr 01, 2025 pm 03:06 PM
Causes and solutions for errors when using PECL to install extensions in Docker environment When using Docker environment, we often encounter some headaches...
 Which one is better, php8 or php7?
Nov 16, 2023 pm 03:09 PM
Compared with PHP7, PHP8 has some advantages and improvements in terms of performance, new features and syntax improvements, type system, error handling and extensions. However, choosing which version to use depends on your specific needs and project circumstances. Detailed introduction: 1. Performance improvement, PHP8 introduces the Just-in-Time (JIT) compiler, which can improve the execution speed of the code; 2. New features and syntax improvements, PHP8 supports the declaration of named parameters and optional parameters, making functions Calling is more flexible; anonymous classes, type declarations of properties, etc. are introduced.


