How to resolve style conflicts in react
Method to resolve style conflicts in react: First open the corresponding code file; then add the module name before the class name, for example, add the component name LoveVideo before the CSS class name of the entire component's style sheet.

The operating environment of this tutorial: windows7 system, react17.0.1 version, thinkpad t480 computer.
Recommended: "Javascript Basics Tutorial"
Resolving style conflicts in react
There are many needs in react development Things to pay attention to, in other words, there are many pitfalls that need to be stepped on. Here I will share a pitfall that I encountered, which is style conflict. This is a noteworthy problem. First, take a look at the example:
There are two components, one is called TestAComponent and the other is called TestBComponent. In the TestA component I wrote a button with a blue background color, and in TestB I wrote a button with a red background color.
TestAComponent Component A:
class TestAComponent extends React.Component {
  render() {
    return (
      <div>
        <button className="box">背景为蓝色</button>
      </div>
    );
  }
}TestA css, the background is set to blue:
.box{
  font-size: 20px;
  margin: 10px;
  padding: 20px;
  background-color: blue;
  border-radius: 10px;
}TestB Component B:
class TestBComponent extends React.Component {
  render() {
    return (
      <div>
        <button className="box">背景为红色</button>
      </div>
    );
  }
}TestB css, the background is set is red:
.box{
  font-size: 20px;
  margin: 10px;
  padding: 20px;
  background-color: red;
  border-radius: 10px;
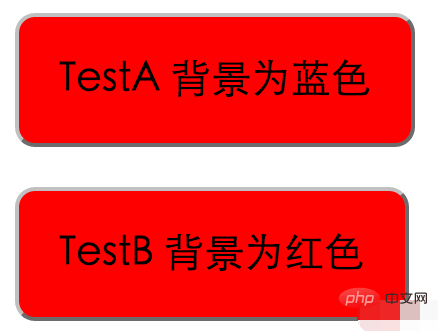
}After writing the code, npm start, you will find that the effect displayed in the browser is like this:

Obviously two Different background colors are set for the buttons. Why is the actual display like this? This is where we analyze the style settings. The class name we set in the label is box. This is a common naming method used by many new front-end developers. However, setting the class names of labels of different components to the same name will cause style conflicts.
Method to solve this problem:
Add the module name before the class name. For example, if this component is called LoveVideo, add the component name LoveVideo before the CSS class name of the entire component's style sheet:
<div>
    <button className="LoveVideobox">TestA 背景为蓝色</button>
</div>
.LoveVideobox{
  font-size: 20px;
  margin: 10px;
  padding: 20px;
  background-color: blue;
  border-radius: 10px;
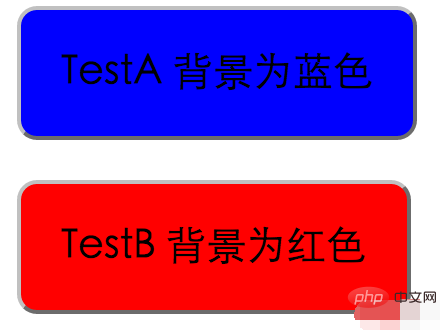
}Refresh the page after modification, and you will find that the problem of style conflict will be solved very well:

In addition to the conflicts caused by the same naming, there are also There is a situation where some global styles are set, such as:
html{
  background-color: #fff;
  font-size: 14px;
}
*{
  margin: 0;
  padding: 0;
  background-color: #fff;
  font-size: 14px;
}Such global styles must not be set, because using react to make a single-page application has only one page. If global styles are set, The entire page will be loaded with this style.
Summary
1. Add the component name prefix to a single component class name. If the component is named LoveVideo, add this prefix to all style names
2. Do not set it Global common styles such as html{}, *{}
The above is the detailed content of How to resolve style conflicts in react. For more information, please follow other related articles on the PHP Chinese website!

Hot AI Tools

Undresser.AI Undress
AI-powered app for creating realistic nude photos

AI Clothes Remover
Online AI tool for removing clothes from photos.

Undress AI Tool
Undress images for free

Clothoff.io
AI clothes remover

Video Face Swap
Swap faces in any video effortlessly with our completely free AI face swap tool!

Hot Article

Hot Tools

Notepad++7.3.1
Easy-to-use and free code editor

SublimeText3 Chinese version
Chinese version, very easy to use

Zend Studio 13.0.1
Powerful PHP integrated development environment

Dreamweaver CS6
Visual web development tools

SublimeText3 Mac version
God-level code editing software (SublimeText3)

Hot Topics
 Guide to React front-end and back-end separation: How to achieve decoupling and independent deployment of front-end and back-end
Sep 28, 2023 am 10:48 AM
React front-end and back-end separation guide: How to achieve front-end and back-end decoupling and independent deployment, specific code examples are required In today's web development environment, front-end and back-end separation has become a trend. By separating front-end and back-end code, development work can be made more flexible, efficient, and facilitate team collaboration. This article will introduce how to use React to achieve front-end and back-end separation, thereby achieving the goals of decoupling and independent deployment. First, we need to understand what front-end and back-end separation is. In the traditional web development model, the front-end and back-end are coupled
 How to build a reliable messaging app with React and RabbitMQ
Sep 28, 2023 pm 08:24 PM
How to build a reliable messaging application with React and RabbitMQ Introduction: Modern applications need to support reliable messaging to achieve features such as real-time updates and data synchronization. React is a popular JavaScript library for building user interfaces, while RabbitMQ is a reliable messaging middleware. This article will introduce how to combine React and RabbitMQ to build a reliable messaging application, and provide specific code examples. RabbitMQ overview:
 React Router User Guide: How to implement front-end routing control
Sep 29, 2023 pm 05:45 PM
ReactRouter User Guide: How to Implement Front-End Routing Control With the popularity of single-page applications, front-end routing has become an important part that cannot be ignored. As the most popular routing library in the React ecosystem, ReactRouter provides rich functions and easy-to-use APIs, making the implementation of front-end routing very simple and flexible. This article will introduce how to use ReactRouter and provide some specific code examples. To install ReactRouter first, we need
 PHP, Vue and React: How to choose the most suitable front-end framework?
Mar 15, 2024 pm 05:48 PM
PHP, Vue and React: How to choose the most suitable front-end framework? With the continuous development of Internet technology, front-end frameworks play a vital role in Web development. PHP, Vue and React are three representative front-end frameworks, each with its own unique characteristics and advantages. When choosing which front-end framework to use, developers need to make an informed decision based on project needs, team skills, and personal preferences. This article will compare the characteristics and uses of the three front-end frameworks PHP, Vue and React.
 Integration of Java framework and front-end React framework
Jun 01, 2024 pm 03:16 PM
Integration of Java framework and React framework: Steps: Set up the back-end Java framework. Create project structure. Configure build tools. Create React applications. Write REST API endpoints. Configure the communication mechanism. Practical case (SpringBoot+React): Java code: Define RESTfulAPI controller. React code: Get and display the data returned by the API.
 How to use React to develop a responsive backend management system
Sep 28, 2023 pm 04:55 PM
How to use React to develop a responsive backend management system. With the rapid development of the Internet, more and more companies and organizations need an efficient, flexible, and easy-to-manage backend management system to handle daily operations. As one of the most popular JavaScript libraries currently, React provides a concise, efficient and maintainable way to build user interfaces. This article will introduce how to use React to develop a responsive backend management system and give specific code examples. Create a React project first
 Vue.js vs. React: Project-Specific Considerations
Apr 09, 2025 am 12:01 AM
Vue.js is suitable for small and medium-sized projects and fast iterations, while React is suitable for large and complex applications. 1) Vue.js is easy to use and is suitable for situations where the team is insufficient or the project scale is small. 2) React has a richer ecosystem and is suitable for projects with high performance and complex functional needs.
 What closures does react have?
Oct 27, 2023 pm 03:11 PM
React has closures such as event handling functions, useEffect and useCallback, higher-order components, etc. Detailed introduction: 1. Event handling function closure: In React, when we define an event handling function in a component, the function will form a closure and can access the status and properties within the component scope. In this way, the state and properties of the component can be used in the event processing function to implement interactive logic; 2. Closures in useEffect and useCallback, etc.


