

Detailed tutorial on integrating the Redis framework to build SpringBoot2.X

redis database tutorial Column introduces the tutorial of building SpringBoot2.X from scratch

Recommended (free): redis database tutorial
I don’t know what to write recently. I have written an article about Kafka integrating Springboot before. Everyone’s response is quite enthusiastic. Hehehe, I feel that it helps everyone. It's pretty good, and it can be considered that I have achieved my goal. It just so happens that today's business module is springboot integrating redis. Because I have done it before, I have ready-made code. It can be used after cv, so I have more time, so I will give it to you. Let’s sort out the code implementation of Springboot’s integration of Redis. From project construction to source code implementation, everything is included below. Read it patiently. I believe it will be helpful to you.
Okay, without further ado, let’s get started. Well, similarly, it is still recommended to implement it on your own PC.
Personal public account: Java Architect Alliance, daily updated technical articles
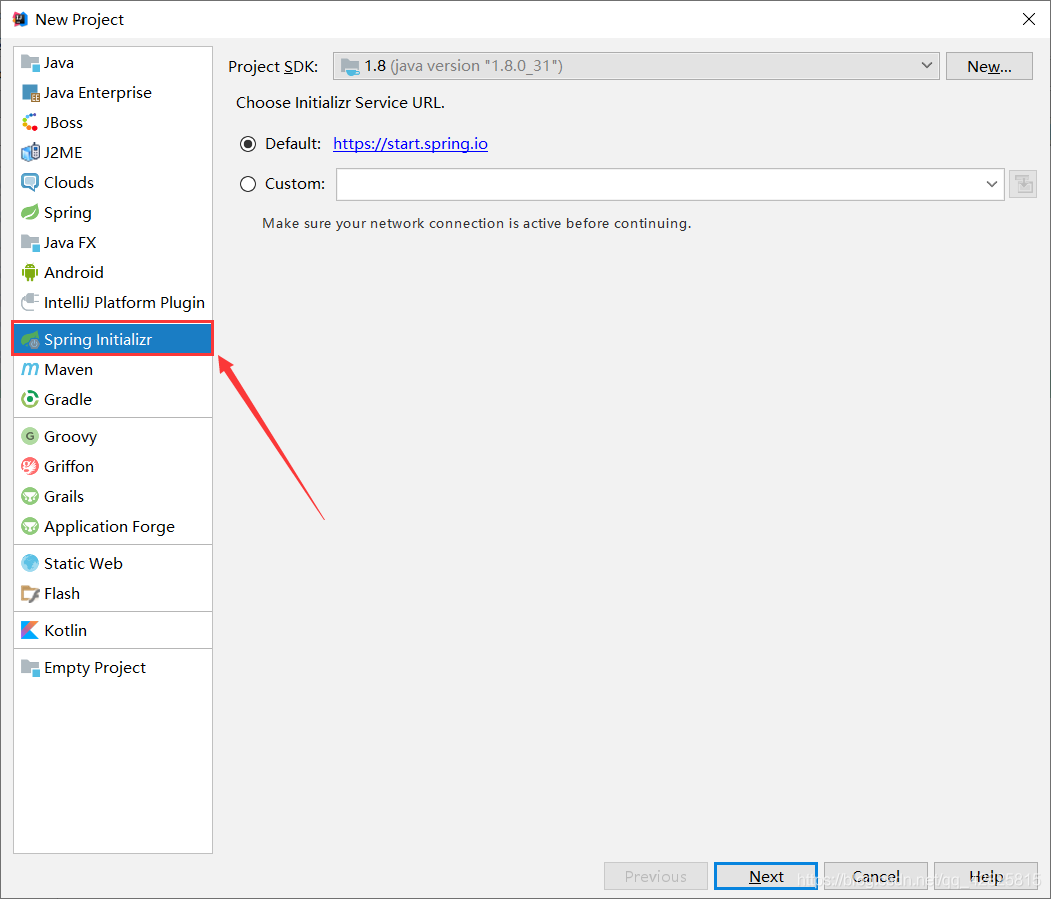
1. Use Spring Initializr to create project web projects
1. File→New→Project
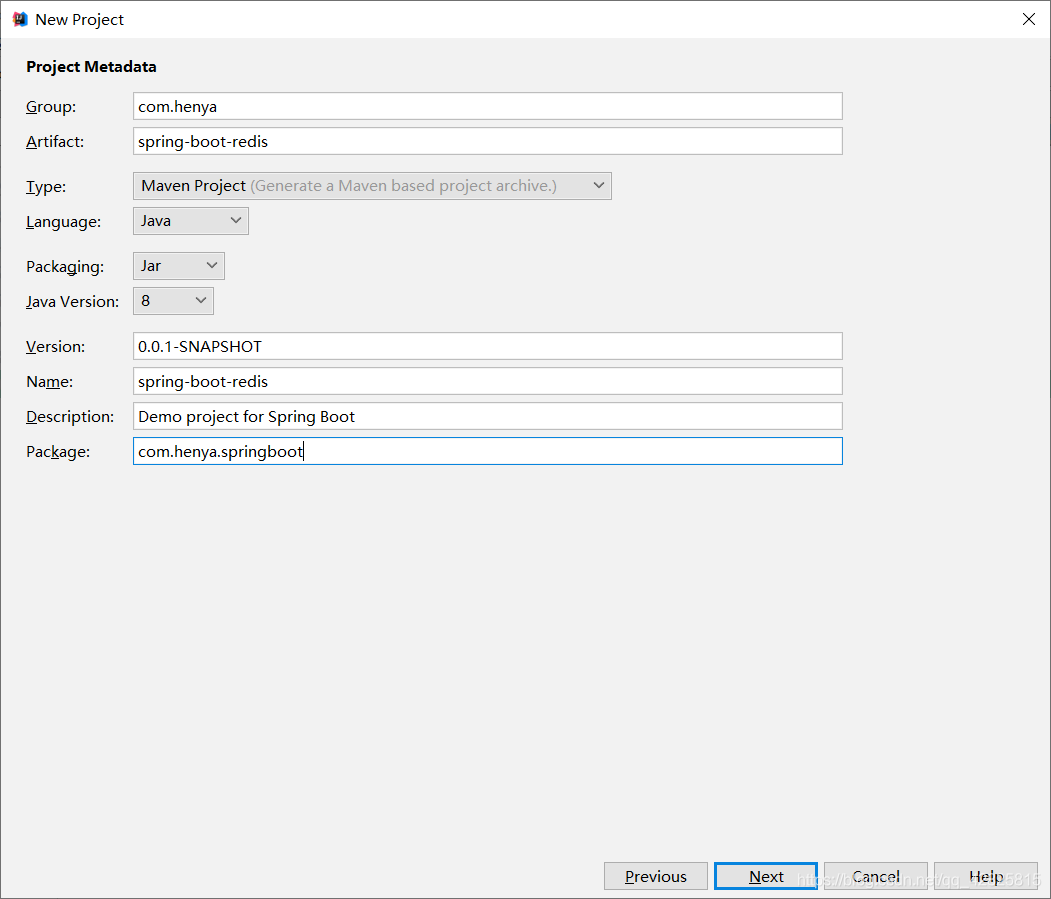
2. Click Next as shown in the picture and name the Group and Artifact
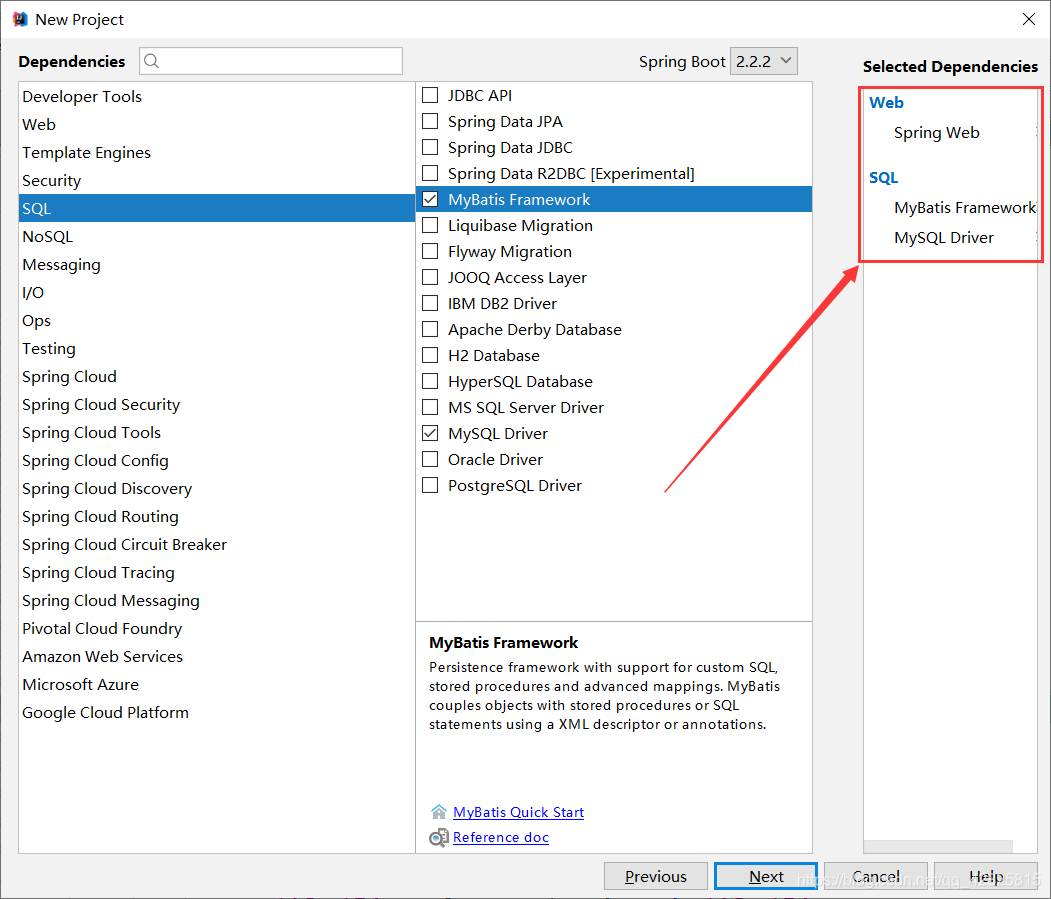
3. After Next, as shown in the figure, check the required dependencies, and Spring Initializr will automatically import the required starter
4. After the project is successfully created , the dependencies in the pom.xml file are as follows
<?xml version="1.0" encoding="UTF-8"?>
<project xmlns="http://maven.apache.org/POM/4.0.0" xmlns:xsi="http://www.w3.org/2001/XMLSchema-instance"
	xsi:schemaLocation="http://maven.apache.org/POM/4.0.0 https://maven.apache.org/xsd/maven-4.0.0.xsd">
	<modelVersion>4.0.0</modelVersion>
	<parent>
		<groupId>org.springframework.boot</groupId>
		<artifactId>spring-boot-starter-parent</artifactId>
		<version>2.2.2.RELEASE</version>
		<relativePath/> <!-- lookup parent from repository -->
	</parent>
	<groupId>com.heny</groupId>
	<artifactId>spring-boot-redis</artifactId>
	<version>0.0.1-SNAPSHOT</version>
	<name>spring-boot-redis</name>
	<description>Demo project for Spring Boot</description>

	<properties>
		<java.version>1.8</java.version>
	</properties>

	<dependencies>
		<dependency>
			<groupId>org.springframework.boot</groupId>
			<artifactId>spring-boot-starter-web</artifactId>
		</dependency>
		<dependency>
			<groupId>org.mybatis.spring.boot</groupId>
			<artifactId>mybatis-spring-boot-starter</artifactId>
			<version>2.1.1</version>
		</dependency>

		<dependency>
			<groupId>mysql</groupId>
			<artifactId>mysql-connector-java</artifactId>
			<scope>runtime</scope>
		</dependency>
		<dependency>
			<groupId>org.springframework.boot</groupId>
			<artifactId>spring-boot-starter-test</artifactId>
			<scope>test</scope>
			<exclusions>
				<exclusion>
					<groupId>org.junit.vintage</groupId>
					<artifactId>junit-vintage-engine</artifactId>
				</exclusion>
			</exclusions>
		</dependency>
	</dependencies>

	<build>
		<plugins>
			<plugin>
				<groupId>org.springframework.boot</groupId>
				<artifactId>spring-boot-maven-plugin</artifactId>
			</plugin>
		</plugins>
	</build>

</project>
5. Add the redis starter
<dependency>
		<groupId>org.springframework.boot</groupId>
		<artifactId>spring-boot-starter-data-redis</artifactId>
	</dependency>
6. Create JavaBean to encapsulate database data and need to implement Serializable
package com.henya.springboot.bean;

import java.io.Serializable;

public class Employee implements Serializable{

	private Integer id;
	private String lastName;
	private String email;
	private Integer gender; //性别 1男 0女
	private Integer dId;


	public Employee() {
		super();
	}


	public Employee(Integer id, String lastName, String email, Integer gender, Integer dId) {
		super();
		this.id = id;
		this.lastName = lastName;
		this.email = email;
		this.gender = gender;
		this.dId = dId;
	}

	public Integer getId() {
		return id;
	}
	public void setId(Integer id) {
		this.id = id;
	}
	public String getLastName() {
		return lastName;
	}
	public void setLastName(String lastName) {
		this.lastName = lastName;
	}
	public String getEmail() {
		return email;
	}
	public void setEmail(String email) {
		this.email = email;
	}
	public Integer getGender() {
		return gender;
	}
	public void setGender(Integer gender) {
		this.gender = gender;
	}
	public Integer getdId() {
		return dId;
	}
	public void setdId(Integer dId) {
		this.dId = dId;
	}
	@Override
	public String toString() {
		return "Employee [id=" + id + ", lastName=" + lastName + ", email=" + email + ", gender=" + gender + ", dId="
				+ dId + "]";
	}
}Note:
You need to implement the Serializable interface when writing JavaBean objects, otherwise the following will be reported Error:
Cannot deserialize; nested exception is org.springframework.core.serializer.support.SerializationFailedException
7. Integrate Mybatis operation database, in the application.properties configuration file Configure data source information in
#serverTimezone用于指定时区,不然会报错
spring.datasource.url=jdbc:mysql://localhost:3306/cache?serverTimezone=UTC
spring.datasource.username=root
spring.datasource.password=123456

# 开启驼峰命名法规则
mybatis.configuration.map-underscore-to-camel-case=true
#日志级别
logging.level.com.henya.springboot.mapper=debug
8. Use the annotated version of Mybatis to create Mapper
##
package com.henya.springboot.mapper;


import com.henya.springboot.bean.Employee;
import org.apache.ibatis.annotations.*;

@Mapper
public interface EmployeeMapper {

 @Select("SELECT * FROM employee WHERE id=#{id}")
 public Employee getEmpById(Integer id);

 @Update("UPDATE employee SET lastName=#{lastName},email=#{email},gender=#{gender},d_id=#{dId} WHERE id=#{id}")
 public void updateEmp(Employee employee);

 @Delete("DELETE FROM emlpoyee WHERE id=#{id}")
 public void delEmpById(Integer id);

 @Insert("INSERT INTO employee(lastName, email, gender, d_id) VALUES (#{lastName}, #{email}, #{gender}, #{dId})")
 public Employee insertEmp(Employee employee);

 @Select("SELECT * FROM employee WHERE lastName=#{lastName}")
 public Employee getEmpByLastName(String lastName);
} You need to use the @MapperScan annotation to scan the interface where the Mapper is located. You only need to add it to the main program class. In addition, use @EnableCaching to enable caching.
@MapperScan("com.henya.springboot.mapper")
@SpringBootApplication
@EnableCaching //开启缓存
public class SpringBootRedisApplication {

	public static void main(String[] args) {
		SpringApplication.run(SpringBootRedisApplication.class, args);
	}
}package com.henya.springboot.service;
import com.henya.springboot.bean.Employee;
import com.henya.springboot.mapper.EmployeeMapper;
import org.springframework.beans.factory.annotation.Autowired;
import org.springframework.cache.annotation.*;
import org.springframework.stereotype.Service;
@CacheConfig(cacheNames = "emp") //抽取缓存的公共配置
@Service
public class EmployeeService {
@Autowired
EmployeeMapper employeeMapper;
/**
* @param id
* @return
*/
@Cacheable(cacheNames = {"emp"},keyGenerator = "myKeyGenerator")
public Employee getEmpById(Integer id) {
System.err.println("开始查询"+ id +"号员工");
Employee employee = employeeMapper.getEmpById(id);
return employee;
}
/**
* @CachePut:既调用方法(这个方法必须要执行),又更新缓存数据
* @param employee
* @return
*/
@CachePut(value = "emp",key = "#result.id")
public Employee updateEmp(Employee employee){
System.err.println("开始更新" + employee.getId() + "号员工");
employeeMapper.updateEmp(employee);
return employee;
}
/**
* @CacheEvict:缓存清除
* @param id
*/
@CacheEvict(value = "emp",beforeInvocation = true)
public void deleteEmp(Integer id){
System.err.println("删除" + id + "员工");
int i = 10/0;
}package com.henya.springboot.controller;
import com.henya.springboot.bean.Employee;
import com.henya.springboot.service.EmployeeService;
import org.springframework.beans.factory.annotation.Autowired;
import org.springframework.web.bind.annotation.GetMapping;
import org.springframework.web.bind.annotation.PathVariable;
import org.springframework.web.bind.annotation.RestController;
/**
* @Description:
* @Author:HenYa
* @CreatTime:2019/12/1 12:44
*/
@RestController
public class EmployeeController {
@Autowired
EmployeeService employeeService;
@GetMapping("/emp/{id}")
public Employee getEmpById(@PathVariable("id") Integer id){
Employee employee = employeeService.getEmpById(id);
return employee;
}
@GetMapping("/emp")
public Employee updateEmp(Employee employee){
Employee emp = employeeService.updateEmp(employee);
return emp;
}
}

static RedisSerializer<Object> java(@Nullable ClassLoader classLoader) {
 return new JdkSerializationRedisSerializer(classLoader);
 }
package com.henya.springboot.config;
import org.springframework.context.annotation.Bean;
import org.springframework.context.annotation.Configuration;
import org.springframework.data.redis.cache.RedisCacheConfiguration;
import org.springframework.data.redis.cache.RedisCacheManager;
import org.springframework.data.redis.cache.RedisCacheWriter;
import org.springframework.data.redis.connection.RedisConnectionFactory;
import org.springframework.data.redis.serializer.GenericJackson2JsonRedisSerializer;
import org.springframework.data.redis.serializer.RedisSerializationContext;
import org.springframework.data.redis.serializer.RedisSerializer;

/**
 * @Description:
 * @Author:HenYa
 * @CreatTime:2019/12/6 20:50
 */
@Configuration
public class MyRedisConfig {
 @Bean
 public RedisCacheManager empCacheManager(RedisConnectionFactory redisConnectionFactory){
 //RedisCacheManager redisCacheManager = new RedisCacheManager(redisConnectionFactory);
 RedisCacheWriter redisCacheWriter = RedisCacheWriter.nonLockingRedisCacheWriter(redisConnectionFactory);

 RedisSerializer<Object> redisSerializer = new GenericJackson2JsonRedisSerializer();

 RedisSerializationContext.SerializationPair<Object> pair = RedisSerializationContext.SerializationPair.fromSerializer(redisSerializer);
 RedisCacheConfiguration redisCacheConfiguration = RedisCacheConfiguration.defaultCacheConfig().serializeValuesWith(pair);
 // 默认会将CacheName作为key的前缀
 return new RedisCacheManager(redisCacheWriter, redisCacheConfiguration);
 }
}The above is the detailed content of Detailed tutorial on integrating the Redis framework to build SpringBoot2.X. For more information, please follow other related articles on the PHP Chinese website!

Hot AI Tools

Undresser.AI Undress
AI-powered app for creating realistic nude photos

AI Clothes Remover
Online AI tool for removing clothes from photos.

Undress AI Tool
Undress images for free

Clothoff.io
AI clothes remover

Video Face Swap
Swap faces in any video effortlessly with our completely free AI face swap tool!

Hot Article
Hot Tools

Notepad++7.3.1
Easy-to-use and free code editor

SublimeText3 Chinese version
Chinese version, very easy to use

Zend Studio 13.0.1
Powerful PHP integrated development environment

Dreamweaver CS6
Visual web development tools

SublimeText3 Mac version
God-level code editing software (SublimeText3)
Hot Topics


 How to build the redis cluster mode
Apr 10, 2025 pm 10:15 PM
How to build the redis cluster mode
Apr 10, 2025 pm 10:15 PM
Redis cluster mode deploys Redis instances to multiple servers through sharding, improving scalability and availability. The construction steps are as follows: Create odd Redis instances with different ports; Create 3 sentinel instances, monitor Redis instances and failover; configure sentinel configuration files, add monitoring Redis instance information and failover settings; configure Redis instance configuration files, enable cluster mode and specify the cluster information file path; create nodes.conf file, containing information of each Redis instance; start the cluster, execute the create command to create a cluster and specify the number of replicas; log in to the cluster to execute the CLUSTER INFO command to verify the cluster status; make
 How to clear redis data
Apr 10, 2025 pm 10:06 PM
How to clear redis data
Apr 10, 2025 pm 10:06 PM
How to clear Redis data: Use the FLUSHALL command to clear all key values. Use the FLUSHDB command to clear the key value of the currently selected database. Use SELECT to switch databases, and then use FLUSHDB to clear multiple databases. Use the DEL command to delete a specific key. Use the redis-cli tool to clear the data.
 How to read redis queue
Apr 10, 2025 pm 10:12 PM
How to read redis queue
Apr 10, 2025 pm 10:12 PM
To read a queue from Redis, you need to get the queue name, read the elements using the LPOP command, and process the empty queue. The specific steps are as follows: Get the queue name: name it with the prefix of "queue:" such as "queue:my-queue". Use the LPOP command: Eject the element from the head of the queue and return its value, such as LPOP queue:my-queue. Processing empty queues: If the queue is empty, LPOP returns nil, and you can check whether the queue exists before reading the element.
 How to use the redis command
Apr 10, 2025 pm 08:45 PM
How to use the redis command
Apr 10, 2025 pm 08:45 PM
Using the Redis directive requires the following steps: Open the Redis client. Enter the command (verb key value). Provides the required parameters (varies from instruction to instruction). Press Enter to execute the command. Redis returns a response indicating the result of the operation (usually OK or -ERR).
 How to use single threaded redis
Apr 10, 2025 pm 07:12 PM
How to use single threaded redis
Apr 10, 2025 pm 07:12 PM
Redis uses a single threaded architecture to provide high performance, simplicity, and consistency. It utilizes I/O multiplexing, event loops, non-blocking I/O, and shared memory to improve concurrency, but with limitations of concurrency limitations, single point of failure, and unsuitable for write-intensive workloads.
 How to use redis lock
Apr 10, 2025 pm 08:39 PM
How to use redis lock
Apr 10, 2025 pm 08:39 PM
Using Redis to lock operations requires obtaining the lock through the SETNX command, and then using the EXPIRE command to set the expiration time. The specific steps are: (1) Use the SETNX command to try to set a key-value pair; (2) Use the EXPIRE command to set the expiration time for the lock; (3) Use the DEL command to delete the lock when the lock is no longer needed.
 How to make message middleware for redis
Apr 10, 2025 pm 07:51 PM
How to make message middleware for redis
Apr 10, 2025 pm 07:51 PM
Redis, as a message middleware, supports production-consumption models, can persist messages and ensure reliable delivery. Using Redis as the message middleware enables low latency, reliable and scalable messaging.
 How to use the redis command line
Apr 10, 2025 pm 10:18 PM
How to use the redis command line
Apr 10, 2025 pm 10:18 PM
Use the Redis command line tool (redis-cli) to manage and operate Redis through the following steps: Connect to the server, specify the address and port. Send commands to the server using the command name and parameters. Use the HELP command to view help information for a specific command. Use the QUIT command to exit the command line tool.
