css when to clear float
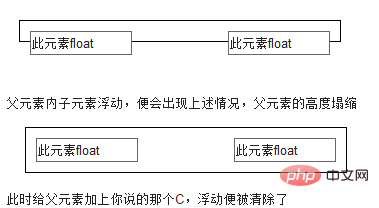
In CSS, when we float an element, we need to clear the float, because when the element is floated, the element will break away from the document flow; and in CSS, any element can float, and the floating element will Generates a block-level box, regardless of what element it is.

css Basic Tutorial》
Clear floats. When do you need to clear floats? What are the methods to clear floats? 1. When do I need to clear floats?
Float is mainly popular in page layout. If the float is not cleared after use, there will be endless troubles.
Analysis of HTML code structure:
<p class="outer">
    <p class="p1">1</p>
    <p class="p2">2</p>
    <p class="p3">3</p>
</p>Analysis of CSS code style:
.outer{border: 1px solid #ccc;background: #fc9;color: #fff; margin: 50px auto;padding: 50px;}.p1{width: 80px;height: 80px;background: red;float: left;}.p2{width: 80px;height: 80px;background: blue;float: left;}.p3{width: 80px;height: 80px;background: sienna;float: left;}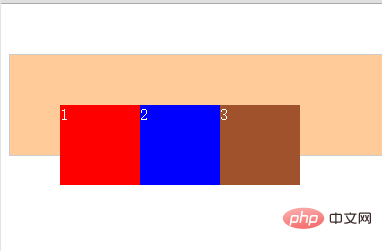
influence appears:
1. The margin of the parent box is affected and cannot be centered left and right.2. I did not give The height of the parent box is set. After floating, the height of the parent box is not expanded. The expanded height in the picture is the effect brought by padding.

What are the methods to clear floats? Clear also has 4 possible values. The most commonly used is both, which clears the floating on the left and right. left and right can only clear floats in one direction. none is the default value.
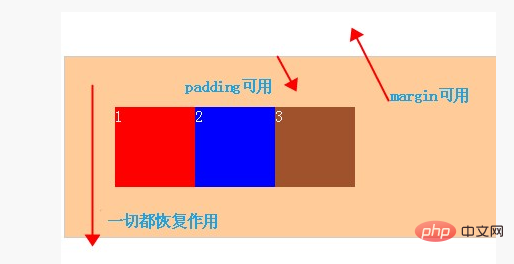
Method 1: Add new elements and apply clear: both;
HTML:
<p class="outer">
    <p class="p1">1</p>
    <p class="p2">2</p>
    <p class="p3">3</p>
    <p class="clear"></p>
</p>CSS:
.clear{clear:both; height: 0; line-height: 0; font-size: 0}Effect:  That is:
[Supplementary]: Use empty The label clears the float. 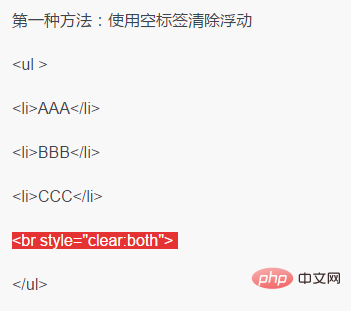

Method 2: The parent p defines overflow: auto (note: it is the parent p, which is the p here .outer)
HTML:
<p class="outer over-flow"> //这里添加了一个class    <p class="p1">1</p>
    <p class="p2">2</p>
    <p class="p3">3</p>
<!--<p class="clear"></p>--></p>CSS:
.over-flow{    overflow: auto; zoom: 1; //zoom: 1; 是在处理兼容性问题
}The rendering is the same as above.
Principle: Use the overflow attribute to clear floats. One thing to note is that the overflow attribute has three attribute values: hidden, auto, and visible. We can use hidden and auto values to clear floats, but remember not to use visible values. If this value is used, the effect of clearing floats will not be achieved. The other two values can.
[Supplement]: Use the overflow attribute
This method effectively solves the disadvantage of having to add unintentional code by clearing floats through empty label elements. To use this method, you only need to define the CSS property: overflow:auto in the element that needs to be cleared of float.
overflow:auto; makes the height adaptive, zoom:1; is for compatibility with IE6, you can also use height:1%; to solve it, note that zoom does not comply with W3C standards. overflow:hidden can also be implemented. overflow:hidden can also be implemented. 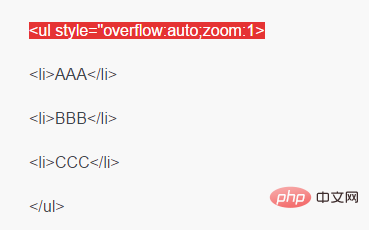

方法三: 据说是最高大上的方法 :after 方法:(注意:作用于浮动元素的父亲)
先说原理:它就是利用:after和:before来在元素内部插入两个元素块,从而达到清除浮动的效果。其实现原理类似于clear:both方法,只是区别在于:clear在html插入一个p.clear标签,而outer利用其伪类clear:after在元素内部增加一个类似于p.clear的效果。下面来看看其具体的使用方法:
.outer {zoom:1;} /*==for IE6/7 Maxthon2==*/.outer:after {clear:both;content:'.';display:block;width: 0;height: 0;visibility:hidden;} /*==for FF/chrome/opera/IE8==*/其中clear:both;指清除所有浮动;content: ‘.’; display:block;对于FF/chrome/opera/IE8不能缺少,
其中content()可以取值也可以为空。visibility:hidden;的作用是允许浏览器渲染它,但是不显示出来,这样才能实现清楚浮动。
即:
.outer{border: 1px solid #ccc;background: #fc9;color: #fff; margin: 50px auto;padding: 50px;} .clearfix:after {content:'';display:block;clear:both;visibility:hidden;zoom:1;}<p class="outer clearfix">
【补充】:
使用after伪对象清除浮动
after伪对象非IE浏览器支持,所以并不影响到IE/WIN浏览器。具体写法可参照以下示例。使用中需注意以下几点。
a、该方法中必须为需要清除浮动元素的伪对象中设置height:0,否则该元素会比实际高出若干像素;
b、content属性是必须的,但其值可以为空,蓝色理想讨论该方法的时候content属性的值设为”.”
再次again:当一个内层元素是浮动的时候,如果没有关闭浮动时,其父元素也就不会再包含这个浮动的内层元素,因为此时浮动元素已经脱离了文档流。也就是为什么外层不能被撑开了!
浮动的特点:
1.浮动的元素,讲向左或者向右浮动,浮动到包围元素的边上,或者上一个浮动元素的边上为止。
2.浮动的元素,不再占用空间,且浮动元素的层级要高于普通元素。
3.浮动的元素,一定是块元素,不管之前是什么元素。
4.如果浮动的元素没有指定宽度的话,浮动后会尽可能变窄,因此浮动元素要指定宽和高。
5.一行的多个元素,要浮动大家一起浮动。
The above is the detailed content of css when to clear float. For more information, please follow other related articles on the PHP Chinese website!

Hot AI Tools

Undresser.AI Undress
AI-powered app for creating realistic nude photos

AI Clothes Remover
Online AI tool for removing clothes from photos.

Undress AI Tool
Undress images for free

Clothoff.io
AI clothes remover

Video Face Swap
Swap faces in any video effortlessly with our completely free AI face swap tool!

Hot Article

Hot Tools

Notepad++7.3.1
Easy-to-use and free code editor

SublimeText3 Chinese version
Chinese version, very easy to use

Zend Studio 13.0.1
Powerful PHP integrated development environment

Dreamweaver CS6
Visual web development tools

SublimeText3 Mac version
God-level code editing software (SublimeText3)

Hot Topics
 How to use bootstrap in vue
Apr 07, 2025 pm 11:33 PM
Using Bootstrap in Vue.js is divided into five steps: Install Bootstrap. Import Bootstrap in main.js. Use the Bootstrap component directly in the template. Optional: Custom style. Optional: Use plug-ins.
 The Roles of HTML, CSS, and JavaScript: Core Responsibilities
Apr 08, 2025 pm 07:05 PM
HTML defines the web structure, CSS is responsible for style and layout, and JavaScript gives dynamic interaction. The three perform their duties in web development and jointly build a colorful website.
 How to write split lines on bootstrap
Apr 07, 2025 pm 03:12 PM
There are two ways to create a Bootstrap split line: using the tag, which creates a horizontal split line. Use the CSS border property to create custom style split lines.
 Understanding HTML, CSS, and JavaScript: A Beginner's Guide
Apr 12, 2025 am 12:02 AM
WebdevelopmentreliesonHTML,CSS,andJavaScript:1)HTMLstructurescontent,2)CSSstylesit,and3)JavaScriptaddsinteractivity,formingthebasisofmodernwebexperiences.
 How to set up the framework for bootstrap
Apr 07, 2025 pm 03:27 PM
To set up the Bootstrap framework, you need to follow these steps: 1. Reference the Bootstrap file via CDN; 2. Download and host the file on your own server; 3. Include the Bootstrap file in HTML; 4. Compile Sass/Less as needed; 5. Import a custom file (optional). Once setup is complete, you can use Bootstrap's grid systems, components, and styles to create responsive websites and applications.
 How to insert pictures on bootstrap
Apr 07, 2025 pm 03:30 PM
There are several ways to insert images in Bootstrap: insert images directly, using the HTML img tag. With the Bootstrap image component, you can provide responsive images and more styles. Set the image size, use the img-fluid class to make the image adaptable. Set the border, using the img-bordered class. Set the rounded corners and use the img-rounded class. Set the shadow, use the shadow class. Resize and position the image, using CSS style. Using the background image, use the background-image CSS property.
 How to use bootstrap button
Apr 07, 2025 pm 03:09 PM
How to use the Bootstrap button? Introduce Bootstrap CSS to create button elements and add Bootstrap button class to add button text
 How to resize bootstrap
Apr 07, 2025 pm 03:18 PM
To adjust the size of elements in Bootstrap, you can use the dimension class, which includes: adjusting width: .col-, .w-, .mw-adjust height: .h-, .min-h-, .max-h-


